
What is a reverse proxy server?
With the rise of cloud computing and distributed systems, it is common to have multiple web servers handling different aspects of a web application. However, managing and directing traffic to multiple servers can be a complex task. This is where setting up a Nginx reverse proxy can come in handy.
A reverse proxy acts as an intermediary between the clients device and one or more web servers. It receives requests from clients and sends them to the appropriate server based on a configuration file. This allows for load balancing and distribution of traffic across multiple servers. This ensures that none of your servers are overwhelmed with requests.
One of the primary benefits of using a reverse proxy is that it enables you to have multiple web servers handling different sections of your website or web application while still appearing as a single website to your users. For example, you could have the main section of your website handled by one Nginx server, while the additional subsections of your website are handled by a separate Nginx server.
This will not only help with managing traffic but also provides an added layer of security by hiding the origin servers from external users. If one of the servers fails, the reverse proxy has the ability to automatically redirect traffic to other healthy servers. This ensures that the website will always remain available and responsive.
Overall a reverse proxy is a powerful tool that can help manage traffic to multiple web servers, provide load balancing, improve security, and ensure high availability of web applications.
Initial Setup
This tutorial assumes that you already have a primary Nginx server set up (reverse proxy server). As well as a second Nginx server with the web app you want to appear on the first. If you need help installing a basic Nginx server, please read our How to install and configure Nginx tutorial.
Overview of Goal
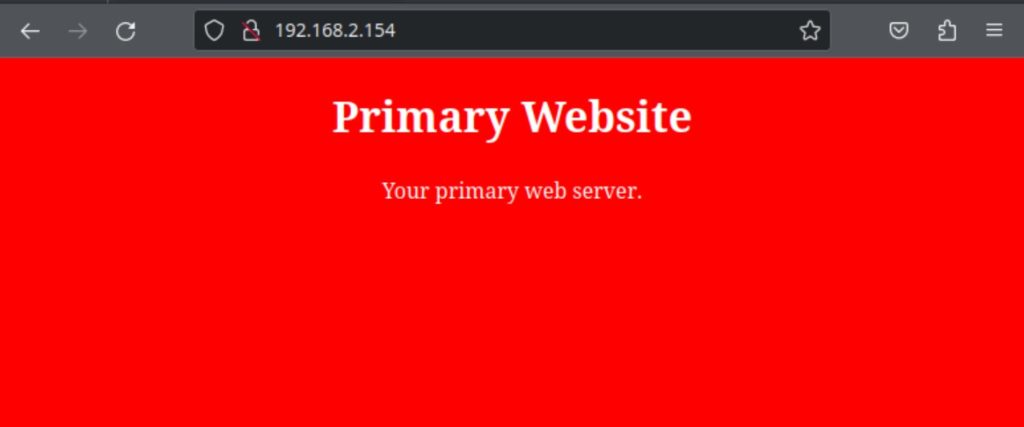
For this example the above web server 192.168.2.154 (shown above) will be our primary web server where we will configure the Nginx reverse proxy.
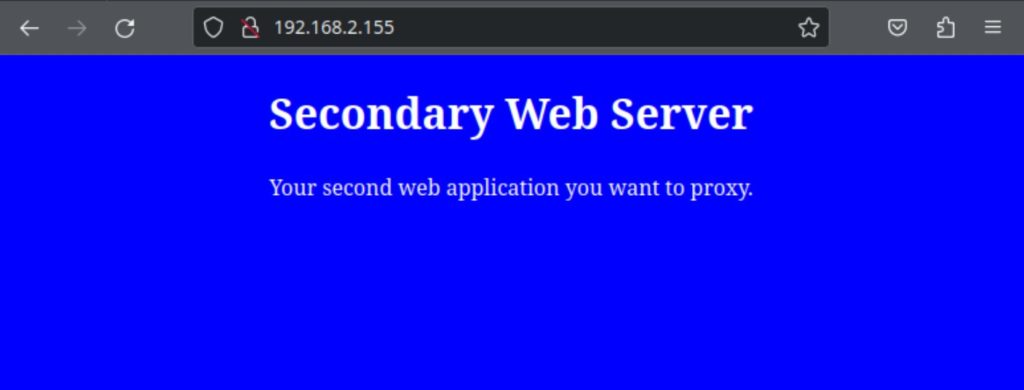
The second web server 192.168.2.155 (shown above) hosts the web application we want to reverse proxy to the first server.
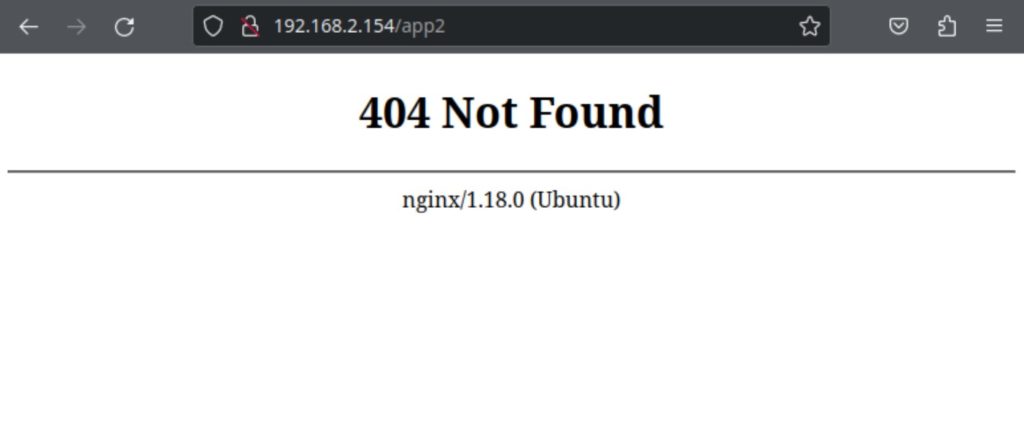
The goal is to be able to access the second web servers content from a subfolder app2/ on the primary server. We want to be able to access the above URL on the primary server and have the blue website content load from the second server. Once we have finished configuring the reverse proxy, we will be able to access the second web servers content using a subfolder on the primary web server 192.168.2.154/app2/.
Connect to the Primary Web Server
To get started connect to the primary web server. In my case this will be the 192.168.2.154 server. Once connected open a new terminal window. Next create a new directory in the /var/www/html/ folder. This is where you will access your secondary web server from. In my case I will use the command shown below.
sudo mkdir /var/www/html/app2Edit the Nginx Config File
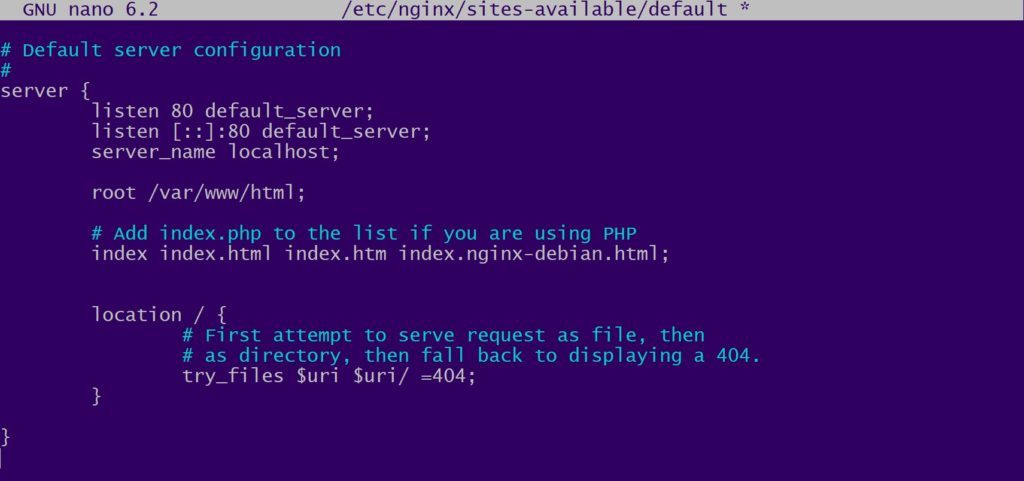
Afterwards we need to edit the /etc/nginx/sites-available/default config file. Open the file in your favorite text editor and navigate to the location / section inside the server { } parentheses as shown above. The command below will open the file with the nano text editor.
sudo nano /etc/nginx/sites-available/defaultAdd a New Location
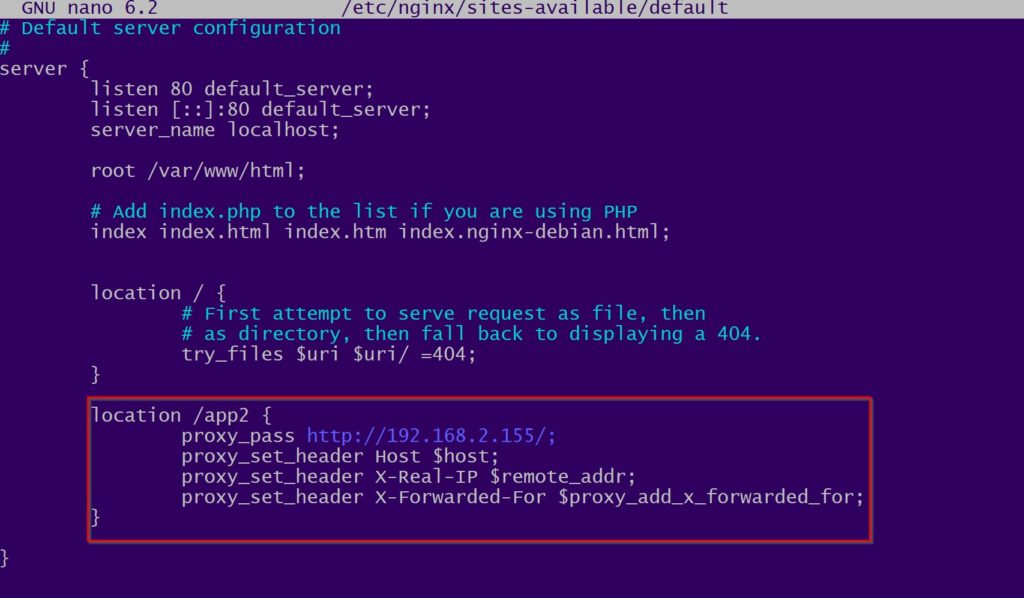
Now we need to add a new location under the first location / block. Use the command block below as an example. Replace FOLDER_NAME with the name of the directory you want the secondary web server accessible from. This is the folder we created in the first step. We also need to replace IP_ADDRESS with the IP of the secondary web server.
location /FOLDER_NAME {
                proxy_pass http://IP_ADDRESS/;
                proxy_set_header Host $host;
                proxy_set_header X-Real-IP $remote_addr;
                proxy_set_header X-Forwarded-For $proxy_add_x_forwarded_for;
}
After adding the location block, close and save the file with Crtl+X.
Restart Nginx
Next we need to restart the Nginx web server to apply our configuration changes. To do this we use the systemctl command below.
sudo systemctl restart nginx.serviceTest the Nginx Reverse Proxy
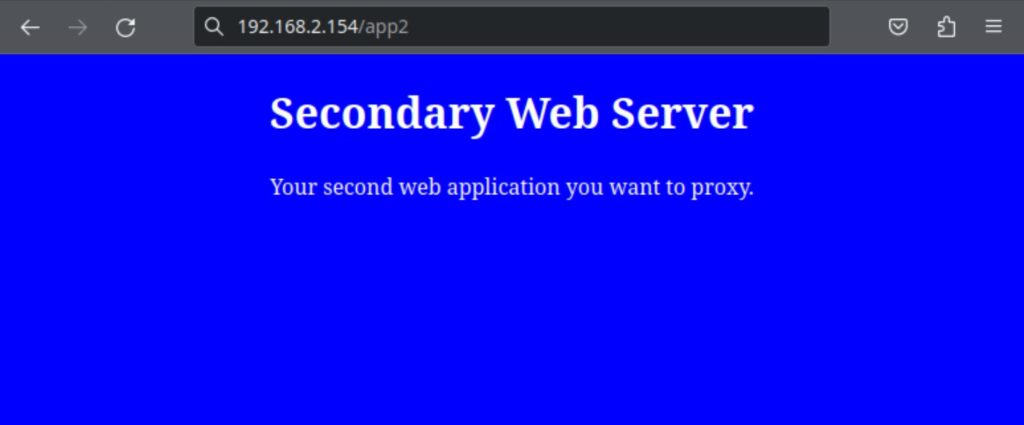
Now we will need to test that the reverse proxy is working. We will navigate to our subfolder we created earlier using the primary web server 192.168.2.154/app2/. Assuming the Nginx config was set up correctly your second web servers content should appear. You have now successfully configured a reverse proxy using the Nginx web server.
Questions?
If you have any questions or comments feel free to leave them below.
Related Resources
View our 5 Reasons to Switch from Windows 10 to Linux tutorial.
Learn How to Generate Images From Text Prompts with Python and TensorFlow.
Check out our How to Setup OpenSSH with Keys on Ubuntu 22.04 tutorial.
View our Deep Learning Image Style Transfer Tutorial Using Neural Style Pt tutorial.
Learn How to Setup Nginx as a Reverse Proxy on Ubuntu 22.04 LTS.
Learn How to Install an Nginx RTMP Server in Ubuntu 22.04.
View all of our available online tools and converters at Formatswap.com.