Efficiency and convenience are at the heart of any well optimized operating system experience. Imagine every time you start your Ubuntu 22.04 system having all of your hard drives automatically mounted at boot. This is where the power of configuring /etc/fstab comes into play.
In this article we will explore automatic drive mounting in Ubuntu 22.04 using fstab. You’ll gain the skills to ensure your system efficiently recognizes and mounts your hard drives as part of its boot sequence. Whether you’re an experienced Linux user or just getting started, this guide will walk you through the process. This will make your daily computing tasks smoother and more efficient. So let’s dive in and improve your Ubuntu hard drive mounting experience.
List Drives and Partitions

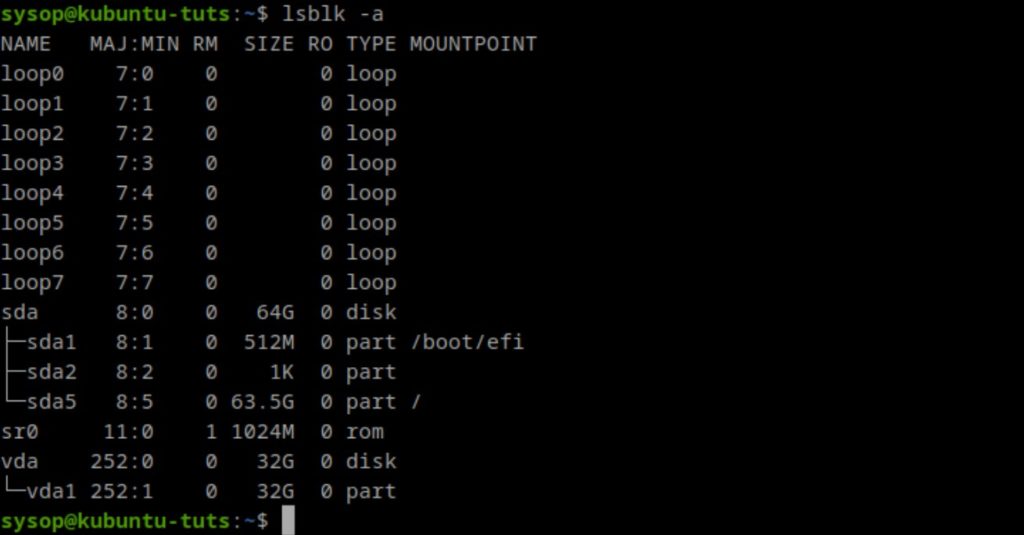
The first step to mounting you hard drive at boot is finding its name. You can list out all hard drive and partition names using the lsblk command. Our drive is the 32GB one labled “vda”. The partition we want to mount is “vda1”. Locate your drive and partition name from the list as it may differ. In most cases it will be sdb or sdc.
lsblk -aCreate Mount Point

The next step is creating the folder for the drives mount point. We will be using the media folder but feel free to use the mnt folder instead. Use the following command to create a mount folder called data in the media folder.
sudo mkdir /media/dataOpen The fstab File

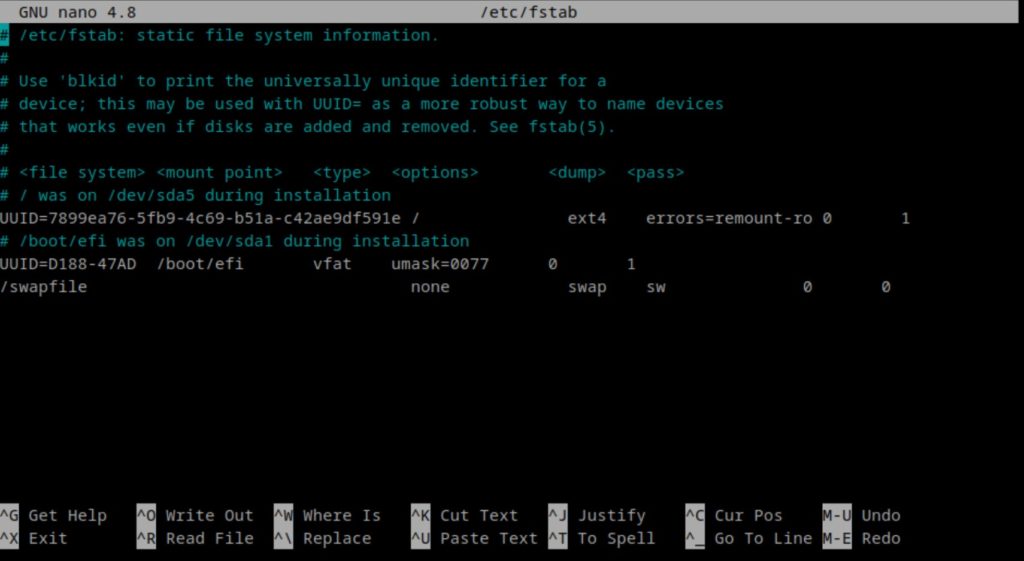
After we create the mount directory we will edit the fstab file. Open it using the nano command below.
sudo nano /etc/fstabAdd Mount Point Line

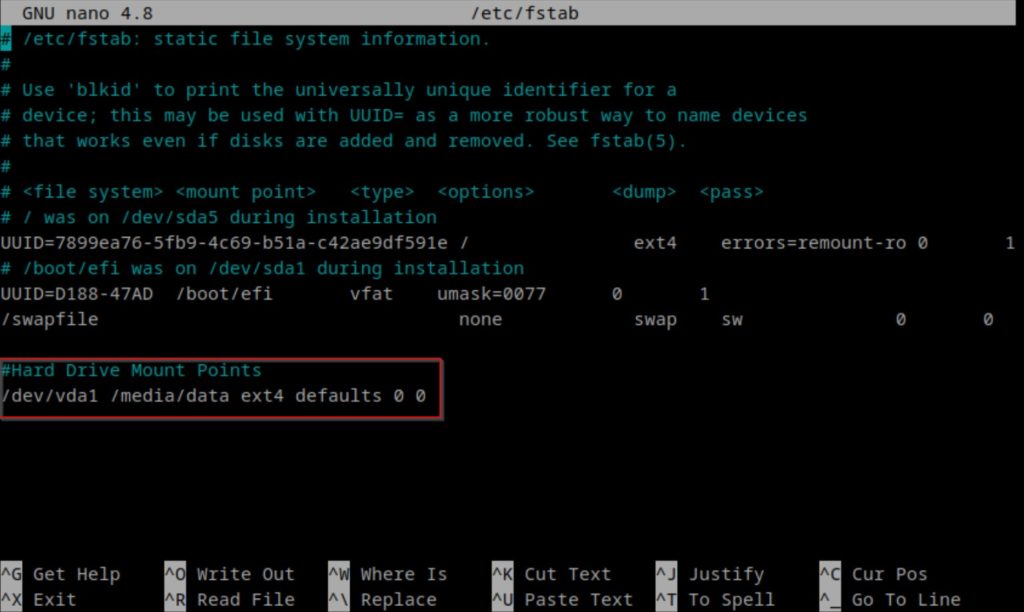
Once the fstab file is open we will navigate to the bottom of the file and add a new line. Replace /dev/MOUNT_POINT with the partition from the disk you want to mount. You will also need to replace /media/MOUNT_DIR with the directory you want to mount it in. After you have added the line save and close the file. In our case we will be using /dev/vda1 and /media/data.
#Hard Drive Mount Points
/dev/MOUNT_POINT /media/MOUNT_DIR ext4 defaults 0 0
Mount All Partitions

After editing the fstab file we need to remount all of the partitions. Use the mount -a command to mount them.
sudo mount -aVerify Mounting

Now we want to check if the disks partition was mounted successfully. Use cd to navigate to the mount point you used in the fstab file, and verify that you can see your files. You can use the ls command to list all files. If you can see your files in the mount directory you have successfully configured a partition to mount at boot in Ubuntu 22.04.
cd /media/data && lsReboot System

After verifying that we can see our files in the mount directory the last step is to reboot the system. Use the reboot command to proceed. Once your system reboots you should see you hard drives partition mounted in the mount directory automatically. This concludes the guide on automatically mounting hard drives at boot.
Fstab FAQ
What is fstab in Linux and what is its purpose?
fstab stands for “file system table” and is a configuration file in Linux that specifies how various storage devices, such as hard drives and partitions should be mounted on the file system at boot. It defines the mounting points, file system types, options, and other parameters essential for device mounting. Essentially fstab ensures that your storage devices are accessible and functional every time your Linux system starts up.
Can I mount network shares and remote filesystems using fstab in Linux?
Yes, you can use fstab to mount network shares and remote filesystems in Linux. To do this you would typically use entries that specify the network location (such as NFS or Samba shares) along with the mount point and other necessary parameters. By configuring fstab in this way you can ensure that these network resources are automatically mounted at boot. This will provide you with seamless access to remote data or networked storage devices. View our tutorial on How to Mount an SMB (Samba) Share in Linux with cifs-utils for additional information.
What should I do if I encounter errors or issues after editing the fstab file?
If you encounter errors or issues after editing the fstab file it’s important to address them promptly to prevent disruptions to your system. Here are some steps to follow:
- Double-check your fstab entries for accuracy. Ensure that the device paths, mount points, and options are correctly specified.
- Use a rescue or live Linux environment to access your system if it fails to boot due to fstab errors. From there you can make corrections to the fstab file.
- If you’re unsure about a specific entry consider commenting it out (adding a “#” at the beginning of the line) temporarily to see if the issue resolves.
- Always keep a backup of the original fstab file before making changes so that you can easily revert to a working configuration if needed.
- Seek assistance from Linux forums, communities, or experienced users if you encounter persistent issues as fstab errors can impact system stability.
Questions?
If you have any questions or comments feel free to leave them below.
Related Resources
View our How to Mount an SMB (Samba) Share in Linux with cifs-utils guide.
Learn How to Install Ubuntu Server 22.04 [Step by Step].
Check out How to Setup OpenSSH with Keys on Ubuntu 22.04.
View our How to Create a Mapped Network Drive in Windows 10 tutorial.
Learn How to Install and Configure Grafana on Ubuntu 22.04.
View all of our available online tools and converters at Formatswap.com.
Доброго пожаловать в КРАКЕН!
Рабочие зеркала поддерживают постоянный доступ через TOR и Onion. Официальный сайт KRAKEN доступен как через TOR, так и через клирнет. Регулярные обновления зеркал гарантируют безопасность вашего входа.
Доброго пожаловать в КРАКЕН!
Доброго пожаловать в КРАКЕН!
KRAKEN кракен зеркало сайта предлагает актуальные ссылки для входа через зеркало или тор. Эти ссылки проверены и гарантируют безопасное соединение с сайтом.
Доброго пожаловать в КРАКЕН!
Для безопасного входа на Кракен клирнет ссылка используйте актуальные onion-ссылки. Рабочие зеркала обеспечивают доступ к сайту без прерываний.
Доброго пожаловать в КРАКЕН!
Ссылка на KRAKEN кракен официальный сайт даркнет поможет вам обойти блокировки
Доброго пожаловать в КРАКЕН!
Для безопасного входа на kra20.cc используйте актуальные onion-ссылки. Рабочие зеркала обеспечивают доступ к сайту без прерываний.
Доброго пожаловать в КРАКЕН!
Ссылка на KRAKEN kra18.cc даркнет поможет вам обойти блокировки
Приятно работать с площадкой, где ценят клиентов — KRAKEN.
https://lkra33.cc/kraken-kak-zaiti-cherez-tor