How to Install VeraCrypt and Encrypt a Flash Drive on Ubuntu 22.04

veracrypt ubuntu splash

Are you worried about your device being stolen? Do you have sensitive files to protect? If you answered yes to either of those questions then you would benefit from encrypting your drive with VeraCrypt. In this tutorial you will learn how to download, install, and setup encryption with VeraCrypt in Linux. One of the primary reasons to use VeraCrypt is that it is an opensource replacement for the now defunct TrueCrypt. Another benefit to VeraCrypt is the ability to encrypt both flash drives and hard disks. You also have the ability to create encrypted file containers. It supports the most popular encryption algorithms such as AES 256 and AES 512. All said you will get a much more robust and secure encryption solution compared to any paid encryption software you could purchase.

Add the required repository

The first step is to add the repository to your packages list.

sudo add-apt-repository ppa:unit193/encryption

Update Ubuntu

The next thing you will want do do is update and upgrade Ubuntu 22.04. To do that simply open a terminal and run the following command.

sudo apt update && sudo apt upgrade

Download and install VeraCrypt

The last step is to install VeraCrypt. You can do so with this command.

sudo apt install veracrypt

Encrypting a volume

In this section of the tutorial you will learn how to create the encrypted flash drive partition using VeraCrypt.

Launching VeraCrypt

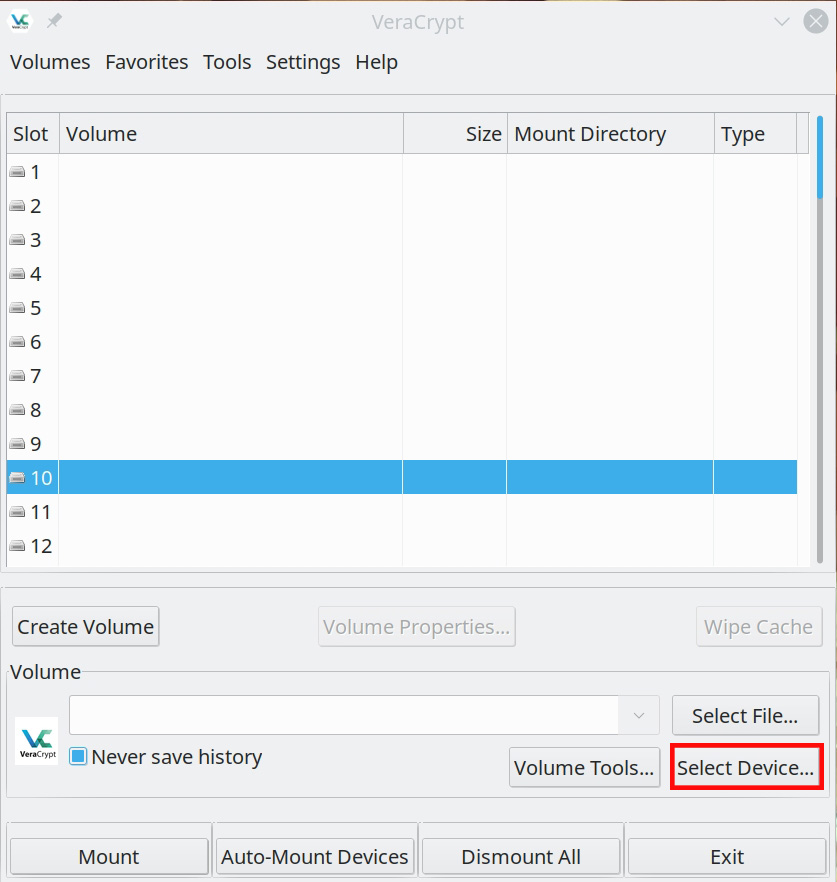
You can launch VeraCrypt by searching for it in your systems start menu or app folder. After you launch the program click on “Select Device…”.
veracrypt encryption screen

Selecting a device to encrypt

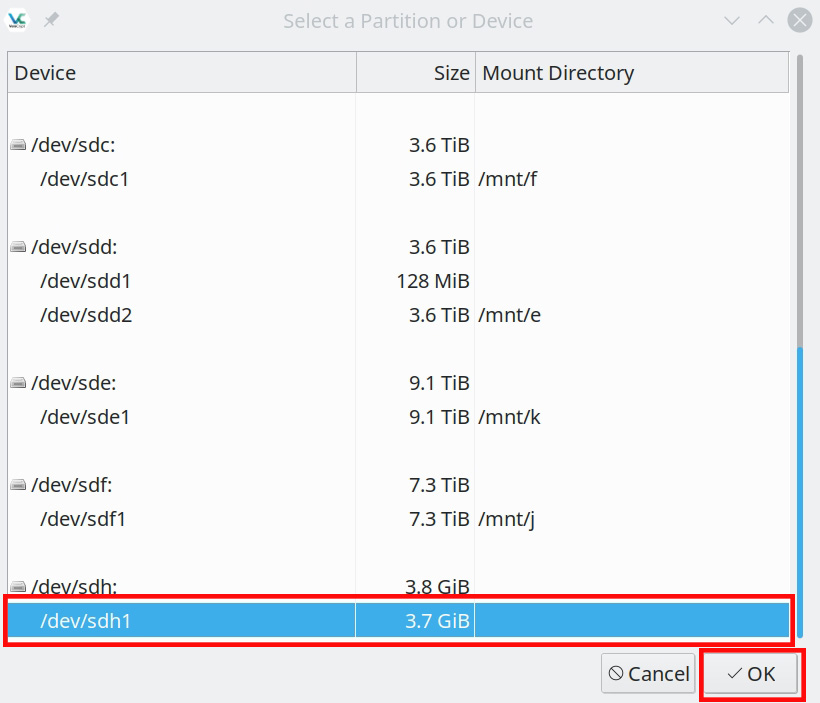
A window will pop up showing all of the storage devices on your computer. Very carefully select the partition on the flash drive you want to encrypt. (warning, all data is wiped during the encryption process)
veracrypt encryption screen

Creating the volume

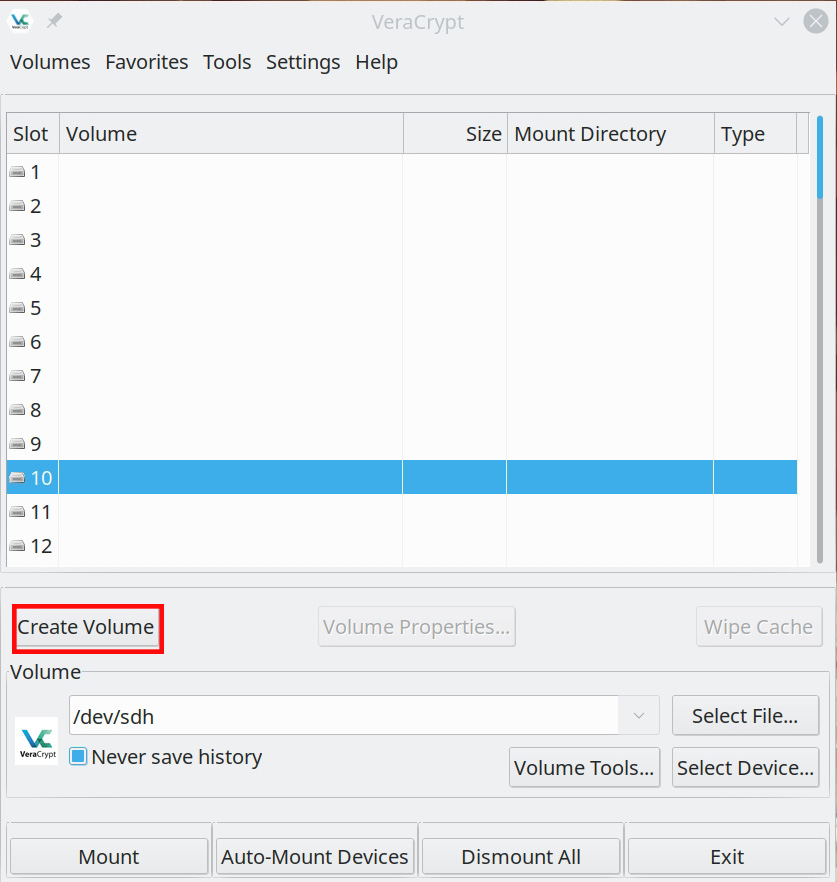
Next you will want to click create volume to begin the encryption process.
veracrypt encryption screen

Select VeraCrypt device type

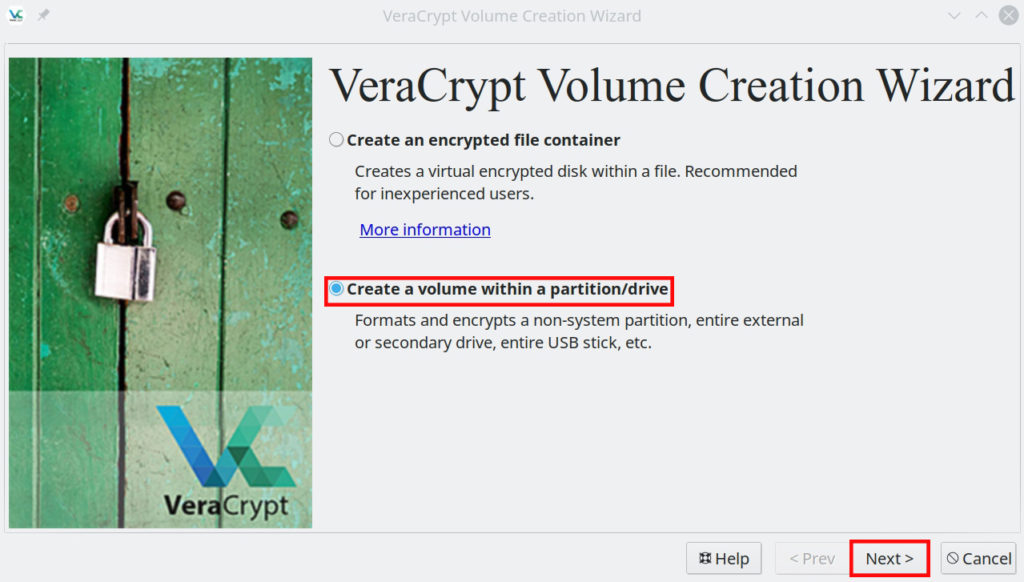
After the “VeraCrypt Volume Creation Wizard” opens you want to select the second option highlighted in red. Then click the “Next” button.
veracrypt encryption screen

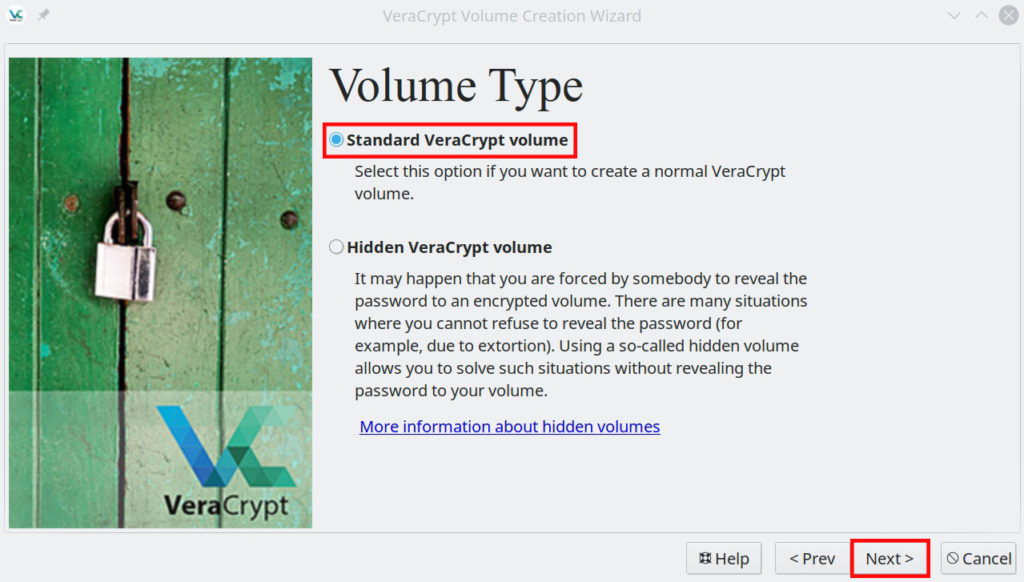
Select VeraCrypt volume type

The next step is to select the VeraCrypt volume type. Choose the first option on the list. “Standard VeraCrypt volume”.
veracrypt encryption screen

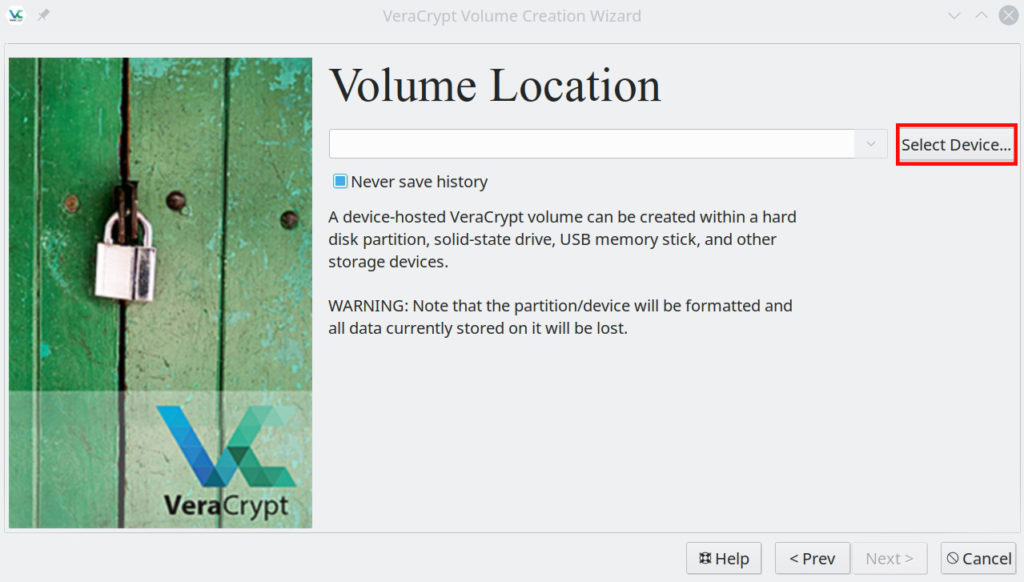
View devices

Afterwards you will have to click “Select Device…” to view the partitions.
veracrypt encryption screen

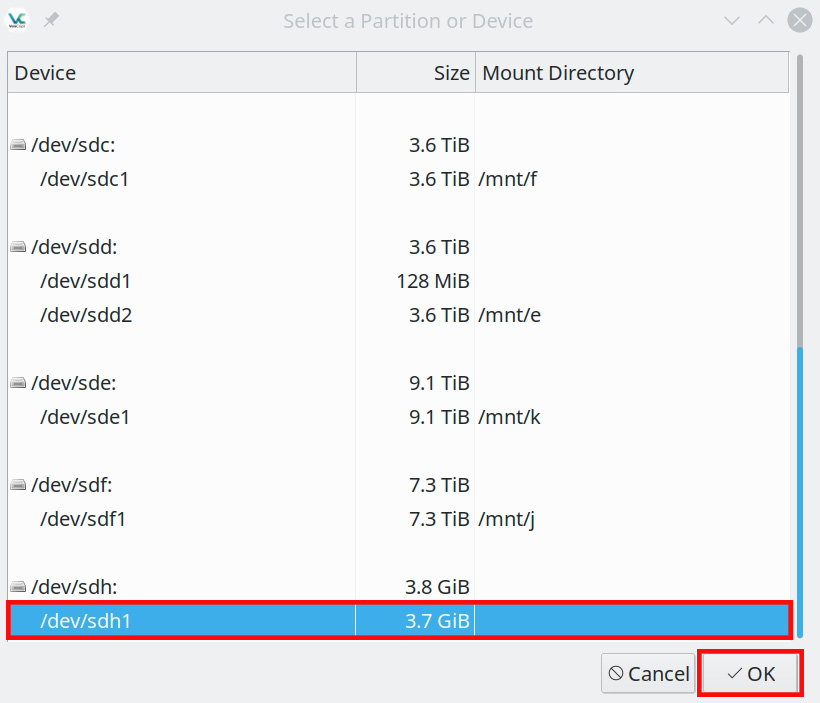
Select USB devices partition

Re-select the partition of the flash drive you want to encrypt. Then press “OK”.
veracrypt encryption screen

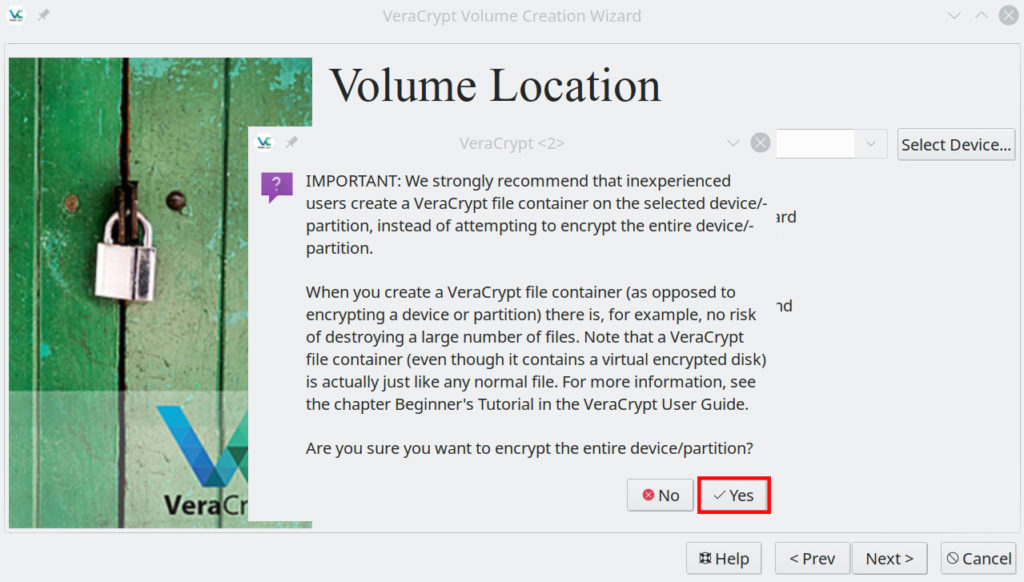
Volume confirmation dialog

A dialog will pop up confirming you would like to proceed. Click on the “Yes” button.
veracrypt encryption screen

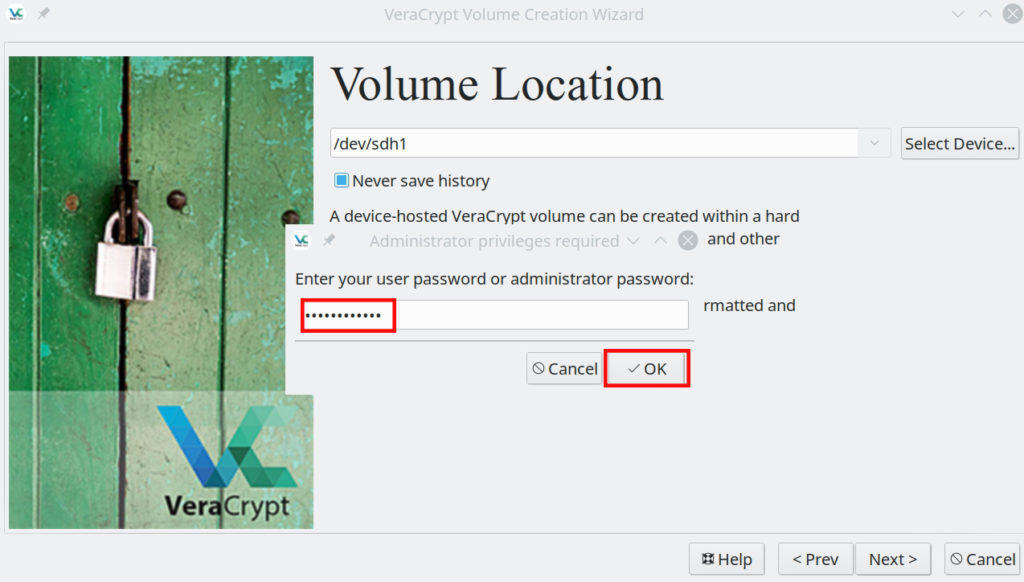
Enter the administrator password

You will receive a popup asking you to type in the administrator password. Afterwards click on the “OK” button.
veracrypt encryption screen

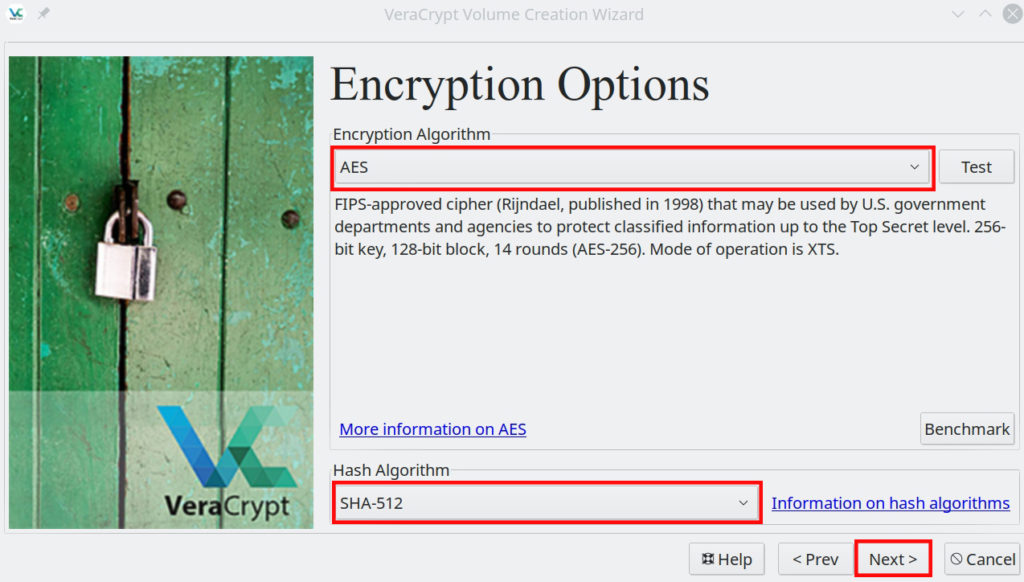
Choose VeraCrypt encryption algorithm

On the next page you will be asked to choose a Encryption Algorithm and a Hash Algorithm. I recommend selecting “AES” for the first box, and “SHA-512” for the second box. After selecting your options click on the “Next” button.
veracrypt encryption screen

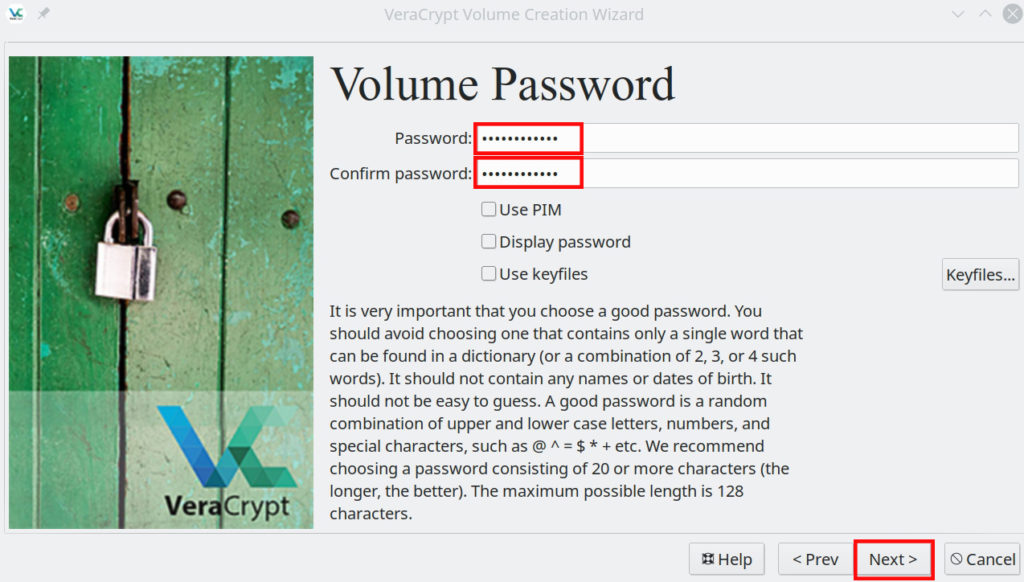
Type and repeat the encryption password

The next part of the wizard will have you enter and re-enter the encryption password you would like to use for the encrypted volume. Enter the passwords and click on the “Next” button.
veracrypt encryption screen

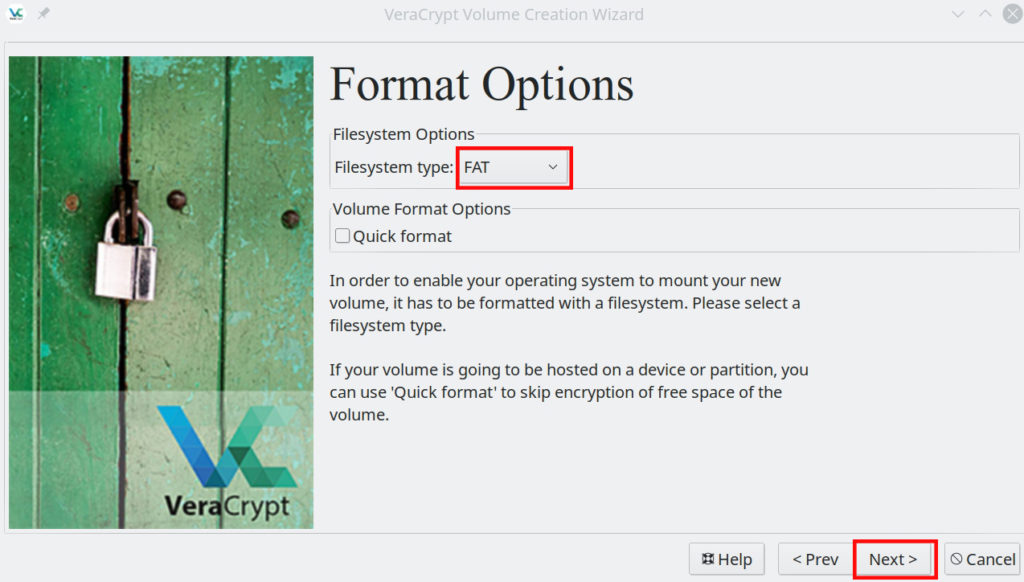
Select encrypted USB format options

On this page it will ask you to choose your flash drives format options. I recommend selecting “FAT”. Afterwards click on the “Next” button.
veracrypt encryption screen

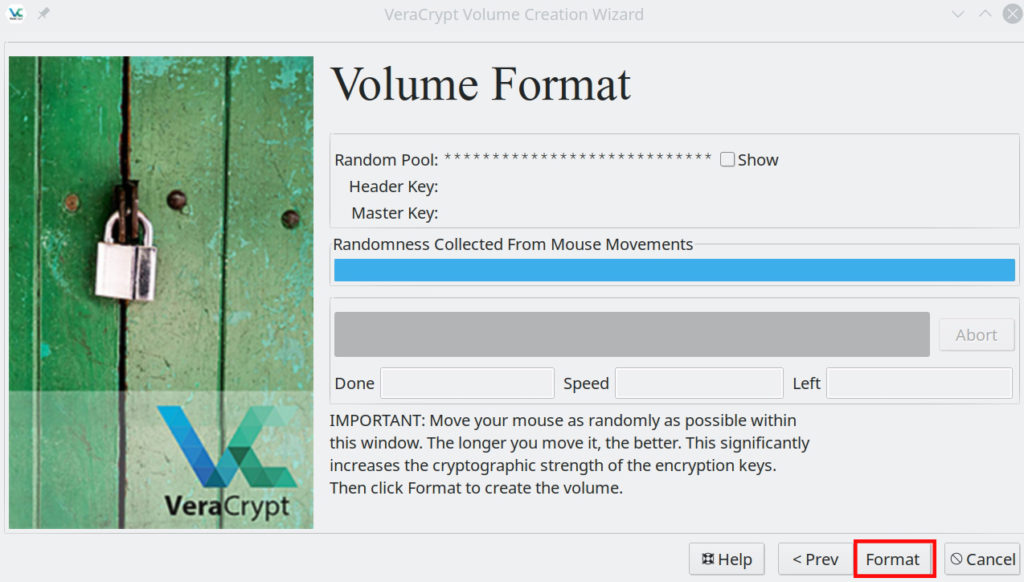
Encrypt the USB partition

For this step you will have to randomly move your mouse for 20-30 seconds to generated the Random Pool key. The longer you do it for the better the cryptographic strength will be. After the blue bar is full click on “Format” to start the encryption process.
veracrypt encryption screen

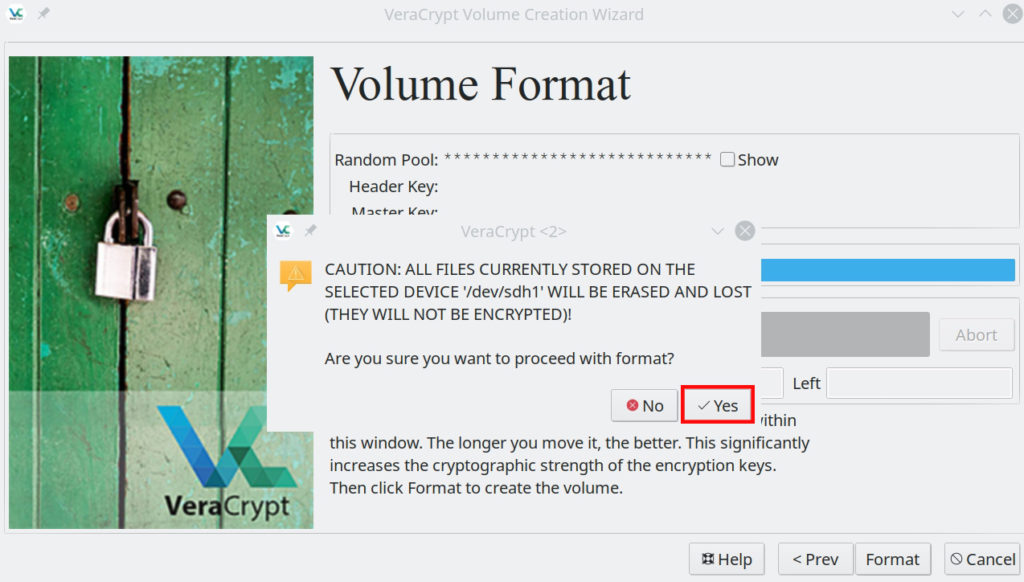
Volume format dialog

You will be asked to confirm that you want to continue encrypting. Press the “Yes” button.
veracrypt encryption screen

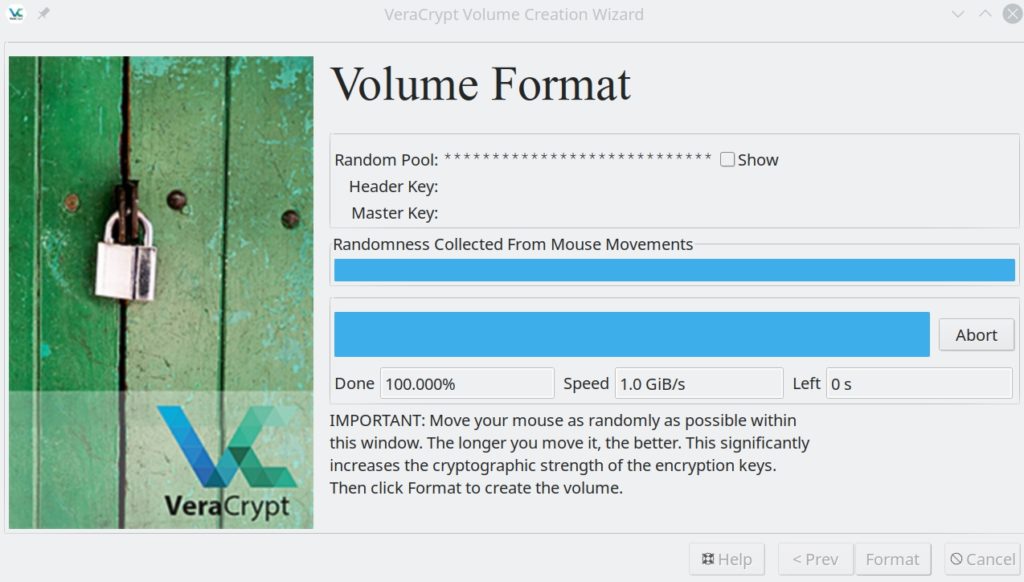
Wait for device to encrypt

The encryption process could take anywhere from 5-30 minutes. Be patient and wait for the process to complete.
veracrypt encryption screen

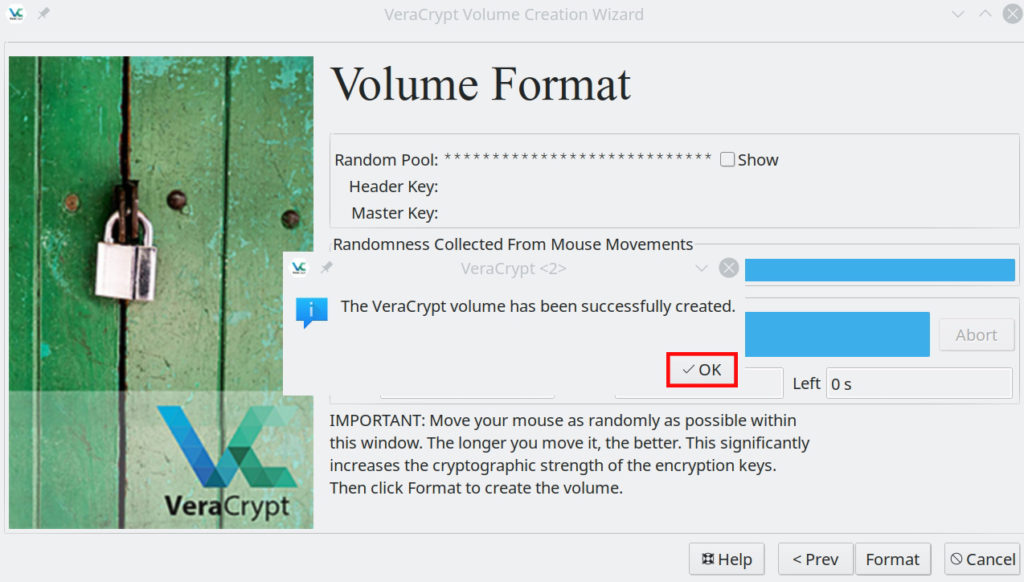
Encryption successful dialog

When the device has finished the encryption process you will get this dialog telling you it is complete. Click on the “OK” button.
veracrypt encryption screen

Exit VeraCrypt

Now that your flash drives partition is encrypted you can exit the application by clicking the “Exit” button.
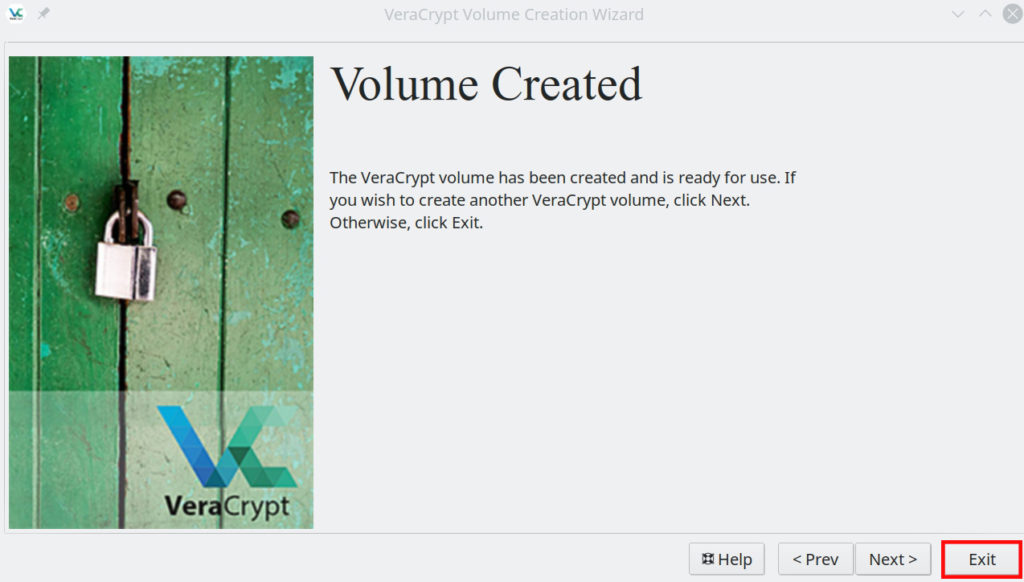
veracrypt encryption screen

Mounting encrypted volume

In this part of the tutorial you will learn how to mount the encrypted partition that you just created.

View the devices

The first step to mounting your partition is to select the device. Click on “Select Device…”.

veracrypt encryption screen

Select an encrypted partition to mount

Next you will want to select the partition of the flash drive that you encrypted in the above steps.
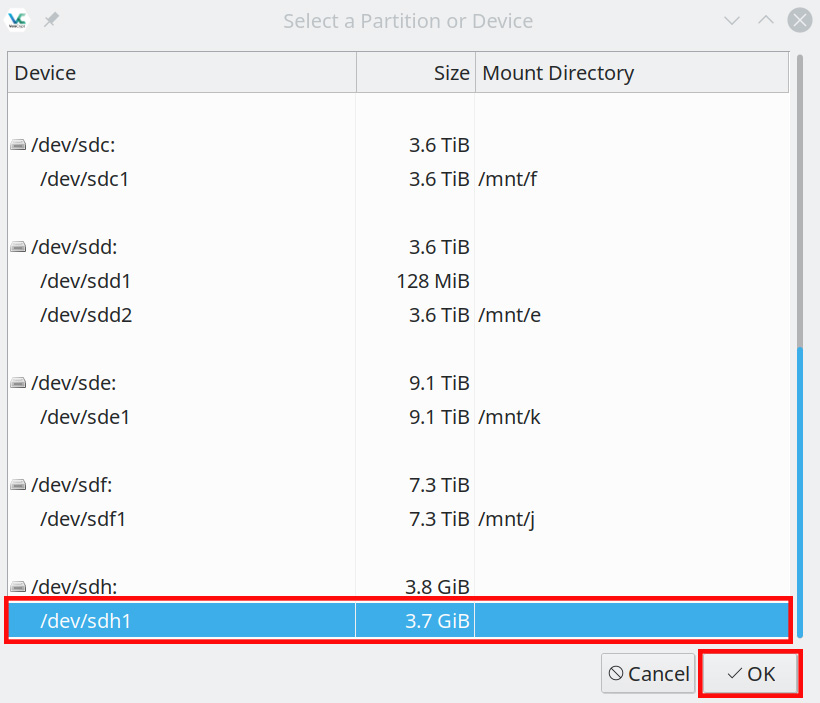
veracrypt window

Type in encrypted USB’s password

Finally type in the encrypted flash drives password.
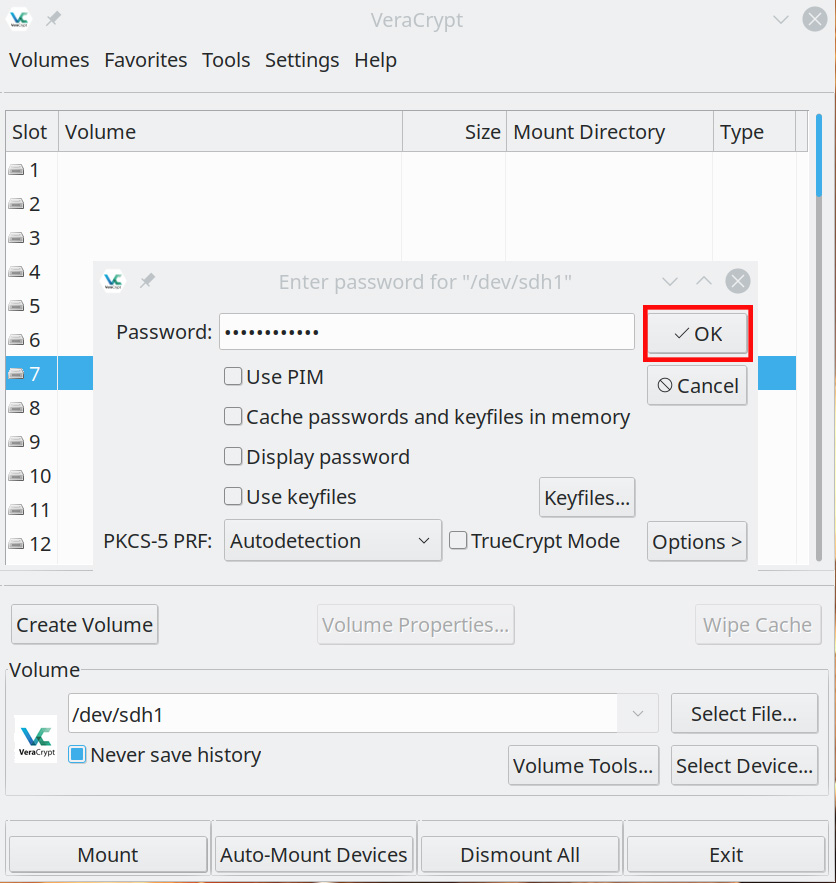
veracrypt window

Opening encrypted USB drive

The encrypted flash drives partition will now show up in the VeraCrypt window. To open it and browse the files double click on the highlighted light blue bar. If you want to dismount the encrypted partition just select it and click “Dismount”. You now know how to download, install, and encrypt flash drive partitions using VeraCrypt on Ubuntu 22.04.
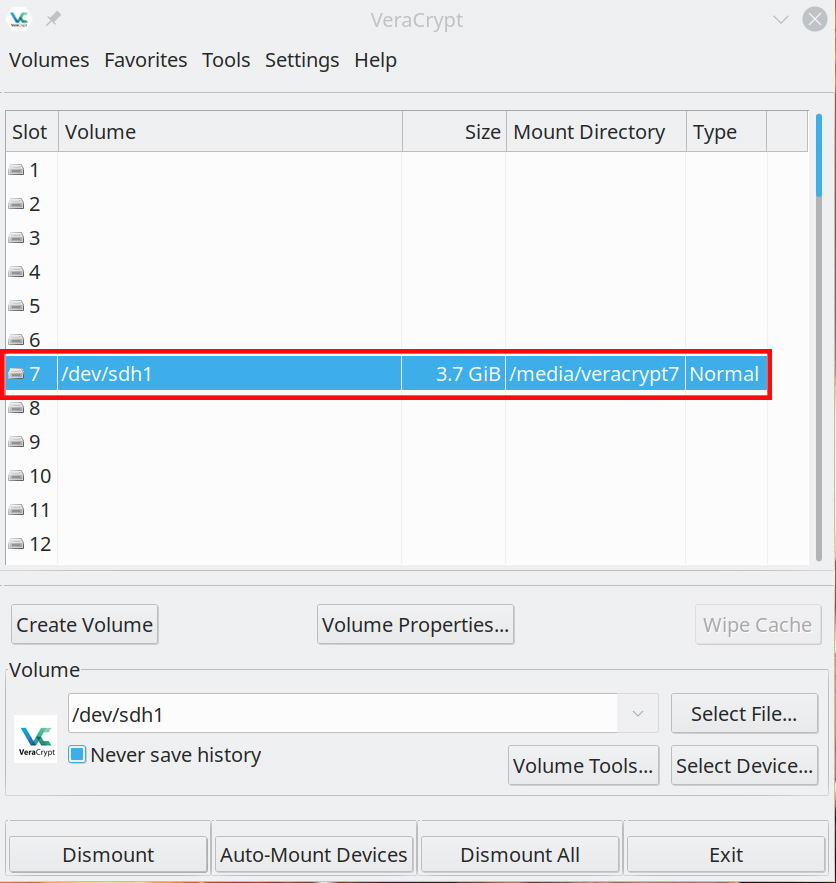
veracrypt window

Related Resources

View our list of The Top 5 Programming Languages to Learn in 2022.

Learn How to Generate Images using Neural Networks with VQGAN.

Click here to learn How to Install MySQL on Ubuntu Server 22.04 LTS.

View our Programming Articles and Tutorials.

Learn more cool things in Linux with our Linux Tutorials.

View all of our available online tools and converters at Formatswap.com.

Affiliate Disclaimer:

This website may contain affiliate links. This means we may receive a small commission if you purchase through our links. However, this does not impact our reviews and comparisons, as we only promote products we personally believe in. We are independently owned and the opinions expressed here are our own.
How to install and configure Nginx – Ubuntu 20.04

splash image install nginx

What is Nginx? Nginx is a opensource web server designed with developers in mind. It was created by Igor Sysoev in 2004. It supports reverse proxying, caching, load balancing, RTMP media streaming, and many more advanced features. In this tutorial you will learn how to install and set up Nginx on Ubuntu 20.04.

Getting Started

Open your terminal prompt of choice.

Update your packages repository and packages.

sudo apt update && sudo apt upgrade -y

Then, install Nginx:

sudo apt install nginx

Setting up UFW Firewall (Optional – Highly Recommended)

If UFW is not enabled or configured, you will first need to enable it. You can check the status of the firewall using this command:

sudo ufw status

Then enable it with this command:

sudo ufw enable

If you are connected to your machine via SSH, make sure it is allowed through the firewall before disconnecting.

sudo ufw allow ssh

Next, we will be allowing Nginx through the firewall – there are 3 settings to be aware of when allowing the web server through. ‘Nginx Full’, ‘Nginx HTTP’, and ‘Nginx HTTPS’. ‘Nginx Full’ allows traffic through both HTTP (port 80) and HTTPS (port 443), whereas HTTP and HTTPS open only their respective ports. It is highly recommended that you only open port 80 to your local network or for non-secure pages (Does NOT process sensitive data!). You will only be able to use HTTPS if you have an SSL certificate – otherwise, your browser or any visitor to your site will get a ‘Site Not Secure’ warning. We will be using ‘Nginx HTTP’ for the purposes of the tutorial, but you may replace the text in the command with the other parameters for your respective use case.

sudo ufw allow 'Nginx HTTP'

If you have any other services running on the machine that you need external clients to have access to, such as port 8080 for a testing server, you may open them with the following command:

sudo ufw allow <port>/<method>
Example: sudo ufw allow 8080/tcp
Example: sudo ufw allow 8000/udp

Configuring Nginx

Finally, it’s time to set up your web server! We will be accessing the root directory for the site, where you will access and store your files. We will also be setting up the configuration for the enabled sites so you can access your site from the web. You should be able to see the default site when going to the URL/IP address of the server.

You can view the IP address of your server by typing the command:

ip a s

Your IP will be the address that is not the loopback address (127.0.0.1) and is usually the second “inet” address depending on your server’s configuration.

welcome to nginx splash screen

If everything is set up correctly, the above image should be the contents of the page.

Next, you will navigate to your site’s configuration to organize things properly and keep your install clean. First, you will disable your site’s default configuration. You can do this by typing the following command:

 sudo unlink /etc/nginx/sites-enabled/default

Then, add a new configuration file for your site. We will be using nano for this example.

sudo nano /etc/nginx/sites-available/<site-name>

And add the following text to the file.

server {
    listen 80;
    listen [::]:80;
    root /var/www/<site-name>;
    index index.html;

    location / {
        try_files $uri $uri/ =404;
}

If you are also using SSL, you must insert the following below the first server block:

server {
    listen 443 ssl;
    root /var/www/<site-name>;
    index index.html;

    location / {
        try_files $uri $uri/ =404;
}

Press CTRL+X and then press Y to save the file.

The server is almost set! You will need to enable the site to make it accessible. You can do this by typing the command:

sudo ln -s /etc/nginx/sites-available/<site-name> /etc/nginx/sites-enabled/

Then test your configuration using the command:

sudo nginx -t

If everything checks out, you can restart your Nginx process.

sudo systemctl restart nginx

Final Steps

You must add the directory to your server before you are able to store your files and make them available.

sudo mkdir /var/www/<site-name>

Lastly, create a an index page for your server and you are all set!

sudo nano /var/www/<site-name>/index.html

Here is some example code that you can use for testing to make sure everything is working:

<html>
<body>
    <h1>Hello, Nginx!</h1>
    <p>This is a test page for Nginx.</p>
</body>
</html>
test page for nginx

If you see this message, you have successfully set up your very own Nginx server on Ubuntu 20.04!

Related Resources

View our list of The Top 5 Programming Languages to Learn in 2022.

You may also like The 5 Best Linux Distributions to Install in 2022.

Setting up MySQL on Ubuntu 22.04

View our Programming Articles and Tutorials.

Learn more cool things in Linux with our Linux Tutorials.

View all of our available online tools and converters at Formatswap.com.

How to Install MySQL on Ubuntu Server 22.04 LTS

install mysql splash image

In this tutorial I will teach you how to download and install MySQL server on Ubuntu 22.04 LTS. Additionally you will learn how to secure your installation and setup a root account. MySQL is vital to have installed if you want to work with storing and receiving data on your website or web application. The first version of MySQL was released on the 23rd of May 1995 by a Swedish company MySQLAB. The other popular database manager MariaDB was created by the same company. Ever since MySQL has grown to be one of the most popular database software’s on the web. Before we begin make sure you have a Ubuntu 20.04 server installed onto a computer or a virtual machine. Also don’t forget to install the openssh-server package if it is not installed. This will give you the ability to ssh into the machine to setup MySQL.

Update and upgrade Ubuntu

sudo apt update && sudo apt upgrade

The above commands will both update and upgrade your Ubuntu install to the latest package versions.

Install the MySQL Server & Client to Ubuntu 20.04

sudo apt install mysql-server && sudo apt install mysql-client

This will install both the MySQL Server and the MySQL Client to your machine. Unlike previous versions of Ubuntu Server you do not have to add any SQL repository’s before installing. This is because Ubuntu 22.04 LTS contains the packages in the standard system repository.

Confirm the installed MySQL version

To confirm which version of MySQL you have installed run the following command. You will receive an output with the version number.

mysql --version

Update MySQL security settings

The default installation of MySQL has several security issues. We need to run the following commands to fix these issues.

sudo mysql_secure_installation

This will open the MySQL secure installation wizard. We need to answer a few questions in the wizard to continue. The first question will be:

Would you like to setup VALIDATE PASSWORD COMPONENT?

Type in “Y” on the keyboard and press “Enter”. This will bring us to the next question which will have us enter a password validation policy.

There are three levels of password validation policy:

LOW    Length >= 8
MEDIUM Length >= 8, numeric, mixed case, and special characters
STRONG Length >= 8, numeric, mixed case, special characters and dictionary                  file

Please enter 0 = LOW, 1 = MEDIUM and 2 = STRONG:

Choose any one of these options. I will be using option #2 MEDIUM. After you type in the number press “Enter” and you will be brought to the following screen to set your password.

Please set the password for root here.

New password:

Re-enter new password:

Do you wish to continue with the password provided?

Type in the password you would like to use and press enter. Next re-enter the password you have chosen. Finally type “Y” than press “Enter” to continue with the password provided. There is the possibility you will receive the following error.

Failed! Error: SET PASSWORD has no significance for user 'root'@'localhost'                            as the authentication method used doesn't store authentication data in the MySQ                           L server. Please consider using ALTER USER instead if you want to change authent                           ication parameters.

If you get this error you will have to exit the script by pressing Ctrl+C. After you exit out login to MySQL.

sudo mysql

Then set the MySQL password.

ALTER USER 'root'@'localhost' IDENTIFIED WITH mysql_native_password by 'SuperSecure1';

*Change the password SuperSecure1 to something secure* Afterwards exit the program by running exit;

exit;

Then just rerun the secure installation setup script again.

sudo mysql_secure_installation

The secure installation setup script will then ask you the following questions. Answer them as you see below.

Enter the password for user root: type your root password and then press "Enter".
Change the password for root? Press N, then press "Enter".
Remove anonymous users? Press Y, then press "Enter".
Disallow root login remotely? Press Y, then press "Enter".
Remove test database and access to it? Press Y, then press "Enter".
Reload privilege tables now? Press Y, then press "Enter".

Testing MySQL Server login

Once you have finished running the MySQL secure installation script and have set up the root password you will need to test the login. This will allow us to login as the root user and setup a database ,tables and or users to go with it. Type the following to login.

sudo mysql -u root

Enter the root password you created in the above steps.

Managing your Ubuntu 22.04 MySQL service

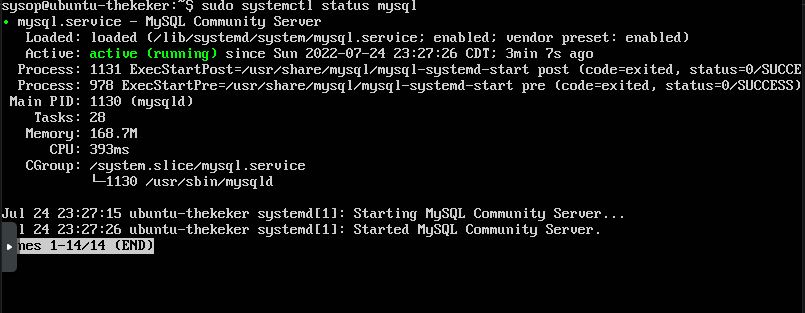
There are several commands worth knowing for managing your MySQL service. One of the most important is the command to check the status of the service.

sudo systemctl status mysql

This will generate an output similar to this. It will tell you if it is running or stopped. Furthermore it will also output any errors.

systemctl mysql output

You will also want to know how to stop the MySQL service. You can do this with the following command.

sudo systemctl stop mysql

To start the MySQL service run:

sudo systemctl start mysql

To restart the MySQL service run:

sudo systemctl restart mysql

To disable the MySQL service run:

sudo systemctl disable mysql

Updating or removing MySQL on Ubuntu 20.04

If you are having any issues with your current version of MySQL or just want the latest features, just run the update command. This will update MySQL and your Linux system to the latest version.

sudo apt update && sudo apt upgrade

If you no longer want MySQL server installed you can easily remove it with the following command.

sudo apt autoremove --purge mysql-server

When you get the message “Do you want to continue?” just type “Y” than press “Enter”. MySQL will be purged and uninstalled.

Related Resources

View our list of The Top 5 Programming Languages to Learn in 2022.

You may also like The 5 Best Linux Distributions to Install in 2022.

If you want to learn how to generate images with neural networks click HERE.

View our Programming Articles and Tutorials.

Learn more cool things in Linux with our Linux Tutorials.

View all of our available online tools and converters at Formatswap.com.

5 Reasons to Switch from Windows 10 to Linux

switch from windows to linux

If you are sick of constant forced updates, user data tracking, and malware attacks you may want to consider making the switch to the Linux operating system. One of the benefits of switching from Windows 10 to Linux is the wide variety of distributions to choose from. A distribution is a flavor of Linux which contains the GNU shell, various preinstalled programs, the Linux kernel, system utilities and just about everything you will see in your operating system. This allows for the user to decide for themselves which distribution most closely matches what they will use their computer for. Are you looking to make the switch? Here are some reasons to do so.

1. Security

Many Linux distributions take a security first approach. This means that security settings are enabled by default. Also unlike Windows 10 and Windows 11, Linux does not collect and track user data. You are able to take full control of your data privacy. Linux has constant and automatic security updates ensuring you are always secure.

2. Price (FREE)

Another benefit to using Linux versus Windows as your operating system is that it is free. Microsoft Windows 10 and 11 are also “free”, but you pay with your data being collected and sold to advertisers. With Linux you get everything Windows offers but for free and with privacy.

3. Software

More than 15,000 developers have contributed to the Linux operating system. With this comes a robust range of great software. The best part is all of the software is free to use in Linux. This is because the operating system is opensource. This means anyone can contribute there time and code to improving Linux. More and more popular software companies are releasing Linux compatible versions of their software. This also includes the gaming industry. As of 2021 there are over 7,500 Linux compatible titles on the Steam game store.

4. Hardware Compatibility

Linux is well known for being the operating system that helps to breath new life into older computers. Linux can run on almost any hardware developed in the past 30 years. If you have an old PC in the closet you can install Linux breathing new life into it. The reason Linux works so well on low performance machines is the low resource usage of the operating system. On average Linux only uses a quarter of the system resources compared to the average Windows machine.

5. Customization

With Linux you can make your operating system truly yours with advanced customization. You are able to customize almost every aspect of the system. Most Linux distributions come with a wide range of themes that are able to be installed. You can also install new icon packs and fonts. This allows you to personalize your operating system with just a few easy clicks. Whether you are looking to customize your system for aesthetic purposes, or just productivity (or a little of both). Then Linux is for you.

Download Linux

If you are looking for an overview and or download links to some of the best Linux distributions, read this article: The 5 Best Linux Distributions to Install in 2022

Related Resources

View our list of The Top 5 Programming Languages to Learn in 2022.

If you want to learn how to generate images with neural networks click HERE.

View our Programming Articles and Tutorials.

Click here to learn How to Install MySQL on Ubuntu 22.04 LTS.

Learn more cool things in Linux with our Linux Tutorials.

View all of our available online tools and converters at Formatswap.com.

The 10 Best Linux Distributions to Install in 2022

top 5 linux distributions

Choosing the best Linux distro in 2022 can be quite daunting with all of the Linux distributions to choose from. This list of the top 10 desktop Linux distributions will help to remove any confusion. Linux distributions have many desktop environments available to choose from. A desktop environment is a collection of all available GUI interfaces the user can interact with. This includes the taskbar, icons, and almost everything a user will see on there screen. Some of the items on the list will have different desktop environments while still using the same Linux flavor such as Ubuntu, Debian, Arch, etc. This is a comprehensive list of the best and most popular Linux distributions.

Ubuntu Linux

Ubuntu Linux is a distribution based on Debian. Is is by far the most used Linux distribution available. Ubuntu’s default desktop environment is Gnome but it is also available in KDE, Xfce. Mate, and more. The LTS (Long Term Support) version of Ubuntu receives regular product and security updates every 6 months. It has become the default choice for businesses looking to use Linux. Ubuntu is one of the best choices if you are looking to play games. It has the best video card driver support of any Linux distro on this list. This makes it the best Linux distro for gaming. Ubuntu Linux is available for desktop, or for servers with Ubuntu server. Overall Ubuntu is a very beginner friendly distribution. It also has some of the most robust documentation and tutorials available to new users.

Latest version: Ubuntu 22.04 LTS

Download Ubuntu

Fedora Linux

Fedora Linux is a bit different than the other distributions on this list due to being sponsored by Red Hat. This makes it one of the only mainstream Linux distributions to be funded by a large corporation. This allows for desktop support plans to be provided to businesses looking to use Linux. Linus Torvalds (the creator of the Linux kernel) uses Fedora as his primary Linux distribution. A new version of Fedora Linux is released every 13 months. The default desktop environment for Fedora is Gnome so it will have a similar feel to Ubuntu out of the box. One of the primary differences of Fedora compared to Debian or Ubuntu is the use of the DNF package manager. Another benefit of Fedora is it’s use of Security-Enhanced Linux by default. This provides a security by default approach greatly increasing the security of your operating system. Overall Fedora makes for a good choice if you want stability and security.

Latest version: Fedora 36

Download Fedora

Debian Linux

Debian Linux is one of the oldest Linux distributions on this list. It was first released in August of 1993. Debian offers many desktop environments such as Xfce, Gnome, Mate, KDE, LXDE, Cinnamon, and LXQT. This gives you a ton of flexibility for choosing the flavor that best suits you. Debian Linux is great for both desktop and server operations alike. This is due to its increased focus on stability and security. Because of this it is one of the best Linux distros for programming Debian also has a wide range of applications to install from it’s online repositories. To date there are over 51,000 packages available. Like Ubuntu, Debian also uses the APT package manager to install packages. You can also use the GUI tool Synaptic if you want a visual way to install software. Debian is a good choice for Office work, web browsing, and gaming. This makes it a overall well rounded choice for a distribution.

Latest version: Debian 11.4

Download Debian

Linux Mint

Linux Mint is a great choice for those who are new to Linux or switching from Mac OS or Windows. The design of Linux Mint greatly resembles the design of Windows 7. This makes it very easy for new users to get basics down. The default desktop environment in Mint is Cinnamon. Linux mint is based on Ubuntu and provides easy access to software with the MintTools Software Manager. Linux mint comes with many applications preinstalled such as Firefox, VLC Media Player, HexChat, VirtualBox, and many more useful programs. It includes essentially almost any application you would need to switch from Windows to Linux. Linux Mint is what you will want to choose if you are new to Linux. Overall if you are looking for a Linux distribution with a lot of preinstalled packages that you can use out of the box, as well as a friendly support community. Then this is the Linux distribution for you.

Latest version: Linux Mint 20.3 “Una” (Cinnamon)

Download Linux Mint

Arch Linux

Arch Linux is the operating system for someone who wants full control over there systems. By default the installation is very minimal requiring the user to install any additional software they may desire. Arch Linux uses a ‘rolling release’ schedule. This means that there are no ‘major releases’ of the operating system. All you need to update to the latest version of Arch Linux is a system update. This distribution provides bleeding edge updates for it’s packages. This means you will always have the most up to date versions of your software. This can come with both con’s as there could be bugs in the latest versions that have not been worked out yet. There is no default desktop environment on Arch as you will need to choose on yourself. I would recommend this distribution for intermediate to advanced Linux users as it takes a lot of configuration to get it usable. The benefit is once you have it fully configured it will be what you want, and only what you want. Without any additional unneeded software. If you are trying to understand how Linux works under the hood, then this distro is for you.

Latest version: Arch Linux 2022.06.01 / 2022.06.01

Download Arch Linux

Arch Linux Installation Guide

Manjaro 

Manjaro is another good Linux distro to install. This operating system is based on the Arch Linux. Unlike Arch, Manjaro focuses on user friendliness and user accessibility. Unlike Ubuntu or Debian, it uses the Pacman package manager. This is used to update your system, as well as to download and install new software. The first version of Manjaro was released in July of 2012, and the first beta version was released in late 2013.There are a variety of desktop environments you can choose when installing Manjaro. You can choose from Xfce, KDE, or Gnome. Manjaro comes with both a CLI as well as a GUI installer to choose from. 

Download Manjaro

Kubuntu

Kubuntu is an Ubuntu based Linux distribution that uses the KDE desktop environment. One of its benefits is that it shares the same package repositories as Ubuntu so you will have access to the same software. The project was originally sponsored by the company Canonical LTD until late 2012. Currently Blue Systems is the main contributor and maintainer for Kubuntu releases. If you are familiar with the Windows 10 operating system you will find the KDE desktop environment to be very similar and easy to use. Kubuntu is by far one of the nicest looking distributions sporting a modern desktop layout. Another great feature of using Kubuntu is its driver support. Almost every driver for audio, video, and networking will be preinstalled.

Download Kubuntu

Elementary OS

Elementary OS is a Linux distribution that was originally released in early March of 2011. It is a Ubuntu based distribution that uses the Pantheon desktop environment. One of the main things that set it apart is its custom GTK+ icon theme, and several in house developed applications. The default window manager for Elementary OS is Gala. The latest release is Juno. It was released in October 2018. Instead of using a strict release schedule, Elementary OS uses the “release when ready” cadence. Elementary OS is a great light weight distribution to install on your laptop or desktop computer.

Download Elementary OS

Lubuntu

Lubuntu is another great lightweight Ubuntu based Linux distribution to try. The name Lubuntu is a combination of the words LXQt and Ubuntu. Lubuntu first received official recognition as a member of the Ubuntu family in May of 2011. It originally used the LXDE desktop environment, but it now uses the LXQT environment. Lubuntu aims to be a functional yet module distribution focused on letting users use their computer in the way they want to use it. Lubuntu is known as a lighter version of Ubuntu. I would recommend using Lubuntu if you have an older computer or one with lower hardware specs.

Download Lubuntu

Linux Lite

Linux Lite is a distribution that was first released in 2012. It uses a custom Xfce desktop environment, and was originally based off of Debian. It is now based off of Ubuntu. Linux Lite’s main goal is to make the transition from Windows to Linux as seamless as possible. They use many customization options to make the distribution work and look the same as Windows. Linux lite uses the “Lite Software” package manager to install new applications. The latest version of Linux lite is version 6.2 “Fluorite”. It was released in November of 2022, and is based on Ubuntu 22.04.

Download Linux Lite

Related Resources

View our list of The Top 5 Programming Languages to Learn in 2022.

If you want to learn how to generate images with neural networks click HERE.

View our Programming Articles and Tutorials.

Learn more cool things in Linux with our Linux Tutorials.

View all of our available online tools and converters at Formatswap.com.

The Top 10 Programming Languages to Learn in 2022

picture of five programming language logos

Picking a first, or new programming language to learn can be a challenge. With many emerging technologies such as Machine Learning, Blockchains, Automation, IOT, and more it can be difficult to find a language to start with. This list is a compilation of languages to add to any developer’s skill set whether you are just beginning your programming journey or a seasoned programming veteran. Take a look below for a list of The Top 10 Programming Languages to Learn in 2022.

1. Python

Python is one of the easiest to learn languages from this list. The syntax is very beginner friendly. Python is a good language to learn as it provides high paying career opportunities. Another reason to learn Python is its heavy use in the emerging machine learning sector. Python makes programming machine learning applications simple with its syntax and the support of many libraries. The above reasons and many more make Python a great beginner programming language. The average Python developer salary is $73k-$120k per year.

2. C#

C# is another high paying, popular, and robust programming language to learn in 2022. One of the biggest selling features of C# is its robust and powerful development tool set. Using Visual Studio you are able to do debugging, testing, development, version control, performance analysis, and much more all from a single development IDE. The final reason to use C# is its popularity with developers. As of 2020 C# remained the most highly adopted language in the programming job sector. The average C# developer salary is $93k-$140k per year.

3. PHP

PHP is one of the most widely used programming languages on the internet. As of 2021 70% of all websites used PHP. Some examples of popular websites that use PHP Microsoft.com, Etsy.com, slack.com. these are just a few of the millions of sites that use PHP. Therefor with the use of the many powerful frameworks available to PHP such as SQL allows you to develop robust web applications. PHP will not be going anywhere anytime soon. Despite the language losing some of its popularity overtime it is still king of back end web development. The average PHP developer salary is $93k-$110k per year.

4. JavaScript

JavaScript is the go to language for front end web scripting. Almost every modern website uses JavaScript in one way or another. JavaScript like Python is a highly abstract language. This means that it is easier for the average person to read and write. JavaScript has some of the highest available employment opportunities in the web development field. It is a fast growing language with a large supportive community of like minded developers. The average JavaScript developer salary is $100k-$120k per year.

5. C

The C Programming Language is one of the more difficult options for a beginner to learn but there are many benefits. C unlike many other high-level languages requires the developer to implement a lot of the methods and API’s themselves. Examples of these would be stacks, queues, arrays, etc. You will learn a lot more about how variables, arrays etc are stored in memory than many of the higher-level languages. You will also learn how to handle the many corner cases that come up in C. The Final reason to learn C is its efficiency. It is one of the fastest languages to use for development in terms of performance.The average C developer salary is $90k-$135k per year.

6. LUA

LUA is another great language to start with as a beginner. Its syntax is very straightforward and easy to read, similar to Python (although there are some differences between the two). The language was designed to be a flexible embedded scripting language, where your code is interpreted and run within the LUA interpreter. It is used a lot in game development, mods, and addons – such as (but not limited to) Garry’s Mod, Computers within the ComputerCraft mod for Minecraft, Roblox, and Factorio. It can also be a popular choice for enterprise, showing up in the codebases of a lot of known brands like Affirm, Venmo, and Shopify. The average LUA developer’s salary is $80k-110k per year.

7. C++

Another highly versatile language to learn is C++. It was created in 1979 by the Stroustrup group at Bell Labs. C++ is sometimes known as “C with classes” as it is essentially the same besides the addition of classes and a more modern compiler. It also supports four different types of memory management. C++ uses a three year release schedule and the compiler is maintained by many vendors such as Microsoft, Oracle, and IBM. This language is ideal for cross platform applications as well as video game development. It is a more advanced language than Python or LUA but the potential is limitless for what you can achieve. As of 2022 C++ was the 4th most popular programming language. The Average C++ developer’s salary is $54k-75k per year.

8. Java

The next programming language on the list is Java. The language was first released by Sun Microsystems in May of 1995. All of Java’s core components such as its compilers and virtual machines were all developed and released by Sun Microsystems. Some of the popular applications written using Java are Minecraft, Angry Birds, and Skype to name a few. One of the best reasons to use Java is its cross platform compatibility. Many operating systems are able to run Java applications such as Windows, Mac, Android, and Linux. Another reason to use Java is its simple syntax. The Java framework is made up of four core components, methods, objects, classes, and instance variables. This makes it easy to learn compared to the C or C++ programming languages. The average Java developer’s salary is $92k-100k per year.

9. Rust

Rust is rapidly gaining popularity with its usage in the web3/blockchain industry. Similar to C++ Rust provides advanced features such as safe concurrency, memory safety, and type interfaces. It was originally developed in 2006 by Graydon Hoare while he was doing research for Mozilla. The first stable version was released in 2014. Since the public release many companies have adopted Rust including Discord, Dropbox, and Microsoft to name a few. Rust aims to be a high performance language with similar speeds to C and C++. They were able to achieve this without sacrificing memory safety. Rust is more efficient and performance compared to other memory safe languages since it does not use a Garbage  collector. Instead memory and other system resources are controlled through resource acquisition at the initial convention. This provides optional access to reference counting. One of the main reasons to learn Rust is that it can run on embedded devices. It also integrates seamlessly with other languages. Another benefit to learning rust is the high salary. The average Rust developer’s salary is 175K-200K.

10. Swift

The Swift language is mainly used to develop iPhone, iPad, Apple Watch, and OS X applications. It was originally developed and released by Apple and the open source community in 2014. Swift was created by Apple mainly to phase out its use of the Objective-C runtime library. This allowed seamless integration with the rest of Apple’s software suite. Swift is a good language to learn as it employs modern programming theory concepts and provides a simple to use syntax. Swift does not use pointers in contrast to Objective-C. Another reason to learn Swift is that it constantly improves. New features are added by Apple every few months. Furthermore its debugging is simple and painless thanks to the Swift interactive tool called Playground. This allows you to troubleshoot your code in a script-like environment. The average Swift developers salary is 45K-95K per year.

Related Resources

View more programming articles and tutorials HERE.

View The 5 Best Linux Distributions to Install in 2022.

If you want to learn how to generate images with neural networks click HERE.

View our other Machine Learning Tutorials.

Learn more cool things in Linux with our Linux Tutorials.

View all of our available online tools and converters at Formatswap.com.

Deep Learning Image Style Transfer Tutorial Using Neural Style Pt

In this tutorial you will learn how to transfer the style of one image onto the content of another. This program uses deep learning with python. The project uses an algorithm based on a convolutional neural network. Style any image using machine learning image processing. We will be using Ubuntu 20.04 for this tutorial. Almost any Linux distribution should work.

The project is based off of a PyTorch implementation of the A Neural Algorithm of Artistic Style article. It was published by Leon A. Gatys, Alexander S, Ecker, and Matthias Bethge. It is based on the Neural-Style code by Justin Johnson’s. Here is an example of The Scream painting’s style being transferred onto a picture of a New York City:

A photo of new york city
Content Image
scream painting
Style Image
style transferred image of new york
Output Image

Dependencies Installation

This project requires you to install the following

Required Dependencies:

Optional dependencies:

  • For CUDA backend:
    • CUDA 7.5 or above
  • For cuDNN backend:
    • cuDNN v6 or above
  • For ROCm backend:
    • ROCm 2.1 or above
  • For MKL backend:
    • MKL 2019 or above
  • For OpenMP backend:
    • OpenMP 5.0 or above

Setup

Navigate to the directory you would like to download neural-style-pt project to. Then git clone the repository.

git clone https://github.com/ProGamerGov/neural-style-pt.git

Download Model

Next you will cd into the cloned directory and download the VGG model files.

cd neural-style-pt/
python models/download_models.py

This will download multiple model files. If you are running on a lighter system use the option -model_file models/nin_imagenet.pth If you have a strong system with a powerful gpu use the option -model_file models/vgg19-d01eb7cb.pth The second option will provide drastically better results at the expense of more strain to the GPU. If you have issues with VGG19 or VGG18 revert back to nin_imagenet.pth.

Creating Deep Learning Style Transfer Images

In this example we will be using the cuDNN with NIN Model. Feel free to use the model of your choice. See the bottom of the tutorial for speed comparisons between the different models. Run the following command replacing -style_image with the path to the style image you want to use. You must all add the path of your content image to -content_image. Feel free to change the -image_size option to increase the resolution of your output machine learning image.

python neural_style.py -style_image examples/inputs/picasso_selfport1907.jpg -content_image examples/inputs/brad_pitt.jpg -output_image profile.png -model_file models/nin_imagenet.pth -gpu 0 -backend cudnn -num_iterations 1000 -seed 123 -content_layers relu0,relu3,relu7,relu12 -style_layers relu0,relu3,relu7,relu12 -content_weight 10 -style_weight 500 -image_size 512 -optimizer adam

Content Image

car photo

Style Image

style image

Deep Learning Output Image

Image of a styled car

Deep Learning Image Options

  • -image_size: Maximum side length (in pixels) of the generated deep learning image. Default is 512.
  • -style_blend_weights: The weight for blending the style of multiple style images, as a comma-separated list, such as -style_blend_weights 3,7. By default all style images are equally weighted.
  • -gpu: Zero-indexed ID of the GPU to use; for CPU mode set -gpu to c.

Advanced Optimization Options

  • -content_weight: How much to weight the content reconstruction term. Default is 5e0.
  • -style_weight: How much to weight the style reconstruction term. Default is 1e2.
  • -tv_weight: Weight of total-variation (TV) regularization; this helps to smooth the image. Default is 1e-3. Set to 0 to disable TV regularization.
  • -num_iterations: Default is 1000.
  • -init: Method for generating the generated image; one of random or image. Default is random which uses a noise initialization as in the paper; image initializes with the content image.
  • -init_image: Replaces the initialization image with a user specified image.
  • -optimizer: The optimization algorithm to use; either lbfgs or adam; default is lbfgs. L-BFGS tends to give better results, but uses more memory. Switching to ADAM will reduce memory usage; when using ADAM you will probably need to play with other parameters to get good results, especially the style weight, content weight, and learning rate.
  • -learning_rate: Learning rate to use with the ADAM optimizer. Default is 1e1.
  • -normalize_gradients: If this flag is present, style and content gradients from each layer will be L1 normalized.

Output and Layer Options

  • -output_image: Name of the output image. Default is out.png.
  • -print_iter: Print progress every print_iter iterations. Set to 0 to disable printing.
  • -save_iter: Save the image every save_iter iterations. Set to 0 to disable saving intermediate results.
  • -content_layers: Comma-separated list of layer names to use for content reconstruction. Default is relu4_2.
  • -style_layers: Comma-separated list of layer names to use for style reconstruction. Default is relu1_1,relu2_1,relu3_1,relu4_1,relu5_1.

Other Deep Learning Options

  • -style_scale: Scale at which to extract features from the style image. Default is 1.0.
  • -original_colors: If you set this to 1, then the output image will keep the colors of the content image.
  • -model_file: Path to the .pth file for the VGG Caffe model. Default is the original VGG-19 model; you can also try the original VGG-16 model.
  • -pooling: The type of pooling layers to use; one of max or avg. Default is max. The VGG-19 models uses max pooling layers, but the paper mentions that replacing these layers with average pooling layers can improve the results. I haven’t been able to get good results using average pooling, but the option is here.
  • -seed: An integer value that you can specify for repeatable results. By default this value is random for each run.
  • -multidevice_strategy: A comma-separated list of layer indices at which to split the network when using multiple devices. See the Multi GPU Section for more details.
  • -backend: nn, cudnn, openmp, or mkl. Default is nn. mkl requires Intel’s MKL backend.
  • -cudnn_autotune: When using the cuDNN backend, pass this flag to use the built-in cuDNN autotuner to select the best convolution algorithms for your architecture. This will make the first iteration a bit slower and can take a bit more memory, but may significantly speed up the cuDNN backend.

GTX 1080 Benchmark Speeds


    -backend nn -optimizer lbfgs: 56 seconds
    -backend nn -optimizer adam: 38 seconds
    -backend cudnn -optimizer lbfgs: 40 seconds
    -backend cudnn -optimizer adam: 40 seconds
    -backend cudnn -cudnn_autotune -optimizer lbfgs: 23 seconds
    -backend cudnn -cudnn_autotune -optimizer adam: 24 seconds

FAQ and Issues

Problem #1:

When running the program you run out of memory.

Solution #1

Try reducing the image size: -image_size 256 (or lower). Note that different image sizes will likely require non-default values for -style_weight and -content_weight for optimal results. If you are running on a GPU, you can also try running with -backend cudnn to reduce memory usage.

Problem #2:

The -backend cudnn performs slower than the default backend.

Solution #2:

Add the flag -cudnn_autotune; This will instead use the built-in cuDNN autotuner to select the best convolution algorithm which will result in much better performance.

Problem #3:

You receive this error message.

Missing key(s) in state_dict: "classifier.0.bias", "classifier.0.weight", "classifier.3.bias", "classifier.3.weight". Unexpected key(s) in state_dict: "classifier.1.weight", "classifier.1.bias", "classifier.4.weight", "classifier.4.bias".

Solution #3:

Due to a mix up with layer locations, older models require an update to be compatible with newer versions of PyTorch. The included donwload_models.py script will perform these updates after downloading the models.

Problem #4:

The image generated is solid gray.

Solution #4:

This is a bug that sometimes occurs in cuda. You need to reduce or increase the size of the image by at least 1px.

Related Resources

View more image examples on the Computer Dreams Twitter.

If you want to learn how to generate images with neural networks click HERE.

View our other Machine Learning Tutorials.

Click here to learn How to Install MySQL on Ubuntu 22.04 LTS.

Learn more cool things in Linux with our Linux Tutorials.

View all of our available online tools at Formatswap.com.

Questions

Feel free to leave a comment below if you have any further questions. Thank you for reading the tutorial.