How to Setup an SFTP Server on Ubuntu 22.04 using OpenSSH

sftp splash

In this article you will learn how to enable and connect to the SFTP server in OpenSSH. With SFTP (Secure File Transfer Protocol) you can easily transfer files over the internet using SSH. We will be using Ubuntu 22.04 for our server, however any version of Linux should work.

This guide will use password authentication with IP firewall restriction. This will prevent anyone besides those who you want accessing the box via SSH or SFTP. If you want the highest level of security possible you will want to enable keys in OpenSSH before following this guide. Learn how to enable keys with our How to Setup OpenSSH with Keys on Ubuntu 22.04 tutorial.

SFTP vs FTP

It is important to mention that SFTP is not the same as FTP. One of the main differences is while they both transfer files, only SFTP encrypts the data during transit. Another difference is FTP is unable to benefit from public key files for authentication. Using public keys with SFTP increases security by encrypting the transfer data stream. If your aim is security then it is highly recommended you use SFTP versus FTP. Now that I have described the differences lets move on to configuring and connecting to an SFTP server in OpenSSH.

Update and Upgrade Ubuntu
update and upgrade ubuntu

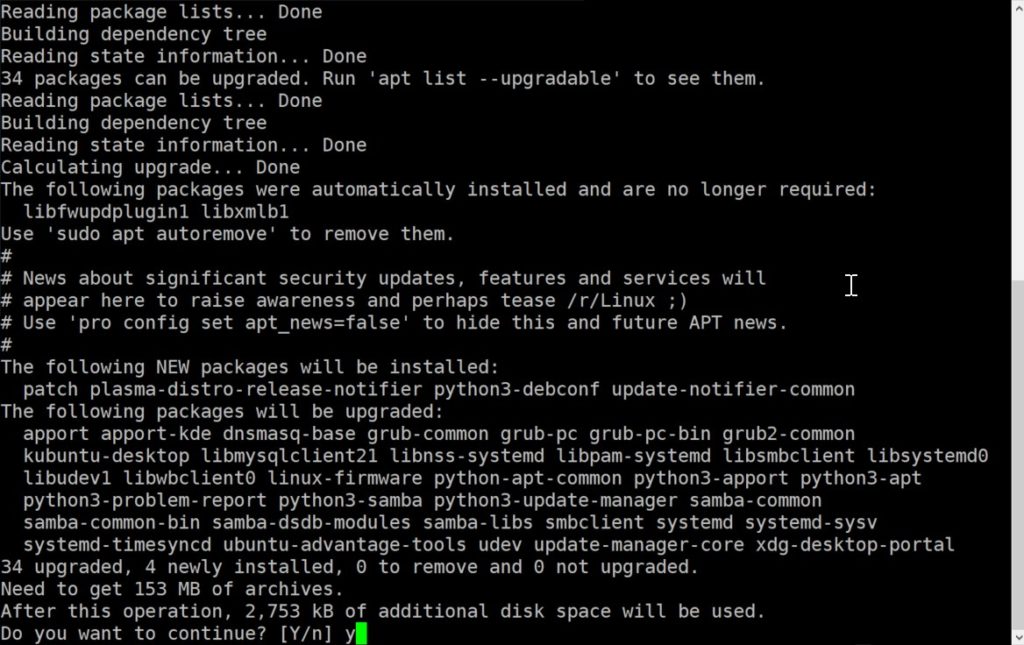
The first thing you need to do is update and upgrade your Ubuntu installation. Open a terminal and type the following command. Afterwards press “Y” to confirm.

sudo apt update && sudo apt upgrade

Install OpenSSH

install open-ssh

After your system has finished updating you will need to install the OpenSSH server software. OpenSSH provides encrypted file transfer for file transfers and remote logins. Install the software using the apt command.

sudo apt install openssh-server

View SSH Status

view ssh status

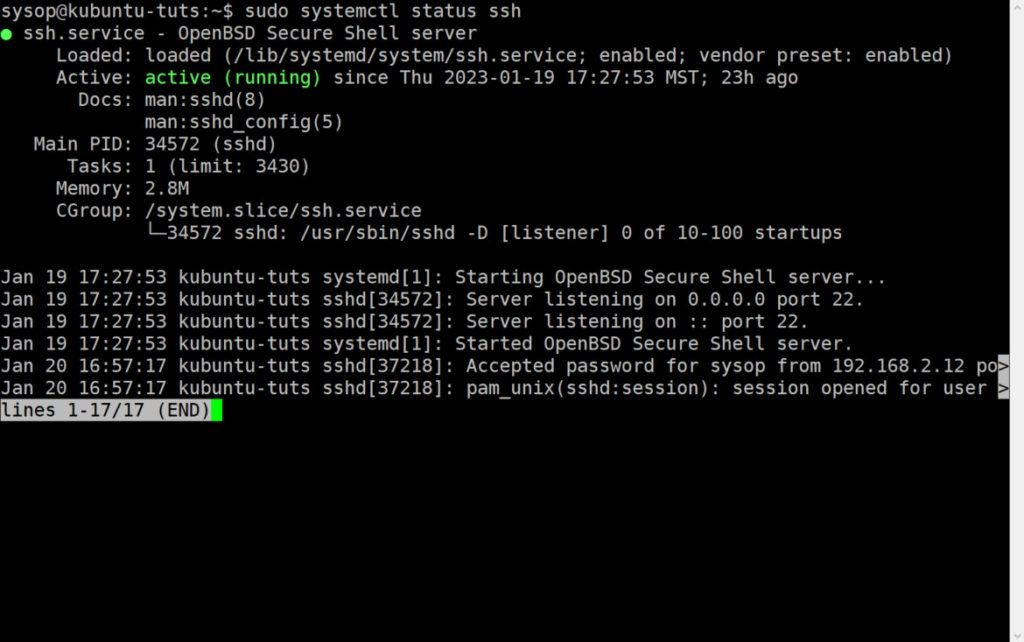
Next you need to verify that OpenSSH is installed on your system and actively running. Use the below command and confirm that you see “active (running)” on the third line.

sudo systemctl status ssh

If SSH does not show as active and running it may be disabled. Run the following command to enable and start the OpenSSH server.

sudo systemctl enable ssh && sudo systemctl start ssh

Create New User

create a new user

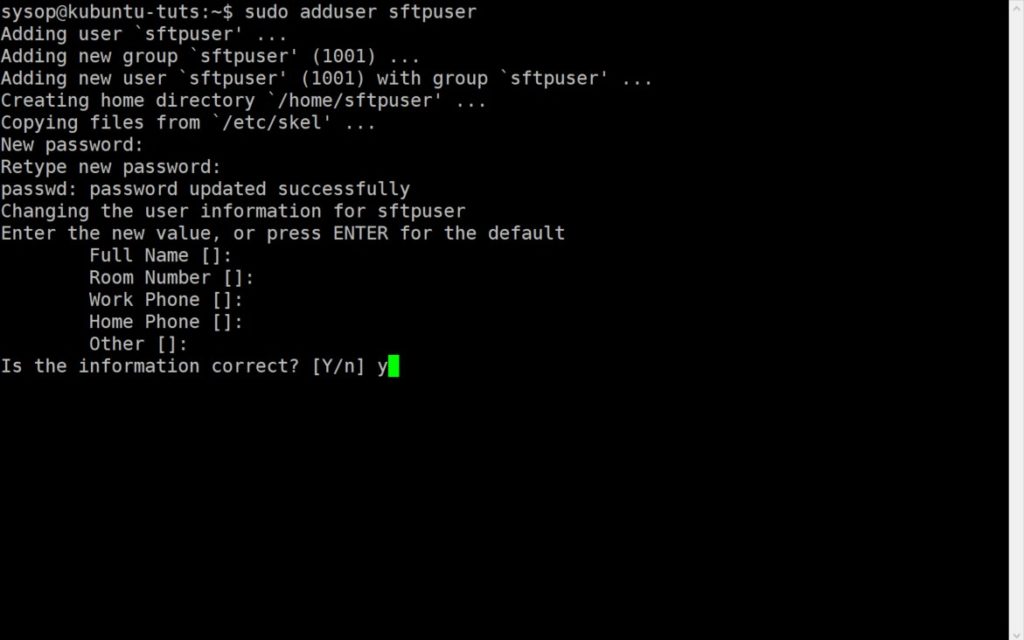
Now you will need to create a new user for logging into the SFTP server. Run the adduser command then type a password. You can skip the other fields if you wish. Finally press “Y” to confirm.

sudo adduser sftpuser

Create New Group

create a new group

Afterwards we will create a new group for our sftpuser. We will configure SSH to give SFTP access to any user in this group. Run the addgroup command to proceed.

sudo addgroup sftpusers

Add User to Group

add user to group

Next we need to add the user to the new group. Run the usermod command to add the sftpuser to the sftpusers group.

sudo usermod -a -G sftpusers sftpuser

Change User’s Home Permissions

change users home permissions

Then we will set new permissions on the sftpuser’s home directory. This will allow the SFTP server to access these files. First execute the chown command followed by the chmod command. The sftpuser’s home will be the folder you access when you connect to the SFTP server.

sudo chown root: /home/sftpuser
sudo chmod 777 /home/sftpuser

Edit the SSH Config File

Next we need to edit the sshd_config file and edit a few lines. Open the configuration file using the nano text editor as shown below.

sudo nano /etc/ssh/sshd_config

Locate the Subsytem Line

locate subsystem line

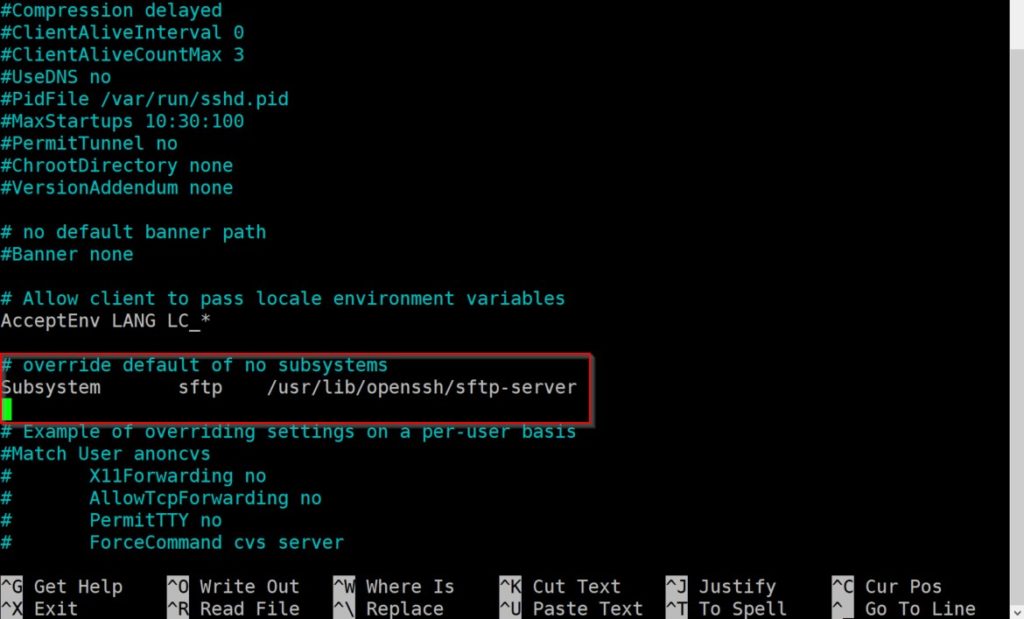
After you open the file scroll down and look for the Subsystem line. Once you locate the line comment it out using the “#” symbol as shown below.

#Subsystem      sftp    /usr/lib/openssh/sftp-server

Add New Lines

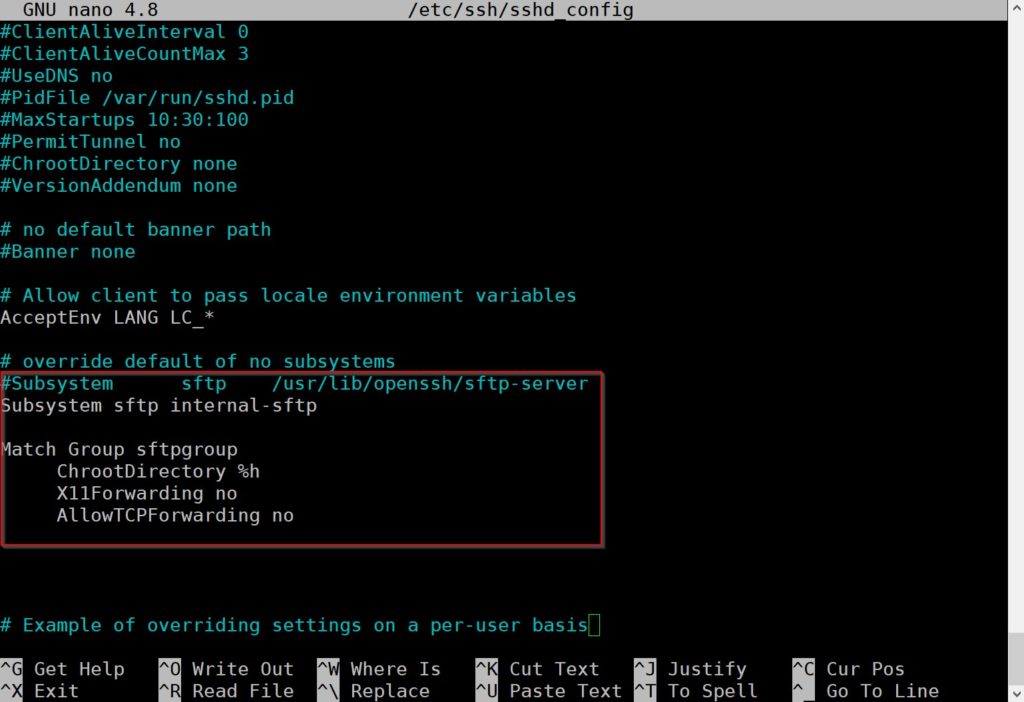
Now that you have commented out the Subsystem line you need to add a few additional lines. Paste the following underneath the line you commented out. Your sshd_config file should match the screenshot above. After the lines have been added save and close the file using “Ctrl+X”.

Subsystem sftp internal-sftp

Match Group sftpgroup
     ChrootDirectory %h
     X11Forwarding no
     AllowTCPForwarding no

Restart SSH

restart ssh

To apply our changes we will restart ssh. Use the following service command.

sudo service ssh restart

Configure the Firewall

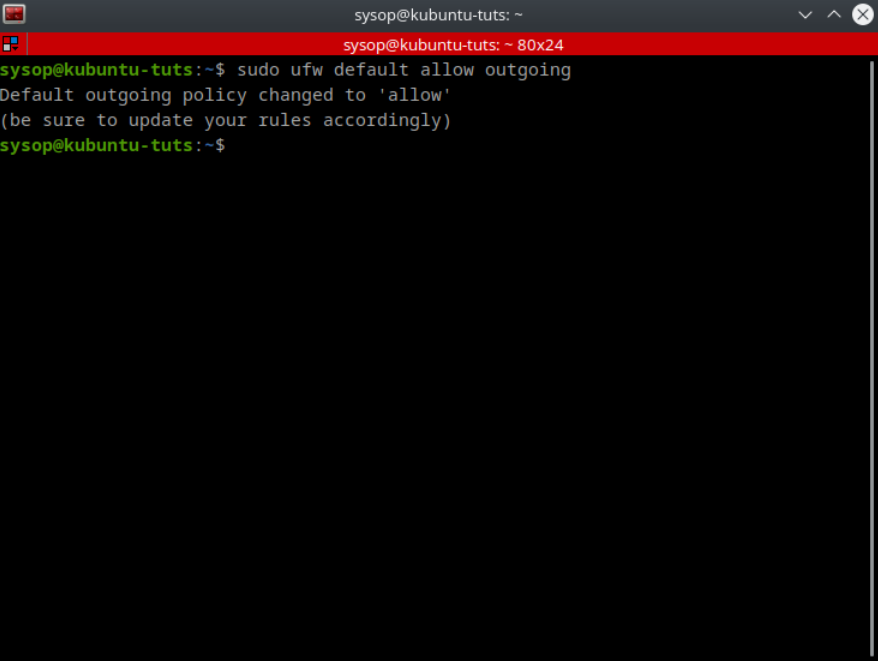
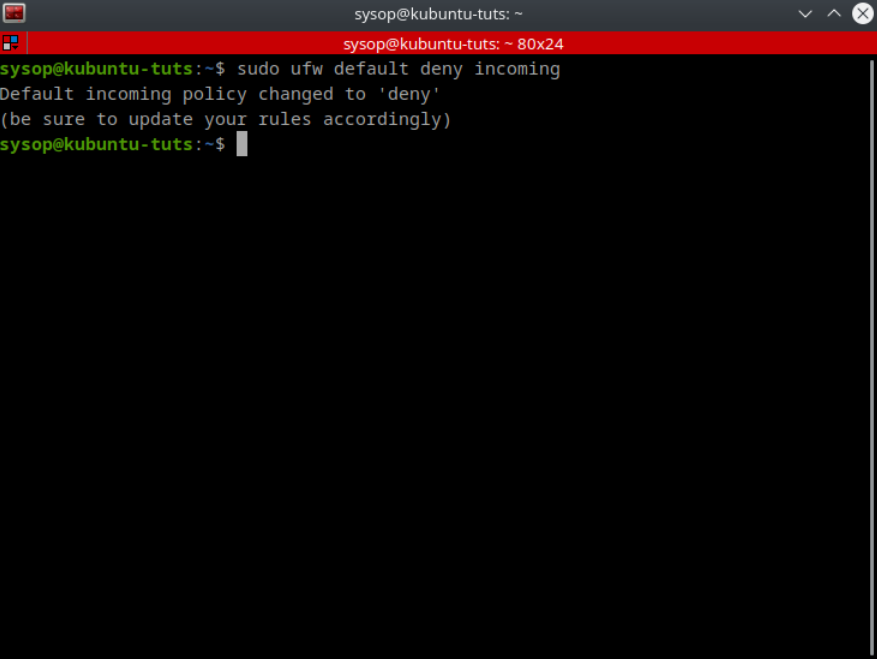
The next step is to configure the firewall using UFW to control access to our SFTP server. Start by denying all incoming traffic, and allowing all outgoing.

sudo ufw default deny incoming
sudo ufw default allow outgoing

Allow SSH (All IP’s)

allow ssh

You have two options when allowing SSH through the firewall. You can either allow any IP to access port 22 (not recommended). Or you can only allow specific IP(s) through the firewall. I recommend the section option as it offers higher security. If you want to allow any IP run the following command.

sudo ufw allow ssh

Allow SSH (Specific IP’s)

allow specfic ip

If you want to only allow specific IP’s to access the server run the following command for each IP you want to have access. You need to replace “IP-ADDRESS” with your own IP. This is highly recommended as it offers the highest level of security.

sudo ufw allow from IP-ADDRESS to any port ssh

Enable UFW

enable ufw

After you have allow the IP’s (or everyone) who you want to have access you will need to enable UFW. Run the following command.

sudo ufw enable

Check Firewall Status

check firerwall status

The last step is to check the firewall status and verify your configuration. Check it using the ufw status command. If you allowed access to only specific IP’s you will see them in the “From” column.

sudo ufw status

Connecting to the SFTP Server

Finally we can test our connection to the SFTP server. The first thing you will need is a FTP client. I recommend downloading FileZilla. This is the software we will use in this tutorial. You can install it using the following apt command.

sudo apt install filezilla

Edit Site List

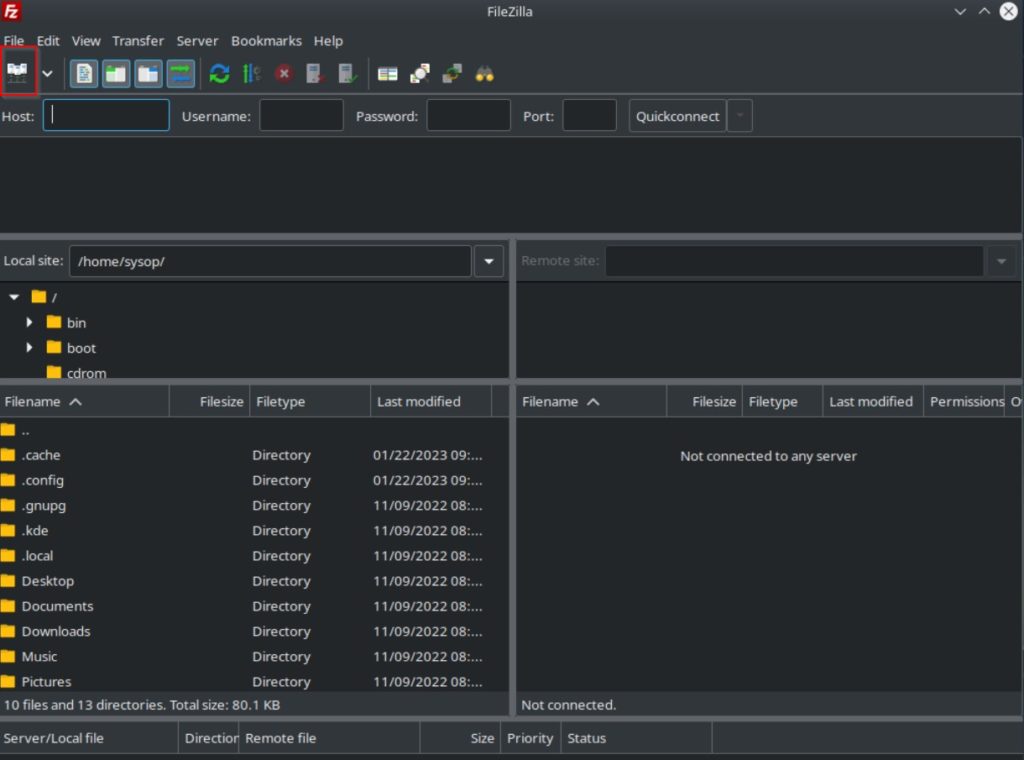
edit filezilla site list

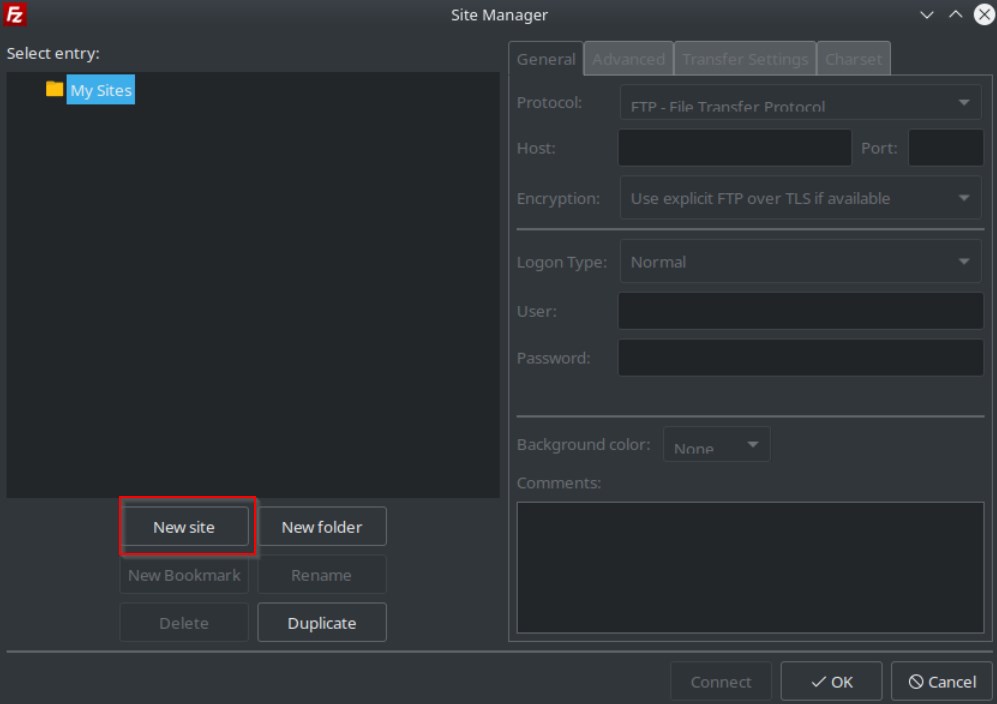
Open Filezilla and click on the site manager button in the upper left hand corner.

Add a New Site
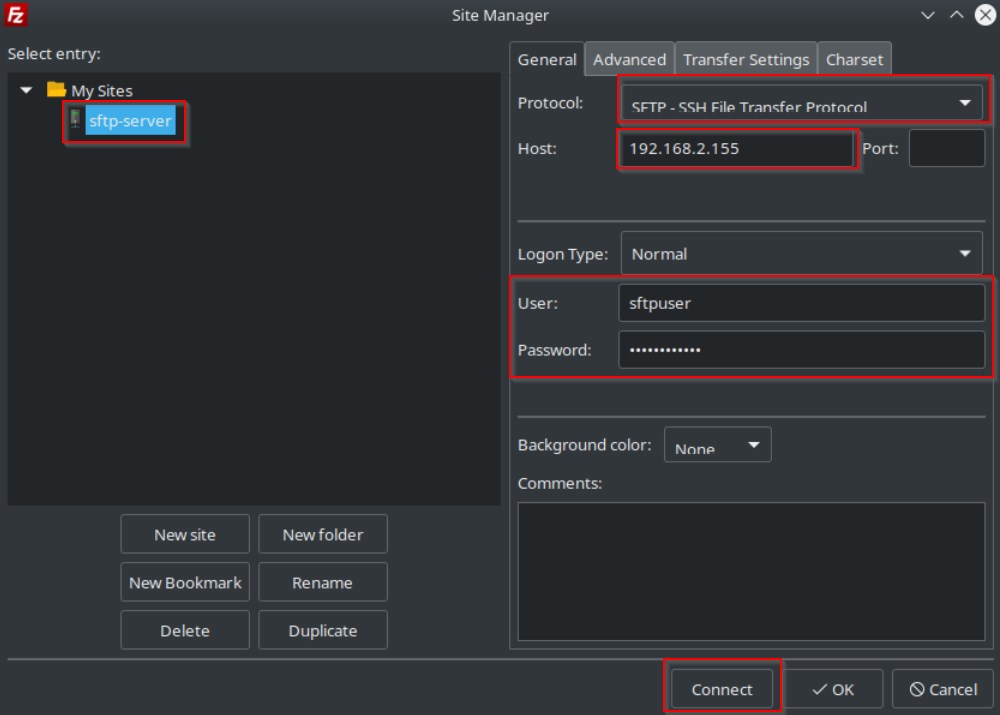
add filezilla site

Type Connection Information

add filezilla connection information

Confirm Host Key Prompt

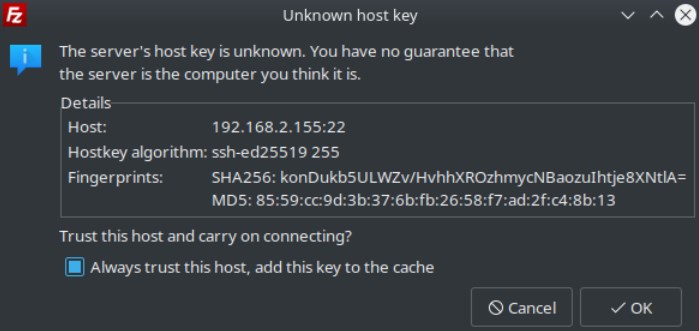
confirm filezilla hostkey

Verify Connection

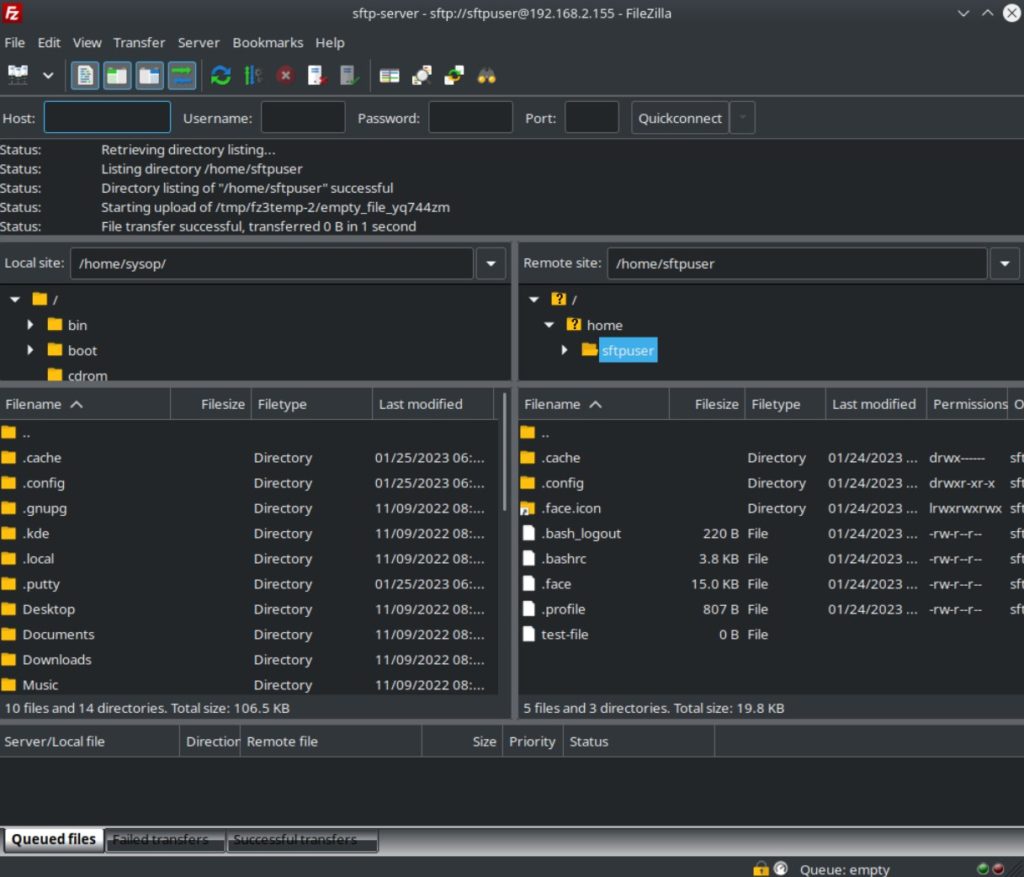
verify filezilla connection

Questions?

If you have any questions or comments feel free to leave them below.

Related Resources

View our 5 Reasons to Switch from Windows 10 to Linux.

Learn How to Install Ubuntu Server 22.04 [Step by Step].

Check out How to Setup OpenSSH with Keys on Ubuntu 22.04.

View our How to Mount an SMB (Samba) Share in Linux with cifs-utils tutorial.

Learn How to Use the Alias Command in Linux.

View all of our available online tools and converters at Formatswap.com.

How to Configure a Firewall in Linux using UFW

ufw linux firewall splash image

This tutorial will teach you how to install and configure UFW (Uncomplicated Firewall) in Linux. Firewalls are vital to keep your applications and systems secure. UFW provides a command line frontend interface for iptables using a few simple commands. It is designed to be easy to use and uncomplicated to configure. Using only Netfilter in iptables for firewalls can be a daunting task. UFW is a simple solution to using a firewall in Linux. In this tutorial we will be using Ubuntu 22.04 but any Ubuntu or Debian based Linux distribution will work.

Check if UFW is Installed

ufw status
sudo ufw status

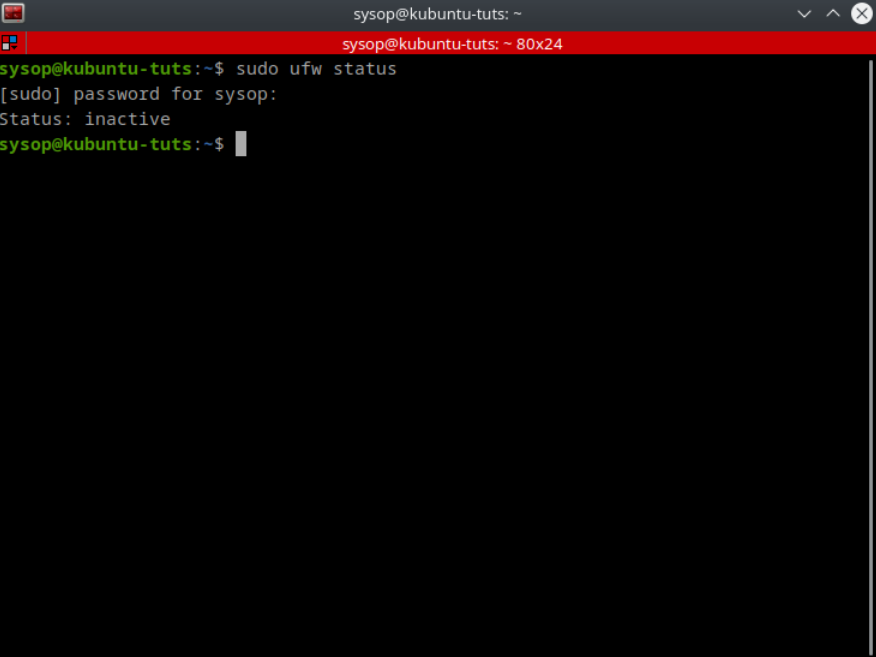
The first thing you need to do is check if UFW is already installed. It is installed by default on most Linux distributions. You can check if UFW is currently installed by opening a terminal shell and running the “ufw status” command. If UFW is already installed you will see a similar output to what is above. It will say “Status: inactive”. If you get an error you will have to install UFW.

Install UFW

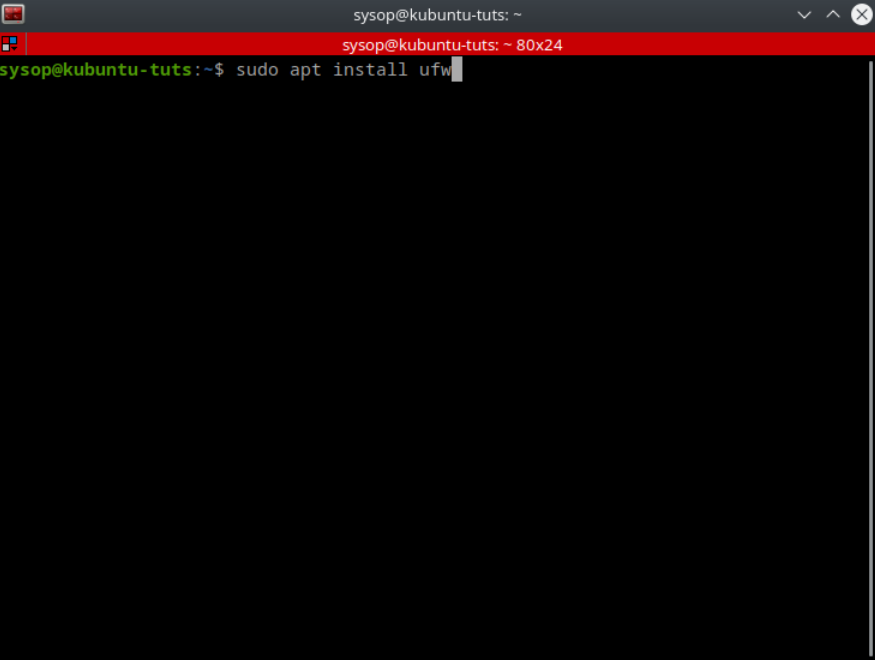
install ufw
sudo apt install ufw

To install UFW run the command “sudo apt install ufw”. Then click yes on the confirmation dialog.

Deny Outgoing and Incoming Connections

ufw allow outgoing
sudo ufw default allow outgoing

The first thing you want to do when configuring the firewall is to deny all incoming and outgoing connections. To deny outgoing connections run the command “sudo ufw default deny outgoing”.

ufw allow deny incoming
sudo ufw default deny incoming

Then repeat the same step using “sudo ufw default deny incoming” to deny the incoming connections.

Configure Firewall Rules

Allow a Program

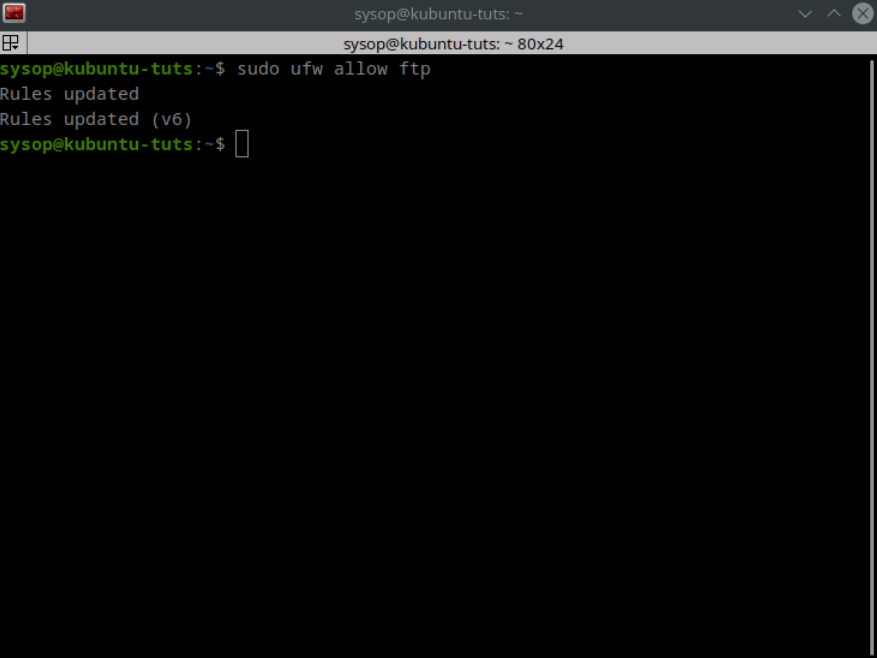
allow ftp ufw
sudo ufw allow ftp

You can allow individual programs through the firewall using their names. Above I allow ftp using the command “sudo ufw allow ftp”.

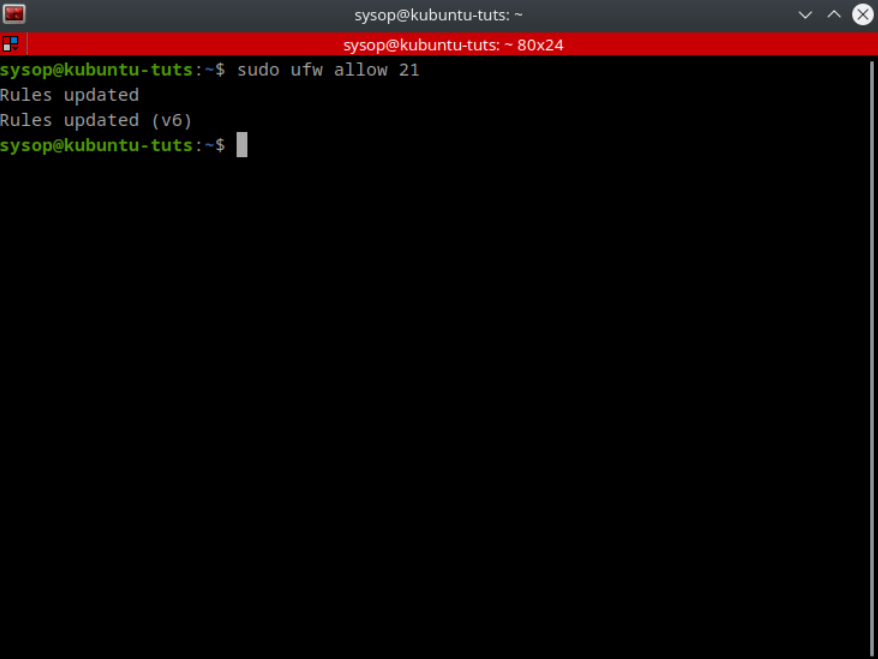
Allow a Specific Port

allow port 21 ufw
sudo ufw allow 21

To allow a specific port use the command “sudo ufw allow 21”. In the above example I am allowing the FTP port 21.

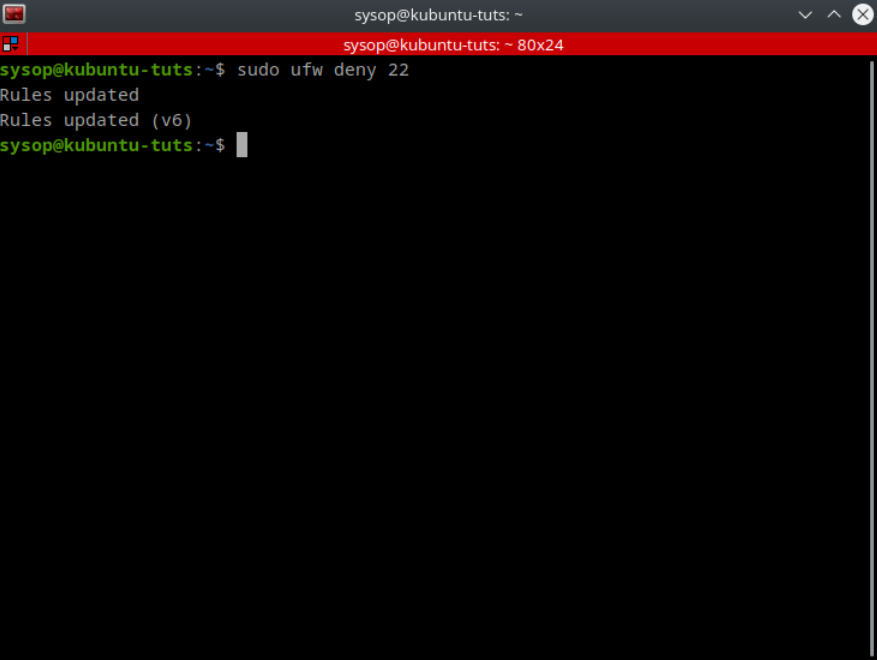
Deny a Specific Port

deny port 22 ufw
sudo ufw deny 22

You can also allow specific programs and ports. In the above example I deny port 22 using “sudo ufw deny 22”.

Allow a TCP Port

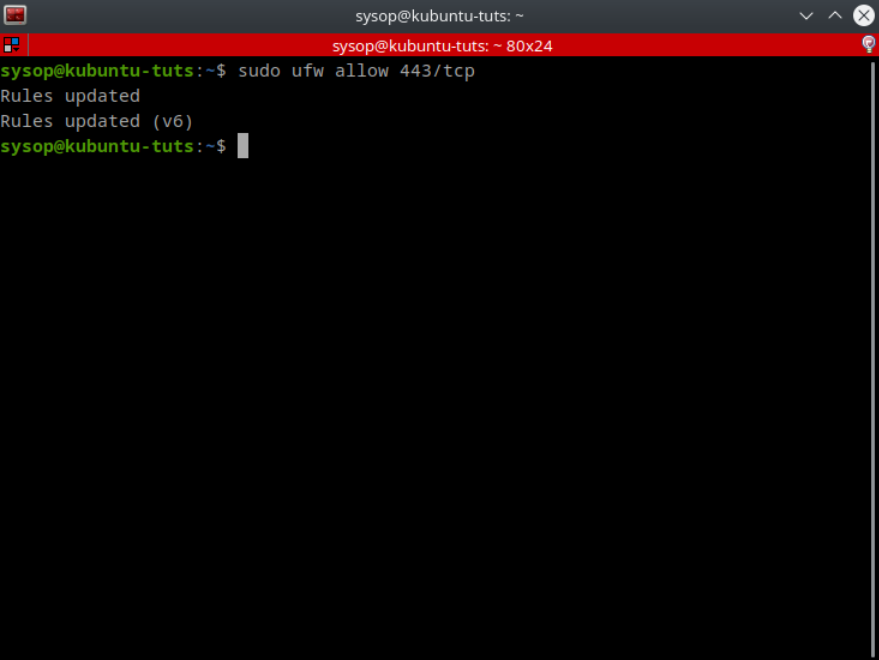
allow tcp port 443 ufw
sudo ufw allow 443/tcp

You can also allow or deny specific ports to be tcp or udp only. In the above example I allow only tcp traffic on port 443.

Allow a UDP Port

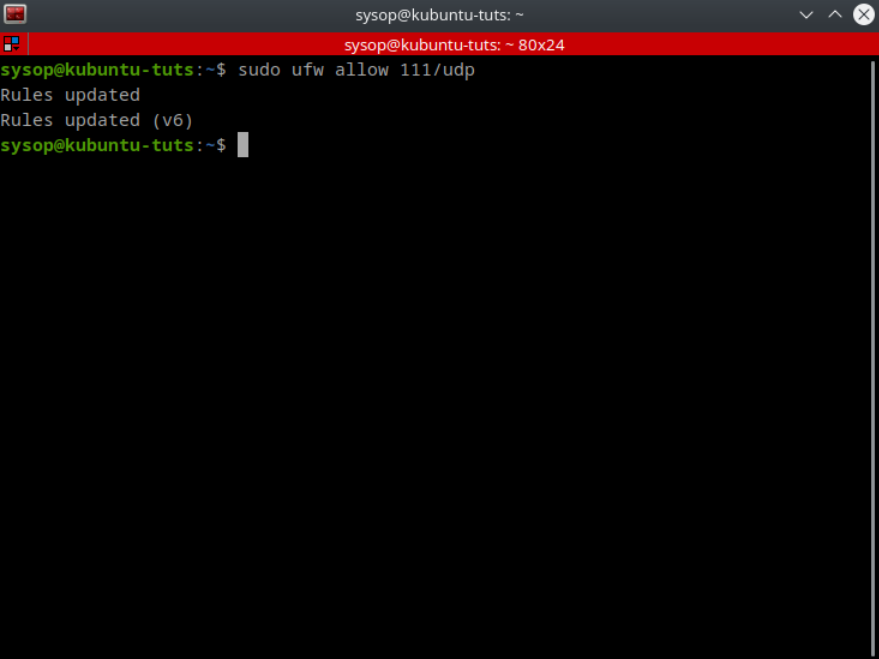
allow udp port 111 ufw
sudo ufw allow 111/udp

You can also allow any deny udp ports as shown above. By default it will allow or deny on both tcp and udp unless you specify one of the two.

Allow and Deny Access to IP Addresses

Sometimes you may want to only allow certain IP addresses access to your system. In this case you can setup a rule to control access on a per IP basis.

Allow an IP

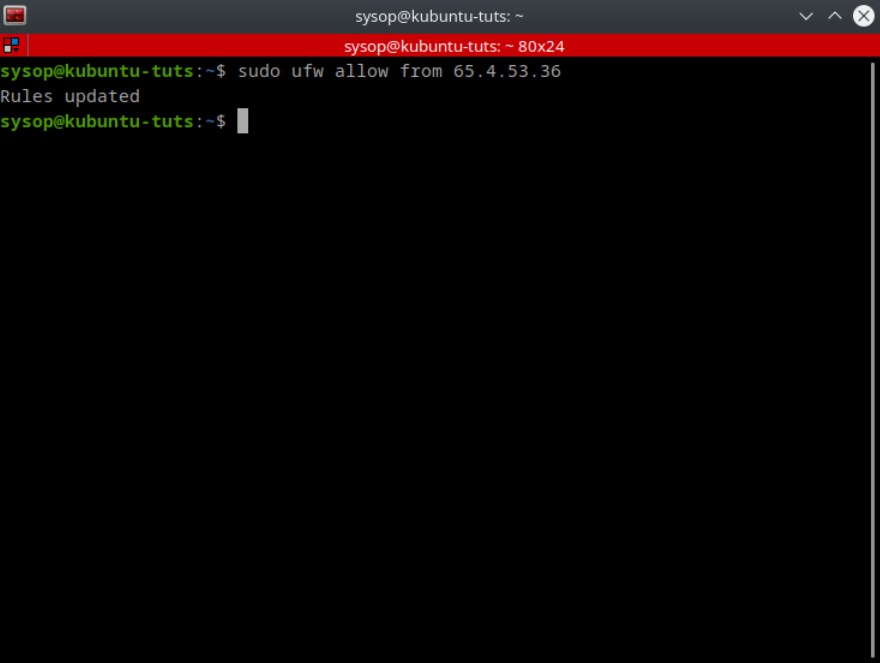
allow an ip address

Using the above rule you are able to allow only specific IP addresses to access your system. This is the securest way to setup a FTP or SSH server that needs remote access.

Deny an IP

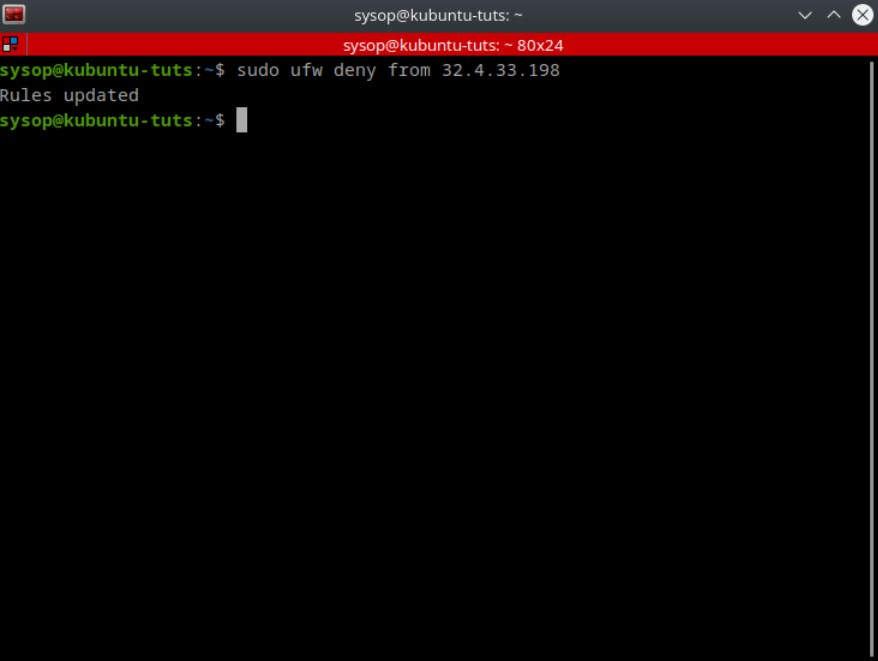
deny an ip address

This rule is useful in situations where you are allowing all IP addresses through the firewall, but just want to block certain ones.

Enable or Disable UFW Firewall Rules

Enable UFW

enable ufw
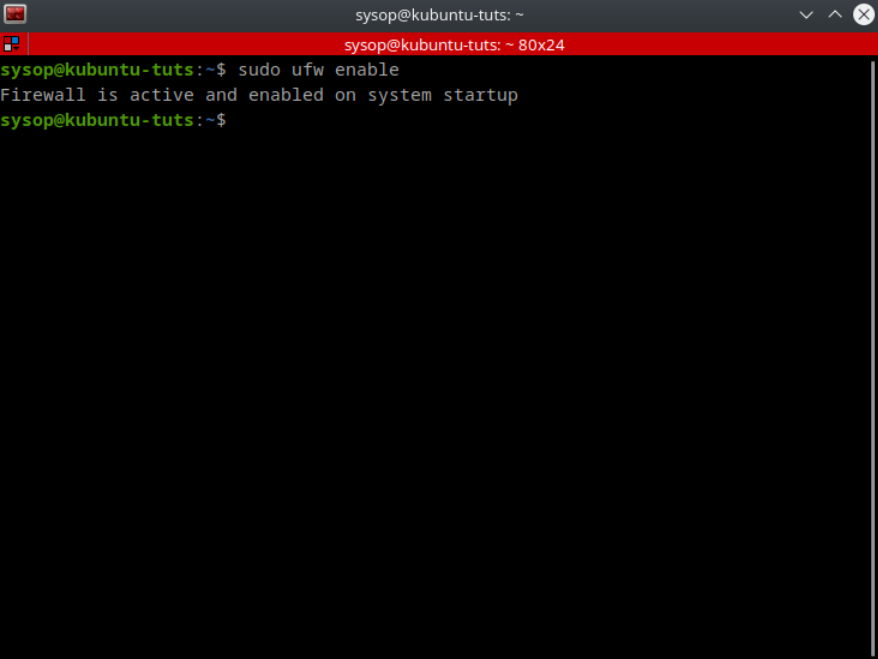
sudo ufw enable

Now you will need to enable the firewall to apply the rule set you created. To enable the UFW firewall type “sudo ufw enable”.

Disable UFW

disable ufw
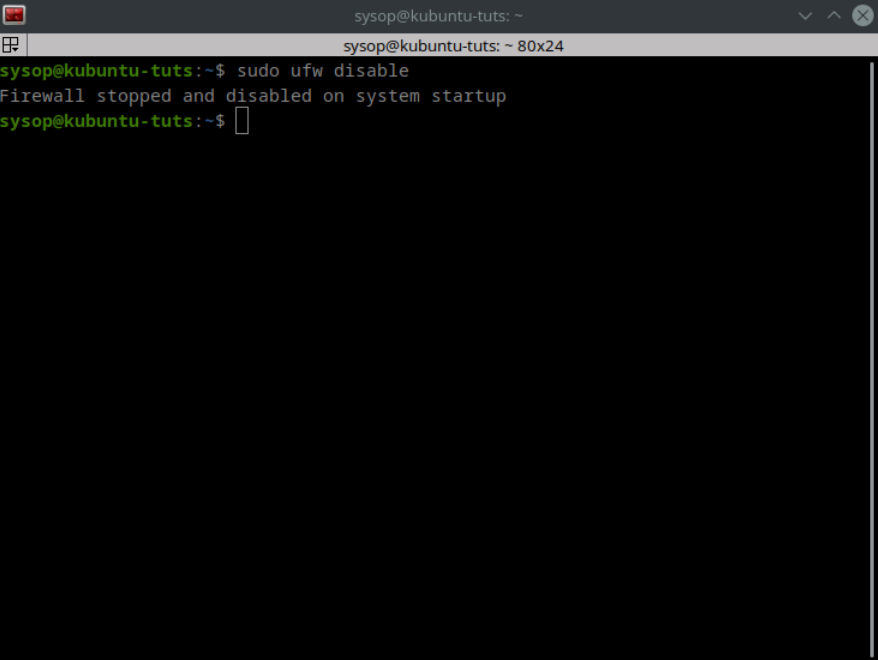
sudo ufw disable

If you need to disable the firewall you can run the command “sudo ufw disable”. This will keep the firewall disabled until you enable it again.

View the Firewalls Status

ufw view status
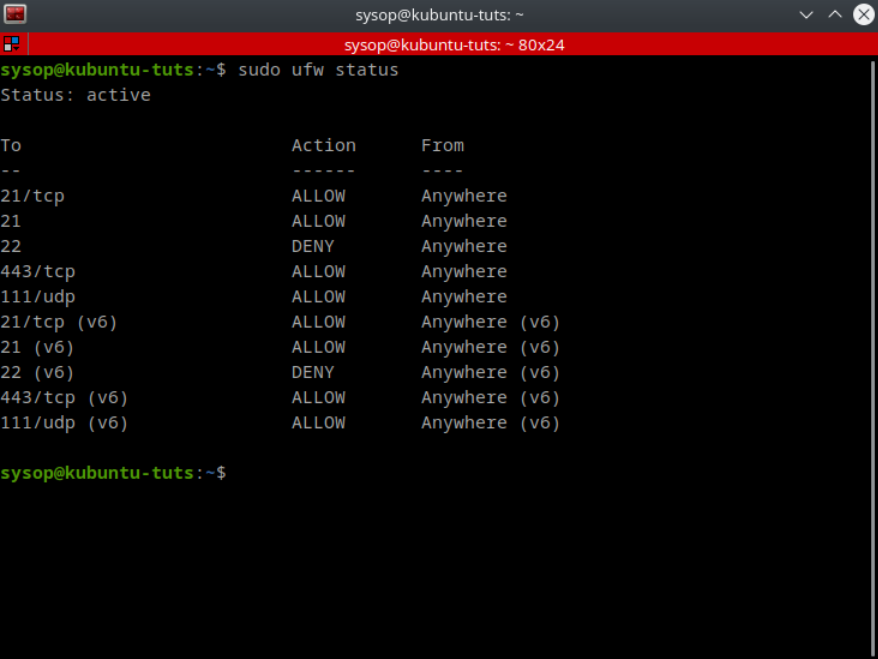
sudo ufw status

To view the status of the firewall type “sudo ufw status”. This will show you all of the ports and or programs that you are allowing or denying through the firewall. It will also show you whether UFW is active or inactive.

Advanced UFW Rules

ufw edit rules files
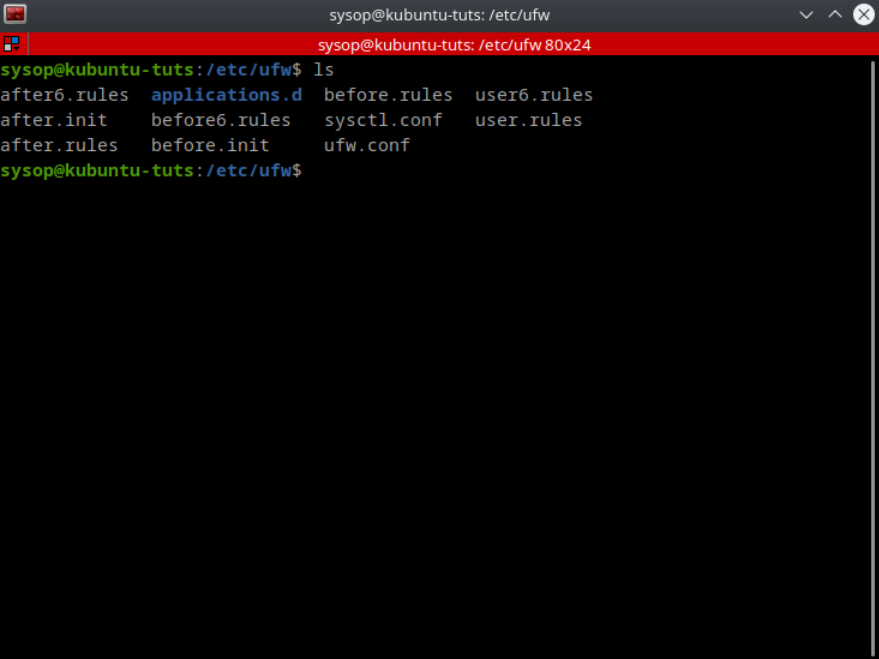
cd /etc/ufw/

Most rules can be applied using the command line but sometimes you want more control over the rules. In this case you can directly edit the rules using the “before.rules” and “after.rules” files located in the “/etc/ufw/” directory. The before rules are applied before UFW is launched while the after rules apply after UFW is running.

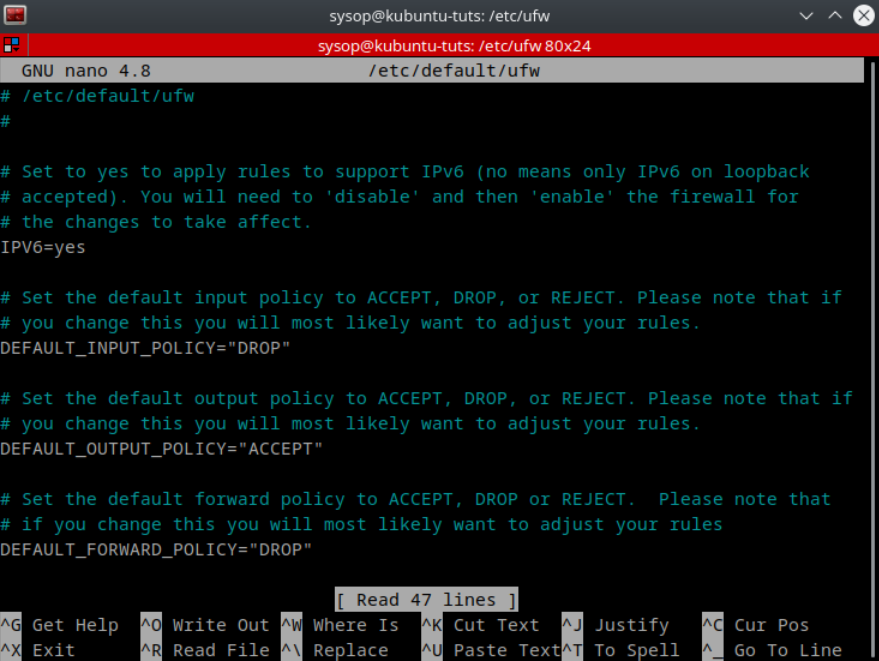
ufw edit config file
nano /etc/default/ufw

You can also edit the UFW configuration file located at “/etc/default/ufw” for more advanced configurations.

Enable Logging

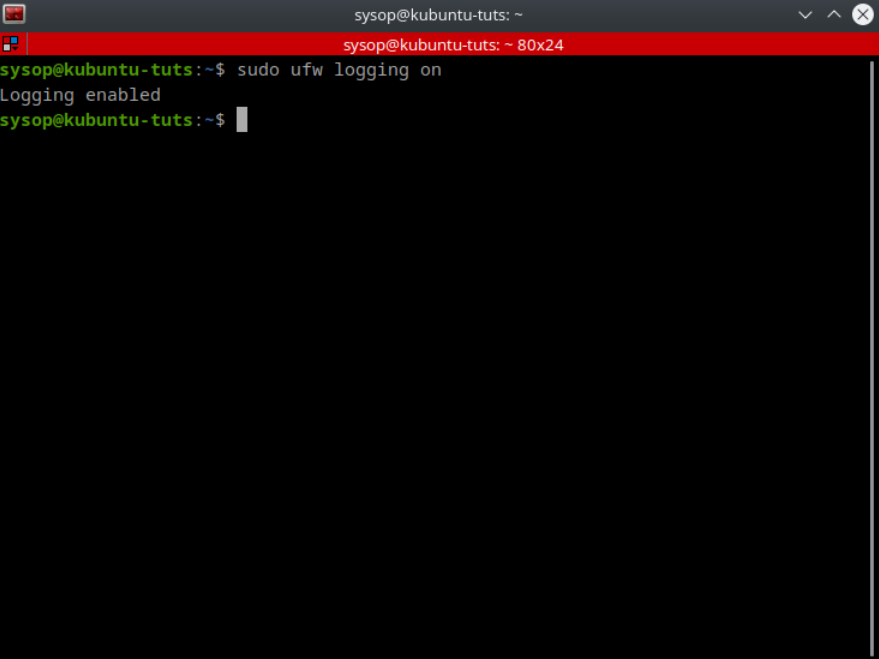
ufw enable logging
sudo ufw logging on

You can enable logging in UFW by running the command “sudo ufw logging on”. This will enable the logs in the lowest mode by default. If you want to specify the log level use the command “sudo ufw logging low|medium|high“.

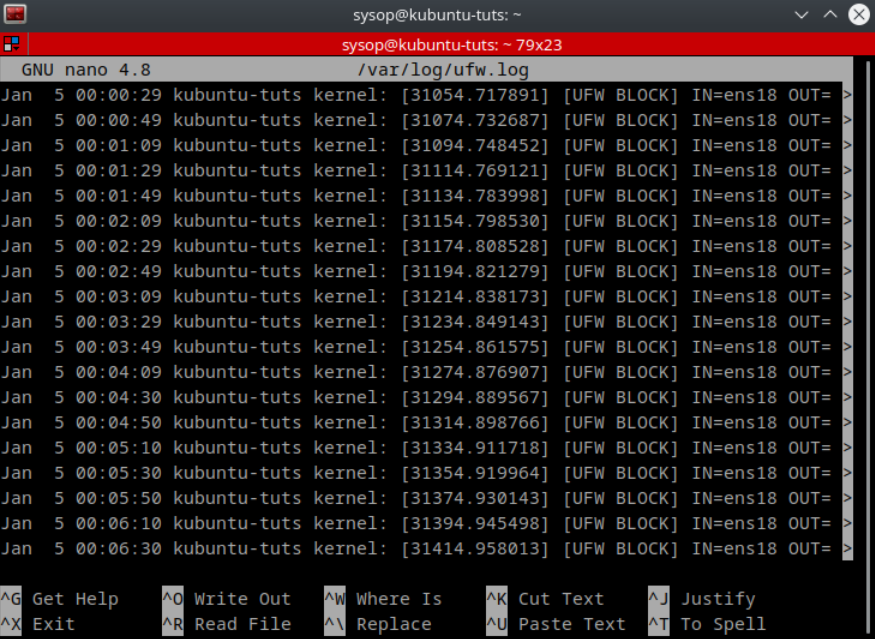
view of ufw log
nano /var/log/ufw.log

The UFW log file will be located at “/var/log/ufw.log” by default. I have set my logging level to low. Above is an example of what your log file may look like.

Additional Questions?

If you have any additional questions or thoughts feel free to comment them below.

Related Resources

View our How to install Kali Linux 2022.3 [step by step] tutorial.

Learn How to Use the Alias Command in Linux.

Check out our How to Add a Network Location in Windows 10 tutorial.

View our How to Setup a FTP Server with FileZilla in Windows tutorial.

Learn more cool things in Windows with our Windows Tutorials.

View all of our available online utilities and converters at Formatswap.com.

How to Setup OpenSSH with Keys on Ubuntu 22.04

ssh key splash

In this tutorial you will learn how to setup a SSH server to use a public key pair on Ubuntu. SSH is a secure protocol used for remotely administrating servers. We will be using OpenSSH to setup the server. SSH servers are great as they allow you to easily remote into any machine and execute commands. With public key authentication you get robust security. It is generally recommended that all users running an SSH server should enable key based authentication. You also don’t have to remember passwords when using key based authentication. For this tutorial we will be using Ubuntu 22.04 server, but you should be able to use any Linux operating system.

Generate Key Pair

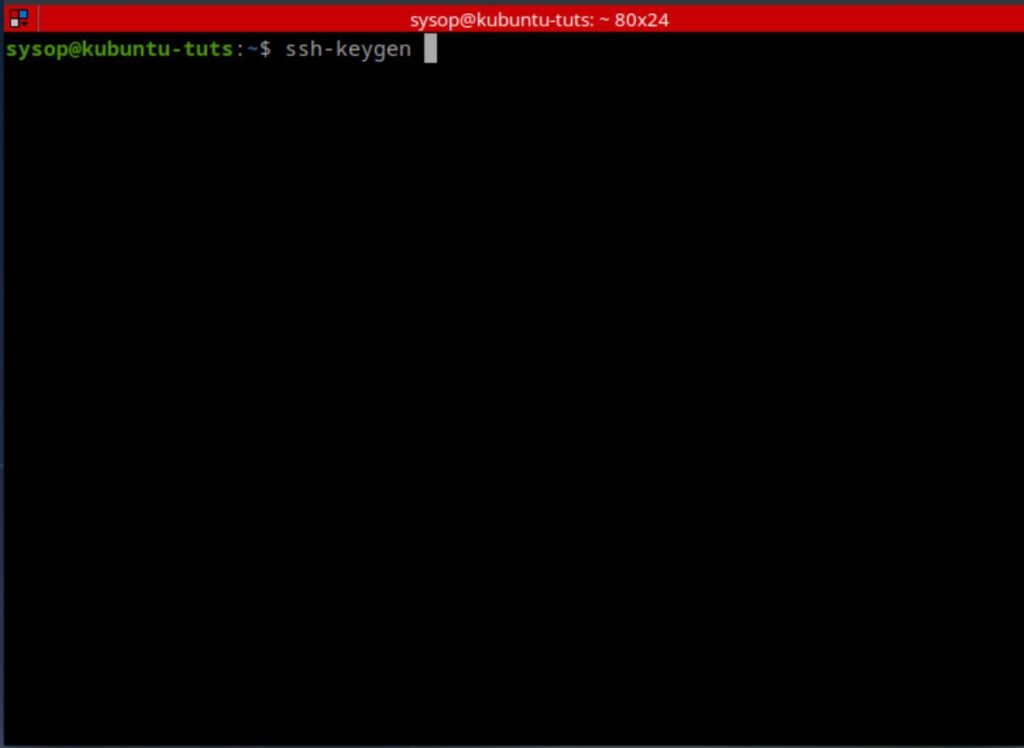
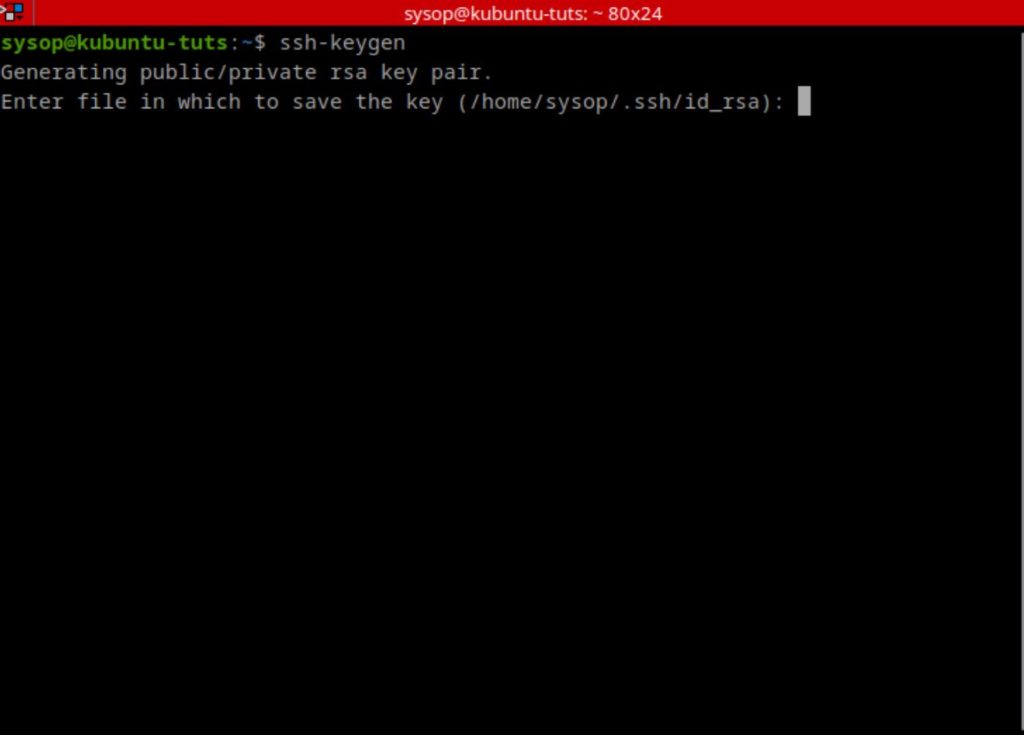
generate key pair

The first step is to generate a key pair on your client machine. Type “ssh-keygen” and press “Enter”. If you get an error you may have to install the Openssh server as shown below.

sudo apt install openssh-server

Select Key Save Location

select key save file location

Next you will be asked to choose a save location for the key. Press “Enter” to use the default, or type a path and filename for the key.

Set a Key Password (optional)

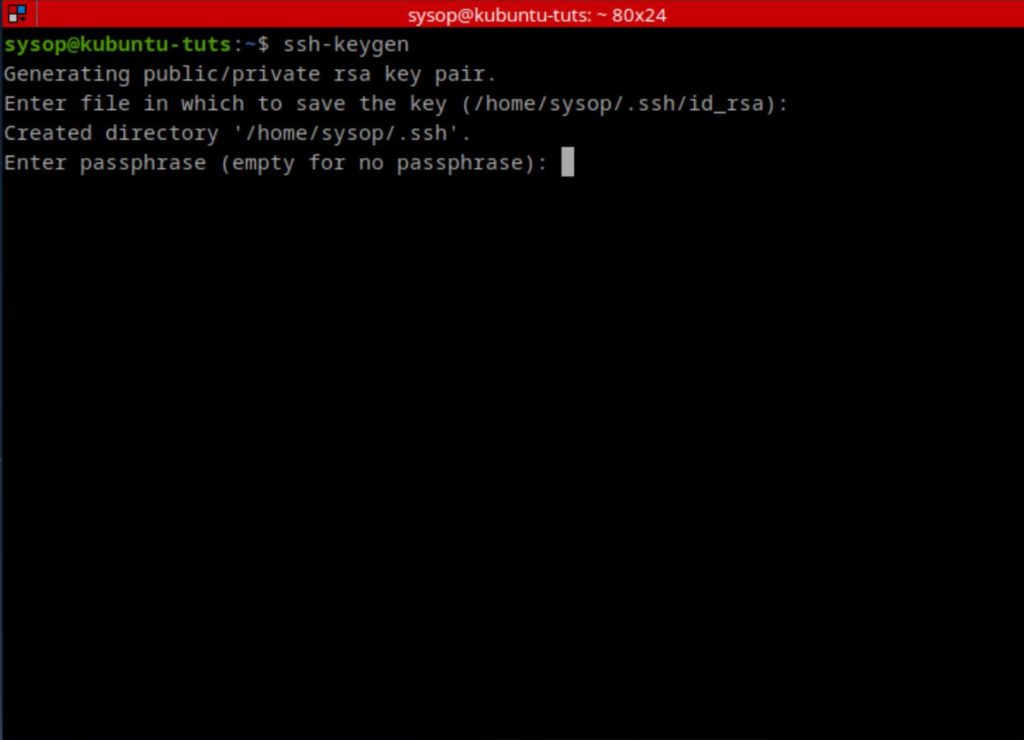
select password

You will then be asked if you want to set a key on the password. This improves security but will require you to enter the password every time you connect to the SSH server. Either type a password or press the “Enter” key twice to not use a password.

Key Generated Successfully

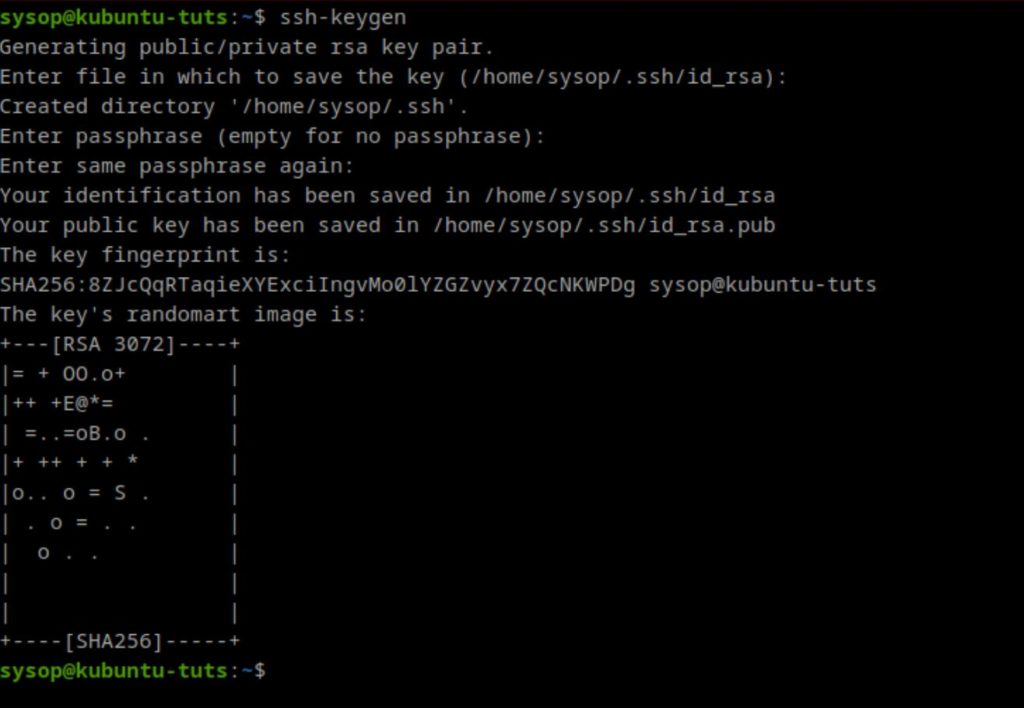
key generated

Now you will see a message telling you that the key pair has been generated successfully. It will also list the fingerprint and the save location for the key.

Copying Public Key

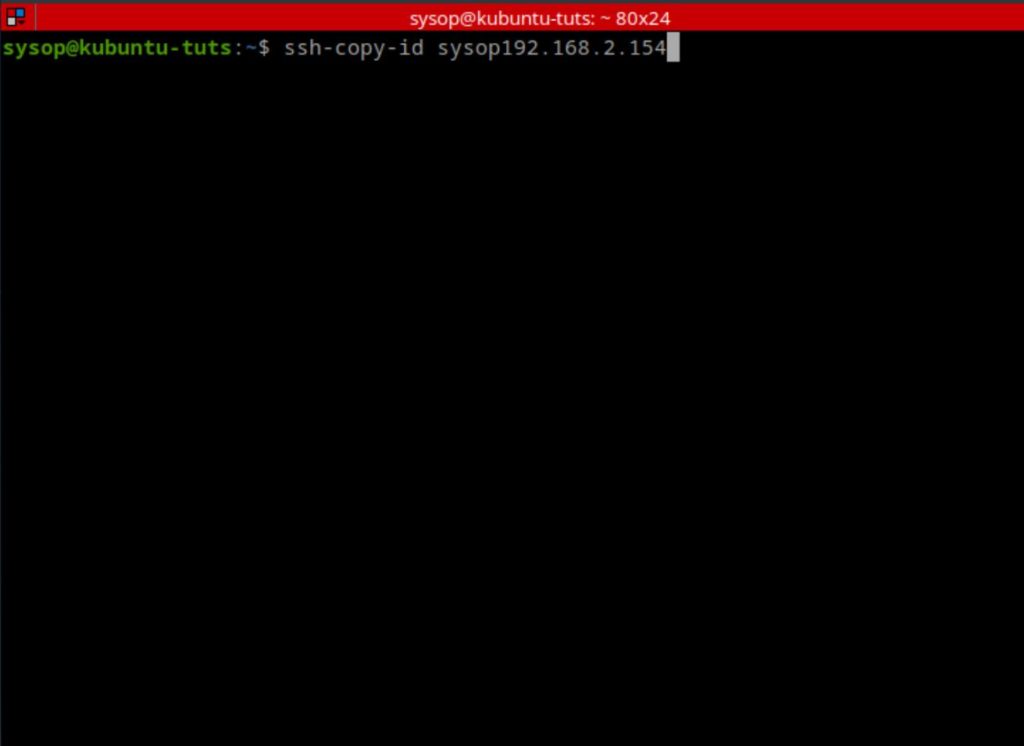
copy the public key

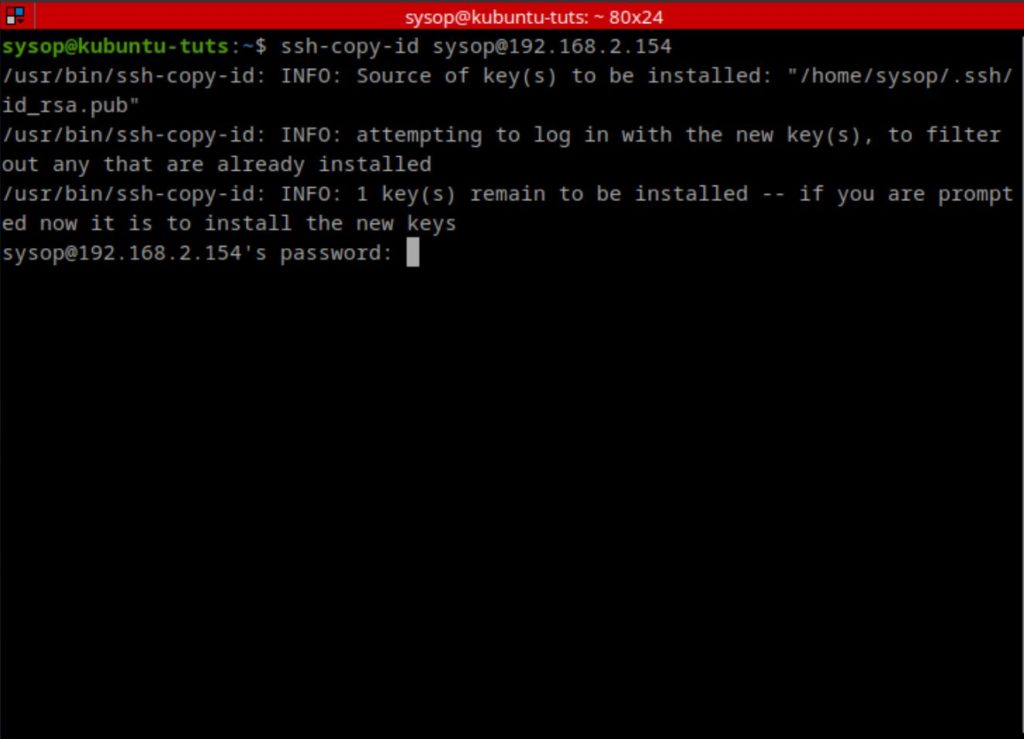
Next we will copy the newly created key to your SSH server. Type in the following command to copy the key.

ssh-copy-id username@ssh-server-ipaddress

Enter the SSH Users Password

optionally select password for key

The server will then ask you to type in the password for the SSH user. Additionally if you set up a password on the key pair, you will also be prompted to type that.

Keys Successfully Added

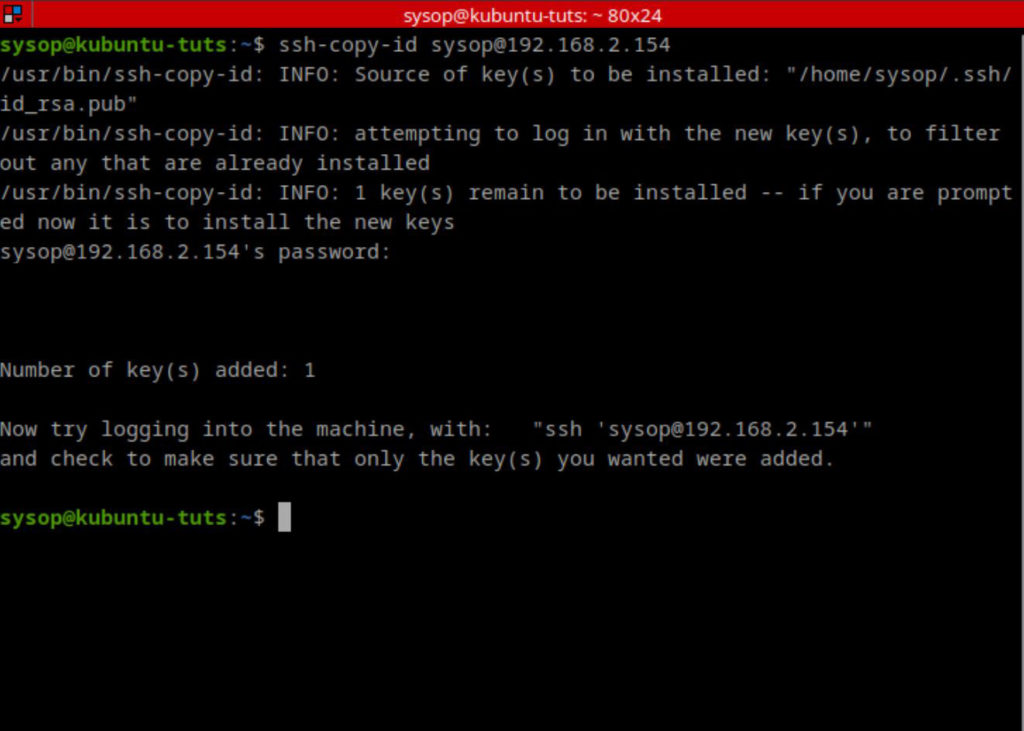
keys added message

After typing your credentials you will be shown a screen telling you that the key has been successfully added.

SSH into the Server

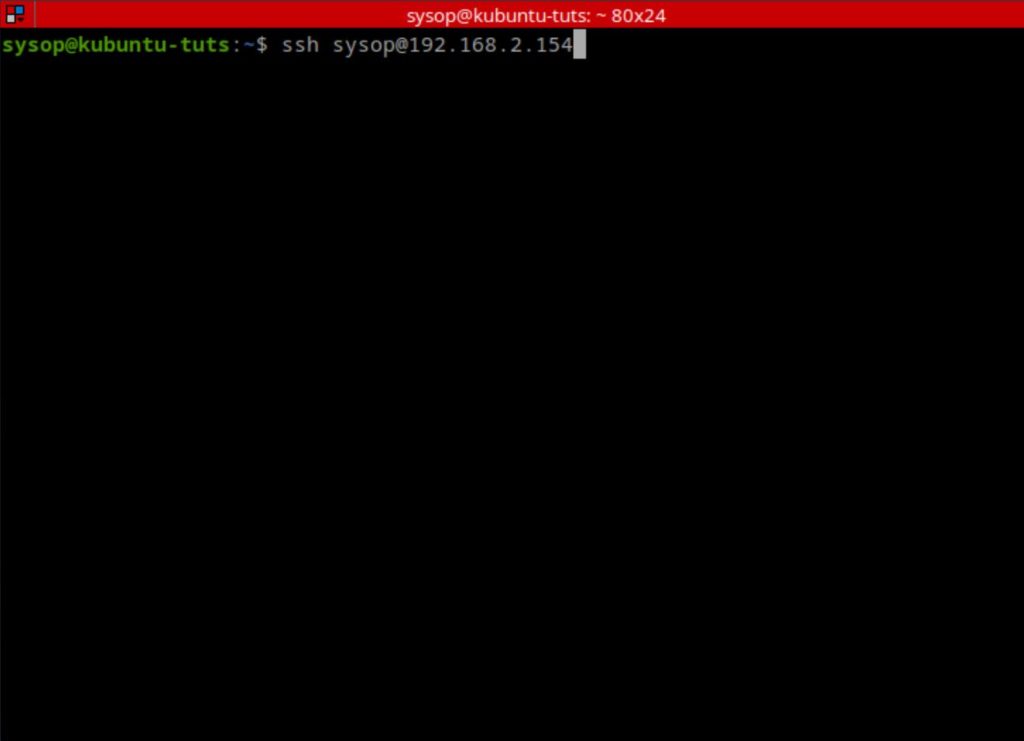
ssh into the server

Now that the key has been added to the SSH server we need to connect back to the server. Connect to it using the SSH command as shown above.

Edit the OpenSSH Config File

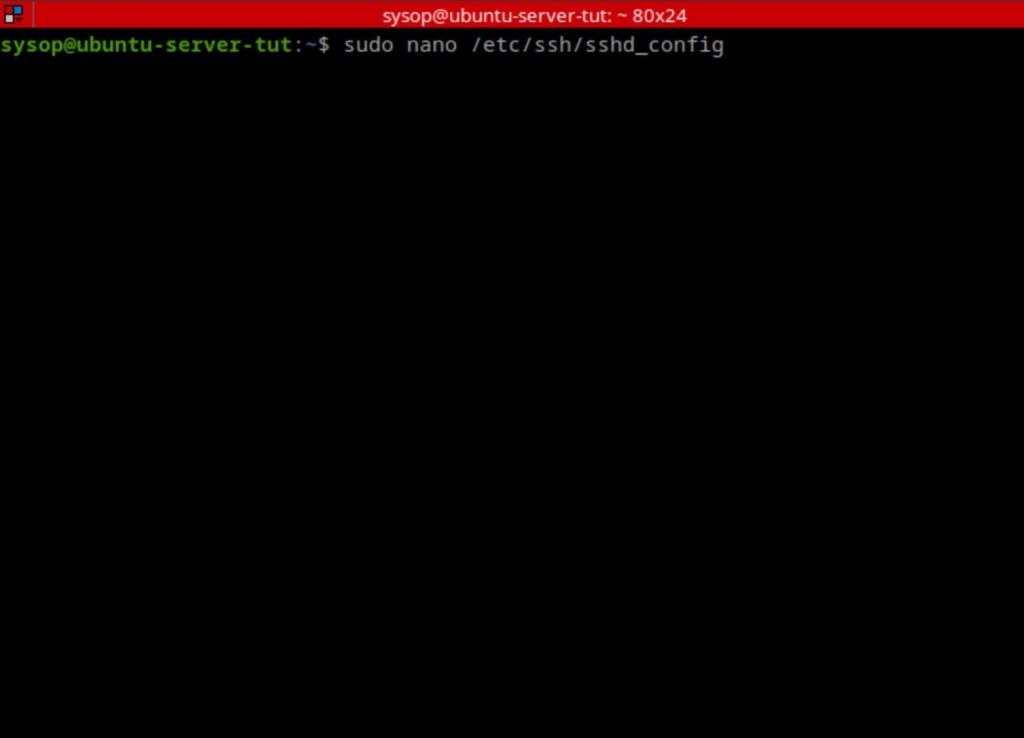
edit the openssh config

Once you are connected to the server you will need to edit a file. Open the sshd_config file using the nano text editor.

sudo nano /etc/ssh/sshd_config

Disable Password Authentication

disable password authentication

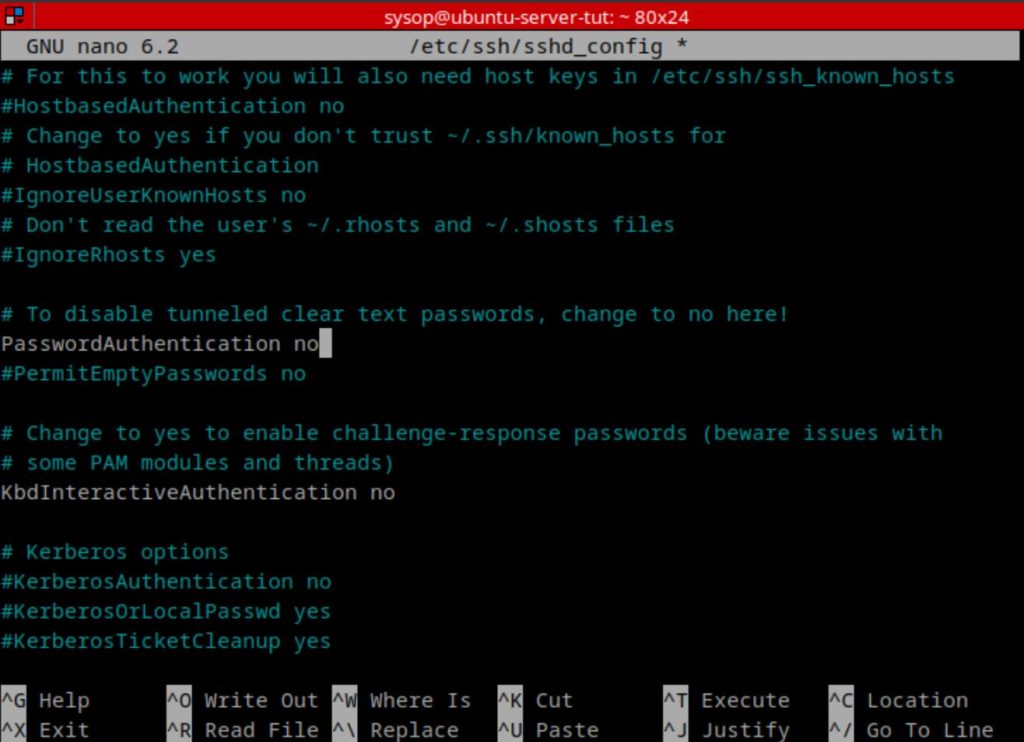
Now that the file is open, use “Ctrl+W” to search for the line “PasswordAuthentication”. Once you locate the line change it from “PasswordAuthentication yes” to “PasswordAuthentication no”. This will cause the SSH server to only log you in using your key.

Save OpenSSH Config File

save openssh config

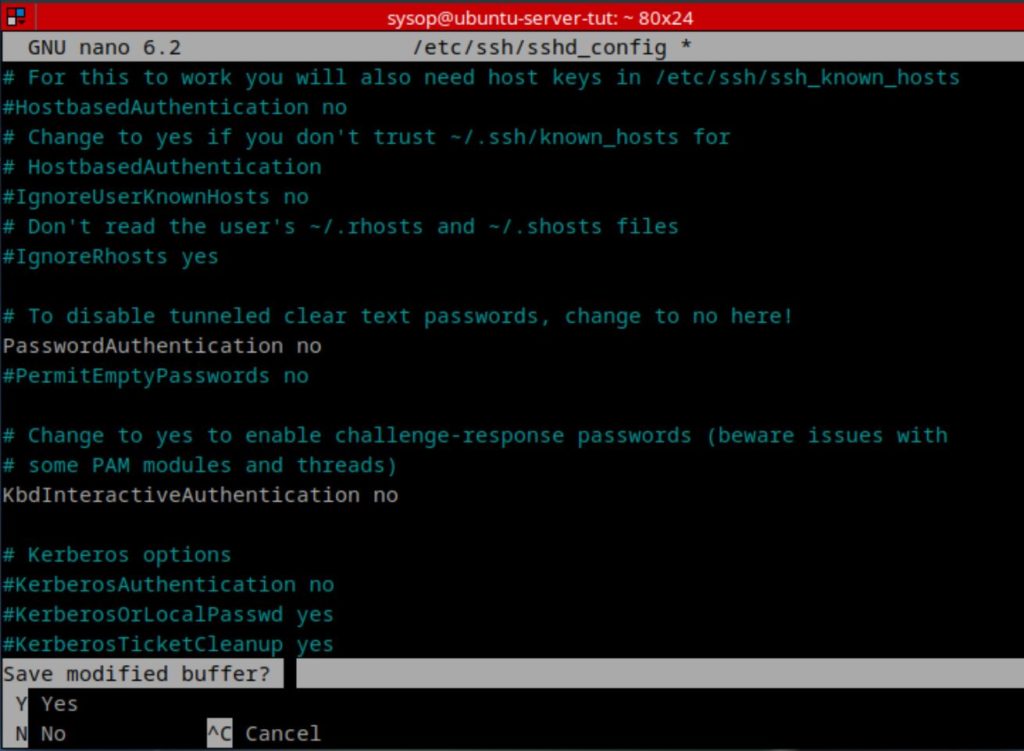
Next simply press “Ctrl+x” then the “Y” key to save the config file.

Restart OpenSSH Server

restart openssh server

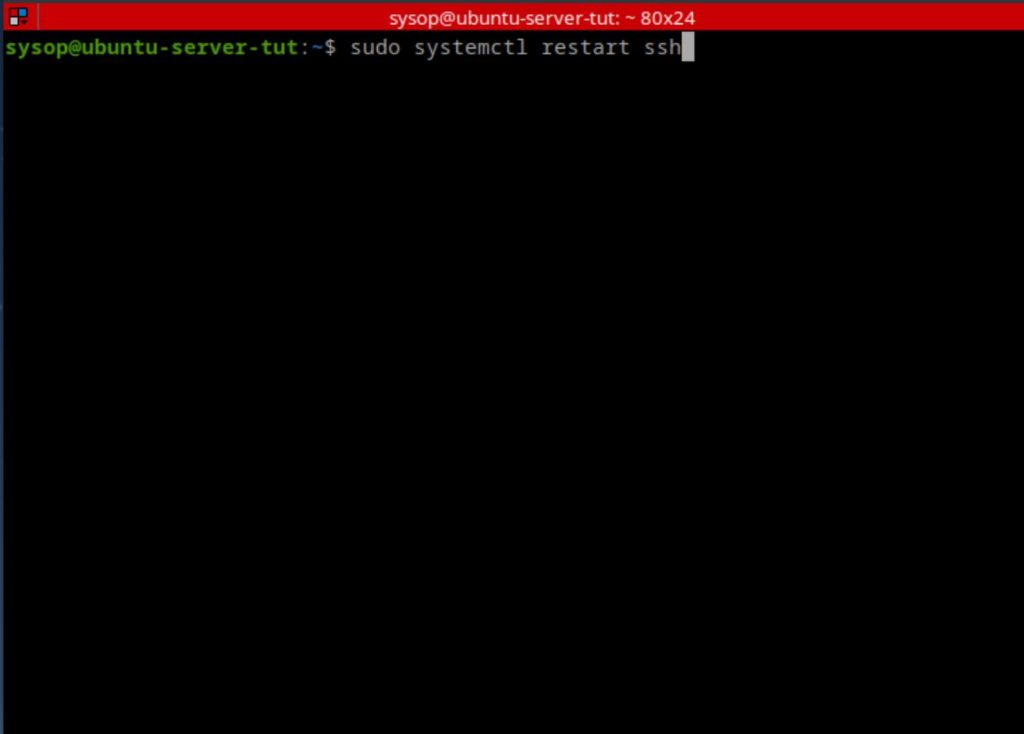
Finally we will need to restart the ssh service on the server. Run the following command to complete this action.

sudo systemctl restart ssh

After the SSH service restarts, you will need to disconnect from the SSH server.

Test the SSH Connection

test ssh connection

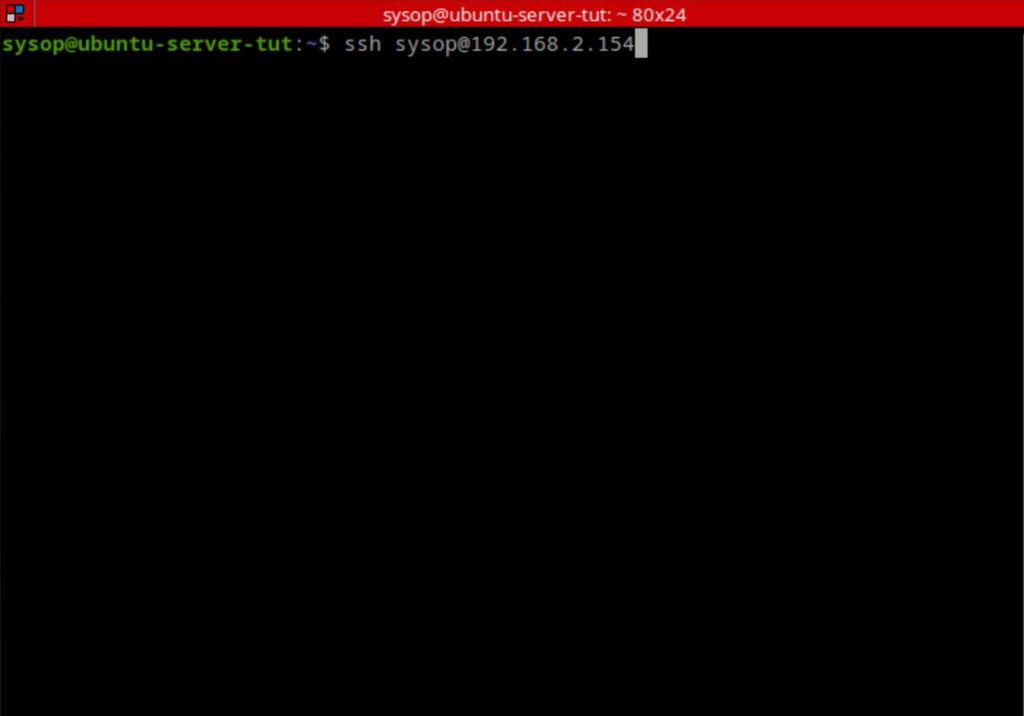
Now we will test that we are able to login to the SSH server using our key pair. Simply try to reconnect to the SSH server. You will be automatically logged in if you don’t have a password on the key pair. Else you will need to enter the password you created for the key.

OpenSSH with a Key Pair is Enabled

successful key ssh

If you are able to connect to the SSH server then you have successfully setup a key for OpenSSH. Remember to keep the key pair in a secure location. Anyone with access to it would be able to login to your server.

SFTP Server (optional)

You can also enable secure file transfer with SFTP using OpenSSH. If you would like to activate the server view our How to Setup an SFTP Server on Ubuntu 22.04 using OpenSSH tutorial.

Additional Questions?

If you have any additional questions or thoughts feel free to comment them below.

Related Resources

View our list of The Top 10 Programming Languages to Learn in 2022.

Learn How to Install Ubuntu Server 22.04 [Step by Step].

Click here to learn How to Install MySQL on Ubuntu Server 22.04 LTS.

View all of our Linux Articles and Tutorials.

Learn How to install and configure Nginx – Ubuntu 20.04.

View all of our available online tools and converters at Formatswap.com.
How to install Kali Linux 2022.3 [step by step]

install kali splash image

In this tutorial you will learn how to install the Debian based Kali Linux operating system. Kali is designed for digital forensics as well as penetration testing. Kali is very useful to have installed if you are currently in or entering into the cyber security field. One of the main benefits of Kali Linux are its approximately 600 penetration testing tools preinstalled.

Download Latest Kali Version

The first step is to download the latest version of Kali Linux from the official website.

Download Kali Linux 2022.3

Boot USB or Select ISO

kali install screen

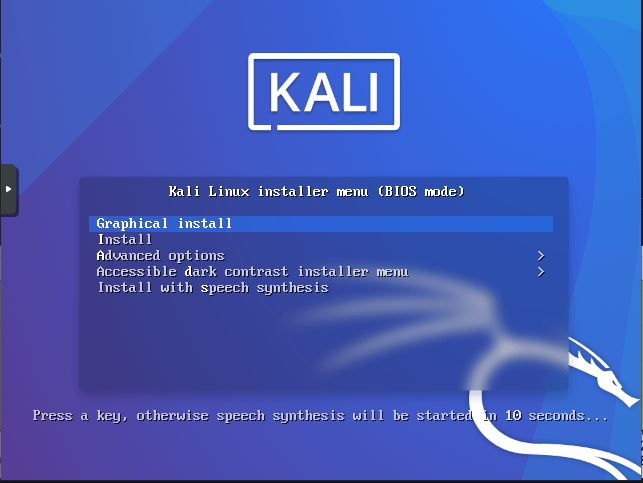
Next you will need to make a bootable USB drive using the Kali ISO file. You can read this tutorial on creating a bootable Linux USB drive using Rufus to learn more. After you create the bootable Kali USB drive, insert it into your computer and select the USB at boot. If you are using a virtual machine, simply select the Kali ISO as your boot device. Once you are booted into the installer, select “Graphical Install”.

Select System Language

kali select language

Now you will select the language you would like to use.

Select Location

select location

Next select your location.

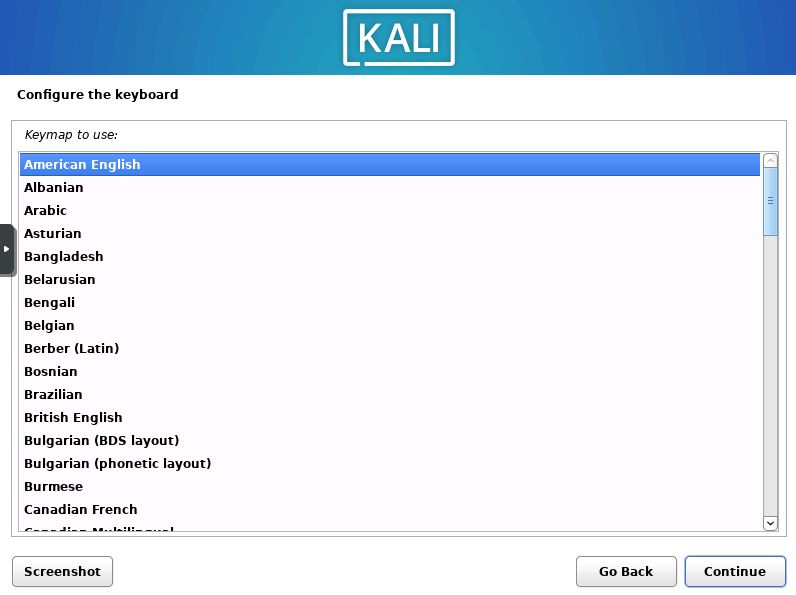
Select Keyboard Layout

select keyboard layout

Afterwards you will need to select a keyboard layout.

Choose Hostname

choose a hostname

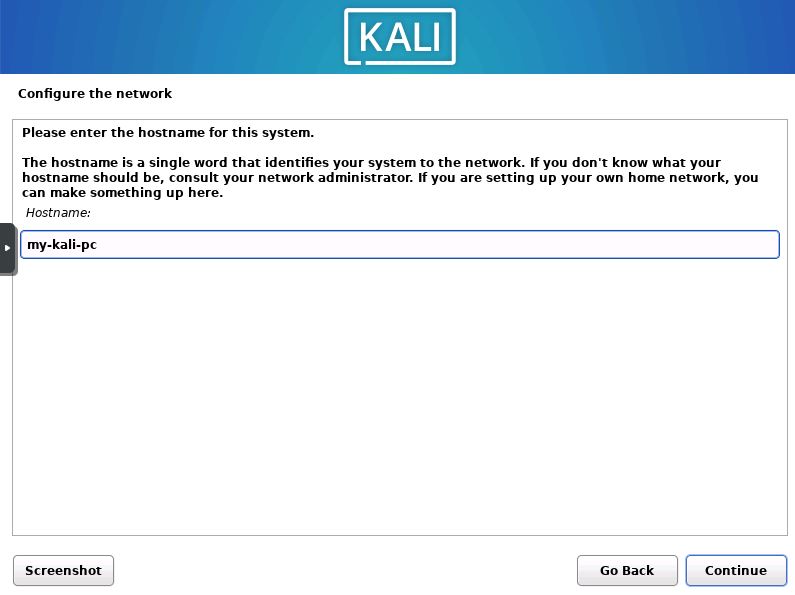
Now you will choose a hostname for the installation. You can enter any name you would like into the box.

Enter Domain Name (optional)

enter a domain name

The next step is to select a domain name. This step is optional, and usually unused. So I will be skipping it.

Set Account Name

set up accouont

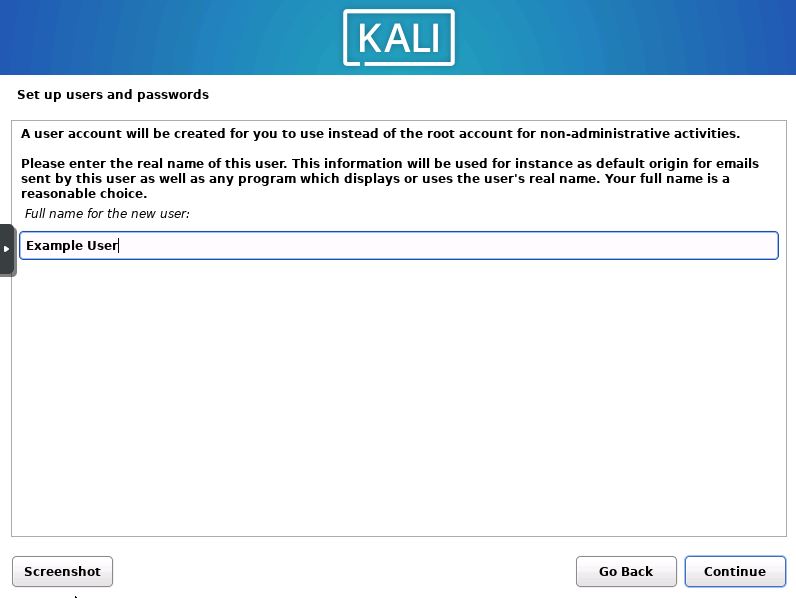
Now you will enter the full name for the new user, afterwards press the “Continue” button.

Enter a Username

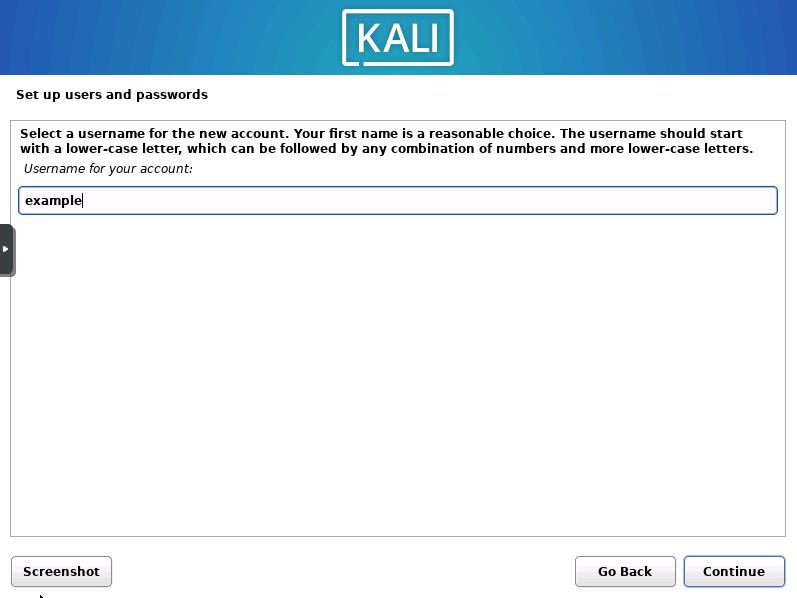
choose a username

Next you will need to set the username for the account. Enter it into the box and then press “Continue”.

Choose a Password

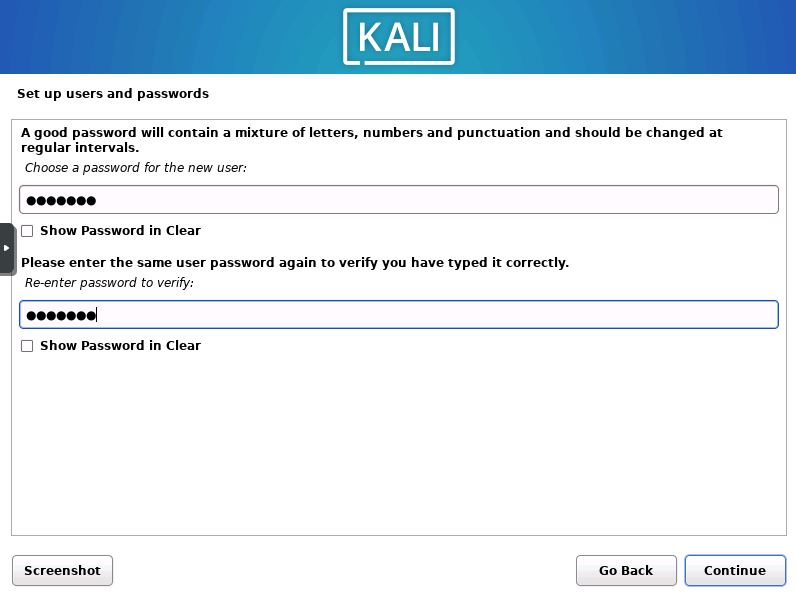
choose a password

After setting the username you will need to create a password for the new user. Enter the password and confirmation password.

Select the Timezone

select a timezone

Now you will set the system timezone. This will set the clocks to the correct time.

Set Partitioning Method

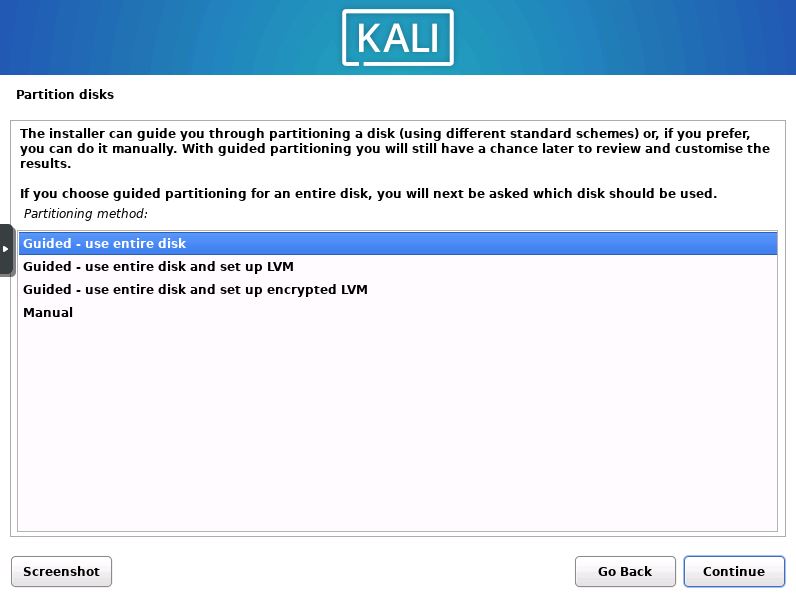
partition the disks

Next you will choose from four different partitioning schemes. Select “Guided – use entire disk” unless you want to encrypt the disk, then press “Continue”.

Select the Disk for Installation

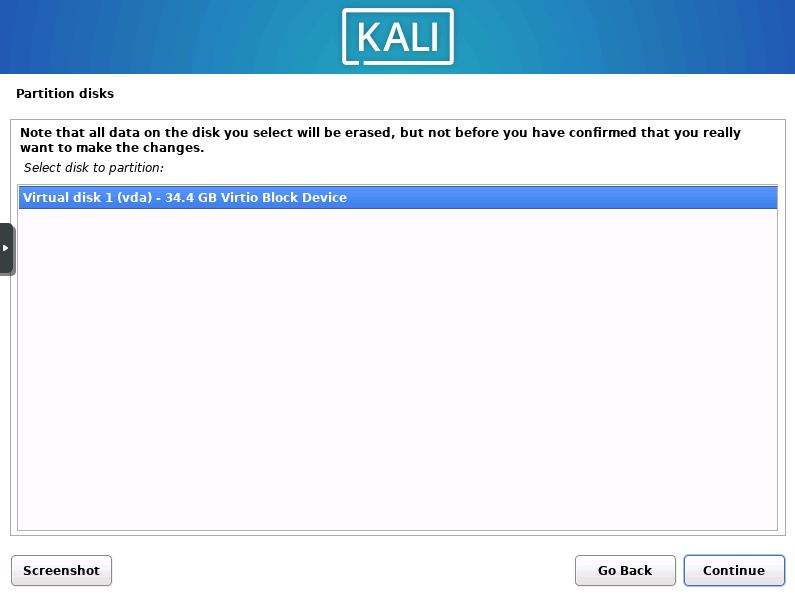
select hdd

Now the installer will ask you which disk you would like to install Kali onto. (note, all data will be deleted from the selected device)

Choose Partition Scheme

partition scheme

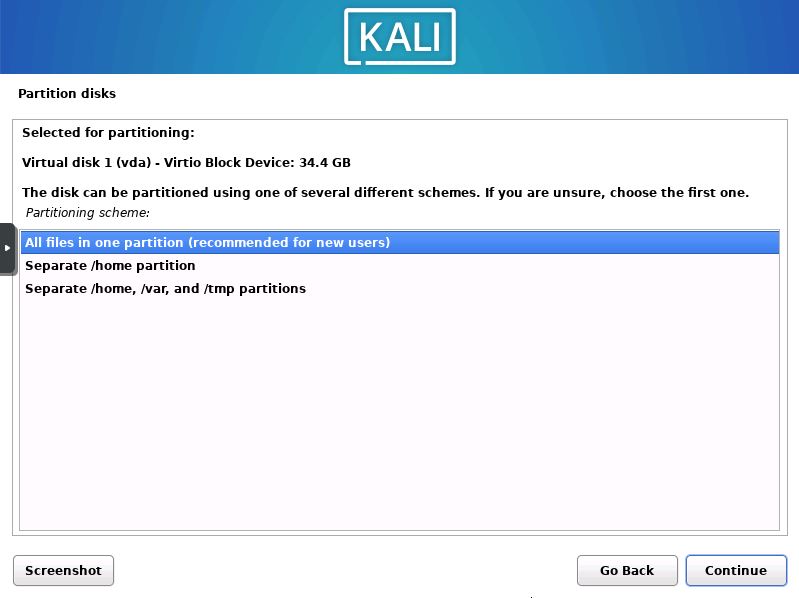
The installer will then ask if you would like a separate home partition, or all files in the same partition. I recommend new users choose the all files in one partition option.

Confirm Partition Changes

finish partitioning

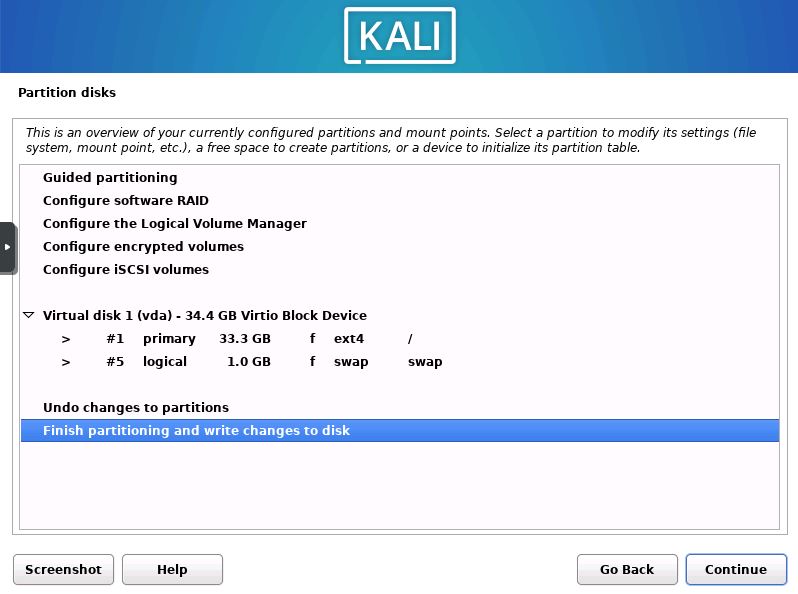
Now you will be shown a overview of the changes that are due to take place. Look them over then press “Finish partitioning and write changes”.

Confirm Write Changes

confirm write changes

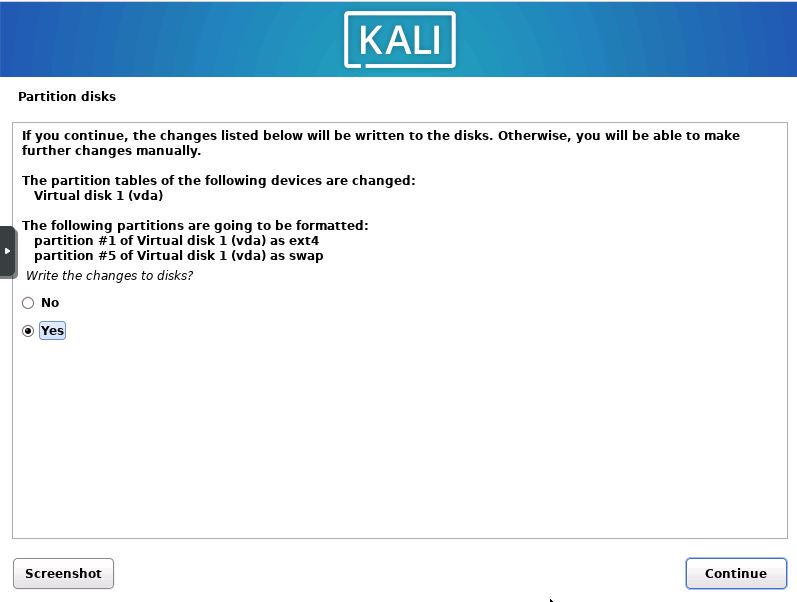
You will then be prompted with a confirmation asking if you want to write the changes to the disk. Click “Continue”.

Wait for the Base System to Install

install base system

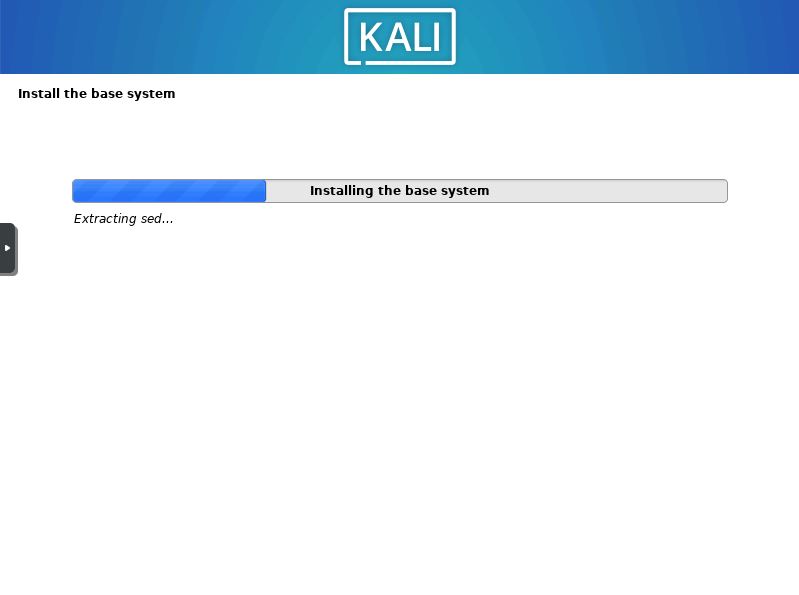
Wait for the base system to finish installing. This can take a while depending on the performance of your computer.

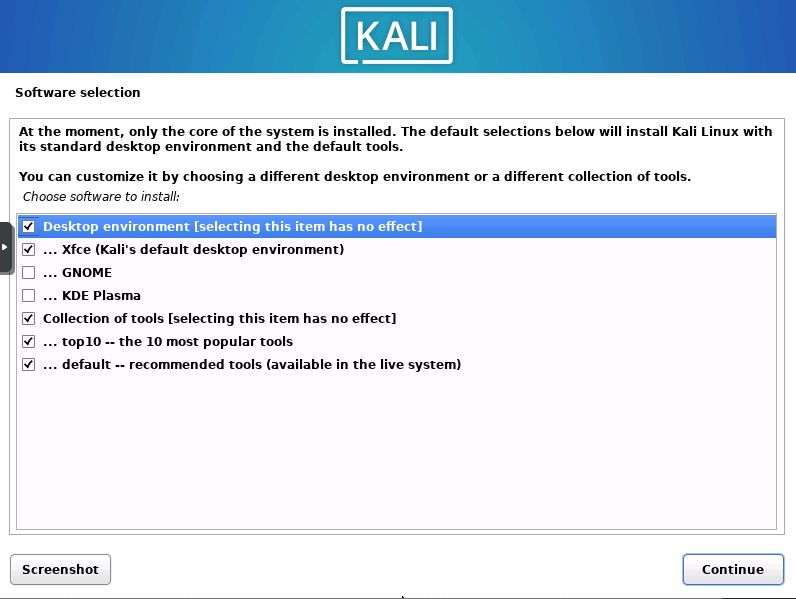
Software Selection

select kali software to install

Now you will be asked which desktop environment you want. As well as what software you would like installed. I recommend keeping all options to default as displayed in the above screenshot.

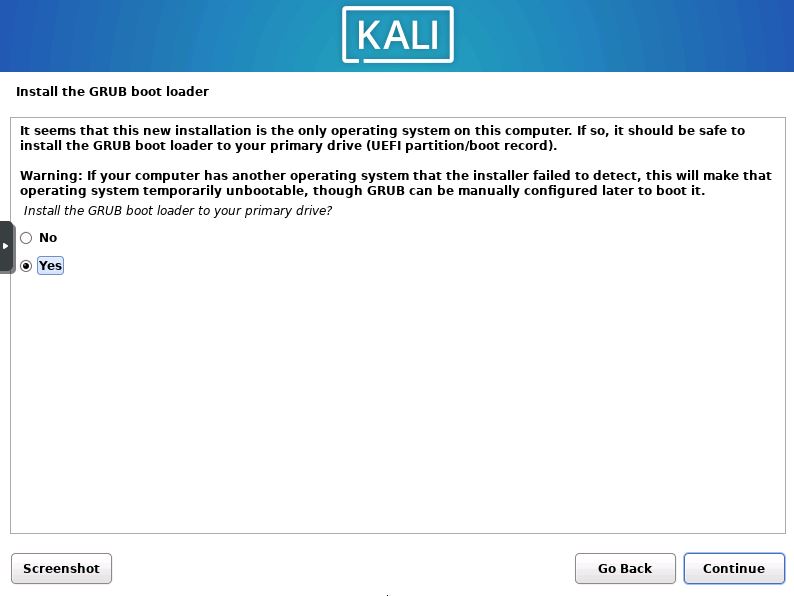
Install Grub

install grub bootloader kali

You will then receive a prompt asking you if you would like to install the Grub boot loader. Select the Yes checkbox and press “Continue”.

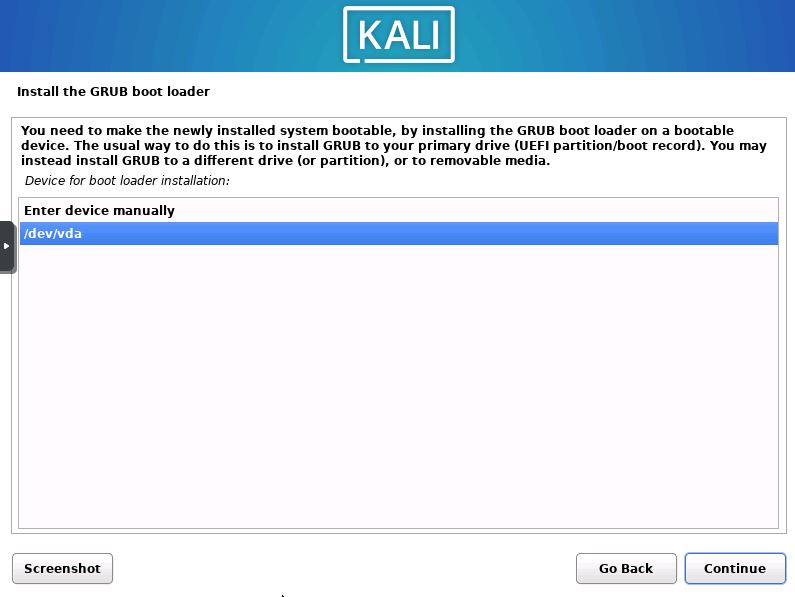
Select Grub Device

select a grub device

Now you will need to select which device to install Grub onto. Select the /dev/x device and then “Continue”.

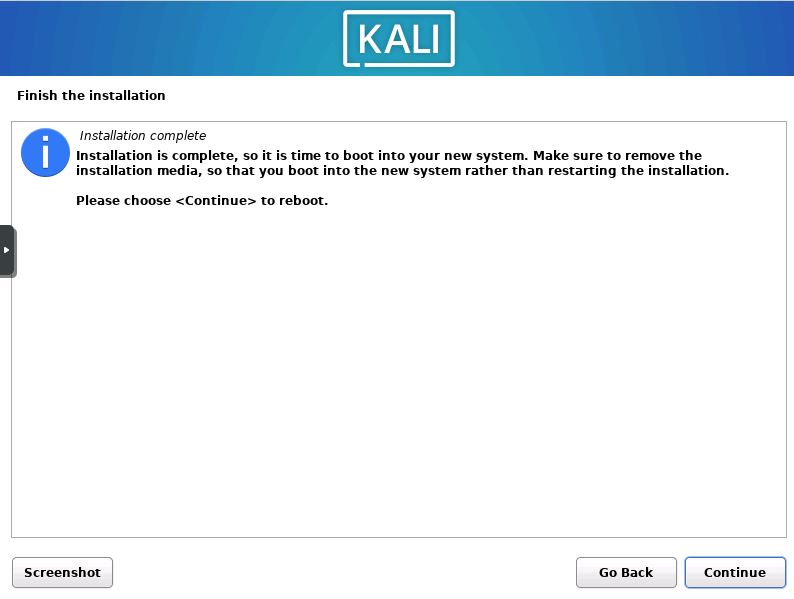
Reboot the System

reboot kali system

Once you see this screen you are almost ready to begin using Kali. Simply remove your installation media and reboot the system.

Installation Complete

test login to kali

Once the system has rebooted you will see the login screen. You have now completed the installation of Kali 2022.3. Enter the credentials that you created earlier to start using Kali.

Additional Questions?

If you have any additional questions or thoughts feel free to comment them below.

Related Resources

View our 5 Reasons to Switch from Windows 10 to Linux.

Learn How to Create a Mapped Network Drive in Windows 10.

Click here to learn How to Easily Create a Bootable Linux USB Drive using Rufus.

View our OS Installs Category.

Learn more cool things in Windows with our Windows Tutorials.

View all of our available online tools and converters at Formatswap.com.
How to Mount an SMB (Samba) Share in Linux with cifs-utils

cifs-utils header image

In this tutorial you will learn how to use the CIFS-UTILS program to mount network shares. You will also learn how mount the file shares at boot. This allows you to avoid typing your credentials, as well as avoiding the use of the mount command when you turn on the system. With CIFS-UTILS you will be able to easily access files from a SMB share on your network. I will be using Ubuntu 22.04 LTS throughout this tutorial. However it is fine if you have a different version, as this guide will work on any Ubuntu based Linux distribution.

Update and Upgrade Ubuntu

update and upgrade ubuntu

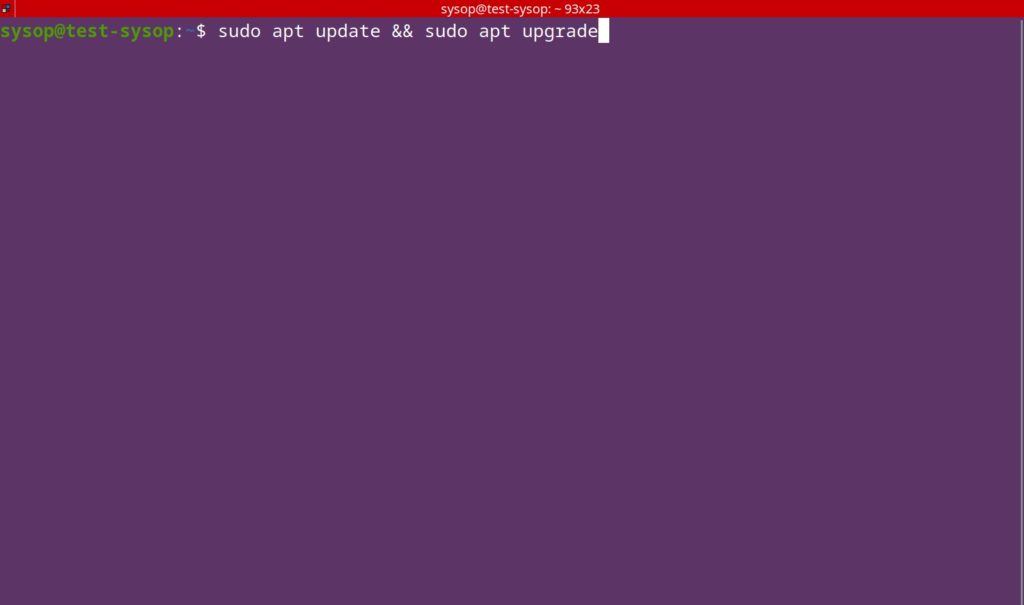
The first thing you will need to do is update and upgrade your Ubuntu installation. Type in the following command and press Enter.

sudo apt update && sudo apt upgrade
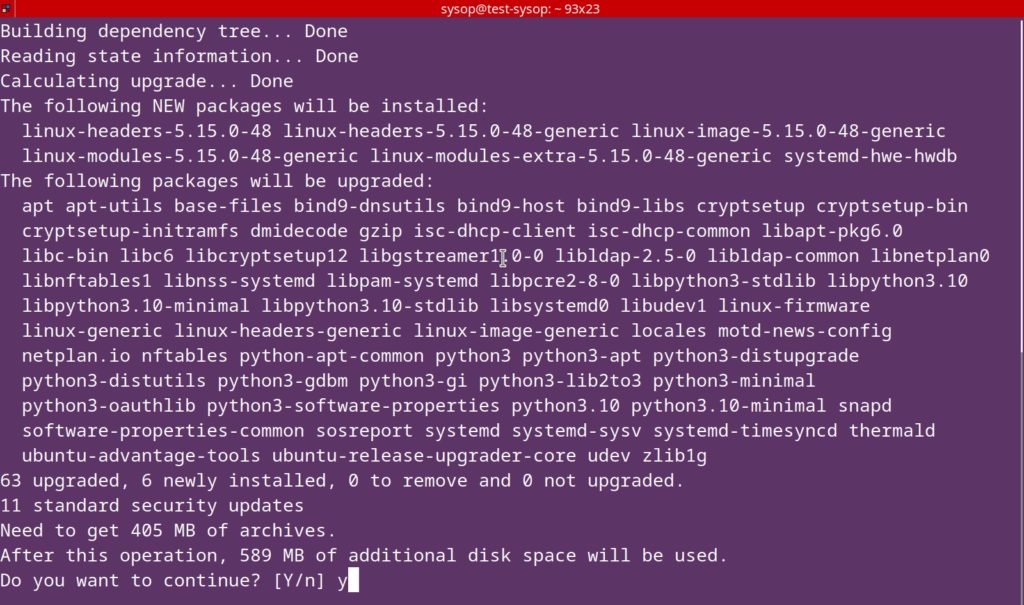
install cifs utils

Now you will see a window asking you if you want to continue. Press “Y” and then Enter.

Install CIFS-UTILS

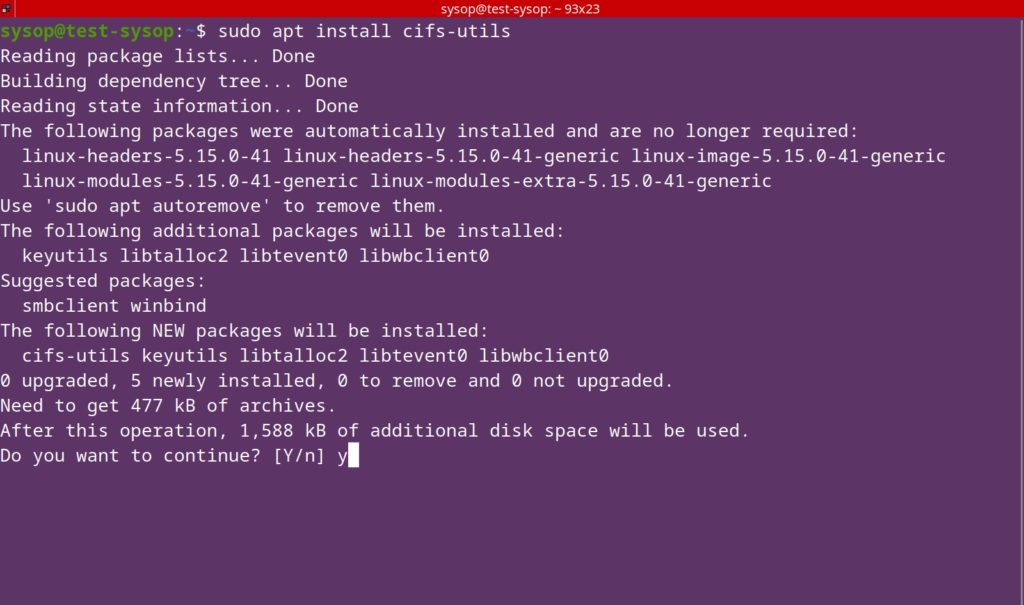
install cifs utils

Afterwards you will need to install cifs-utils. This is a program that allows you to easily mount different file shares on Linux. Type in the following command to install it.

sudo apt install cifs-utils

Create a Mount Directory

make share mount folder

Next you need to create a folder to mount the SMB share. You can create a folder in either /mnt/ or /media/.

sudo mkdir /media/Share
or
sudo mkdir /mnt/Share

Navigate to the Home Folder

cd to home folder

Now navigate to your home folder.

cd ~/

Create the Credentials File

create creds file

Once you are in the home folder you need to create a credentials file. A credentials file is vastly more secured versus providing the password and username in plain text.

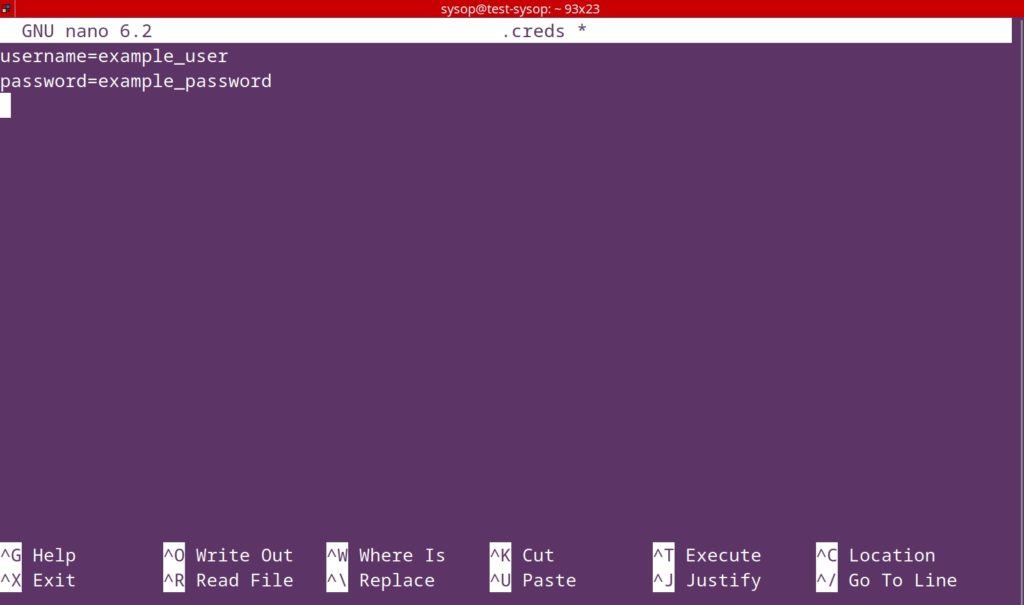
nano .creds
enter user and pass cifs-utils

Now type your username and password in the format above. Once you have typed your credentials, press “Ctrl+X” then “Y” to save and quit the text editor.

Apply Permissions

apply permissions to creds file

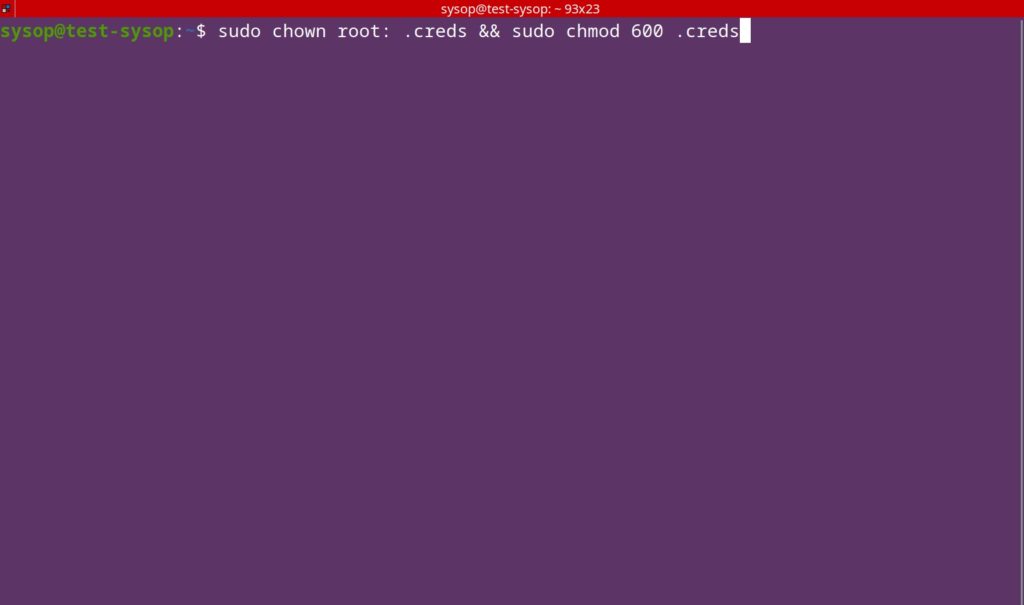
Next we will apply the permissions to the credentials file. For security reasons you only want root to be able to read and write the file. Enter the command below to apply the changes.

sudo chown root: .creds && sudo chmod 600 .creds

Mount the SMB Share

mount smb share

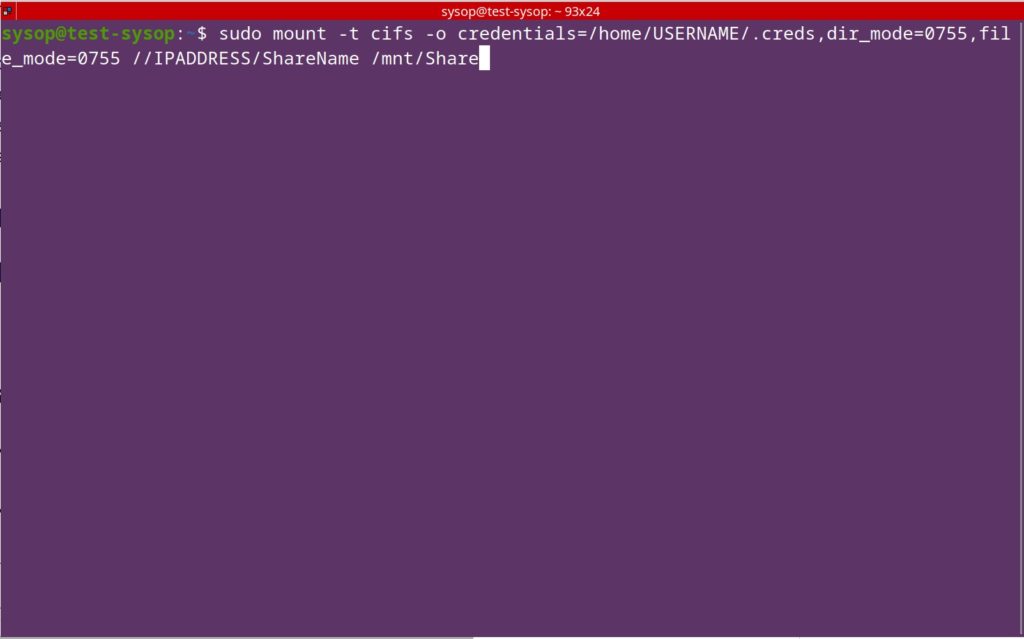
Finally you will mount the SMB network share. Enter the below cifs mount command replacing the credential directory, IP address, mount location, and share name with your own.

sudo mount -t cifs -o credentials=/home/USERNAME/.creds,dir_mode=0755,file_mode=0755 //IPADDRESS/ShareName /mnt/Share

After you run the command you can navigate to the mount folder to view the network share that you have added. You have now successfully mounted a SMB network share using cifs-utils.

Auto Mounting

If you only use the mount command, your network share will no longer be mounted when you reboot. We will edit the fstab file and add a few entries. This is the file that defines what file systems are mounted at boot. Continue reading below to make the share persistent.

Edit the fstab File

edit fstab file

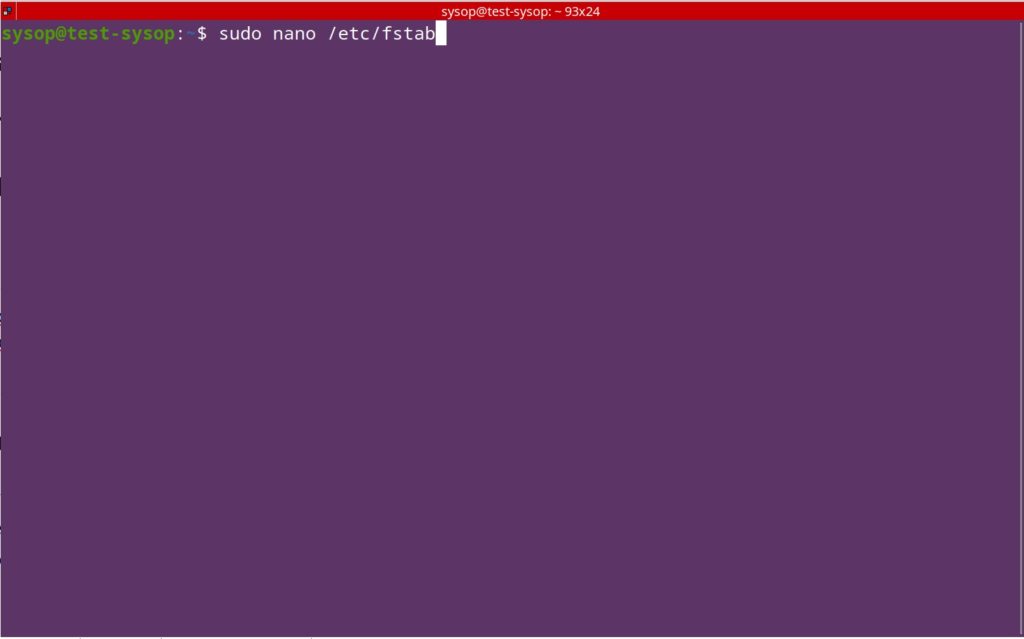
First we need to open the fstab file. Type in the following command to edit it.

sudo nano /etc/fstab

Add fstab Entries

mount cifs share

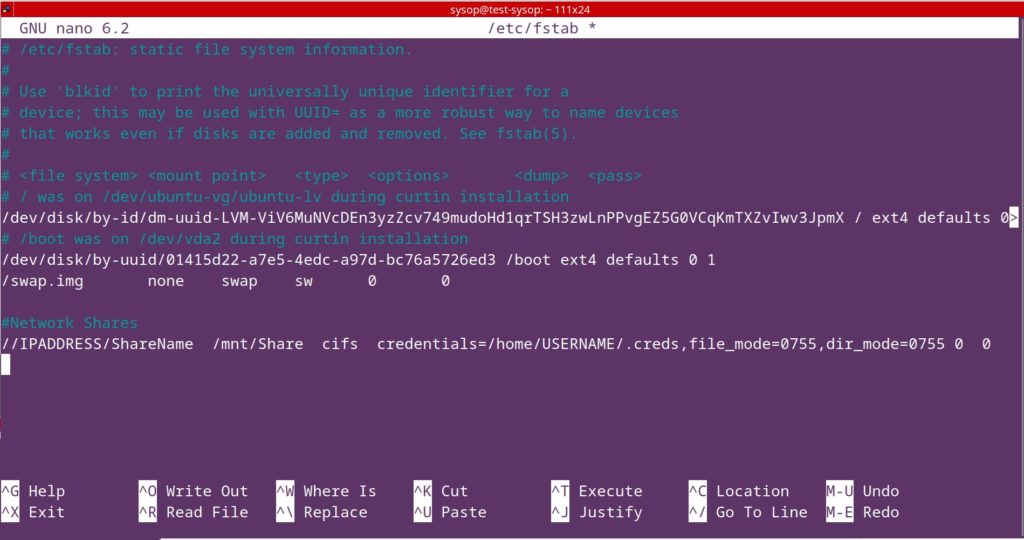
Now you will want to add a new line for mounting your cifs share. Use the code below as an example of what to type, replacing the credentials, IP, and share name with your own.

//IPADDRESS/ShareName  /mnt/Share  cifs  credentials=/home/USERNAME/.creds,file_mode=0755,dir_mode=0755 0  0

Reboot PC

reboot pc

The last step will be to reboot your PC. After rebooting you will see the network share mounted at /mnt/ShareName or /media/ShareName depending on where you created the folder. Thank you for reading the tutorial. If you are interested in similar technology tutorials check out some of our articles below.

Questions?

If you have any questions or comments feel free to leave them below.

Related Resources

View our How to Permanently Disable Windows Defender article.

Learn How to Install Ubuntu Server 22.04 [Step by Step].

Click here to learn How to install and configure Nginx – Ubuntu 20.04.

View our Programming Articles and Tutorials.

Learn more cool things in Linux with our Linux Tutorials.

View all of our available online tools and converters at Formatswap.com.
How to Use the Alias Command in Linux

linux header image

In this tutorial you will learn how to create your own custom alias commands in Linux. Setting up a Linux alias is a very easy thing to do. Aliases are very beneficial as they save a lot of time, such as remembering long or complicated commands. We will be adding our own aliases by editing the “.bashrc” file. This tutorial will work on virtually all Linux distributions. Continue reading below to get started.

Open the Terminal

launch terminal in linux

The first thing you need to do is open a new Terminal window in Linux.

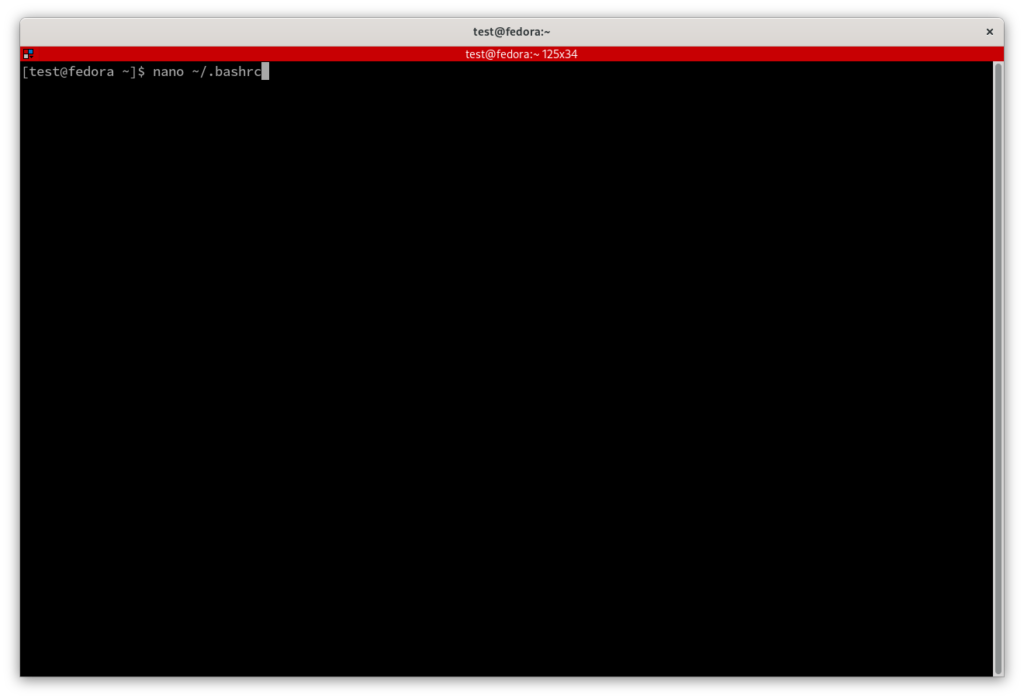
Edit the .bashrc File

edit bashrc

Once you have the new terminal window open, enter the command nano ~/.bashrc and press Enter. This will open your .bashrc file using the nano text editor. The .bashrc file is a script that runs every time you launch Bash. You can add commands here for customizing and automating your Linux environment. If you open the file and it is blank it means you do not already have it (the file). The file will be created once you save using Ctrl+X, press the Y key, then press Enter.

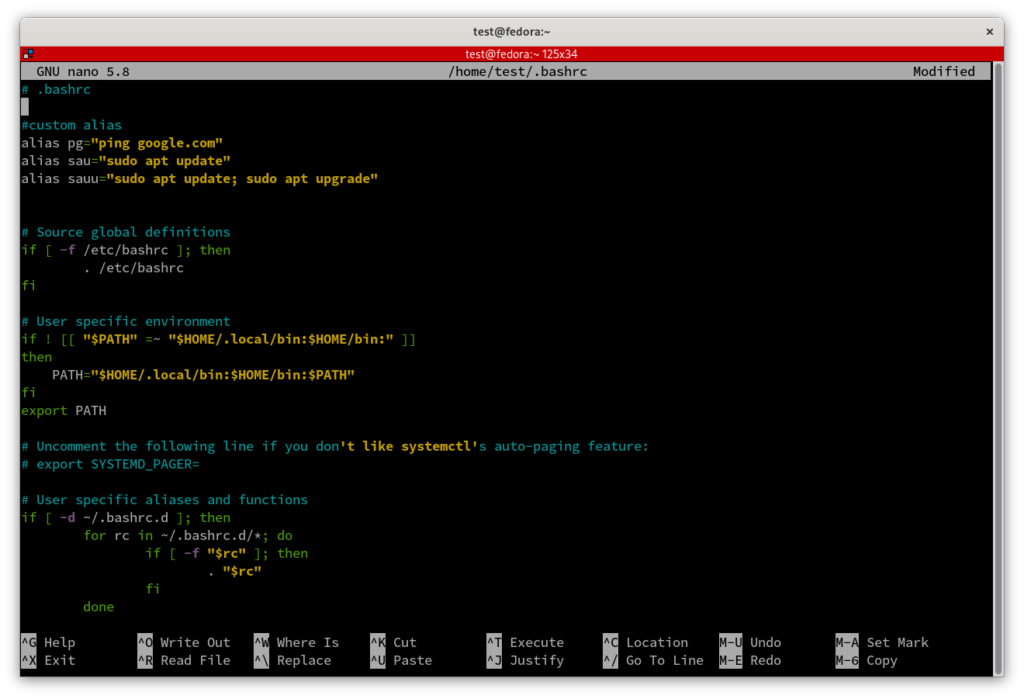
Add the Command Alias’s

add alias commands to bashrc file

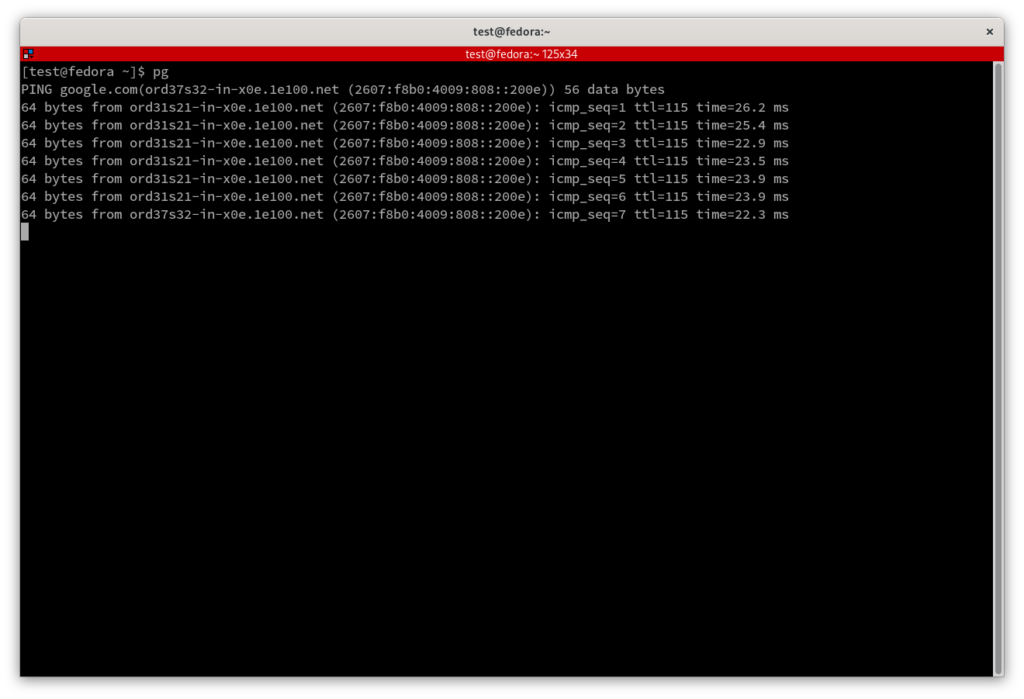
Towards the top of your bashrc file you will want to add a few new lines. Afterwards you can begin typing your alias commands. The format to use is alias aliasname=”Linux Command”. For example one of my aliases is ‘alias pg=”ping google.com”‘. When the command “pg” is ran, it will ping Google. The possibilities with aliases are endless. After adding your custom aliases simply save and close the file.

Reload the Bash Configuration

reload bashrc

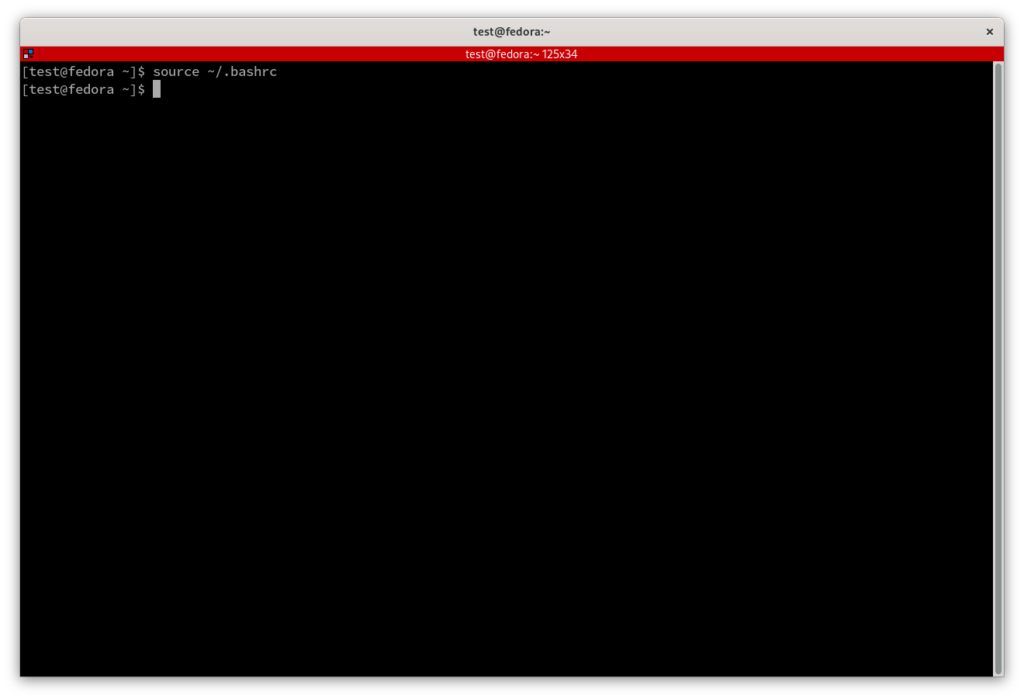
Next you will have to reload the .bashrc file to reload the changes you just made. To do this type “source ~/.bashrc” and press Enter. The alias is now ready to be used.

Test the Linux Alias’s

test the alias command

To use your custom Linux aliases type the command that was written for it. In my example I used “pg” to ping google.com. Above is an example of the custom alias command running.

Additional Questions?

If you have any additional questions or thoughts feel free to comment them below.

Related Resources

View our list of The Top 10 Programming Languages to Learn in 2022.

Learn How to Install Ubuntu Server 22.04 [Step by Step].

Click here to learn How to Install MySQL on Ubuntu Server 22.04 LTS.

View our Programming Articles and Tutorials.

Learn How to install and configure Nginx – Ubuntu 20.04.

View all of our available online tools and converters at Formatswap.com.
How to Install Ubuntu Server 22.04 [Step by Step]

ubuntu splash image

In this beginner friendly tutorial you will learn how to install Ubuntu Server 22.04 LTS. Ubuntu Server is currently one of the most popular Linux based server operating system. One of the biggest advantages to using Ubuntu Server is the stability that it brings. As an LTS release it will provide you five years of security updates and support by default. This will ensure your server is always secure and has the latest software. To start this tutorial make sure you have a virtual machine, an unused hard drive, or a empty partition to be able to install the operating system. If you want to learn how how to make a bootable installation flash drive click here. You will also have to download the Ubuntu Server ISO file. You can do that by clicking this link. Download Ubuntu Server 22.04 LTS

Language selection

ubuntu install window

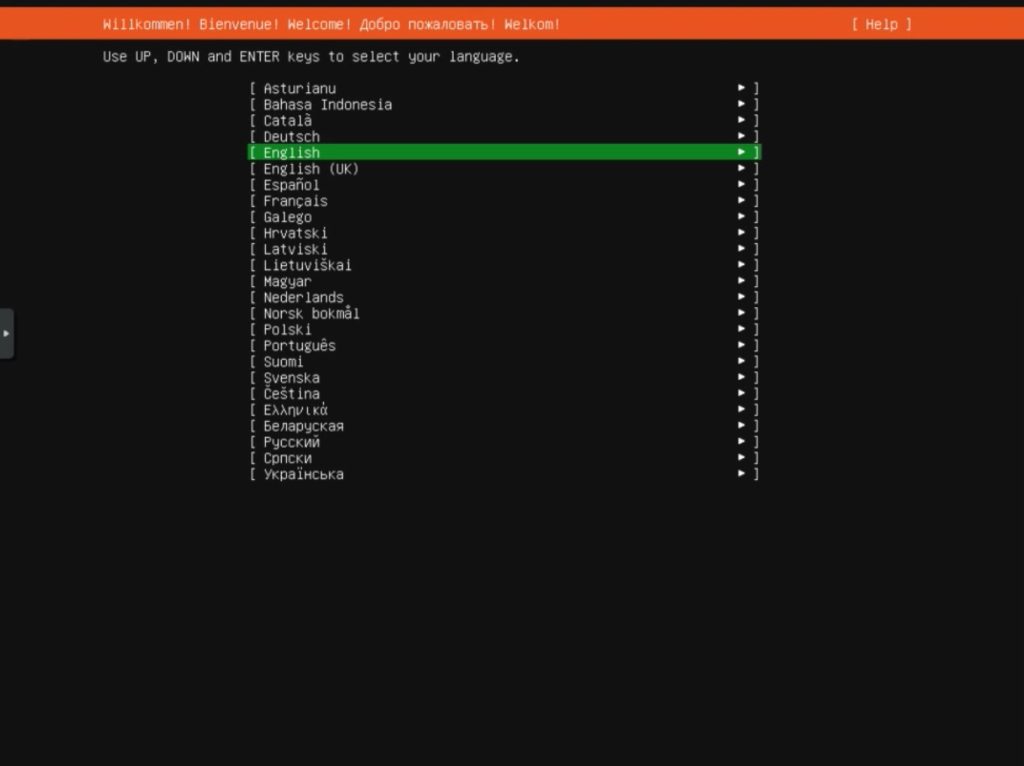
The first step after booting into your Ubuntu Server or ISO is to select the language. Choose your language and then press “Enter”.

Update the installer

ubuntu install window

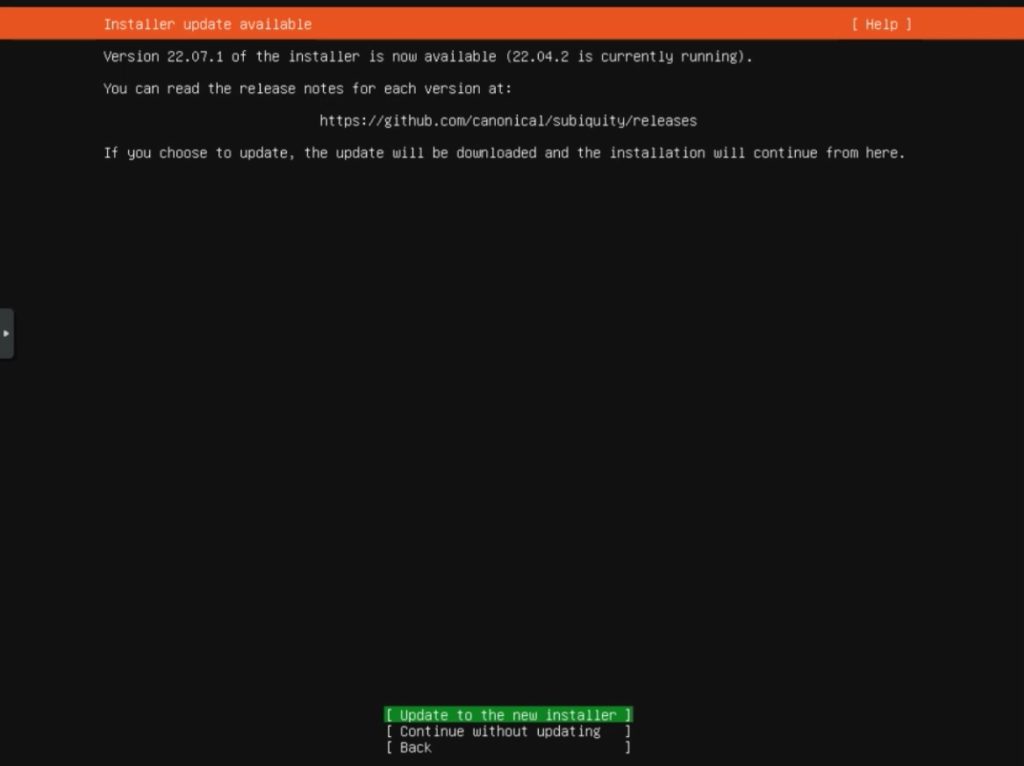
Next the installer will ask you if you want to update. I recommend updating to the latest installer. Select “Update to the new installer” then press “Enter”.

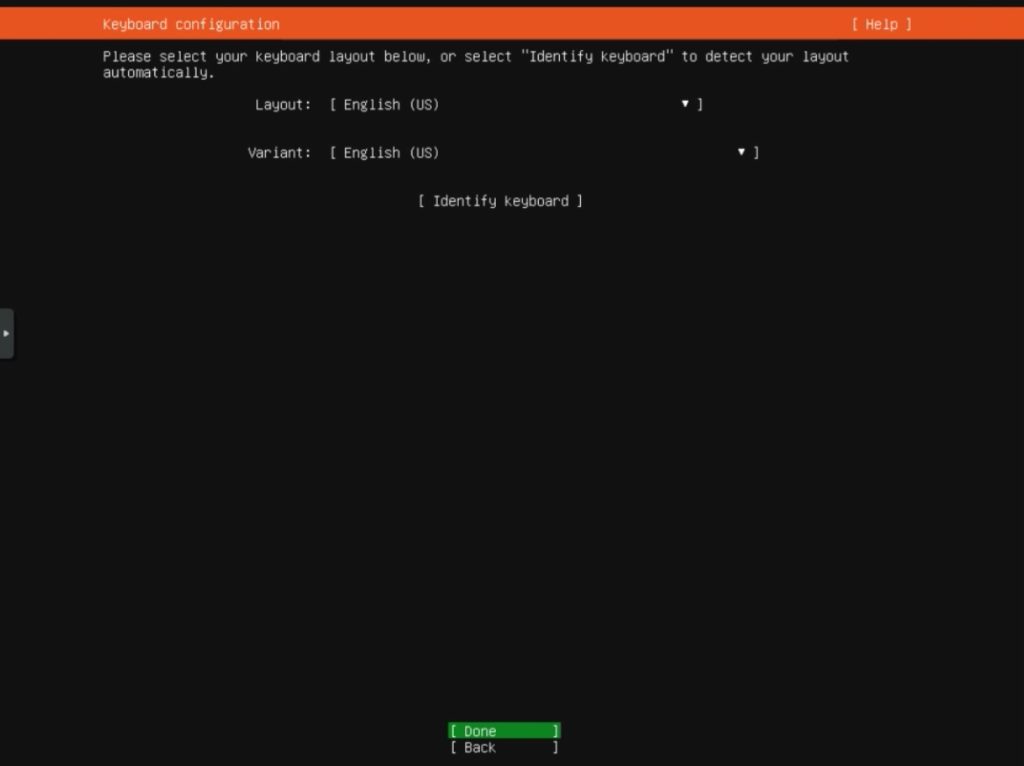
Keyboard configuration

ubuntu install window

After that you will be brought to the keyboard configuration page. If you are okay with the default (automatic) keyboard layout, select “Done” and press “Enter” to continue.

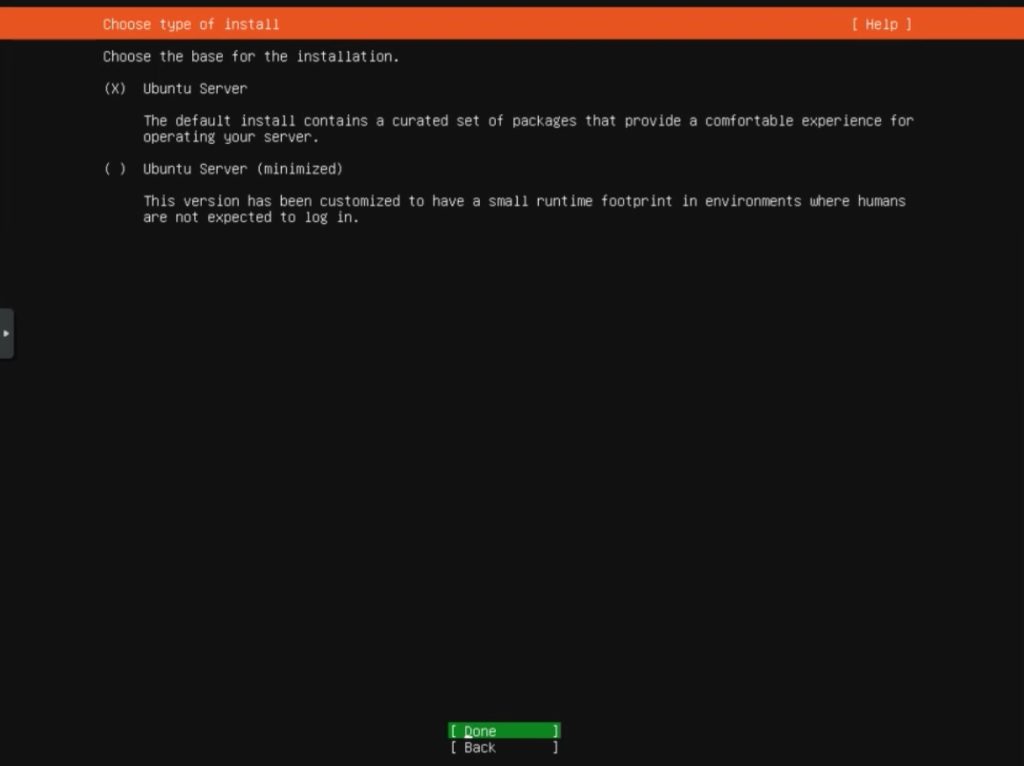
Installation type

ubuntu install window

This page will ask you if you want to do the default Ubuntu Server installation or the minimal version. I recommend the first option. Select your choice then select “Done” and press “Enter”.

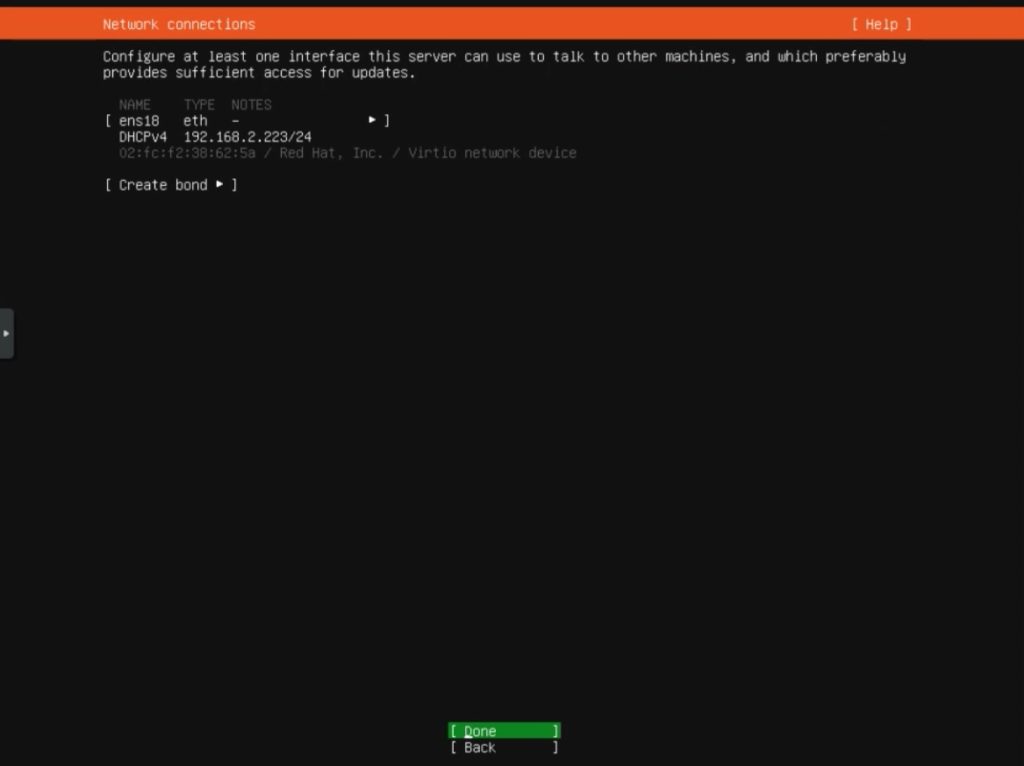
Network configuration

ubuntu install window

Next we have the network configuration page. By default the installer will automatically detect your IP address settings. If you want to change it select the network adapter “ens18” and press “Enter”. I recommend just keeping it at its default settings. Select “Done” and press “Enter”.

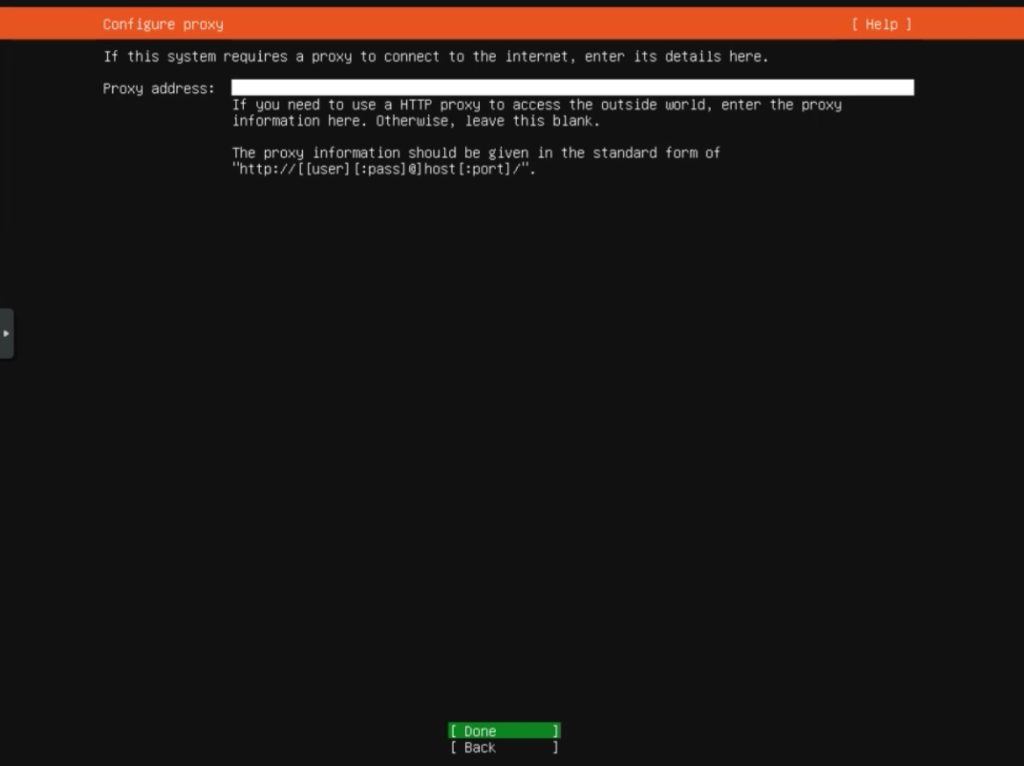
Configure network proxy

ubuntu install window

Afterward you will be brought to the proxy configuration page. If you have a proxy you would like to use enter its information. Else just select “Done” and press “Enter”.

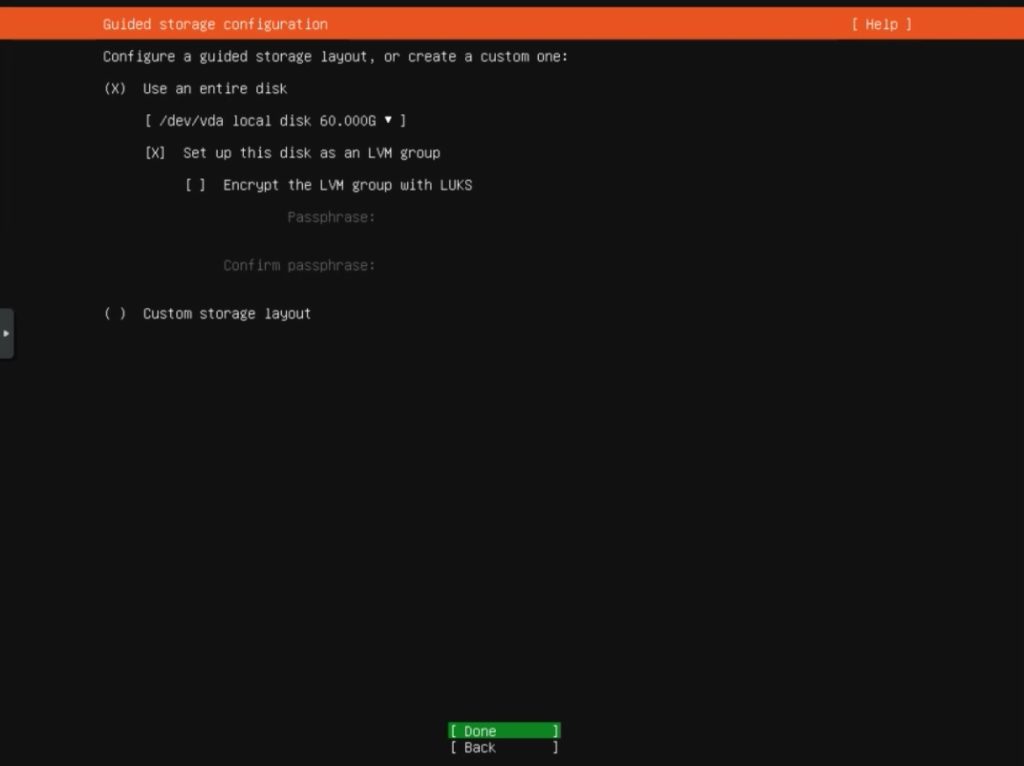
Guided storage configuration

ubuntu install window

Now we will need to setup the storage configuration. Luckily the installer does the hard part for us. If you are using a full physical or virtual disk, select “Use an entire disk” and press “Space” to mark it. Afterwards select “Done” and press “Enter” to proceed.

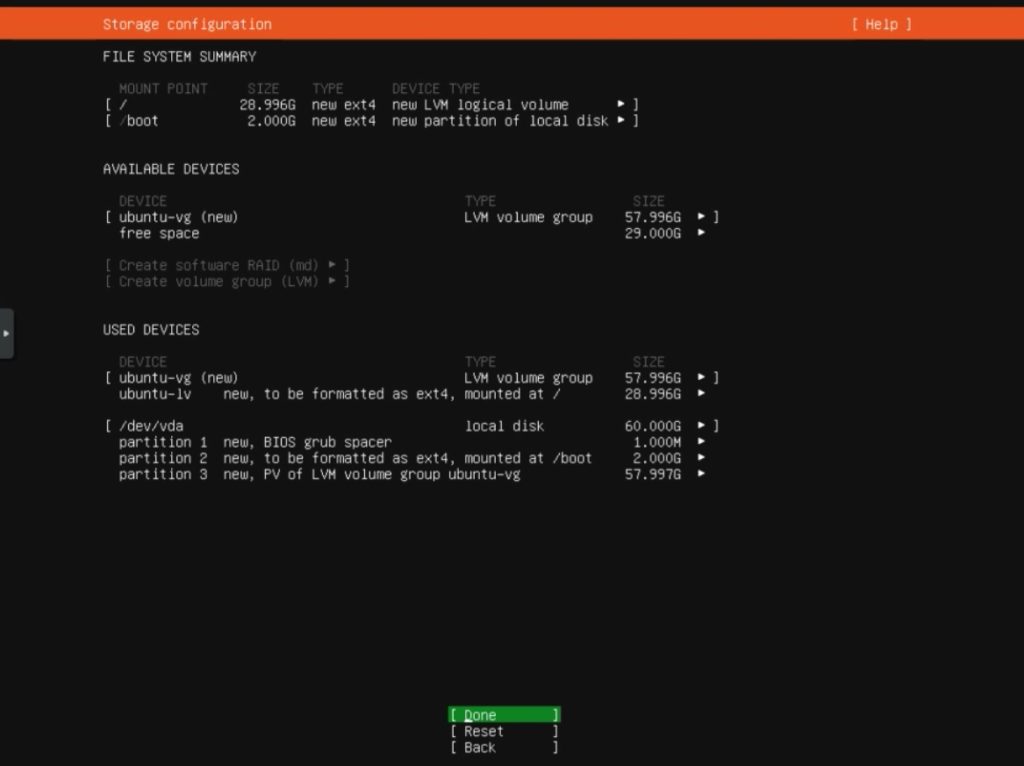
Review storage configuration

install ubuntu 22.024

This next page will show you a review of the storage configuration changes that will take place. Review the disk and partition names, and if everything looks correct proceed to the next step.

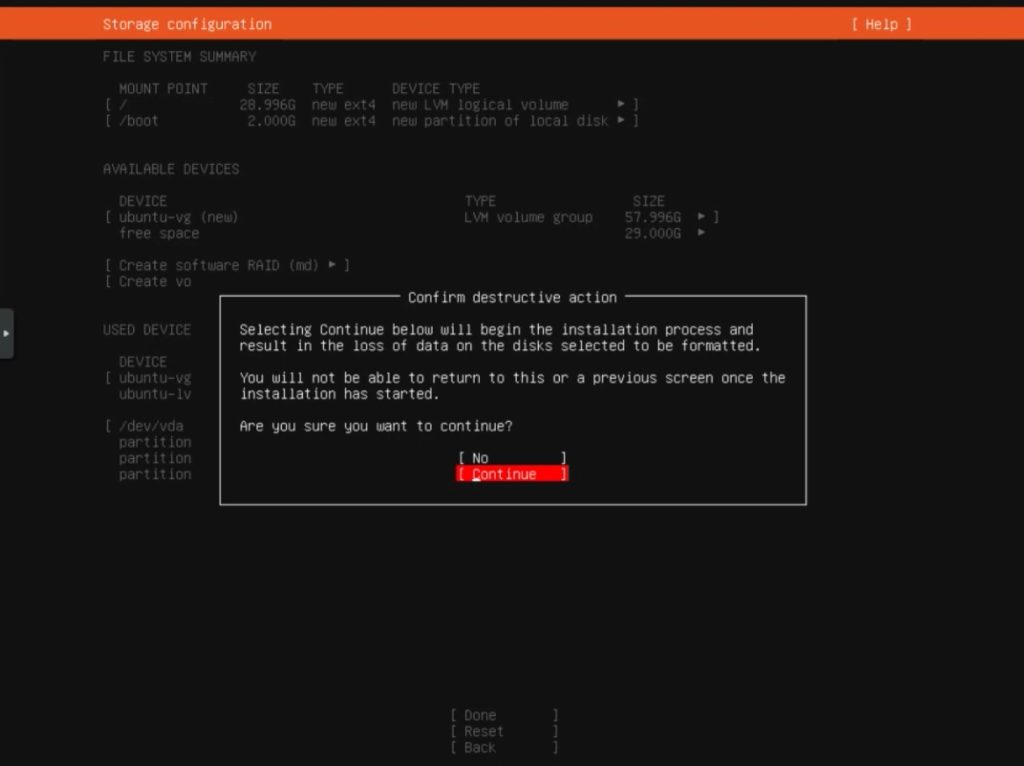
Confirm storage configuration

install ubuntu 22.024

Now you will be asked to confirm the storage configuration options. Select “Continue” and press “Enter” to proceed to the next step.

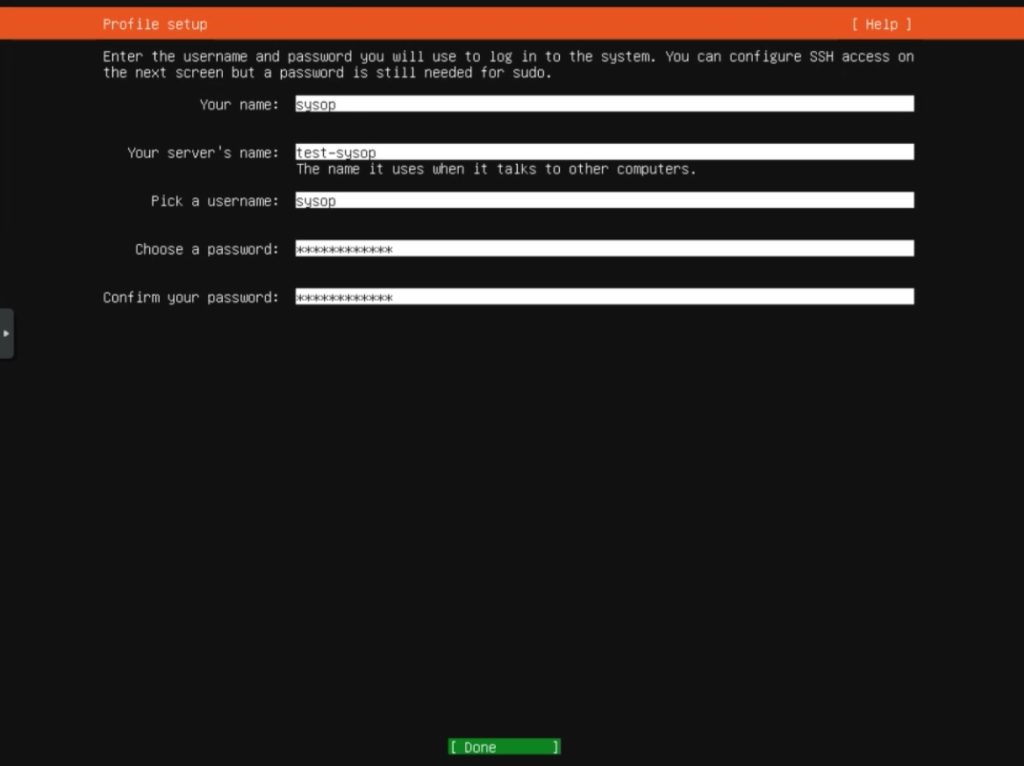
Setup Ubuntu user account

install ubuntu 22.024

Afterwards you will need to setup your user account. Enter a name, server name, username, and password. Then click on “Done” and press “Enter”.

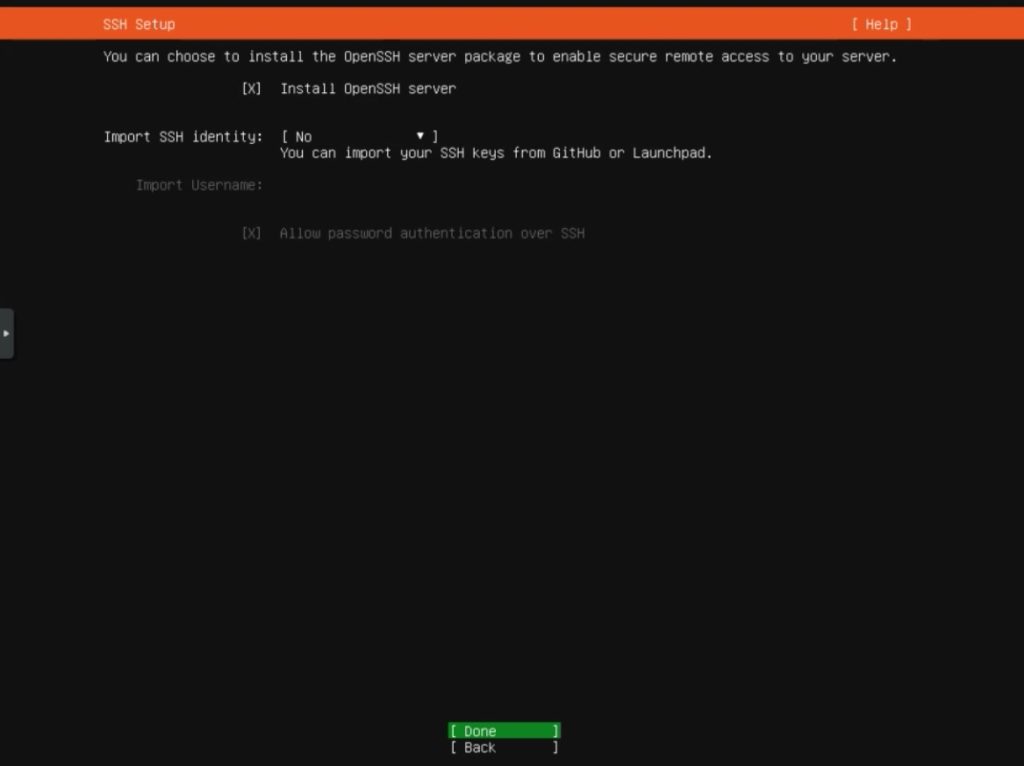
Install SSH

install ubuntu 22.024

This step is optional. If you would like to enable the SSH server select “Install OpenSSH server” then press “Space” to mark it. Afterwards press “Done.” and press “Enter”.

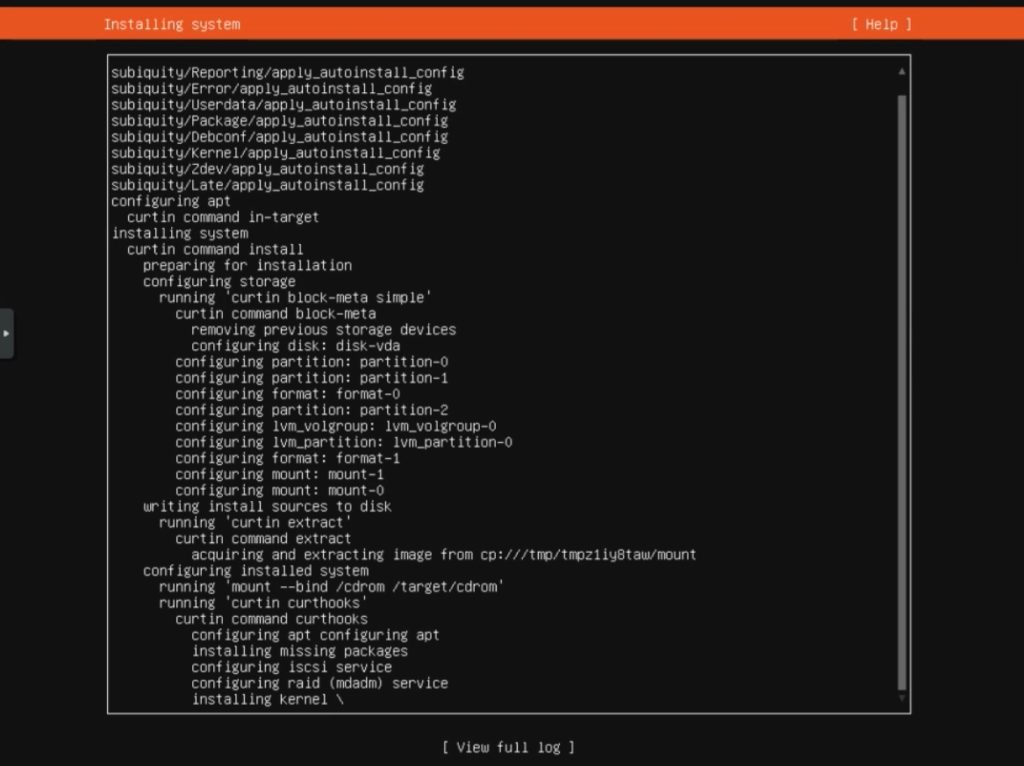
Wait for system to be installed

install ubuntu 22.024

Now the system will begin installing. This can take anywhere from 20-30 mins to fully install Ubuntu Server. Wait for it to complete.

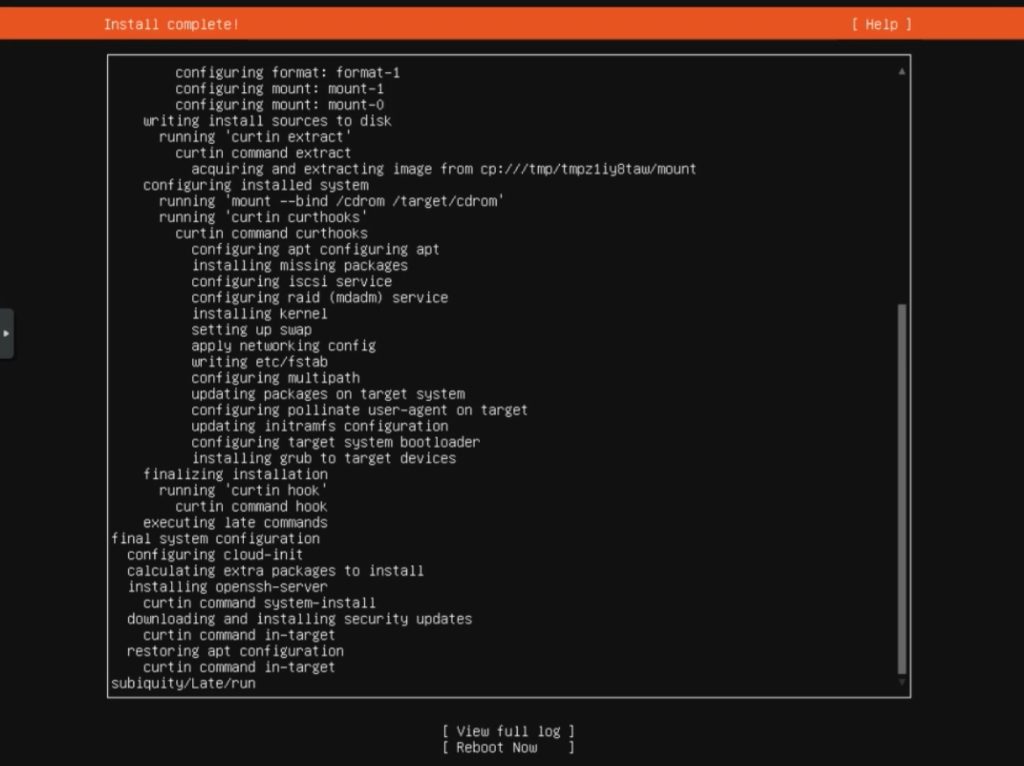
Installation complete

install ubuntu 22.024

Once the installation is complete you will see this screen. Select “Reboot Now” and press “Enter” to reboot the system and continue.

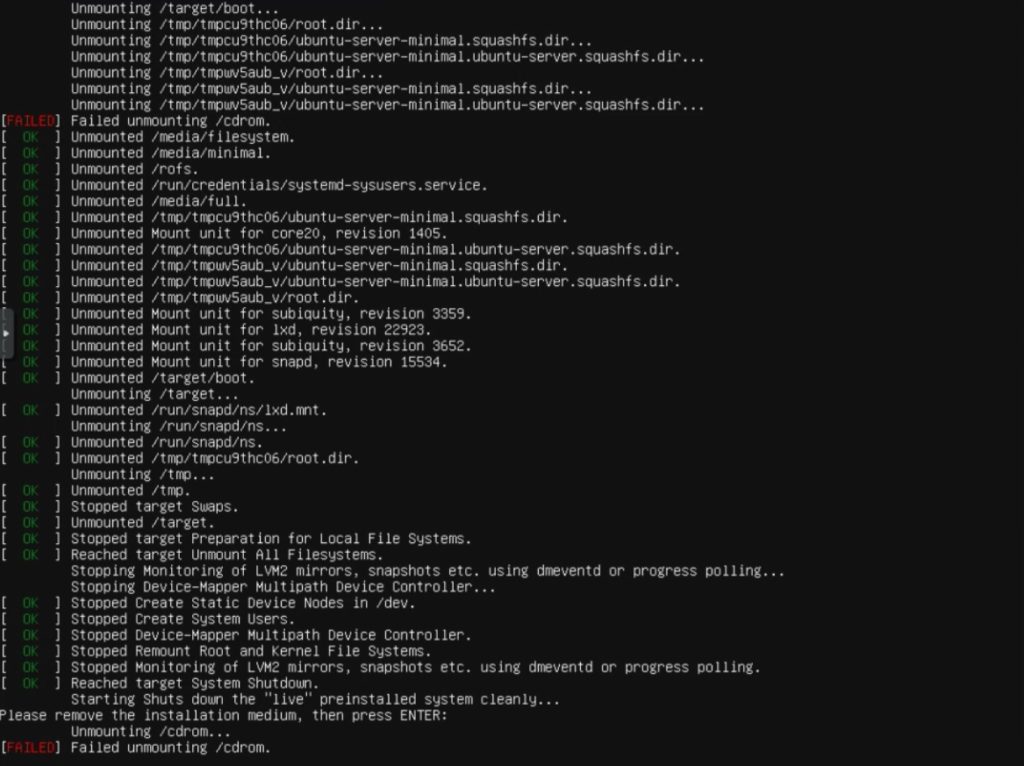
Unmount USB drive or ISO file

install ubuntu 22.024

After the system reboots you will get a message telling you to “Please remove the installation medium, than press Enter”. Remove your USB drive or ISO file if you are using a virtual machine. Once you have completed this step press “Enter” one final time to reboot.

Login to Ubuntu Server 22.04

install ubuntu 22.024

You will be brought to the Ubuntu Server login screen. Type in the credentials you created for your account. You will then be logged into the system. You have now successfully installed Ubuntu Server 22.04. If you are looking for other Linux tutorials check out our articles below.

Related Resources

View our list of The Top 5 Programming Languages to Learn in 2022.

Check our our The Best Mechanical Gaming Keyboards to Purchase in 2023 article.

How to Install VeraCrypt and Encrypt a Flash Drive on Ubuntu 22.04.

Click here to learn How to Install MySQL on Ubuntu Server 22.04 LTS.

View our Programming Articles and Tutorials.

Learn more cool things in Linux with our Linux Tutorials.

View all of our available online tools and converters at Formatswap.com.
How to Install VeraCrypt and Encrypt a Flash Drive on Ubuntu 22.04

veracrypt ubuntu splash

Are you worried about your device being stolen? Do you have sensitive files to protect? If you answered yes to either of those questions then you would benefit from encrypting your drive with VeraCrypt. In this tutorial you will learn how to download, install, and setup encryption with VeraCrypt in Linux. One of the primary reasons to use VeraCrypt is that it is an opensource replacement for the now defunct TrueCrypt. Another benefit to VeraCrypt is the ability to encrypt both flash drives and hard disks. You also have the ability to create encrypted file containers. It supports the most popular encryption algorithms such as AES 256 and AES 512. All said you will get a much more robust and secure encryption solution compared to any paid encryption software you could purchase.

Add the required repository

The first step is to add the repository to your packages list.

sudo add-apt-repository ppa:unit193/encryption

Update Ubuntu

The next thing you will want do do is update and upgrade Ubuntu 22.04. To do that simply open a terminal and run the following command.

sudo apt update && sudo apt upgrade

Download and install VeraCrypt

The last step is to install VeraCrypt. You can do so with this command.

sudo apt install veracrypt

Encrypting a volume

In this section of the tutorial you will learn how to create the encrypted flash drive partition using VeraCrypt.

Launching VeraCrypt

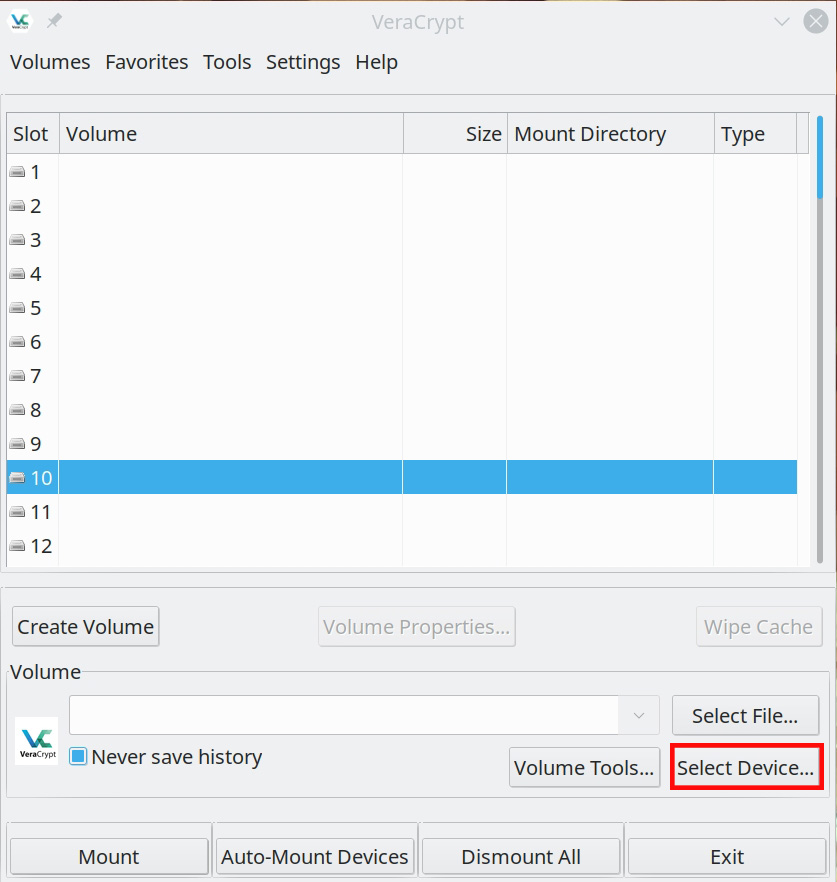
You can launch VeraCrypt by searching for it in your systems start menu or app folder. After you launch the program click on “Select Device…”.

veracrypt encryption screen

Selecting a device to encrypt

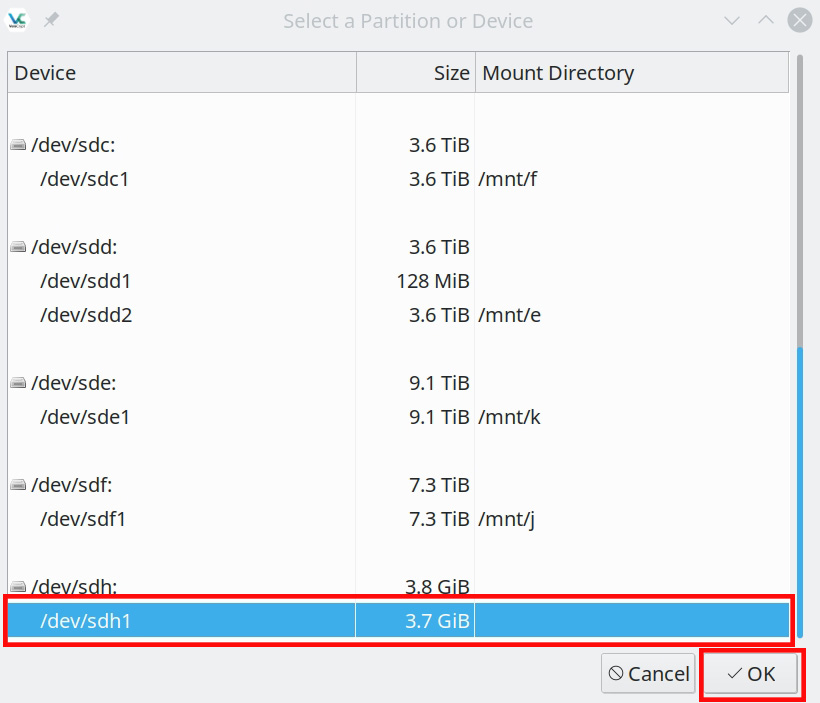
A window will pop up showing all of the storage devices on your computer. Very carefully select the partition on the flash drive you want to encrypt. (warning, all data is wiped during the encryption process)

veracrypt encryption screen

Creating the volume

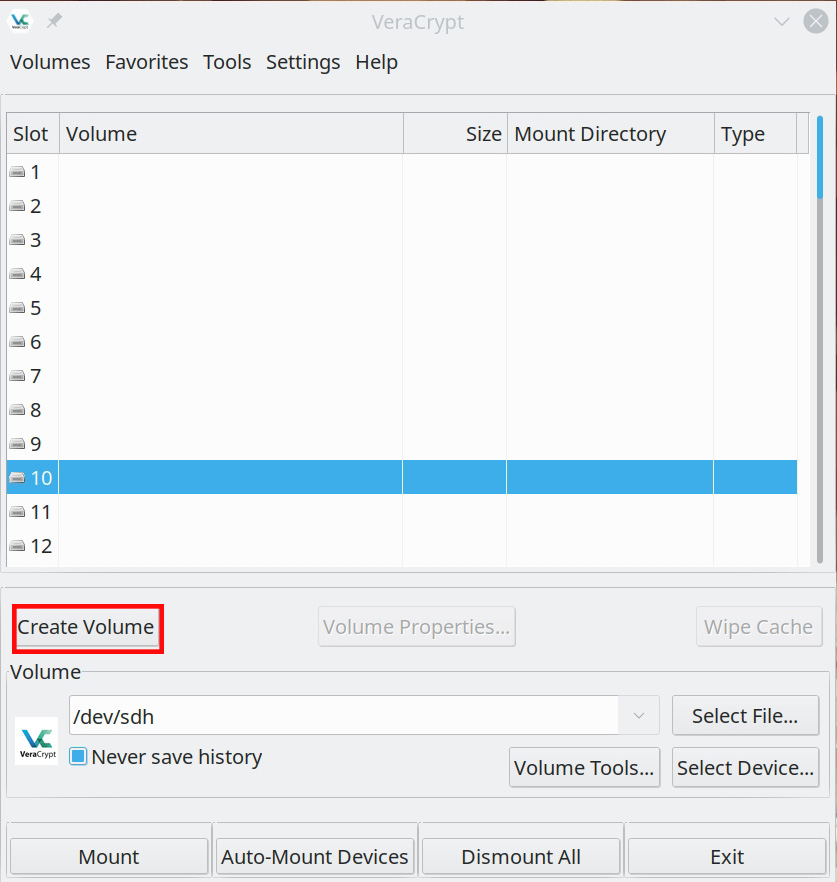
Next you will want to click create volume to begin the encryption process.

veracrypt encryption screen

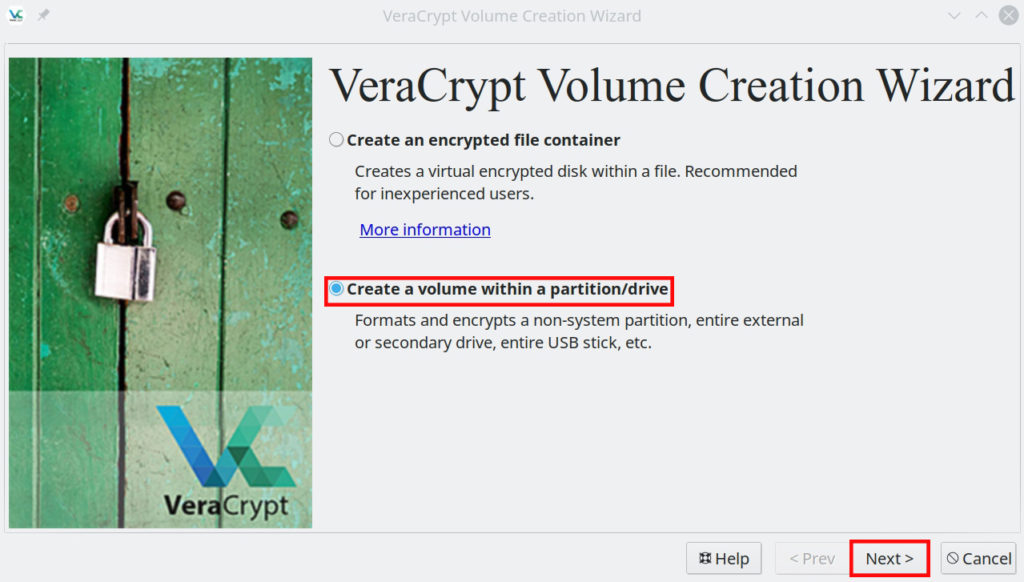
Select VeraCrypt device type

After the “VeraCrypt Volume Creation Wizard” opens you want to select the second option highlighted in red. Then click the “Next” button.

veracrypt encryption screen

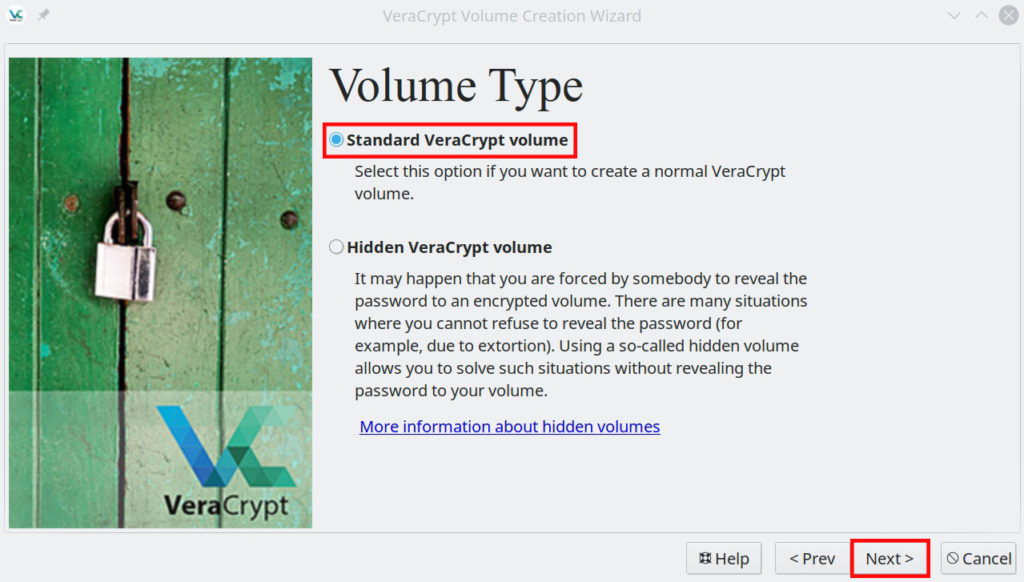
Select VeraCrypt volume type

The next step is to select the VeraCrypt volume type. Choose the first option on the list. “Standard VeraCrypt volume”.

veracrypt encryption screen

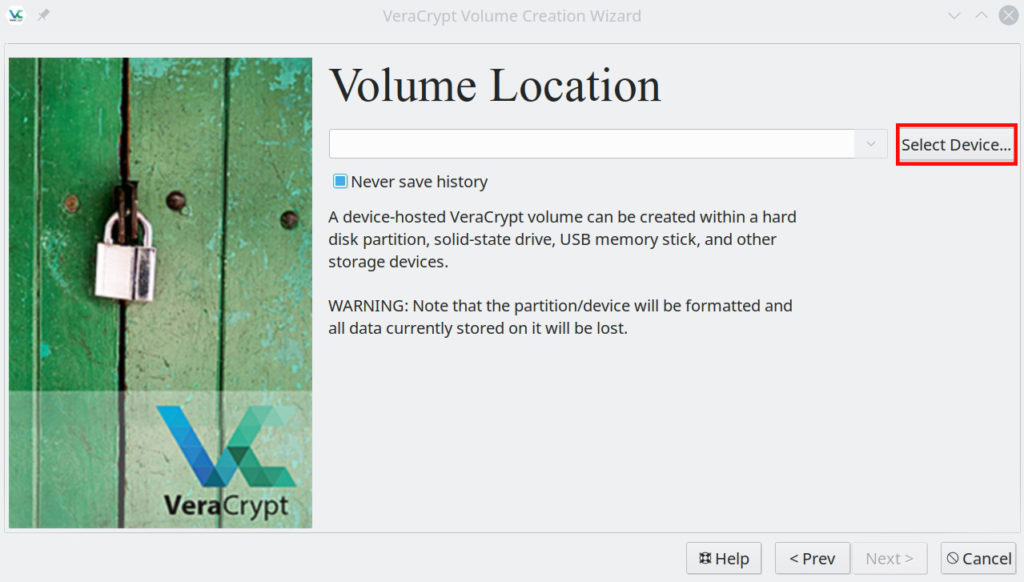
View devices

Afterwards you will have to click “Select Device…” to view the partitions.

veracrypt encryption screen

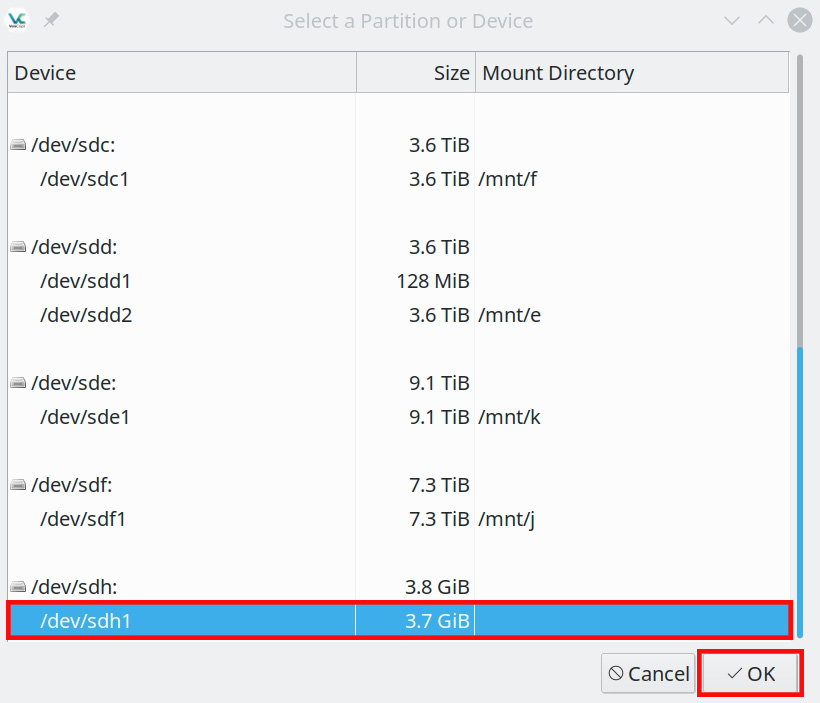
Select USB devices partition

Re-select the partition of the flash drive you want to encrypt. Then press “OK”.

veracrypt encryption screen

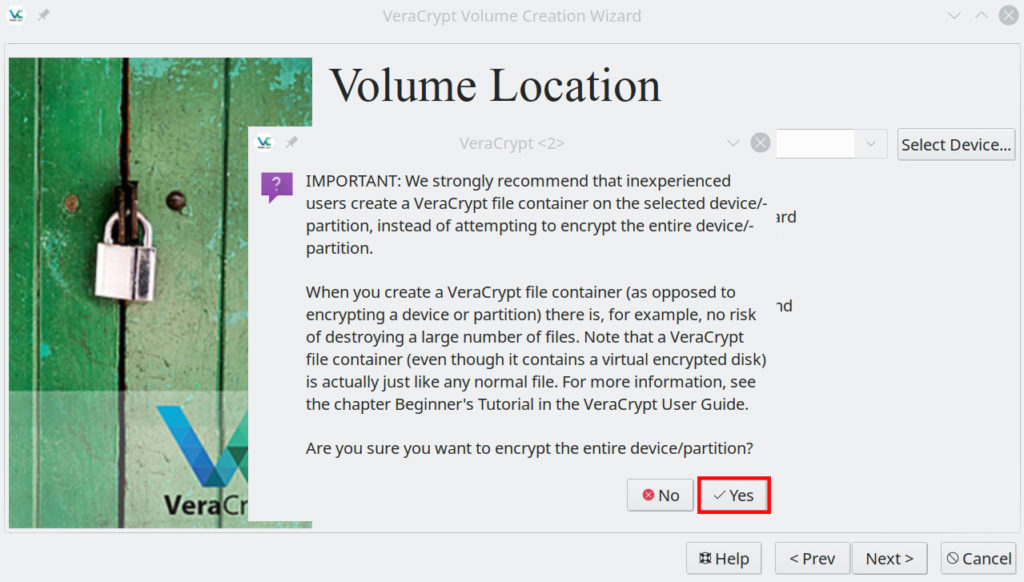
Volume confirmation dialog

A dialog will pop up confirming you would like to proceed. Click on the “Yes” button.

veracrypt encryption screen

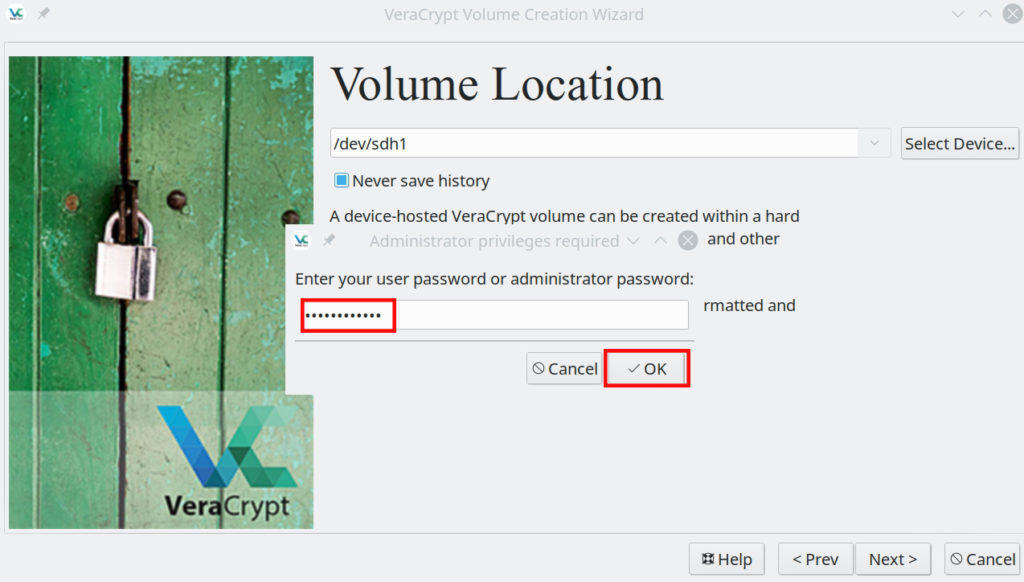
Enter the administrator password

You will receive a popup asking you to type in the administrator password. Afterwards click on the “OK” button.

veracrypt encryption screen

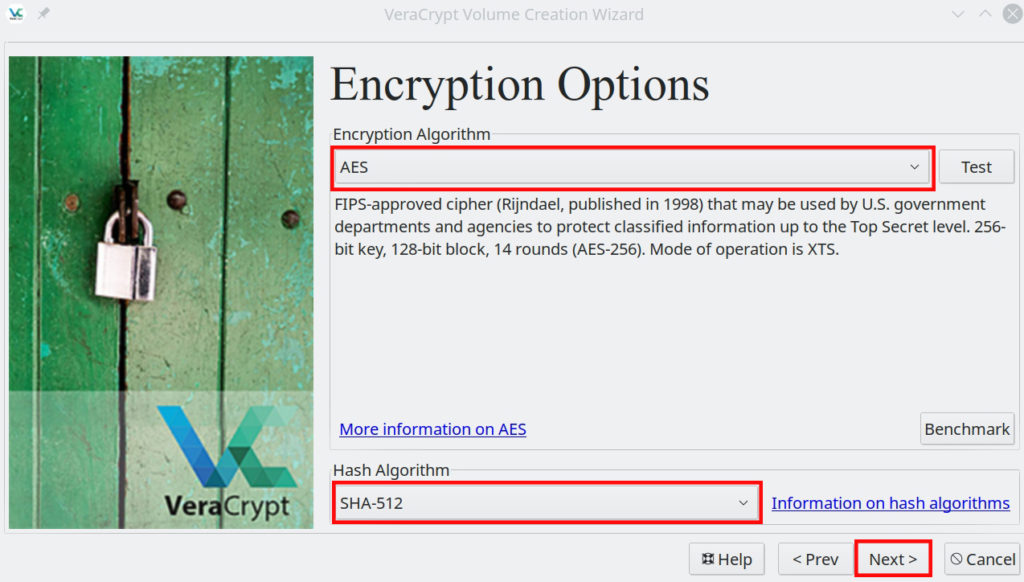
Choose VeraCrypt encryption algorithm

On the next page you will be asked to choose a Encryption Algorithm and a Hash Algorithm. I recommend selecting “AES” for the first box, and “SHA-512” for the second box. After selecting your options click on the “Next” button.

veracrypt encryption screen

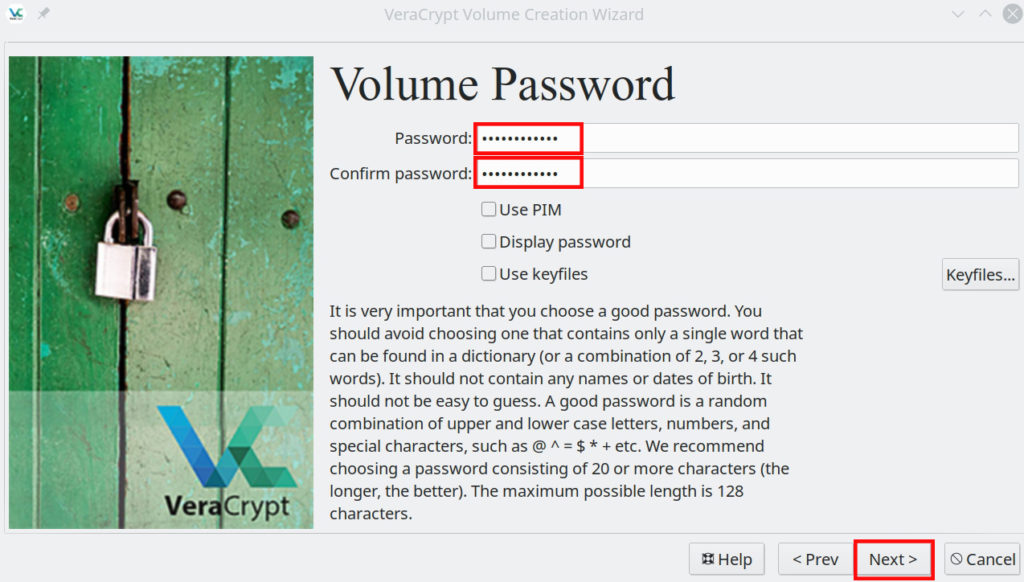
Type and repeat the encryption password

The next part of the wizard will have you enter and re-enter the encryption password you would like to use for the encrypted volume. Enter the passwords and click on the “Next” button.

veracrypt encryption screen

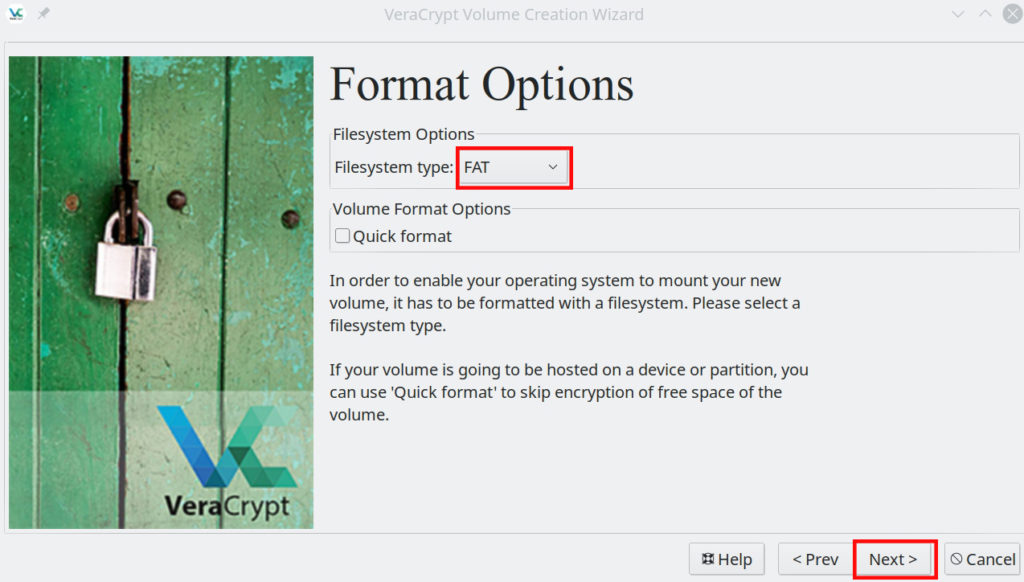
Select encrypted USB format options

On this page it will ask you to choose your flash drives format options. I recommend selecting “FAT”. Afterwards click on the “Next” button.

veracrypt encryption screen

Encrypt the USB partition

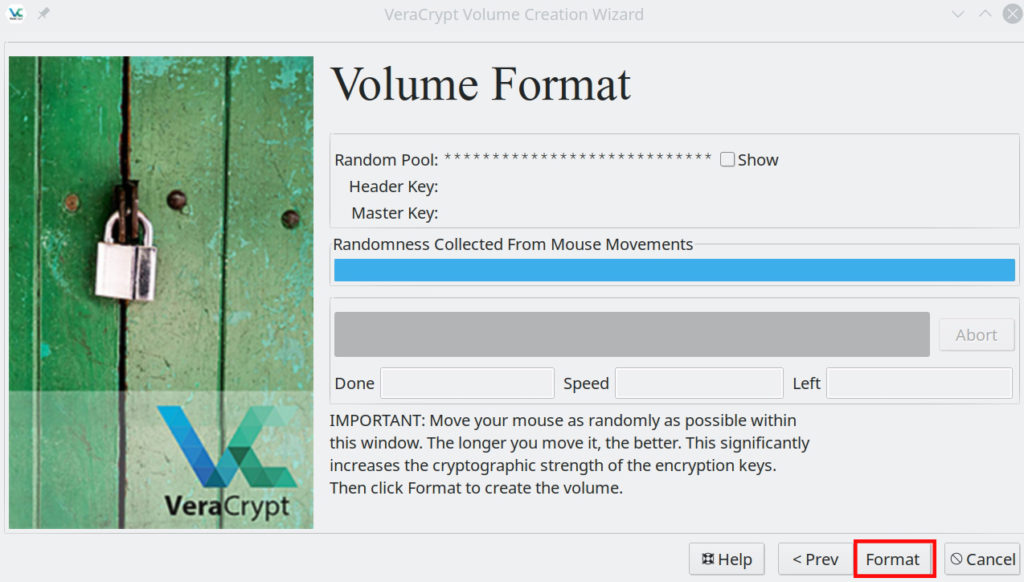
For this step you will have to randomly move your mouse for 20-30 seconds to generated the Random Pool key. The longer you do it for the better the cryptographic strength will be. After the blue bar is full click on “Format” to start the encryption process.

veracrypt encryption screen

Volume format dialog

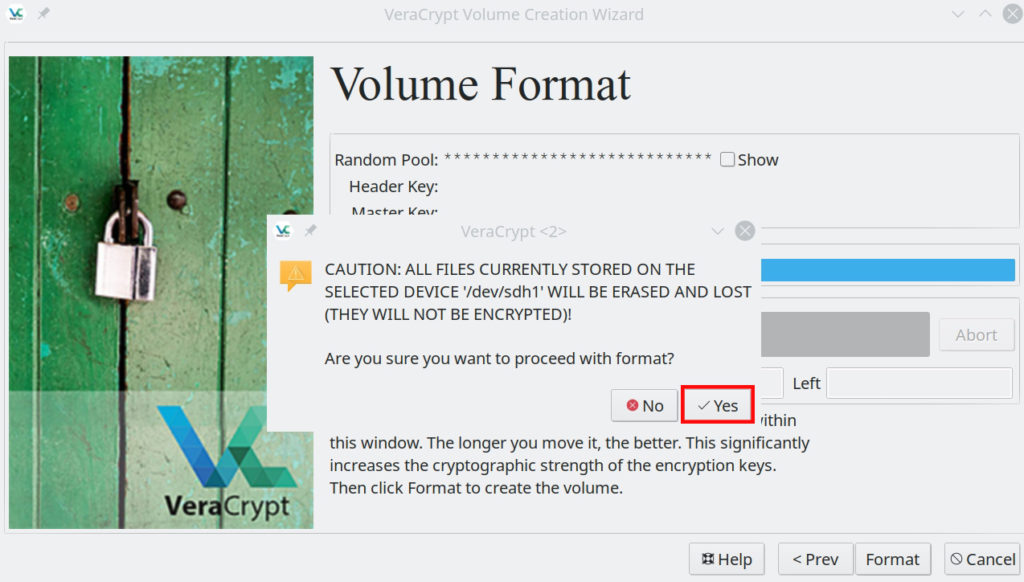
You will be asked to confirm that you want to continue encrypting. Press the “Yes” button.

veracrypt encryption screen

Wait for device to encrypt

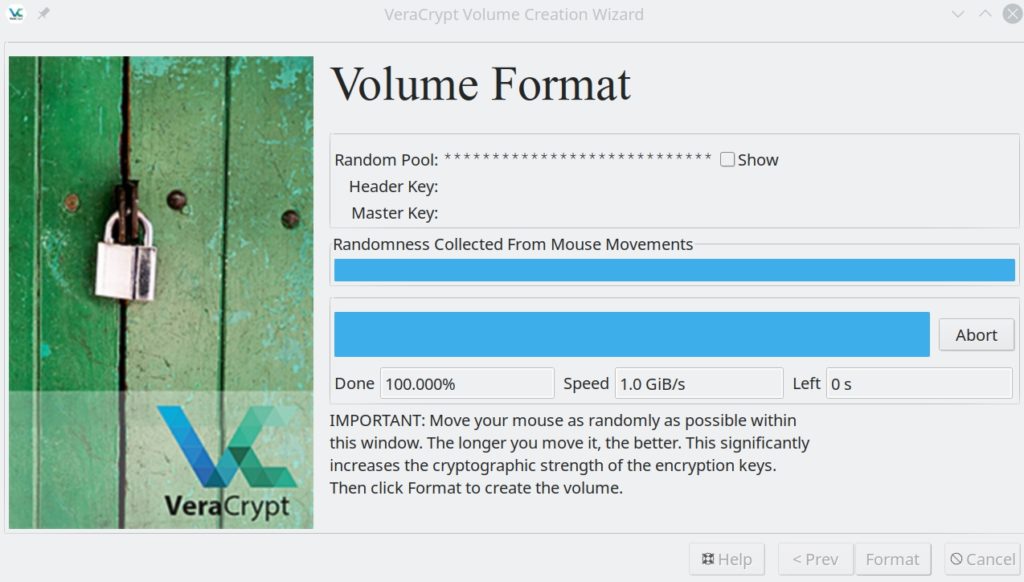
The encryption process could take anywhere from 5-30 minutes. Be patient and wait for the process to complete.

veracrypt encryption screen

Encryption successful dialog

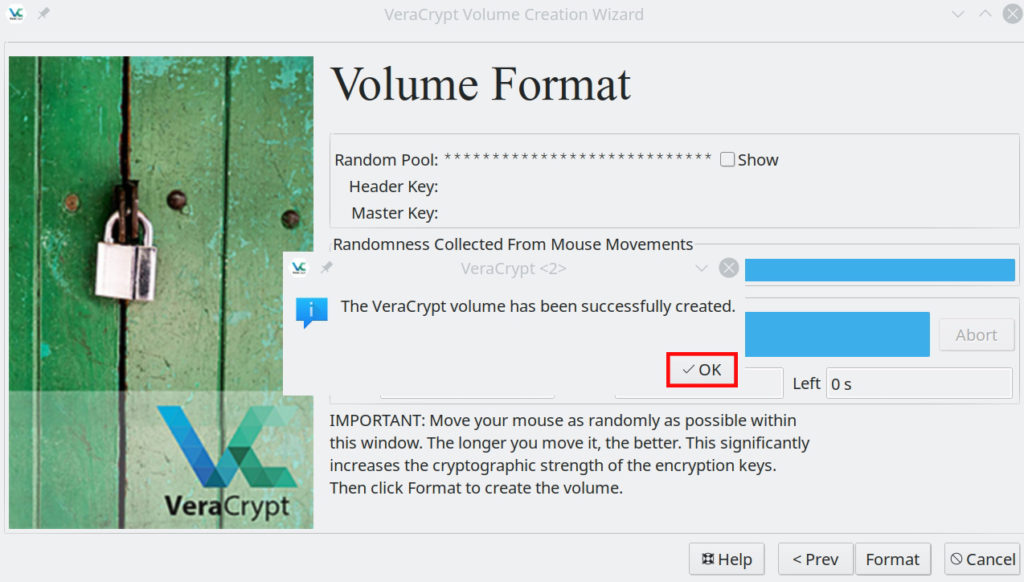
When the device has finished the encryption process you will get this dialog telling you it is complete. Click on the “OK” button.

veracrypt encryption screen

Exit VeraCrypt

Now that your flash drives partition is encrypted you can exit the application by clicking the “Exit” button.

veracrypt encryption screen

Mounting encrypted volume

In this part of the tutorial you will learn how to mount the encrypted partition that you just created.

View the devices

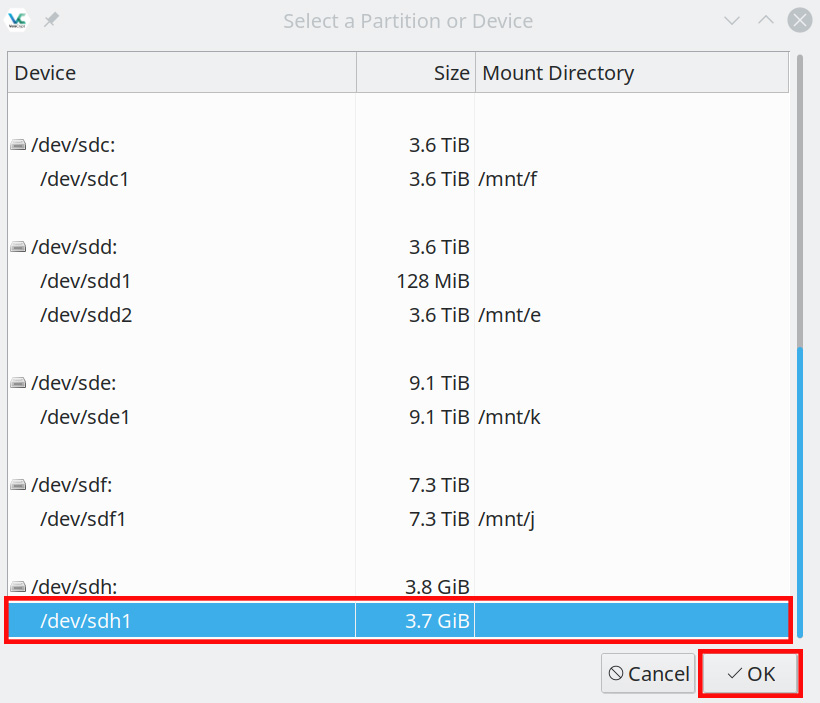
The first step to mounting your partition is to select the device. Click on “Select Device…”.

veracrypt encryption screen

Select an encrypted partition to mount

Next you will want to select the partition of the flash drive that you encrypted in the above steps.

veracrypt window

Type in encrypted USB’s password

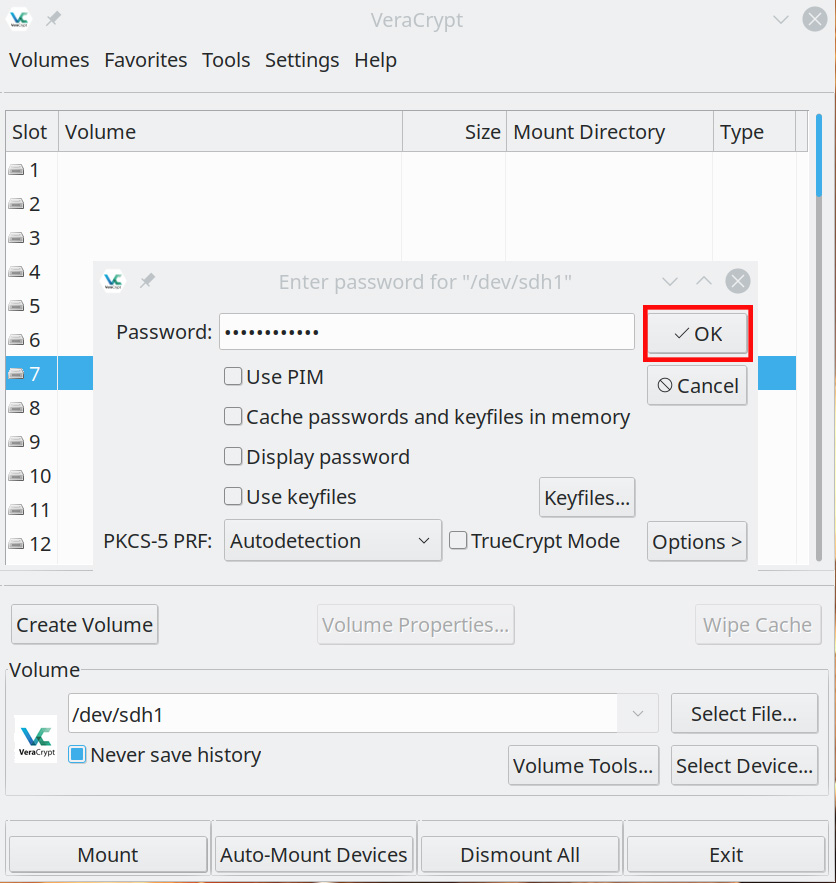
Finally type in the encrypted flash drives password.

veracrypt window

Opening encrypted USB drive

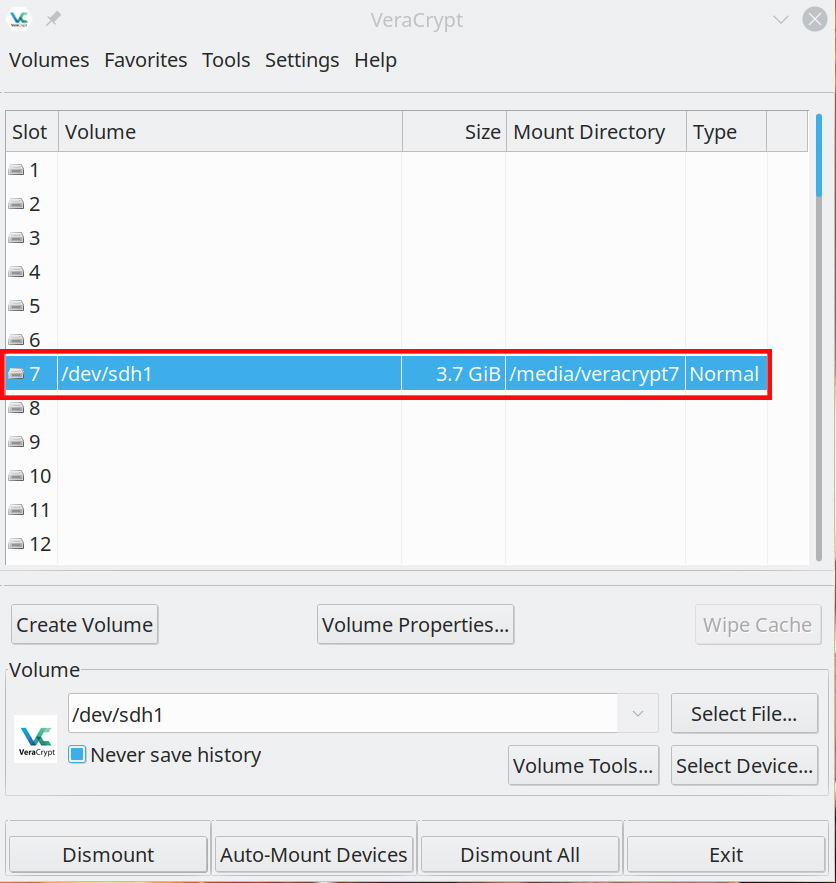
The encrypted flash drives partition will now show up in the VeraCrypt window. To open it and browse the files double click on the highlighted light blue bar. If you want to dismount the encrypted partition just select it and click “Dismount”. You now know how to download, install, and encrypt flash drive partitions using VeraCrypt on Ubuntu 22.04.

veracrypt window

Related Resources

View our list of The Top 5 Programming Languages to Learn in 2022.

Learn How to Generate Images using Neural Networks with VQGAN.

Click here to learn How to Install MySQL on Ubuntu Server 22.04 LTS.

View our Programming Articles and Tutorials.

Learn more cool things in Linux with our Linux Tutorials.

View all of our available online tools and converters at Formatswap.com.
Affiliate Disclaimer:

This website may contain affiliate links. This means we may receive a small commission if you purchase through our links. However, this does not impact our reviews and comparisons, as we only promote products we personally believe in. We are independently owned and the opinions expressed here are our own.

How to install and configure Nginx – Ubuntu 20.04

splash image install nginx

What is Nginx? Nginx is a opensource web server designed with developers in mind. It was created by Igor Sysoev in 2004. It supports reverse proxying, caching, load balancing, RTMP media streaming, and many more advanced features. In this tutorial you will learn how to install and set up Nginx on Ubuntu 20.04.

Getting Started

Open your terminal prompt of choice.

Update your packages repository and packages.

sudo apt update && sudo apt upgrade -y

Then, install Nginx:

sudo apt install nginx

Setting up UFW Firewall (Optional – Highly Recommended)

If UFW is not enabled or configured, you will first need to enable it. You can check the status of the firewall using this command:

sudo ufw status

Then enable it with this command:

sudo ufw enable

If you are connected to your machine via SSH, make sure it is allowed through the firewall before disconnecting.

sudo ufw allow ssh

Next, we will be allowing Nginx through the firewall – there are 3 settings to be aware of when allowing the web server through. ‘Nginx Full’, ‘Nginx HTTP’, and ‘Nginx HTTPS’. ‘Nginx Full’ allows traffic through both HTTP (port 80) and HTTPS (port 443), whereas HTTP and HTTPS open only their respective ports. It is highly recommended that you only open port 80 to your local network or for non-secure pages (Does NOT process sensitive data!). You will only be able to use HTTPS if you have an SSL certificate – otherwise, your browser or any visitor to your site will get a ‘Site Not Secure’ warning. We will be using ‘Nginx HTTP’ for the purposes of the tutorial, but you may replace the text in the command with the other parameters for your respective use case.

sudo ufw allow 'Nginx HTTP'

If you have any other services running on the machine that you need external clients to have access to, such as port 8080 for a testing server, you may open them with the following command:

sudo ufw allow <port>/<method>
Example: sudo ufw allow 8080/tcp
Example: sudo ufw allow 8000/udp

Configuring Nginx

Finally, it’s time to set up your web server! We will be accessing the root directory for the site, where you will access and store your files. We will also be setting up the configuration for the enabled sites so you can access your site from the web. You should be able to see the default site when going to the URL/IP address of the server.

You can view the IP address of your server by typing the command:

ip a s

Your IP will be the address that is not the loopback address (127.0.0.1) and is usually the second “inet” address depending on your server’s configuration.

welcome to nginx splash screen

If everything is set up correctly, the above image should be the contents of the page.

Next, you will navigate to your site’s configuration to organize things properly and keep your install clean. First, you will disable your site’s default configuration. You can do this by typing the following command:

 sudo unlink /etc/nginx/sites-enabled/default

Then, add a new configuration file for your site. We will be using nano for this example.

sudo nano /etc/nginx/sites-available/<site-name>

And add the following text to the file.

server {
    listen 80;
    listen [::]:80;
    root /var/www/<site-name>;
    index index.html;

    location / {
        try_files $uri $uri/ =404;
}

If you are also using SSL, you must insert the following below the first server block:

server {
    listen 443 ssl;
    root /var/www/<site-name>;
    index index.html;

    location / {
        try_files $uri $uri/ =404;
}

Press CTRL+X and then press Y to save the file.

The server is almost set! You will need to enable the site to make it accessible. You can do this by typing the command:

sudo ln -s /etc/nginx/sites-available/<site-name> /etc/nginx/sites-enabled/

Then test your configuration using the command:

sudo nginx -t

If everything checks out, you can restart your Nginx process.

sudo systemctl restart nginx

Final Steps

You must add the directory to your server before you are able to store your files and make them available.

sudo mkdir /var/www/<site-name>

Lastly, create a an index page for your server and you are all set!

sudo nano /var/www/<site-name>/index.html

Here is some example code that you can use for testing to make sure everything is working:

<html>
<body>
    <h1>Hello, Nginx!</h1>
    <p>This is a test page for Nginx.</p>
</body>
</html>
test page for nginx

If you see this message, you have successfully set up your very own Nginx server on Ubuntu 20.04!

Related Resources

View our list of The Top 5 Programming Languages to Learn in 2022.

You may also like The 5 Best Linux Distributions to Install in 2022.

Setting up MySQL on Ubuntu 22.04

View our Programming Articles and Tutorials.

Learn more cool things in Linux with our Linux Tutorials.

View all of our available online tools and converters at Formatswap.com.
How to Install MySQL on Ubuntu Server 22.04 LTS

install mysql splash image

In this tutorial I will teach you how to download and install MySQL server on Ubuntu 22.04 LTS. Additionally you will learn how to secure your installation and setup a root account. MySQL is vital to have installed if you want to work with storing and receiving data on your website or web application. The first version of MySQL was released on the 23rd of May 1995 by a Swedish company MySQLAB. The other popular database manager MariaDB was created by the same company. Ever since MySQL has grown to be one of the most popular database software’s on the web. Before we begin make sure you have a Ubuntu 20.04 server installed onto a computer or a virtual machine. Also don’t forget to install the openssh-server package if it is not installed. This will give you the ability to ssh into the machine to setup MySQL.
Update and upgrade Ubuntu

sudo apt update && sudo apt upgrade

The above commands will both update and upgrade your Ubuntu install to the latest package versions.

Install the MySQL Server & Client to Ubuntu 20.04

sudo apt install mysql-server && sudo apt install mysql-client

This will install both the MySQL Server and the MySQL Client to your machine. Unlike previous versions of Ubuntu Server you do not have to add any SQL repository’s before installing. This is because Ubuntu 22.04 LTS contains the packages in the standard system repository.

Confirm the installed MySQL version

To confirm which version of MySQL you have installed run the following command. You will receive an output with the version number.

mysql --version

Update MySQL security settings

The default installation of MySQL has several security issues. We need to run the following commands to fix these issues.

sudo mysql_secure_installation

This will open the MySQL secure installation wizard. We need to answer a few questions in the wizard to continue. The first question will be:

Would you like to setup VALIDATE PASSWORD COMPONENT?

Type in “Y” on the keyboard and press “Enter”. This will bring us to the next question which will have us enter a password validation policy.

There are three levels of password validation policy:

LOW    Length >= 8
MEDIUM Length >= 8, numeric, mixed case, and special characters
STRONG Length >= 8, numeric, mixed case, special characters and dictionary                  file

Please enter 0 = LOW, 1 = MEDIUM and 2 = STRONG:

Choose any one of these options. I will be using option #2 MEDIUM. After you type in the number press “Enter” and you will be brought to the following screen to set your password.

Please set the password for root here.

New password:

Re-enter new password:

Do you wish to continue with the password provided?

Type in the password you would like to use and press enter. Next re-enter the password you have chosen. Finally type “Y” than press “Enter” to continue with the password provided. There is the possibility you will receive the following error.

Failed! Error: SET PASSWORD has no significance for user 'root'@'localhost'                            as the authentication method used doesn't store authentication data in the MySQ                           L server. Please consider using ALTER USER instead if you want to change authent                           ication parameters.

If you get this error you will have to exit the script by pressing Ctrl+C. After you exit out login to MySQL.

sudo mysql

Then set the MySQL password.

ALTER USER 'root'@'localhost' IDENTIFIED WITH mysql_native_password by 'SuperSecure1';

*Change the password SuperSecure1 to something secure* Afterwards exit the program by running exit;

exit;

Then just rerun the secure installation setup script again.

sudo mysql_secure_installation

The secure installation setup script will then ask you the following questions. Answer them as you see below.

Enter the password for user root: type your root password and then press "Enter".
Change the password for root? Press N, then press "Enter".
Remove anonymous users? Press Y, then press "Enter".
Disallow root login remotely? Press Y, then press "Enter".
Remove test database and access to it? Press Y, then press "Enter".
Reload privilege tables now? Press Y, then press "Enter".

Testing MySQL Server login

Once you have finished running the MySQL secure installation script and have set up the root password you will need to test the login. This will allow us to login as the root user and setup a database ,tables and or users to go with it. Type the following to login.

sudo mysql -u root

Enter the root password you created in the above steps.

Managing your Ubuntu 22.04 MySQL service

There are several commands worth knowing for managing your MySQL service. One of the most important is the command to check the status of the service.

sudo systemctl status mysql

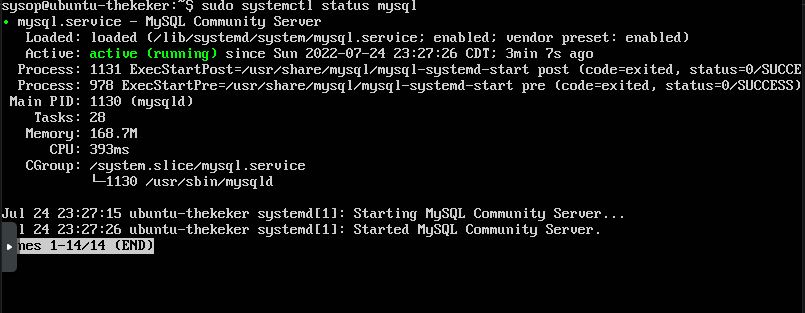
This will generate an output similar to this. It will tell you if it is running or stopped. Furthermore it will also output any errors.

systemctl mysql output

You will also want to know how to stop the MySQL service. You can do this with the following command.

sudo systemctl stop mysql

To start the MySQL service run:

sudo systemctl start mysql

To restart the MySQL service run:

sudo systemctl restart mysql

To disable the MySQL service run:

sudo systemctl disable mysql

Updating or removing MySQL on Ubuntu 20.04

If you are having any issues with your current version of MySQL or just want the latest features, just run the update command. This will update MySQL and your Linux system to the latest version.

sudo apt update && sudo apt upgrade

If you no longer want MySQL server installed you can easily remove it with the following command.

sudo apt autoremove --purge mysql-server

When you get the message “Do you want to continue?” just type “Y” than press “Enter”. MySQL will be purged and uninstalled.

Related Resources

View our list of The Top 5 Programming Languages to Learn in 2022.

You may also like The 5 Best Linux Distributions to Install in 2022.

If you want to learn how to generate images with neural networks click HERE.

View our Programming Articles and Tutorials.

Learn more cool things in Linux with our Linux Tutorials.

View all of our available online tools and converters at Formatswap.com.