How to Create a Windows 10 Virtual Machine Using VirtualBox on Ubuntu 22.04

install virtualbox splash image

Welcome to our comprehensive tutorial on creating a Windows 10 virtual machine using VirtualBox on Ubuntu 22.04. In this article we will guide you through the step-by-step process of not only installing VirtualBox on your Ubuntu 22.04 system, but also constructing a new virtual machine within VirtualBox. Whether you’re a beginner or an experienced user this tutorial will equip you with the necessary knowledge to set up and configure Windows 10 within a virtualized environment. This will enable you to seamlessly run Windows applications on your Ubuntu system. So, let’s dive in and explore the exciting world of virtualization with VirtualBox!

Update and Upgrade Ubuntu 22.04
update and upgrade ubuntu

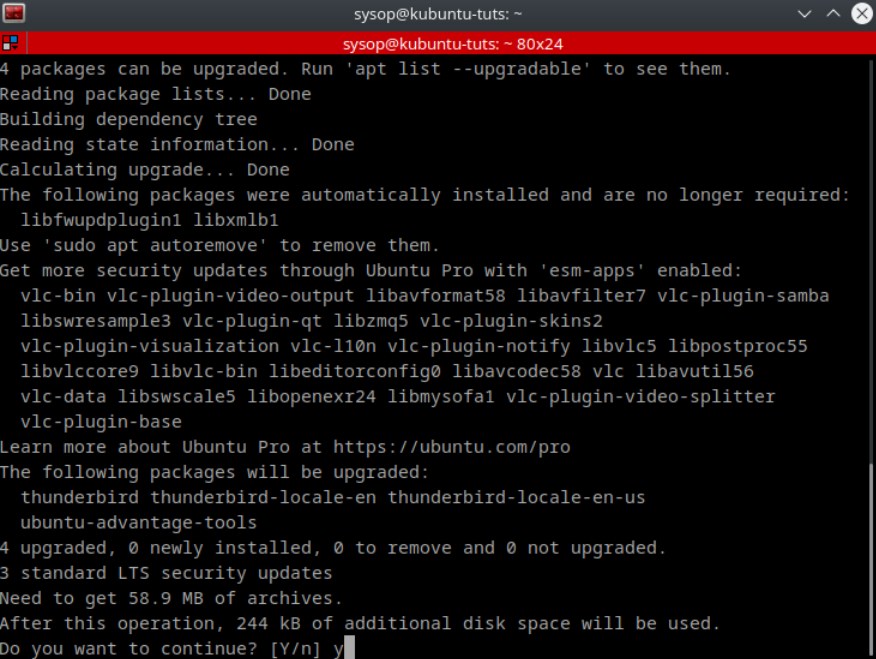
The first step is to update and upgrade Ubuntu 22.04. You can do so using the apt command.

sudo apt update && sudo apt upgrade

Install VirtualBox

install virtualbox

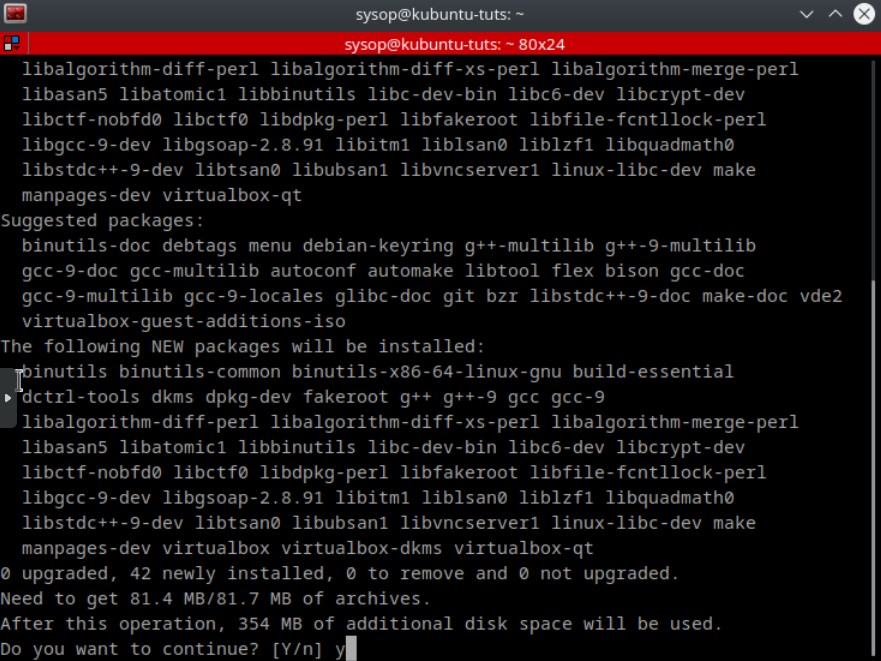
Next you will need to install the VirtualBox package as well as the VirtualBox DKMS package. You can install them both with the following command.

sudo apt install virtualbox virtualbox-dkms

Install VirtualBox Extension Pack (optional)
install virtualbox extensions

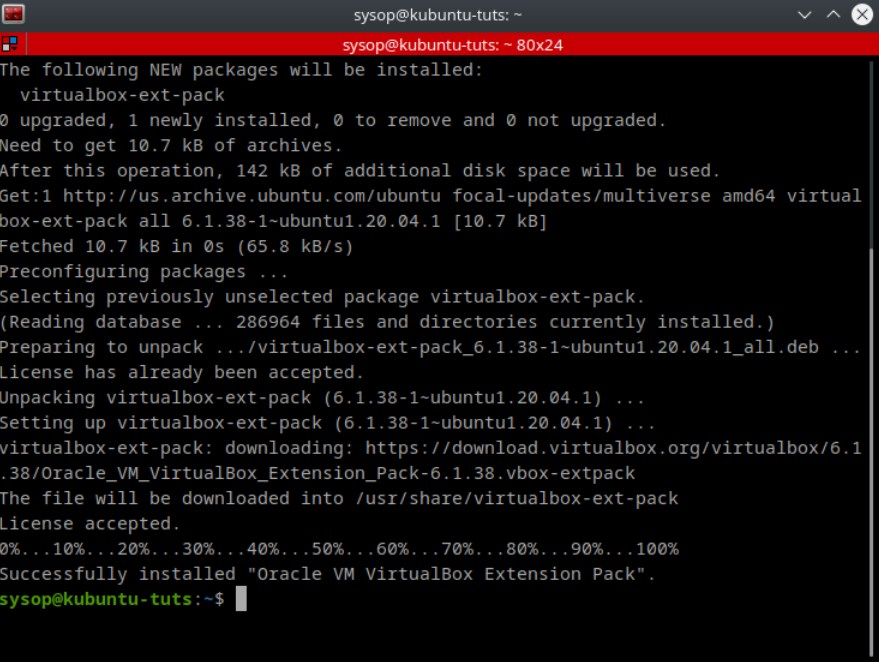
After installing the two packages you can install the VirtualBox extension pack. This gives you features such as shared clip board, and shared folders within your virtual machine. This step is optional but it is highly recommended.

sudo apt install virtualbox-ext-pack

Add Your User to the User Group

add user to virtualbox group

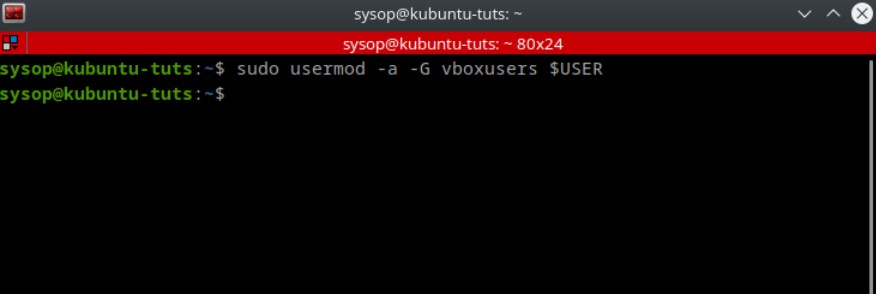
The final step of the installation process is to add your user account the the vboxusers group. Use the usermod command below to complete this operation.

sudo usermod -a -G vboxusers $USER

Download Windows 10 ISO

Download Windows 10

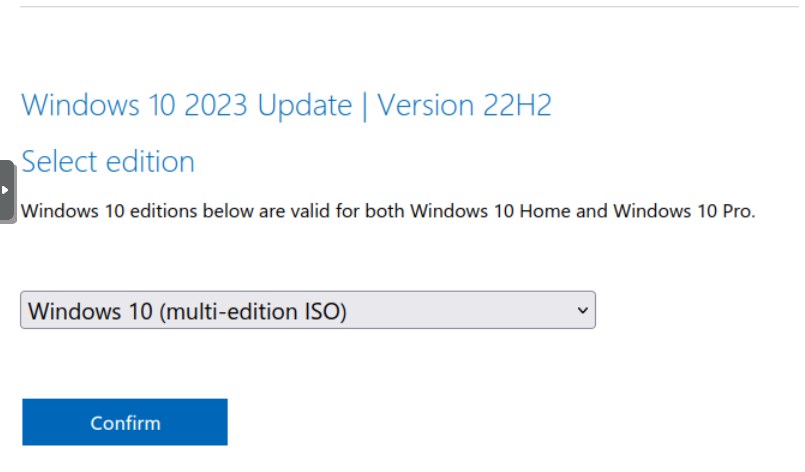
Now that VirtualBox is installed we can download our ISO that we will use for the virtual machine. In this example I will be using the Windows 10 (64 Bit) installation ISO file. However the Windows 11 process would be virtually the same.

Download Windows 10 (ISO File)

Create a New Virtual Machine with VirtualBox
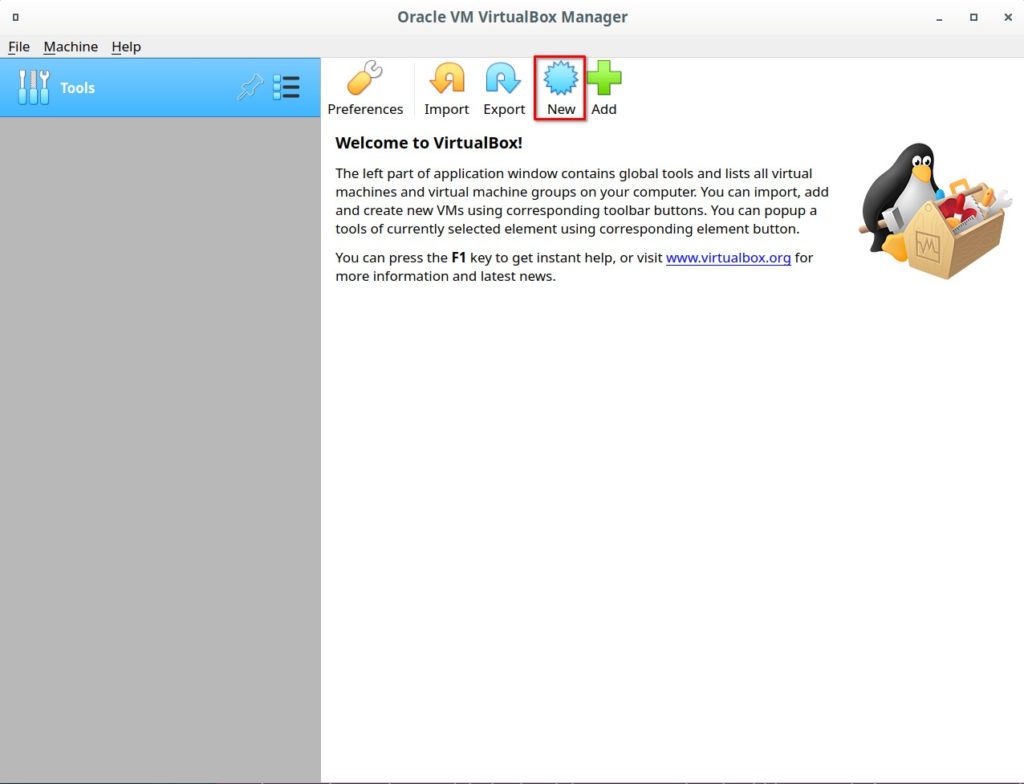
create new vm with virtualbox

The next step is to open VirtualBox and create a new virtual machine. Simply open the application and click on the “New” button as shown in the screenshot.

Set the Virtual Machines Options
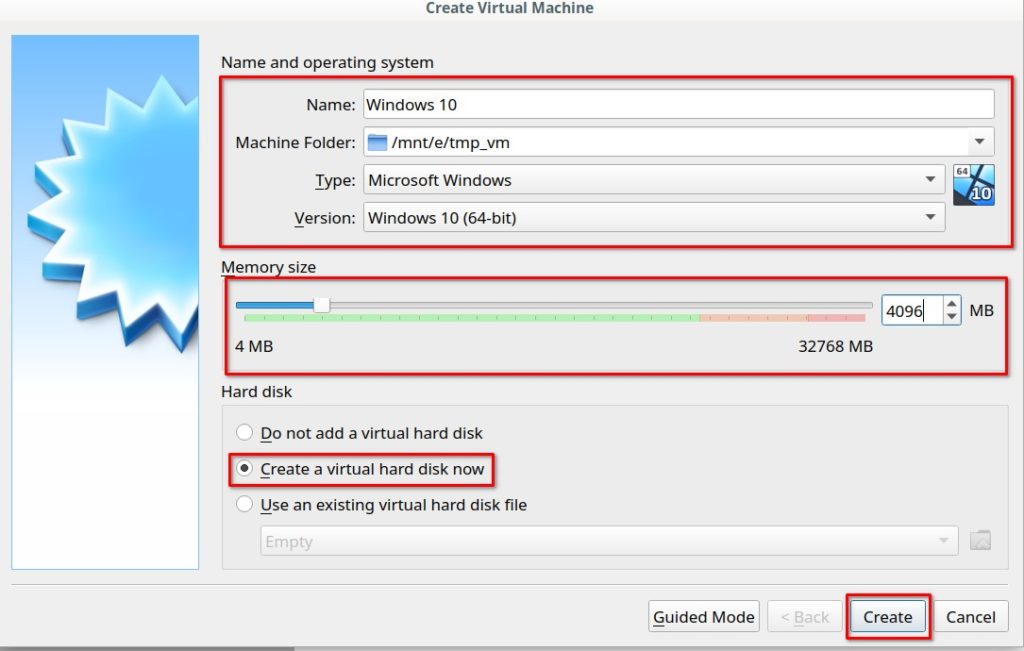
fill out virtualbox config

You will then be asked to choose a name for the virtual machine. Then you will need to select the amount of memory you want available to the virtual machine. Finally select “Create a virtual hard disk now” then press the “Create” button.

Create a Virtual Hard Disk
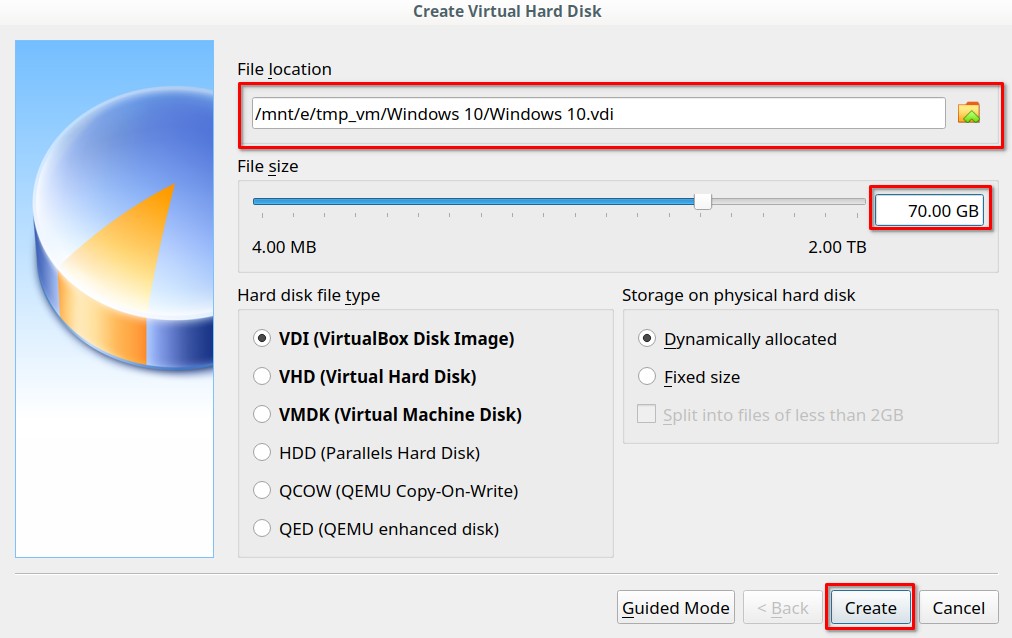
create the virtual hard drive

On the virtual hard disk creation wizard you will be asked to choose a location, as well as choose the disks size. After you have made your selections click on “Create” to finish.

Power on the Windows 10 Virtual Machine
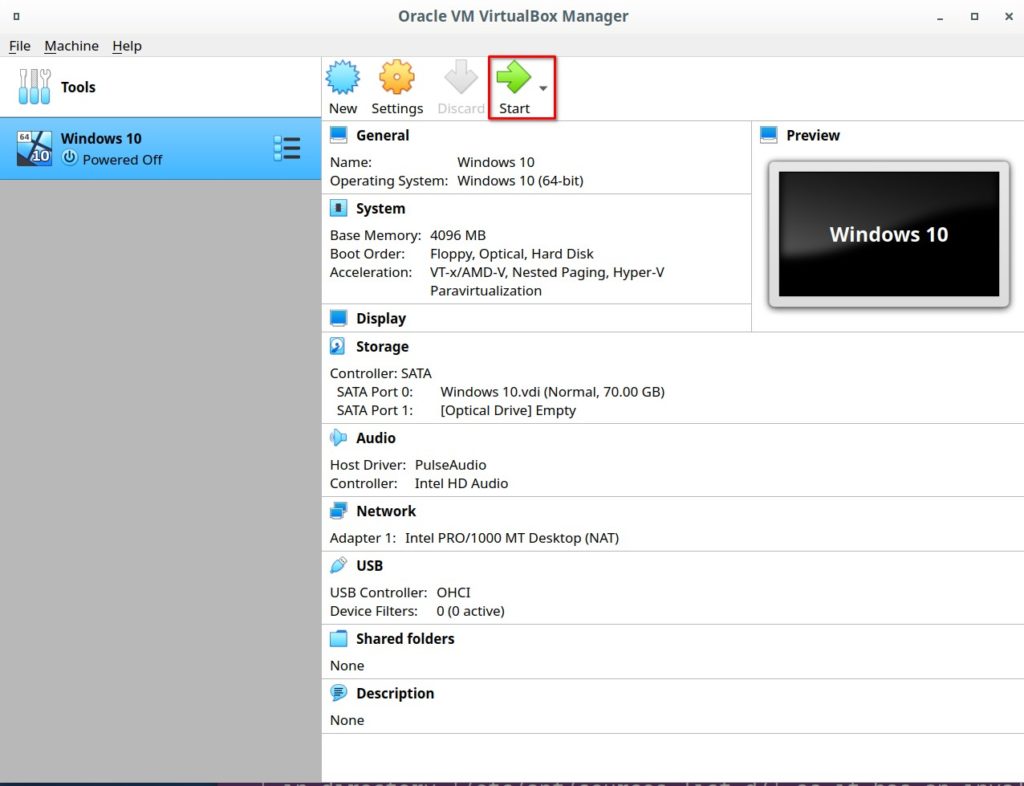
start the virtual machine

After creating the new virtual machine you will be greeted with this screen showing the Windows 10 VM. Click on the machine and then click “Start” to launch the machine.

Select the Boot Disk
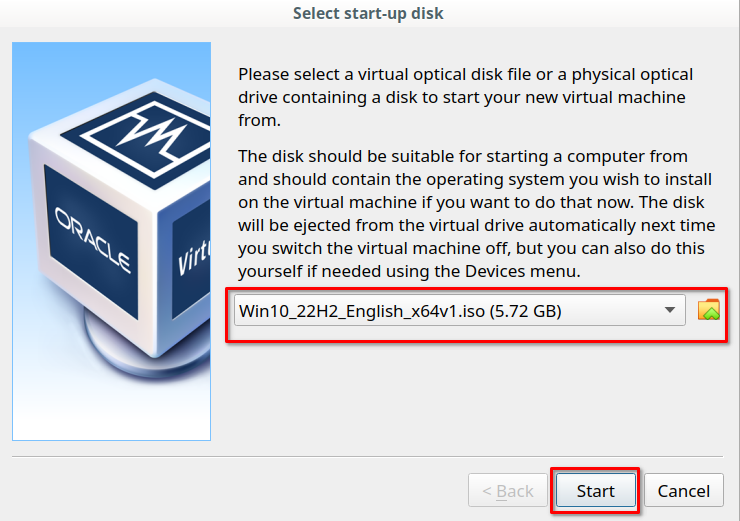
select the iso file

Once the virtual machine starts you will be asked to choose an installation ISO. Select the Windows 10 ISO file we downloaded earlier (or another of your choice). Then click on “Start”.

Start the Windows 10 Installation
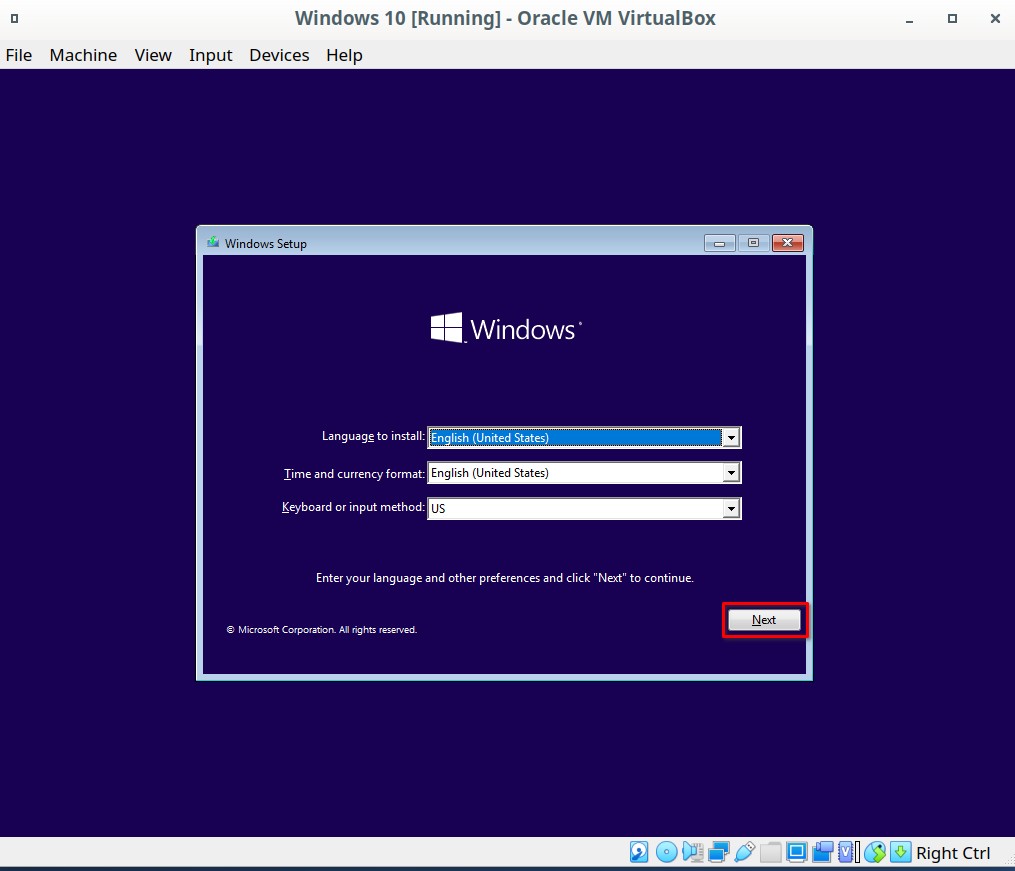
start installation process for windows 10

After a few moments you will reach the Windows 10 installation screen. Select a language and click “Next” to continue.

Click Install Now
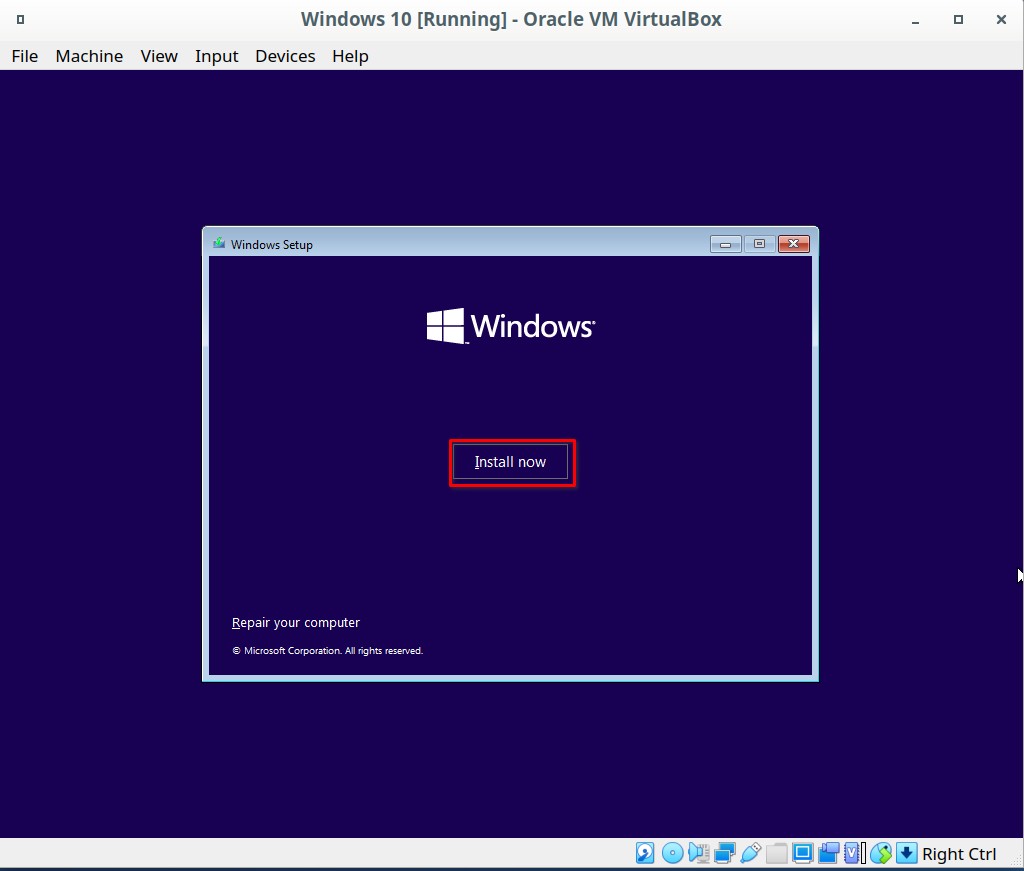
click install windows 10 now

On the next screen simply press “Install now”.

Windows Product Activation
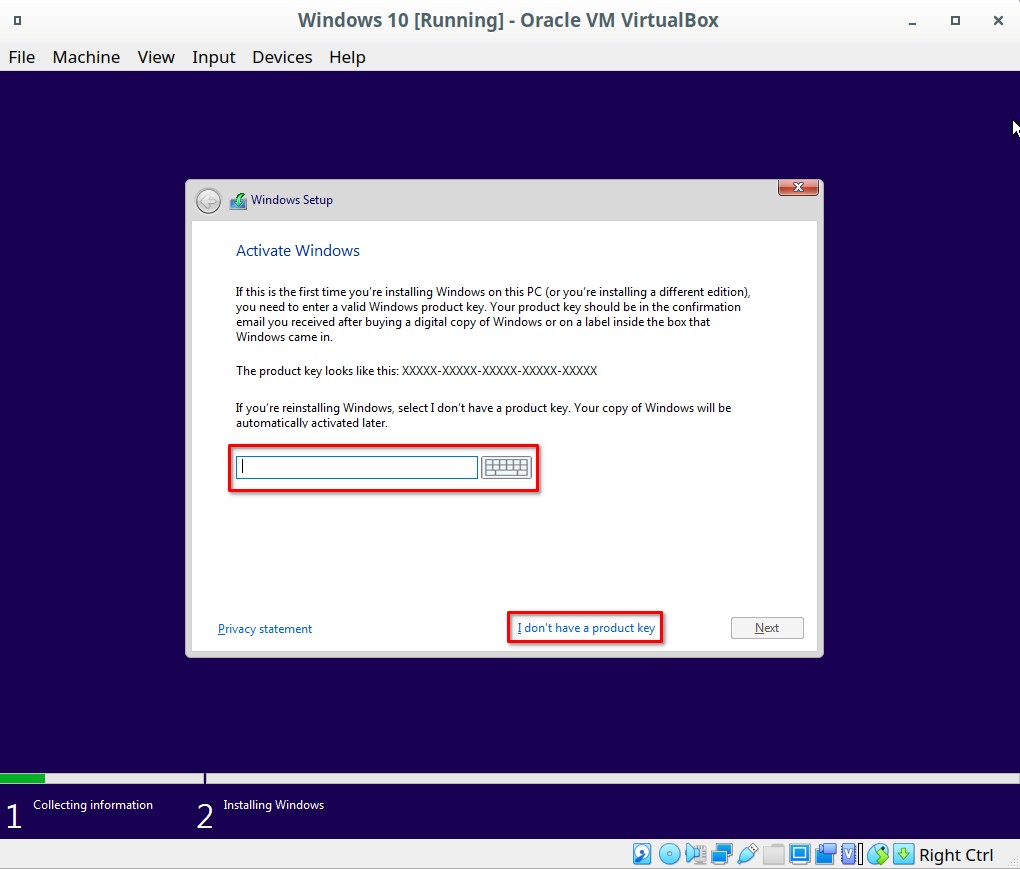
enter up skip product key

The next screen will ask you if you want to provide a Windows activation key. Either enter your key and press next, or click “I don’t have a product key” to continue.

Select the Version of Windows 10 to Install
select windows version

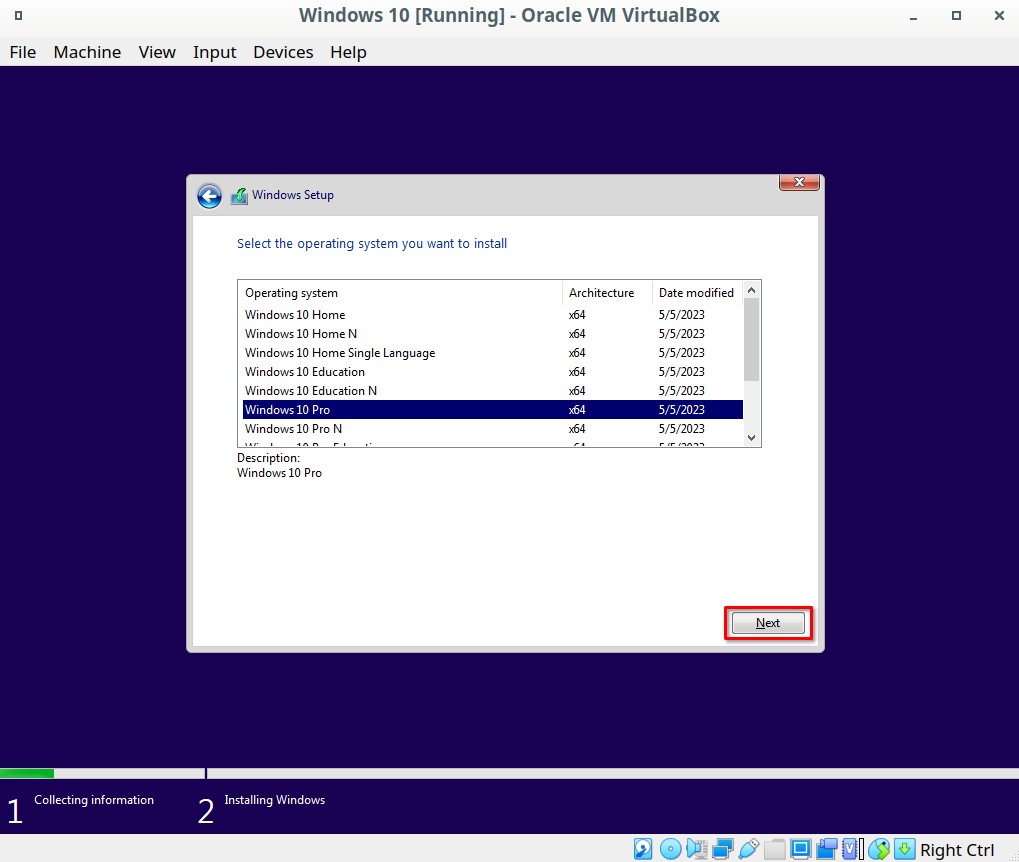
You will now be asked which version of Windows 10 you would like to install. For this demo I will be selecting “Windows 10 Pro”. After you select it click “Next”.

Accept the License Agreement
accept the licence

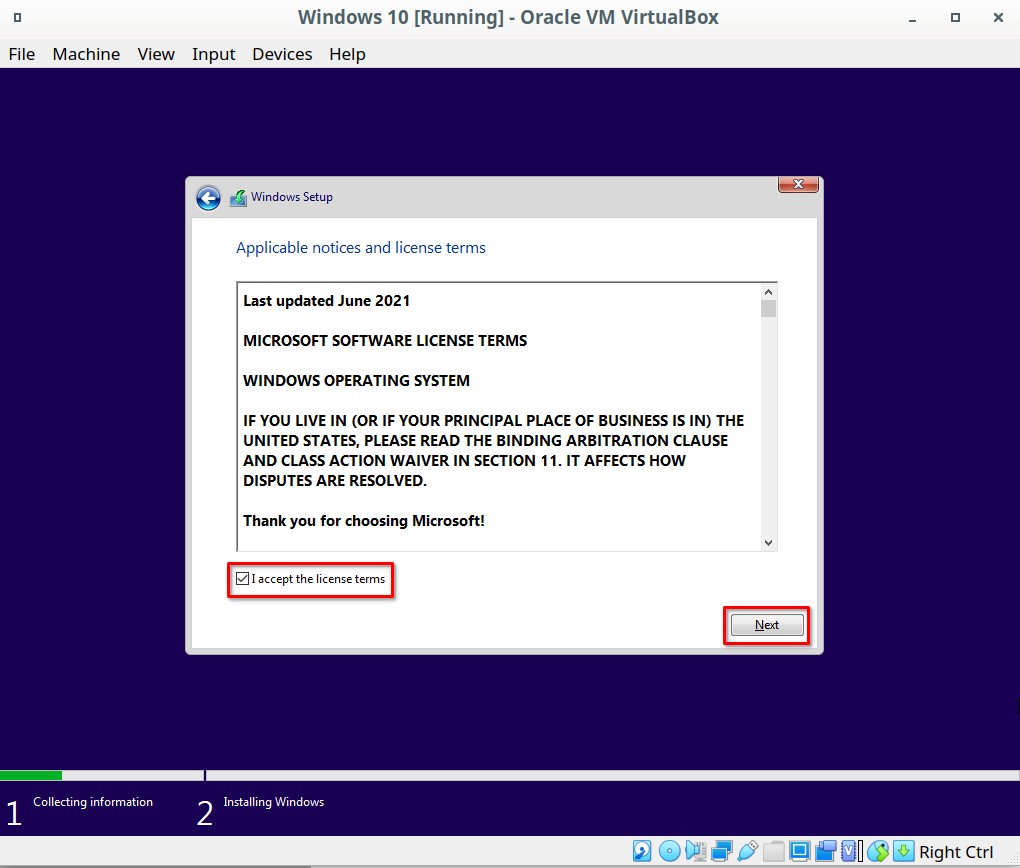
Now you will be asked to accept Microsoft’s license terms for the Windows Operating System. Enable the checkbox then click “Next”.

Choose Custom Windows Install
choose custom install

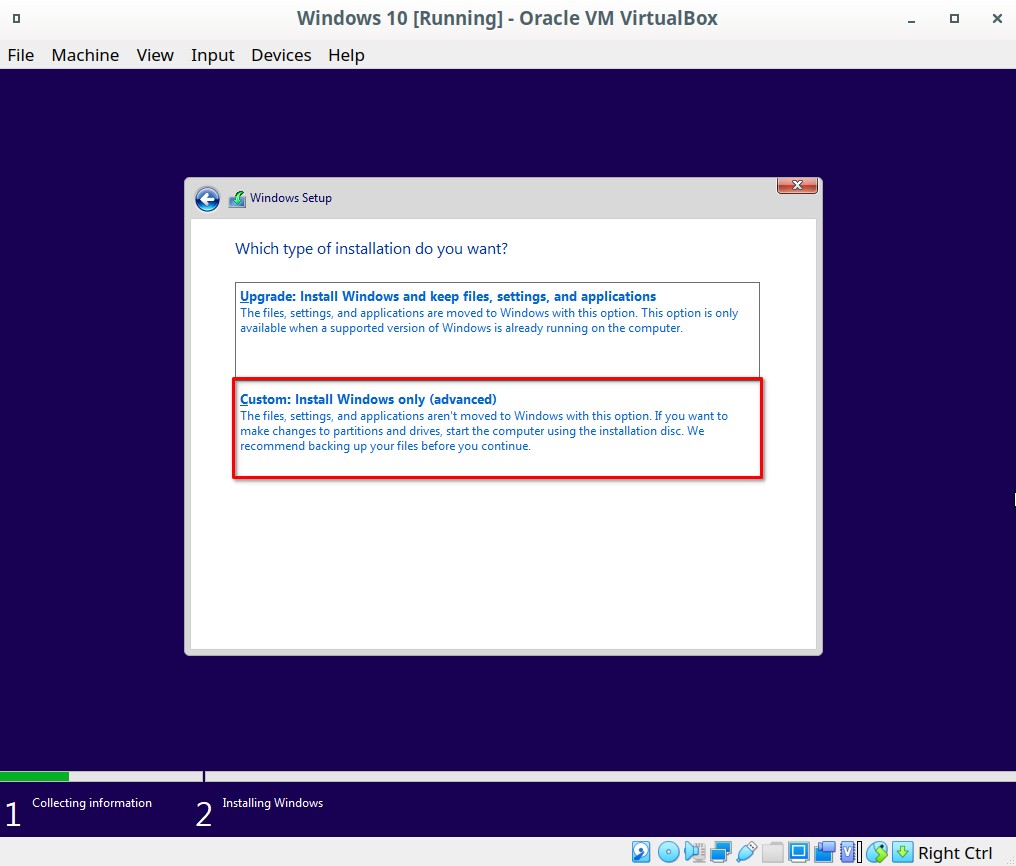
Next you will be asked if you would like to upgrade an existing Windows installation or install a fresh version. Since this is a virtual machine we will want to select “Custom: Install Windows only (advanced)”.

Choose Where to Install Windows
select the disk

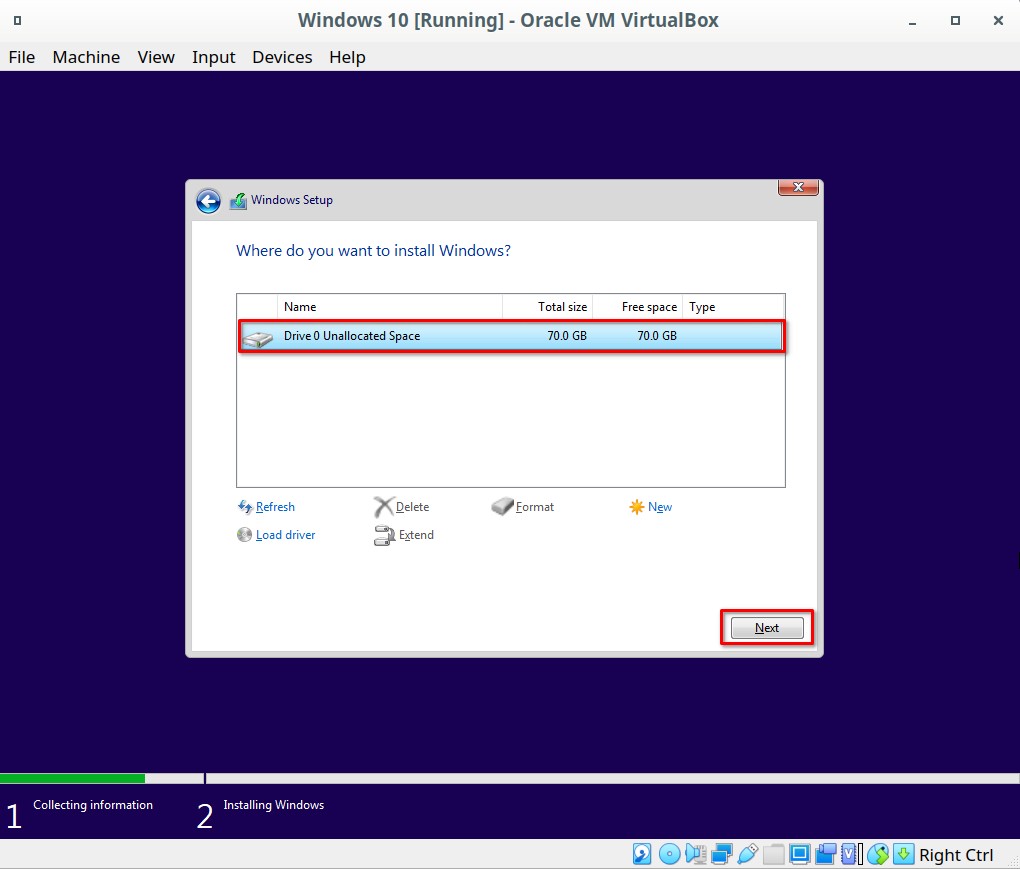
After selecting “Custom” you will be asked to choose the location Windows should be installed. Click on the virtual hard disk we created in the earlier, then click “Next”.

Wait for the Windows Installation to Complete
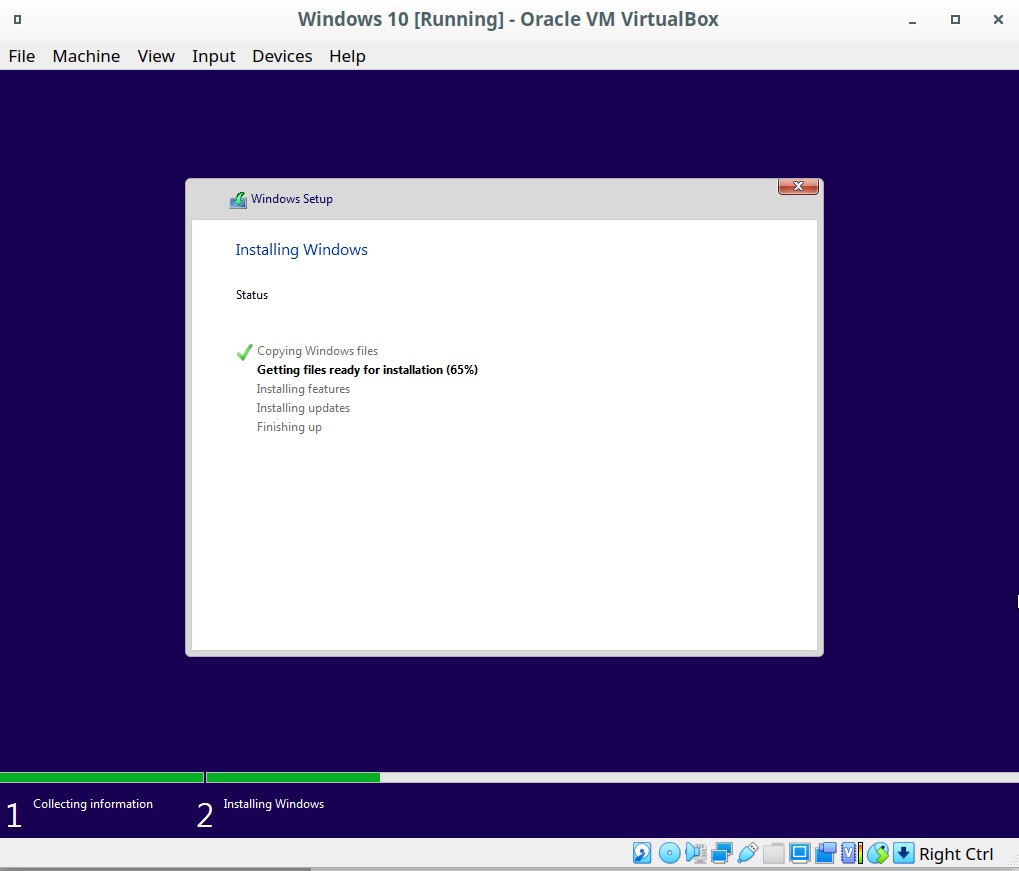
wait for windows 10 to finish installing

Once you reach this screen Windows is installing. Wait for the process to complete successfully.

Finalize the Windows 10 Configuration
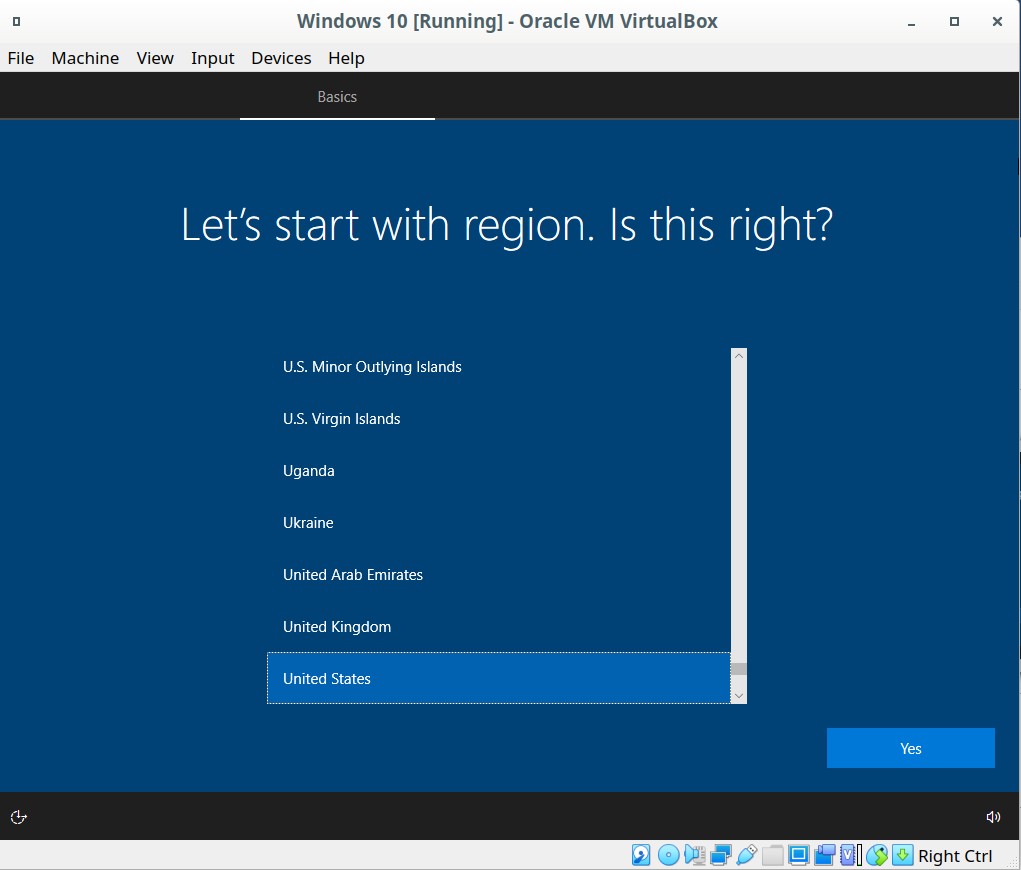
follow windows setup prompts

After the base installation finishes you will see this screen. Go through each of the steps and provide your personalization preferences.

Wait for Windows to Configure
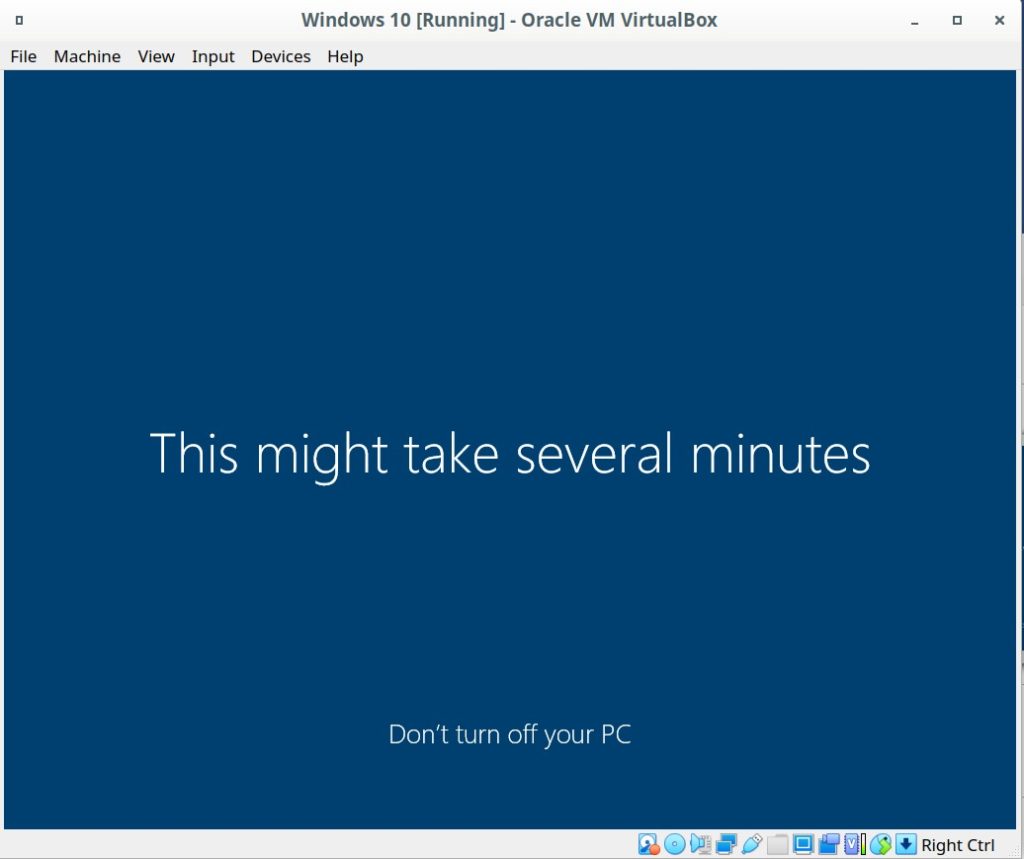
wait for final windows 10 setup

Wait for Windows 10 to finish configuring on the virtual machine.

Insert the VirtualBox Guest Additions CD
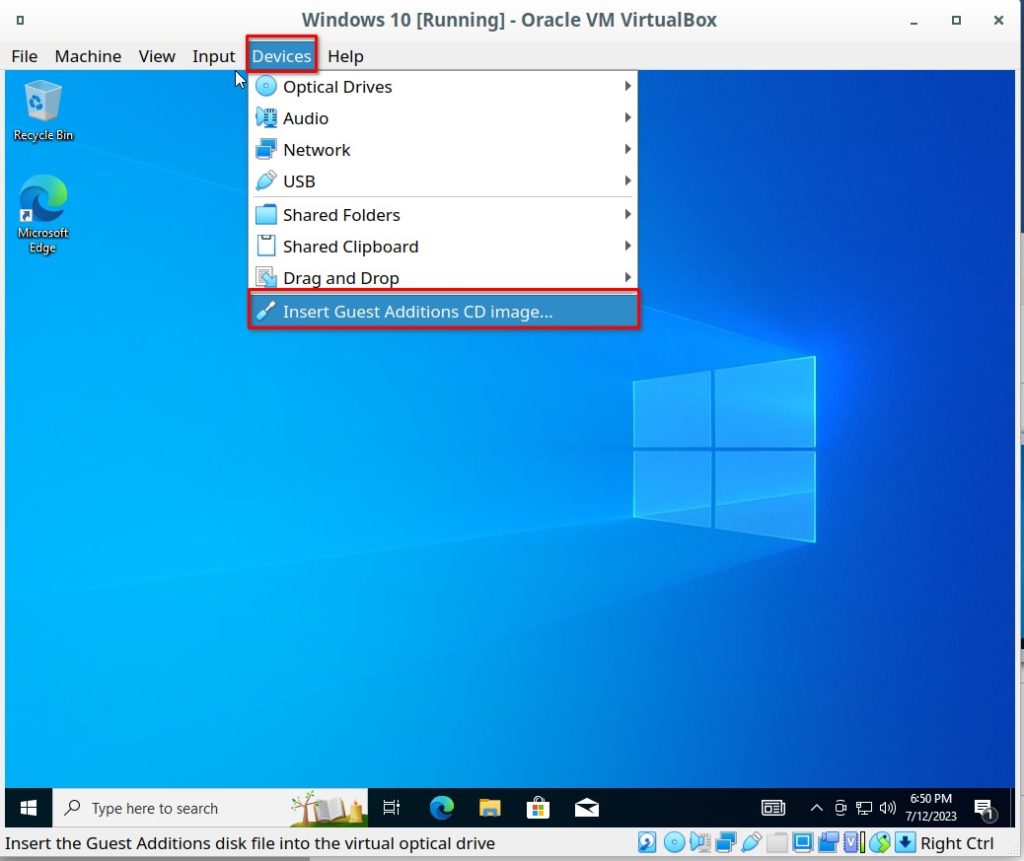
insert virtualbox guest cd

Once you are able to login to Windows we will want to install the VirtualBox Guest Additions package. To do so simply click on “Devices”, and then “Insert Guest Additions CD image…” shown in the screenshot above.

Open the VirtualBox Guest Additions CD
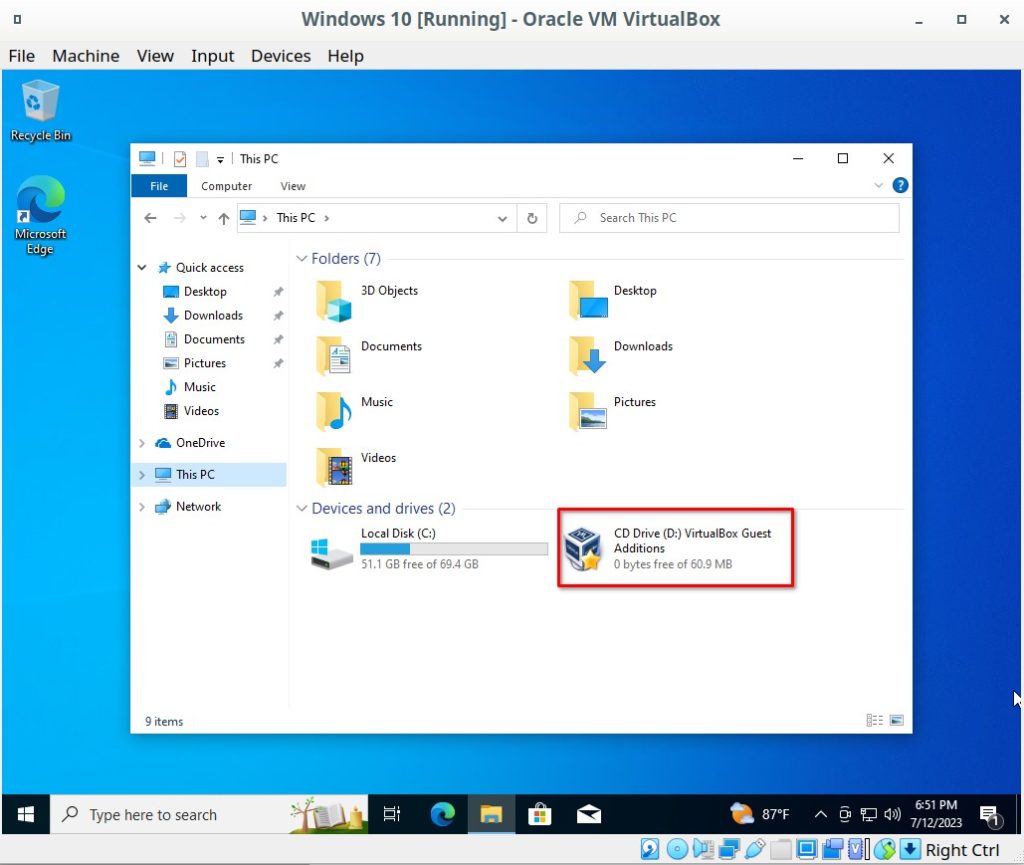
open guest additions cd

Now that you have inserted the CD it can’t be located in File Explorer under “This PC”. Double click on the CD to open it.

Launch the VirtualBox Guest Additions Installation Wizard
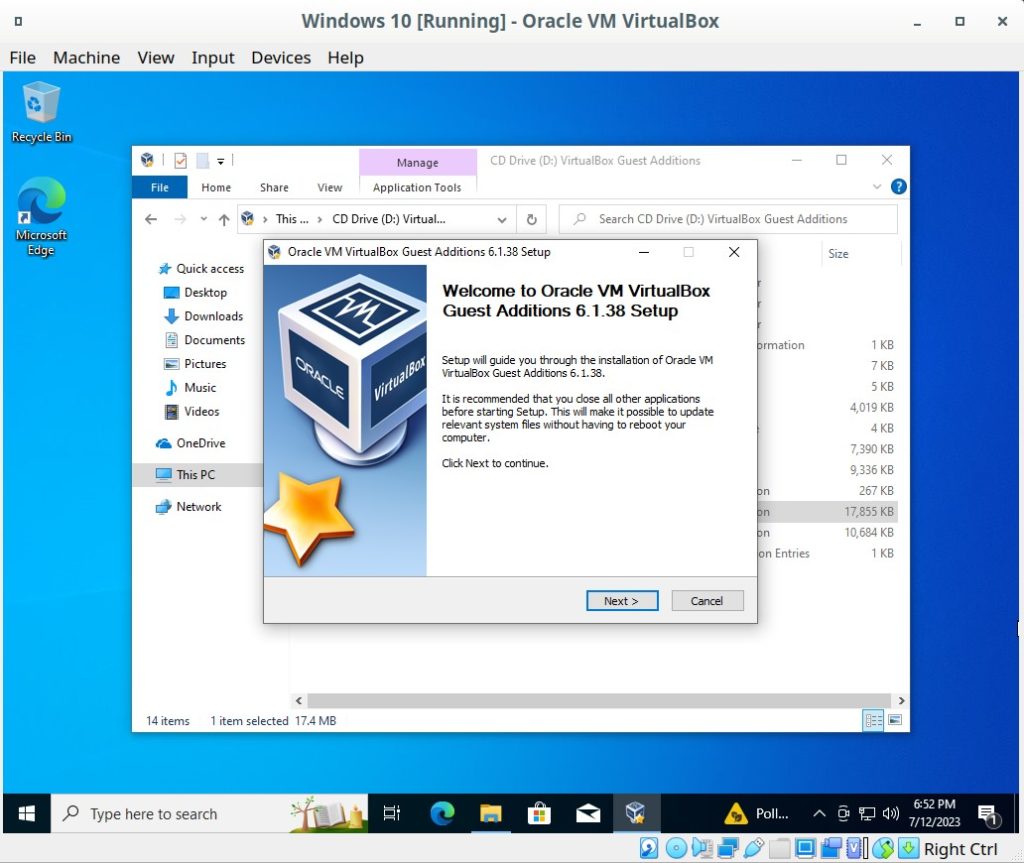
install guest cd

Launch the Oracle VM VirtualBox Guest Additions installer executable found in the CD folder. Follow the onscreen prompts to install the software.

Reboot the Windows 10 Virtual Machine
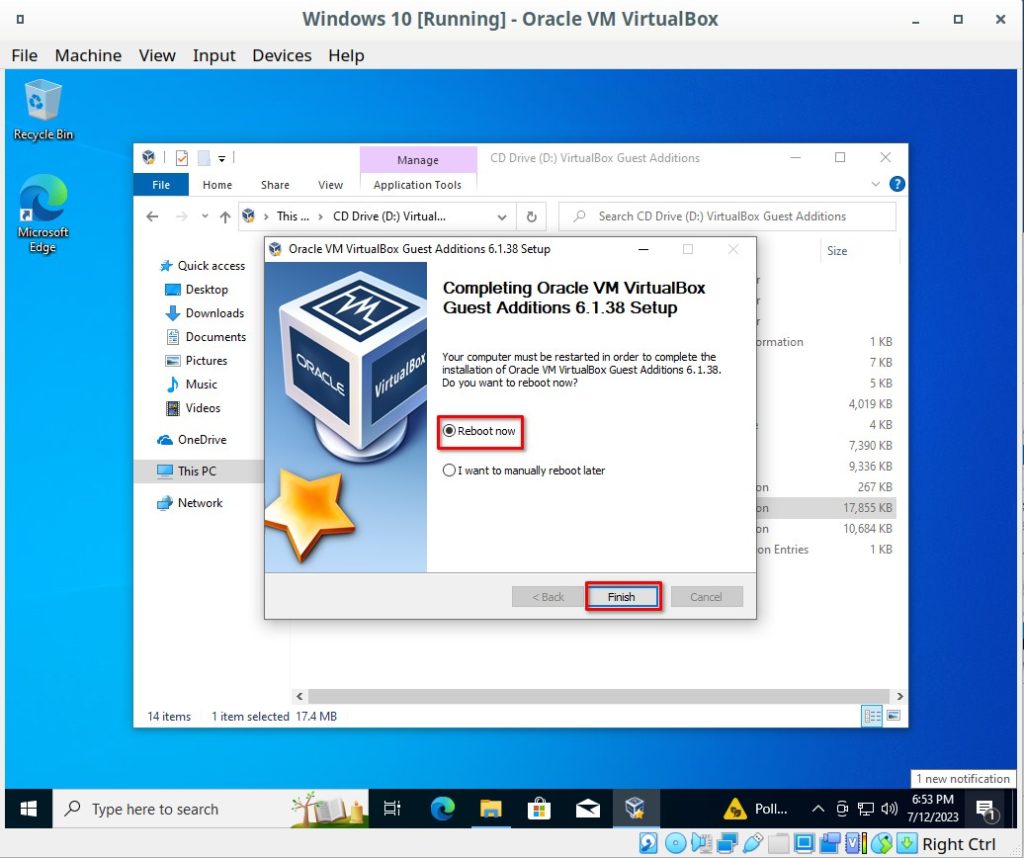
reboot virtualbox

The final step will be to reboot the virtual machine. Once the machine reboots you have successfully setup a Windows 10 virtual machine using VirtualBox in Ubuntu 22.04.

Questions?

If you have any questions or comments feel free to leave them below.

Related Resources

View our guide on How to Install WordPress on Ubuntu 22.04.

Learn How to Permanently Disable Windows Defender.

Check out our Installing Elementary OS: A Comprehensive Guide for Beginners article.

View our How to Install an Nginx RTMP Server in Ubuntu 22.04 tutorial.

Learn more cool things in Linux with our Linux Tutorials.

View all of our available online tools and converters at Formatswap.com.

How to Setup a FTP Server with FileZilla in Windows

How to Setup a FTP Server with FileZilla in Windows

In this tutorial you will learn how to install a FTP server in Windows 10. However the same process will apply to Windows 7, Windows 11, and Windows Server 2008/2012. We will be using the FileZilla Server to set up the FTP service. FileZilla is by far the easiest FTP server application to set up and configure. One of the main benefits to setting up an FTP server is the ability to easily share files with others. It is useful anytime you want to transfer files from your computer to a server or vise versa. An FTP server is one of the most crucial tool to install on your servers.

Download FileZilla Server

download filezilla server

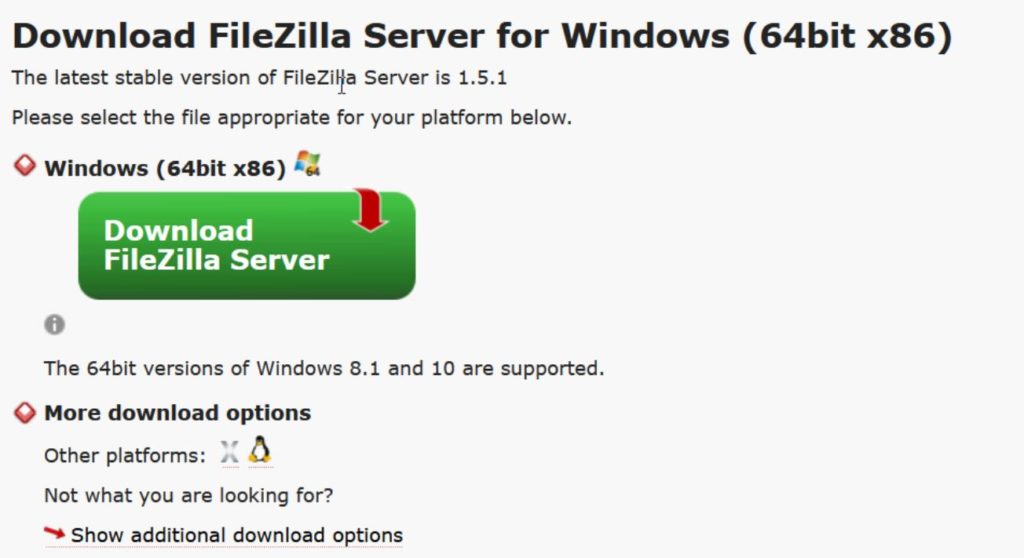
The first step will be downloading the FileZilla server installer. Navigate to the download page and download the latest release.

Download FileZilla

Launch the Installer

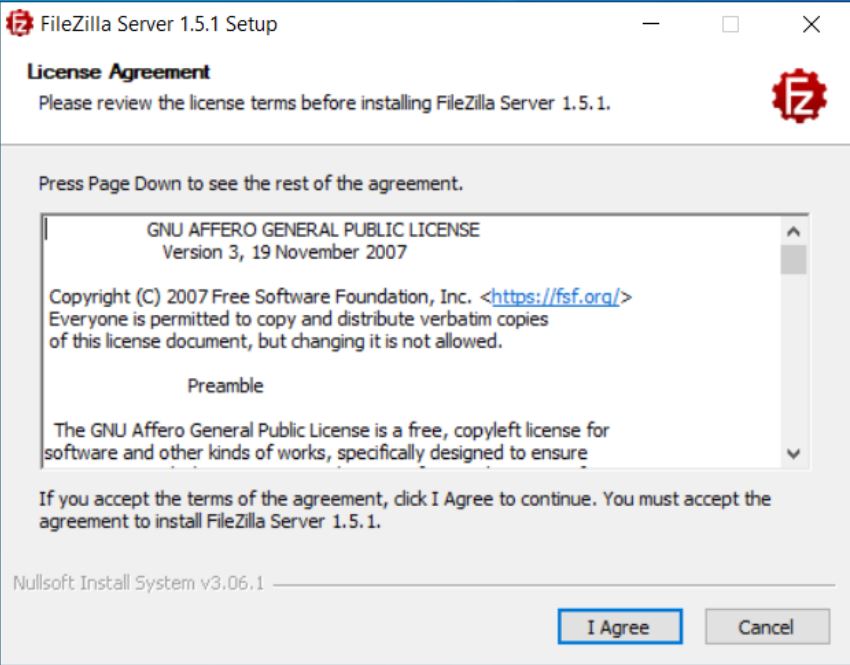
accept agreement

Now open the installer executable and follow the prompts.

Choose Installation Settings

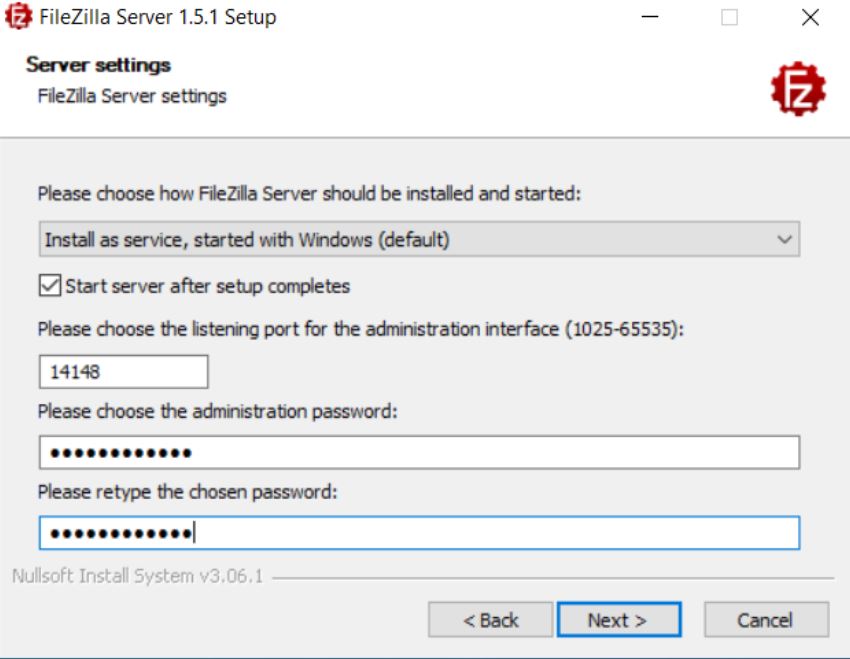
set a default admin password

Once you get to this screen of the installer you will need to type an administrator password. You can also change the port that the admin interface runs on from this screen. You can use the default options for the rest of the process.

Installation Completed

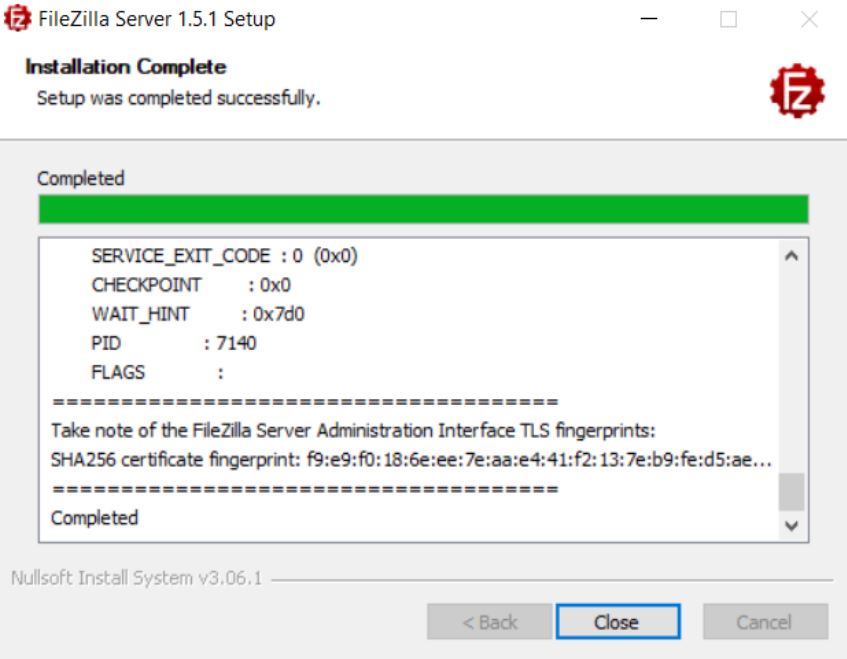
filezilla server install finished

When this screen opens you have successfully completed the installation of FileZilla Server. Close the installer.

Connect to the Admin Interface

click connect

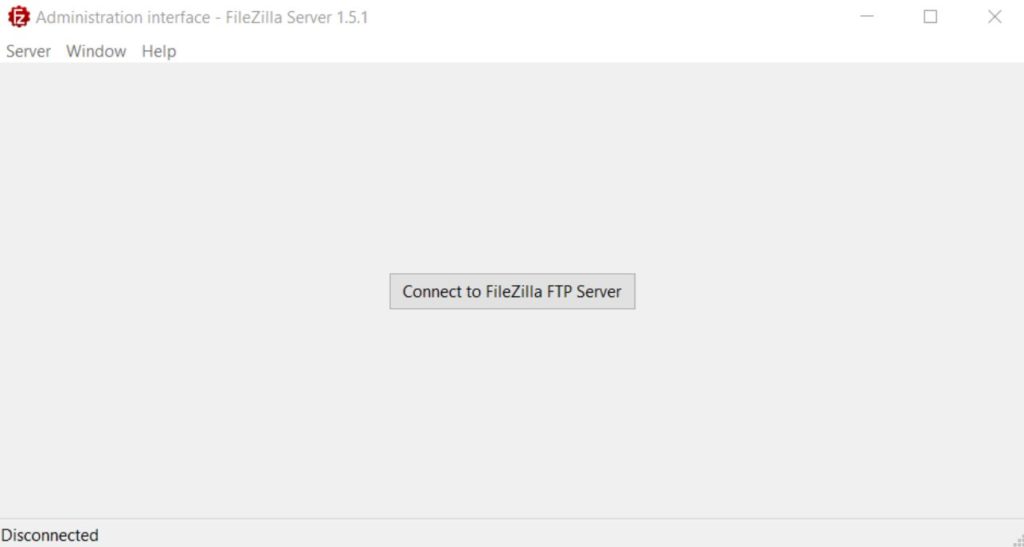
The administration interface will open once you have closed the installer. Click “Connect to the FileZilla FTP Server” to get started.

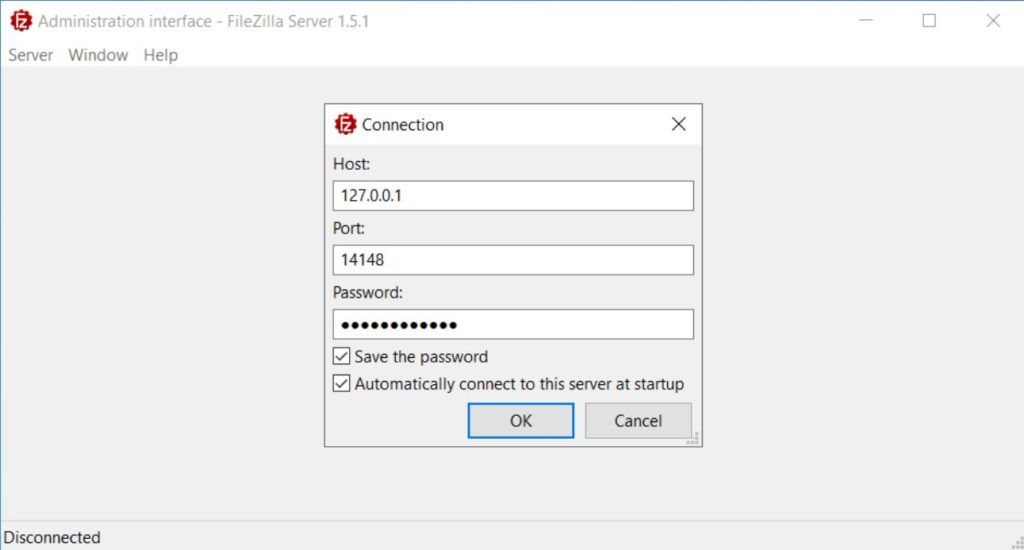
Input Connection Information

connect to ftp server

Type in the administration password that you entered during the installation. Then click on OK to continue.

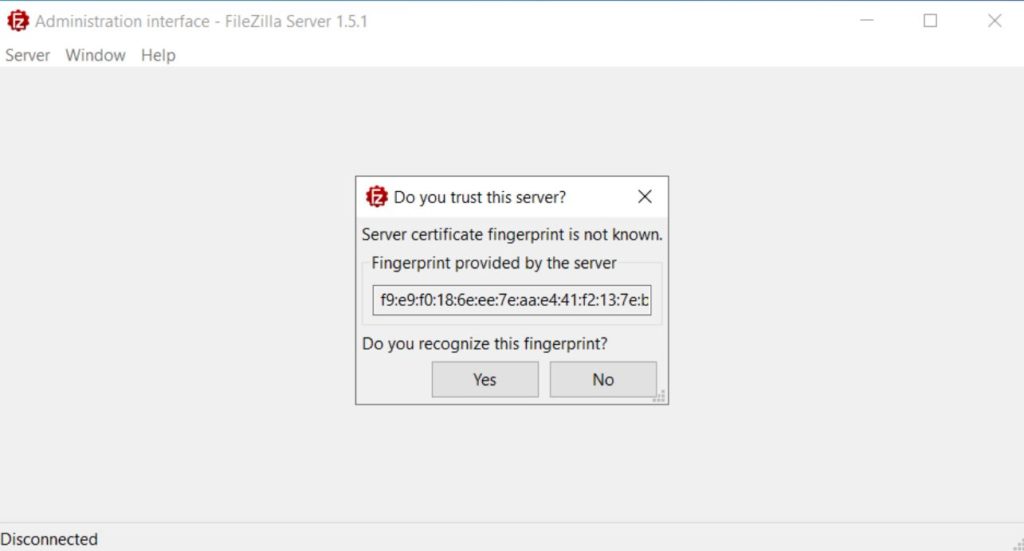
Verify Server Fingerprint

verify fingerprint

You will be asked to verify the certificate fingerprint since it is the first time you have opened it. Click “Yes” to verify.

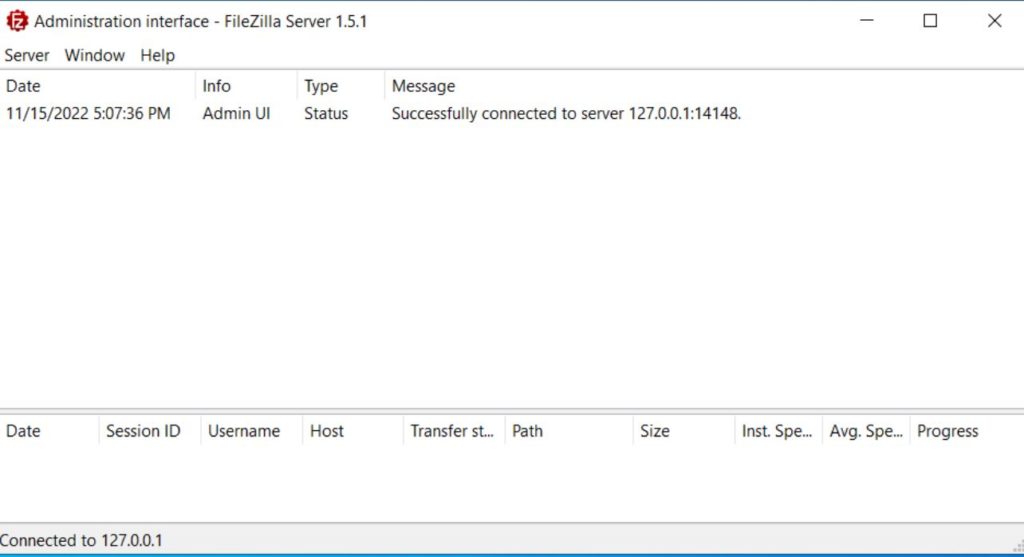
Admin Interface Started

admin interface connected

Afterwards you will be connected to the FileZilla FTP Server administrator interface. We now have to configure our users.

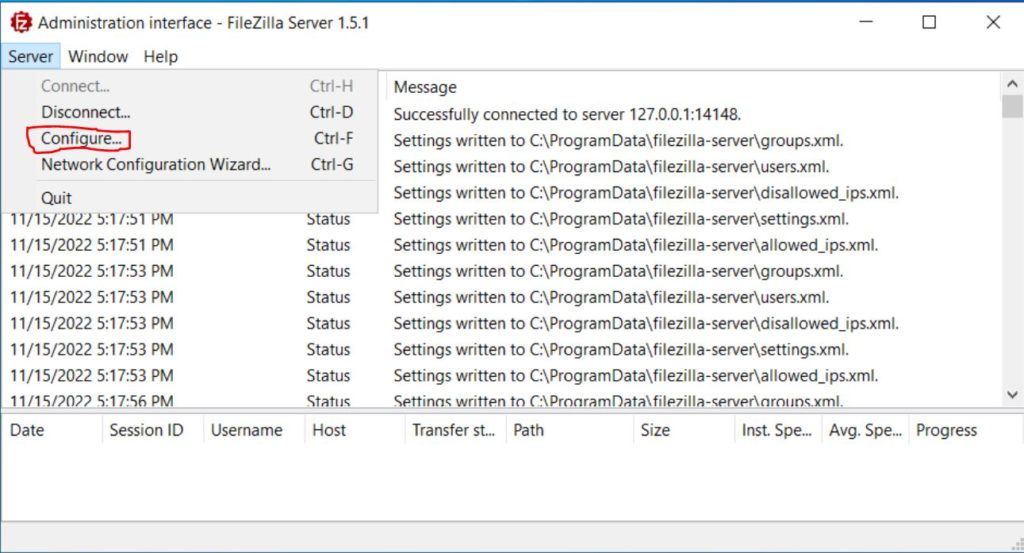
Open FTP Server Configuration

open filezilla server configuration

Click on “Server” in the top left corner and then click “Configure…”. This will open the server configuration screen.

Navigate to the Users Screen

navigate to users

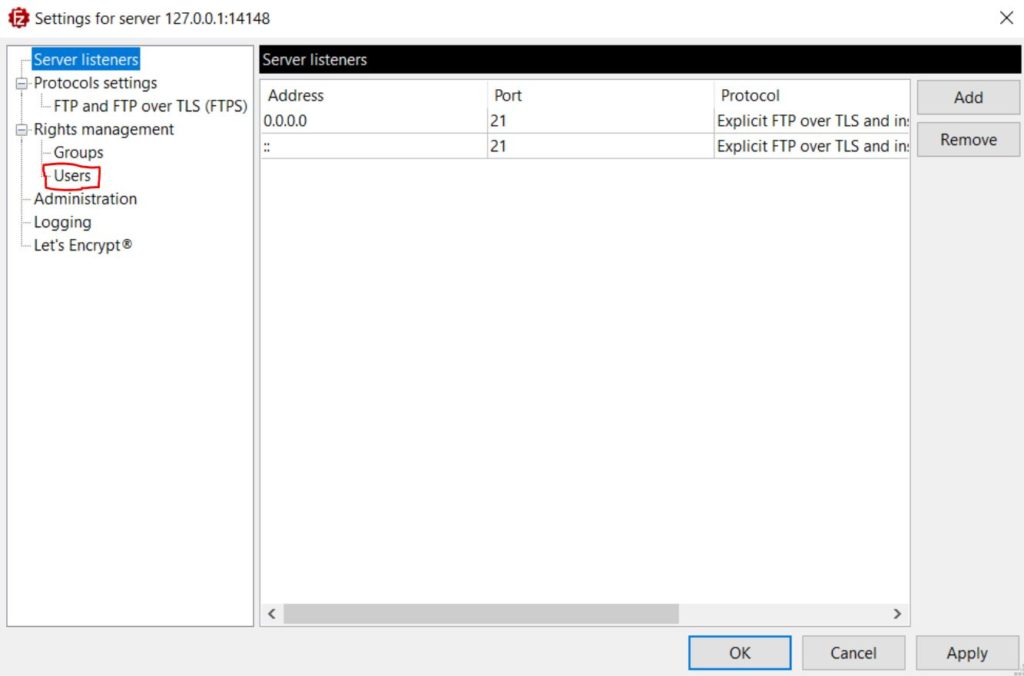
Once the server configuration opens, click on the “Users” row in the left column.

Add a New User

create a ftp user account

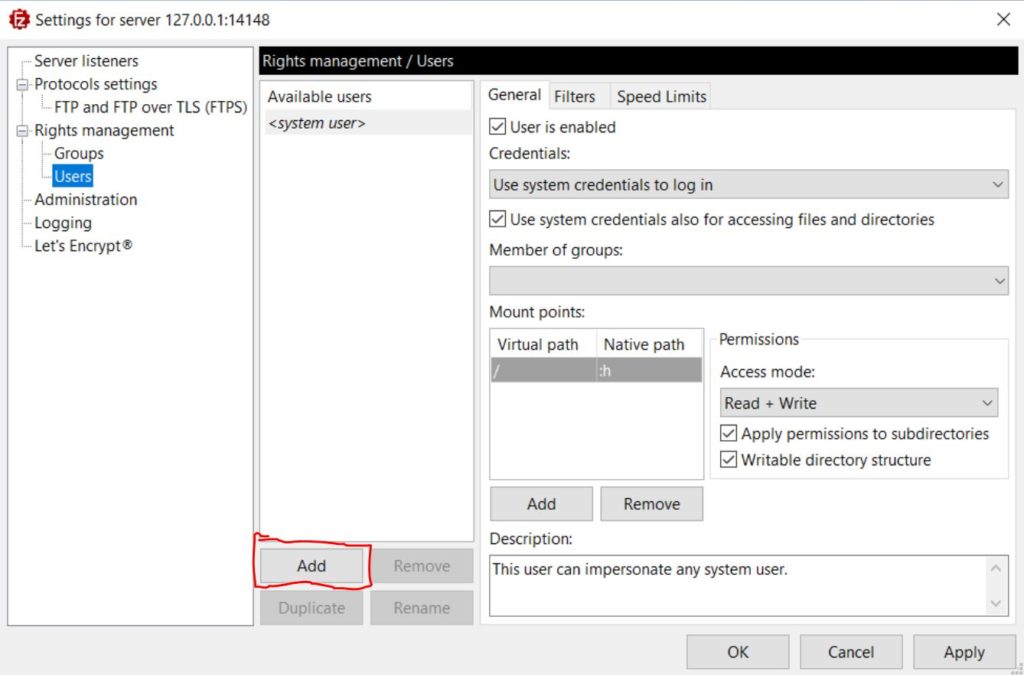
Next click on the “Add” button in the middle column to add a new user.

Configure the User and Mount Points

add ftp user details

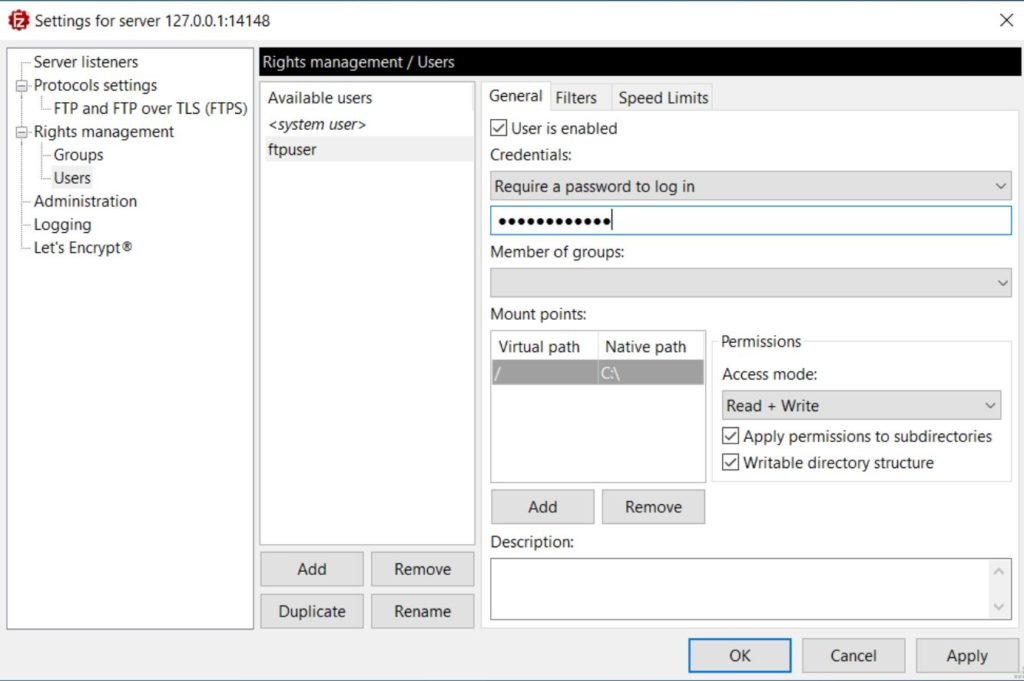
Type in a name for the new user. Then you will need to fill in a few fields in the left column. Type a password for the user, then set a “Virtual path” and a “Native path”. The virtual path can be anything you want. I recommend just forward slash. The Native path is the directory on the server which you want users to be able to read and write from. In my example I am using the “C:\” path to share the whole computer. Set this to any directory you wish. Once you click “Apply” and “OK” you will be done configuring the FTP server.

Open Windows Defender Firewall

search for firewall

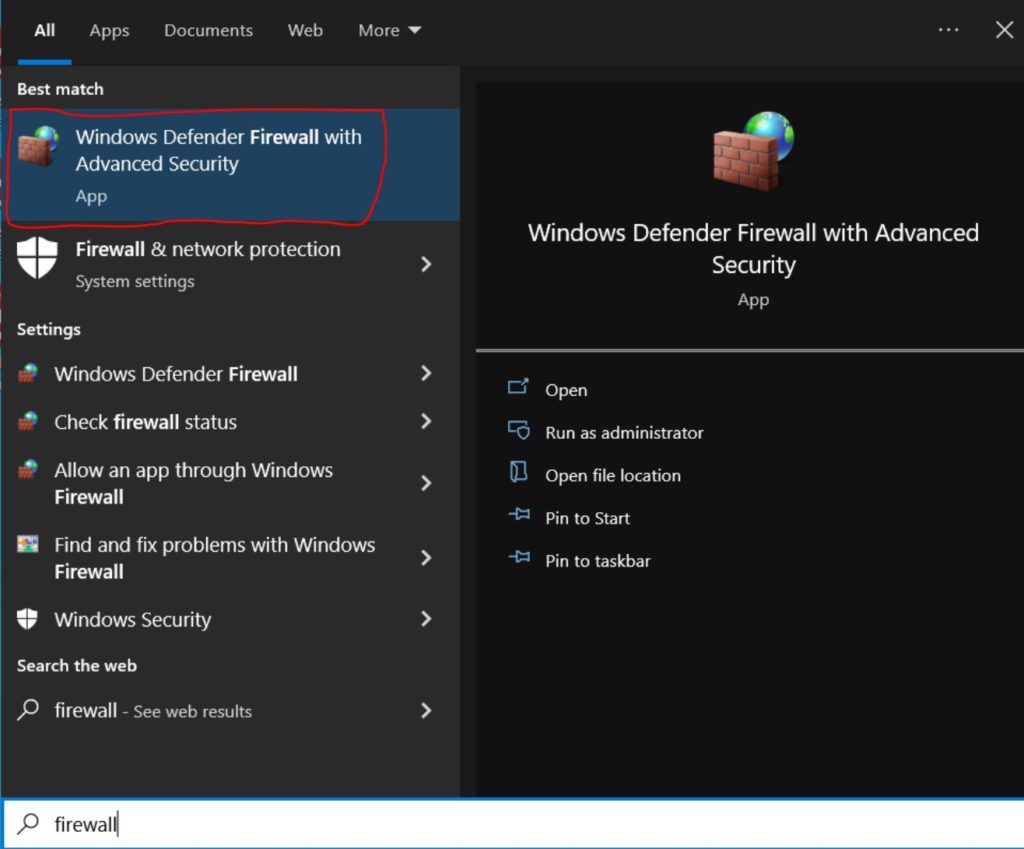
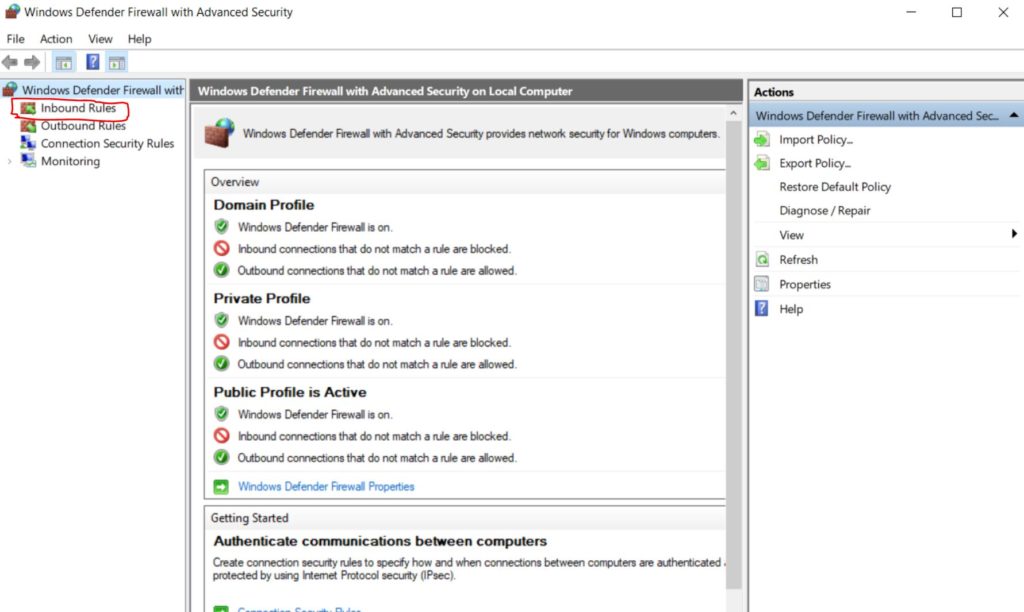
The next step is to configure the Windows Defender Firewall. Open the start menu and search for “firewall”. Then open the “Windows Defender Firewall with Advanced Security” application.

Navigate to Inbound Rules

navigate to inbound firewall rules

Once it has opened navigate to the “Inbound rules” by clicking on it in the left side column.

Create a New Inbound rule

add a new firewall rule

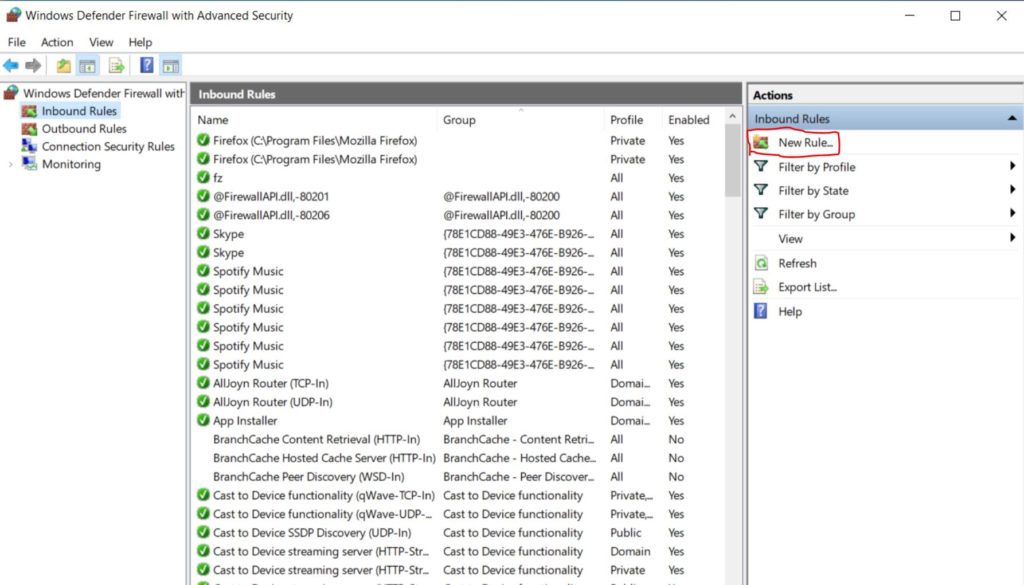
Next click on the “New Rule…” button in the right side column.

Choose the Firewall Rule Type

select program from list

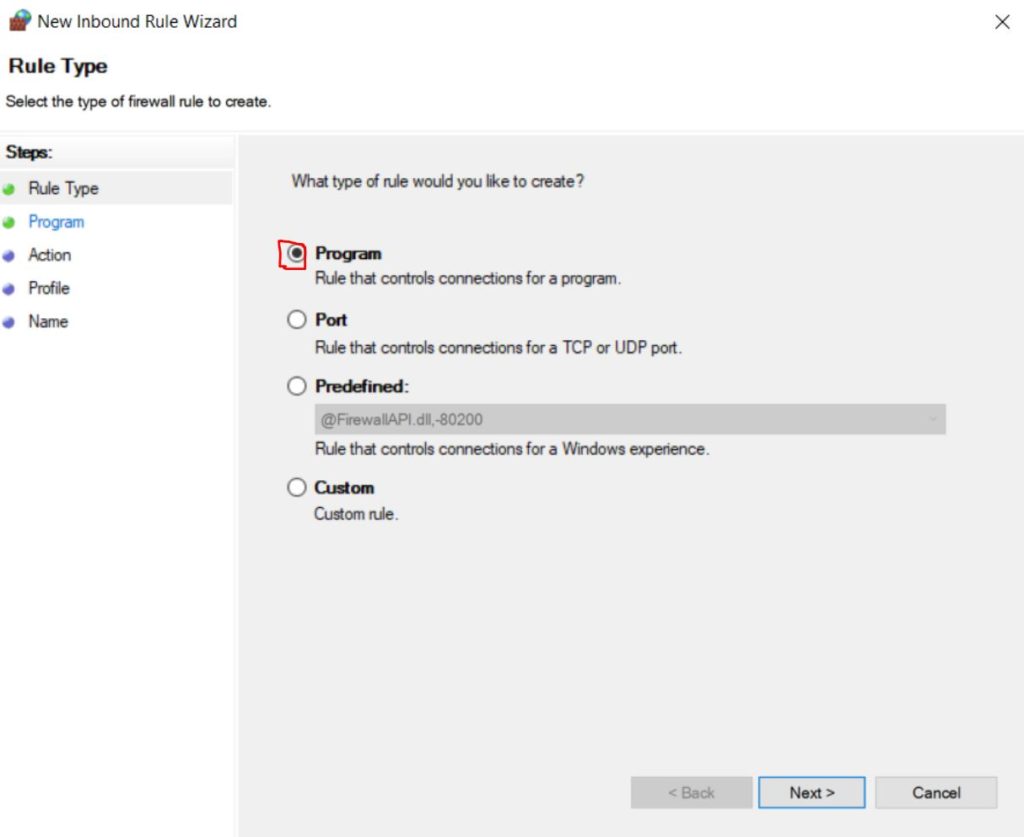
Now you will be asked which type of firewall rule you would like to create. Select the “Program” option from the list.

Select a Program Path

click browse

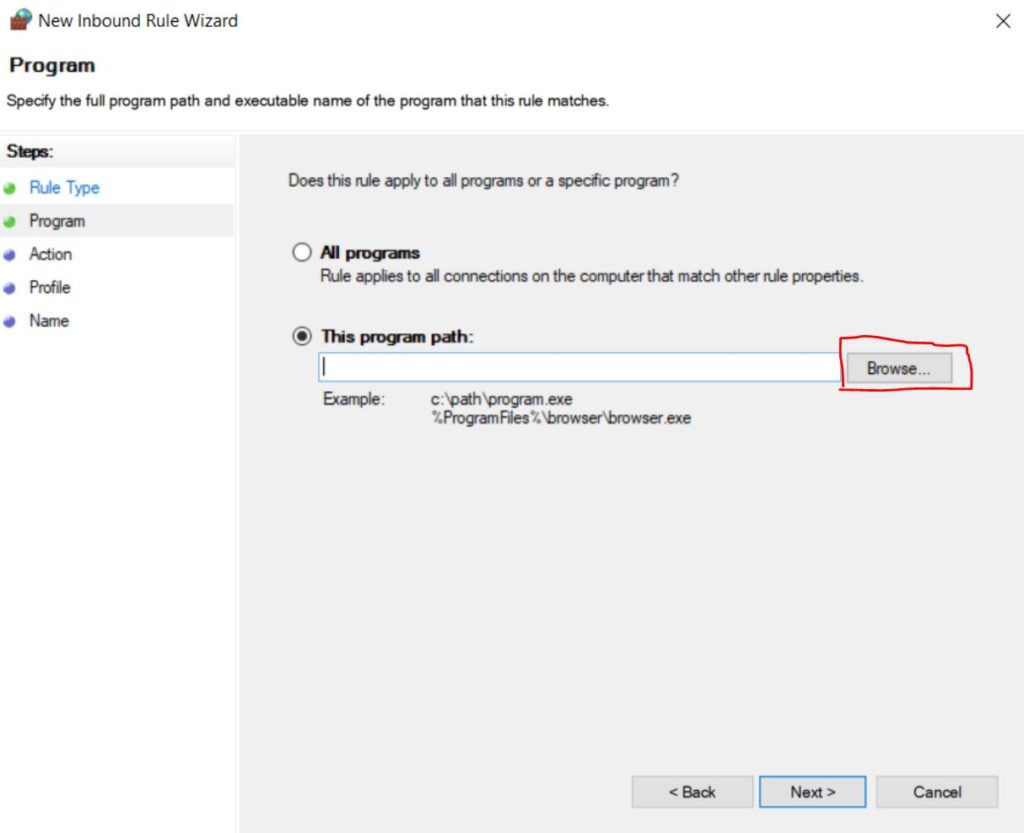
Click on the “This program path” radio button, then click “Browse…”.

Select the Program to Allow

select filezilla server

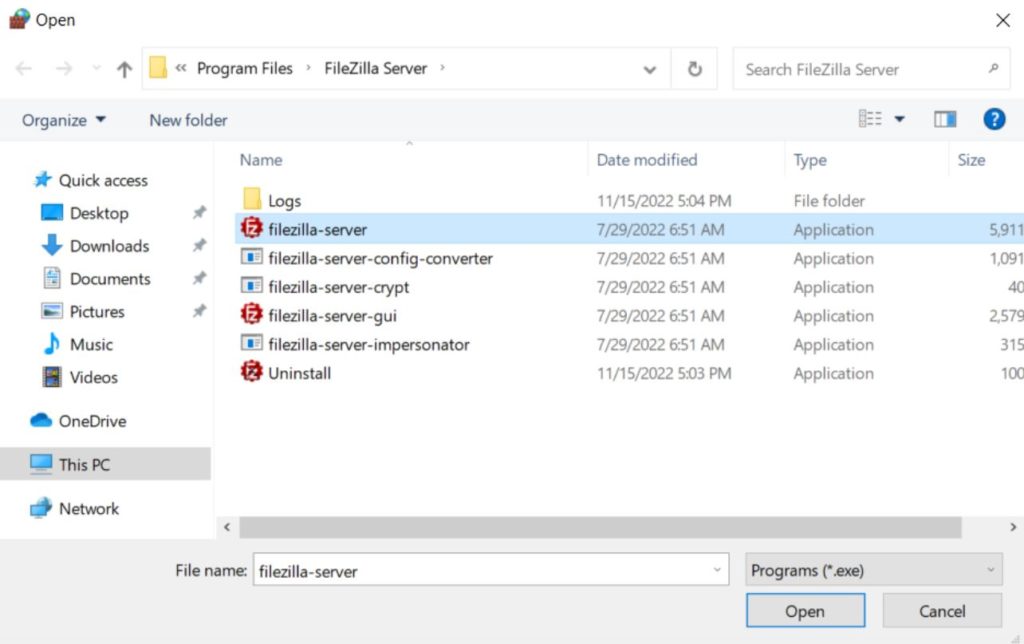
Navigate to the FileZilla Server installation folder. It is usually located at “C:\Program Files\FileZilla Server”. Once you find the folder click on the “filezilla-server” executable, then click the “Open” button.

Choose the Firewall Rules Action

set firewall to allow connection

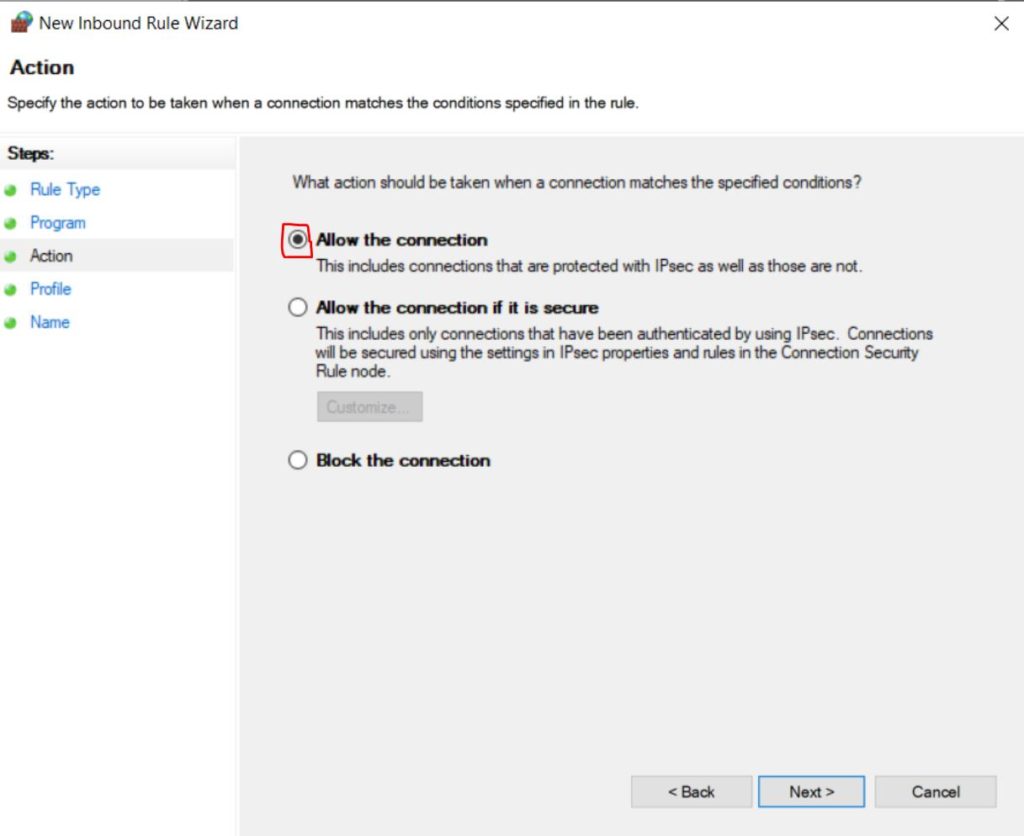
Next select the “Allow the connection” radio button. Then click the “Next” button.

Select Profile Rules

set firewall profile

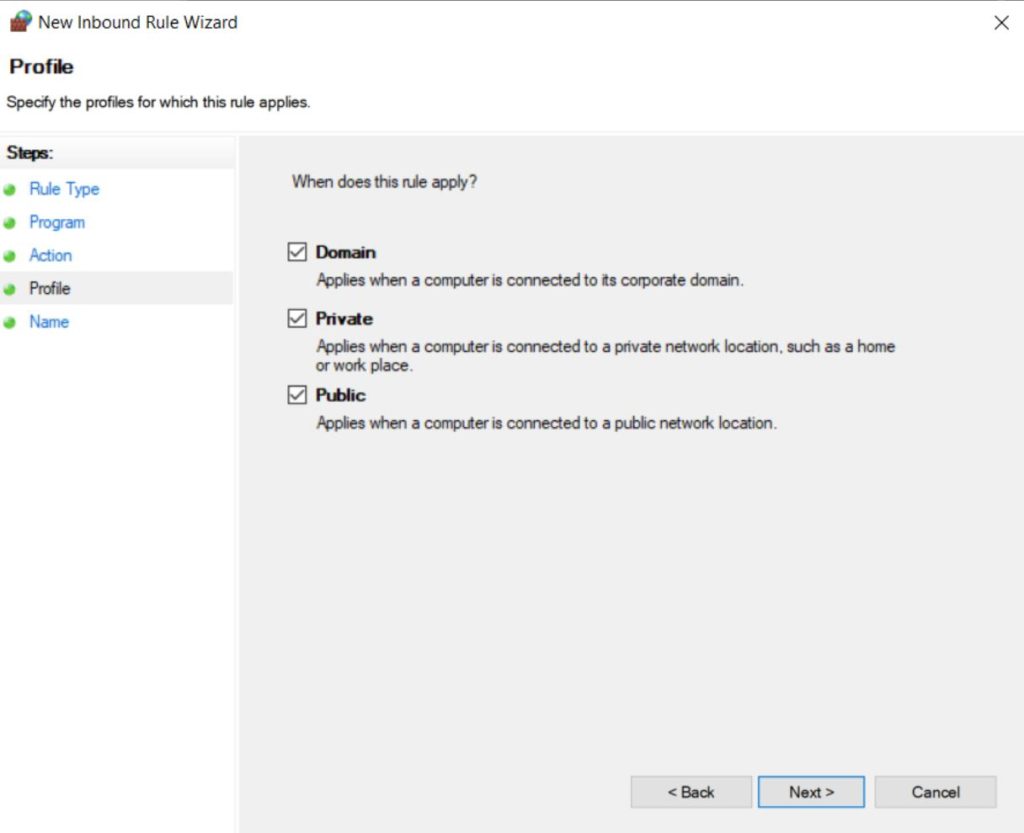
You can use the default settings on this screen. Click the “Next” button.

Select a Name for the Firewall Rule

set a name for firewall rule

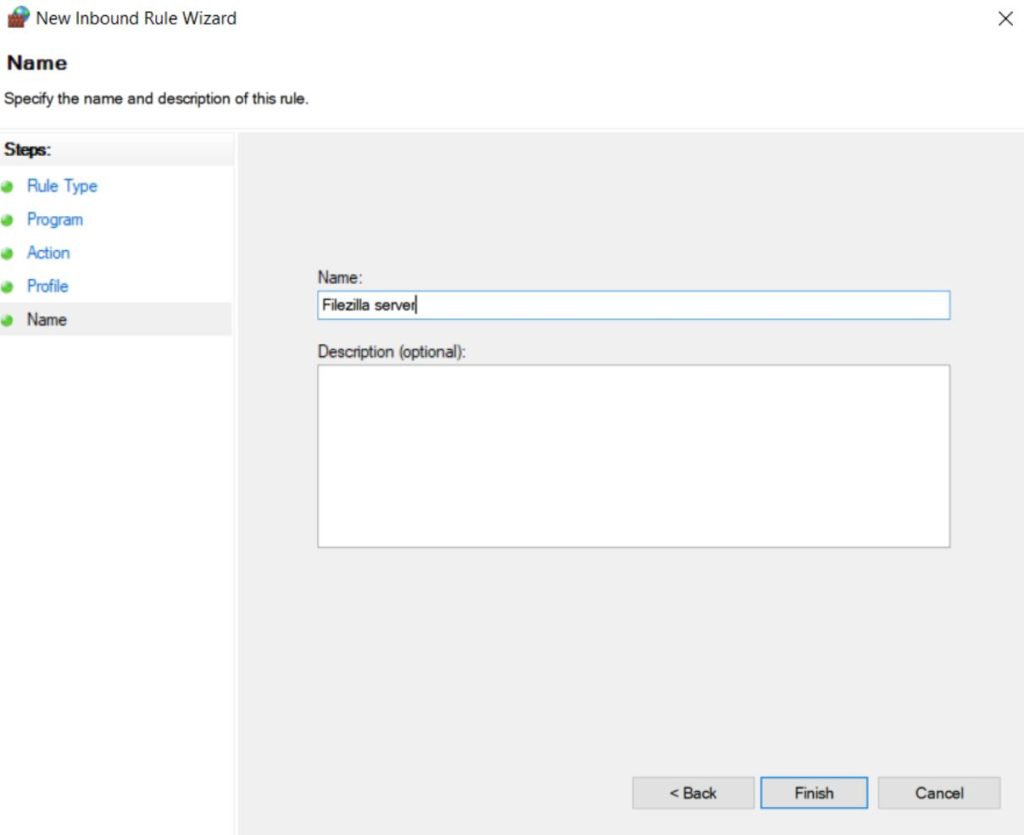
Finally type in a name for the firewall rule. This can be anything you would like.

Open the FileZilla Site Manager

click site manager

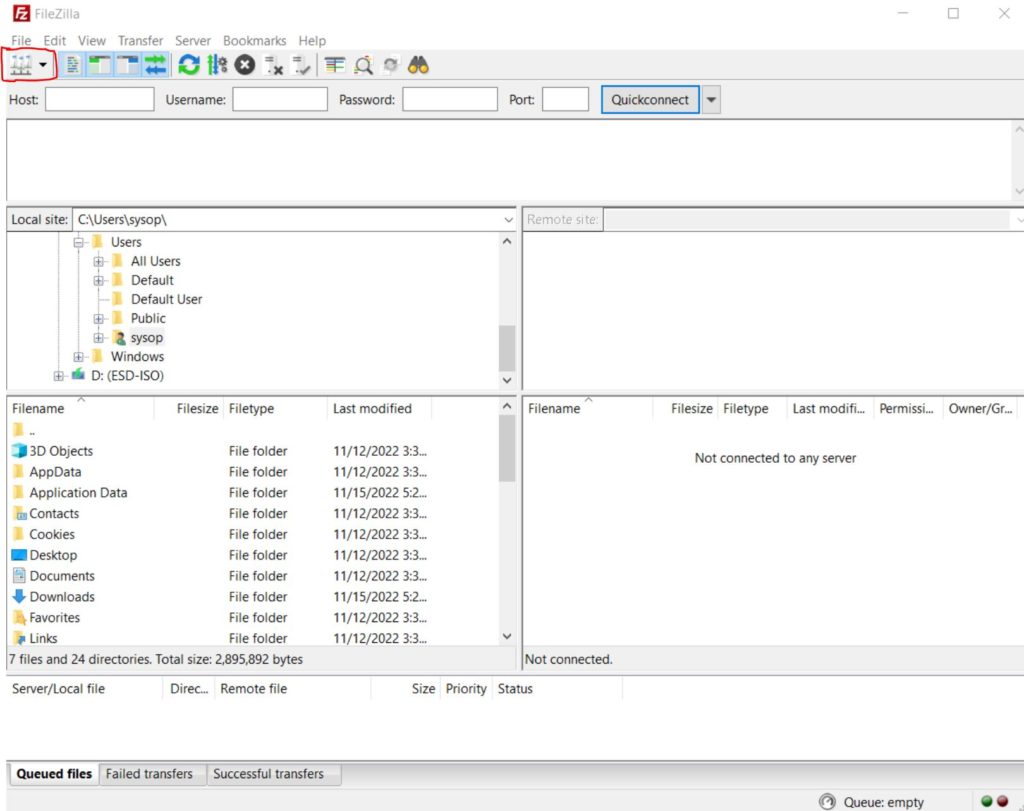
At this point everything should be configured properly. We can now test the FTP connection. Open FileZilla (Client), then click on the “Site Manager” button in the upper left hand corner.

Add a New Site

add a new site to site manager

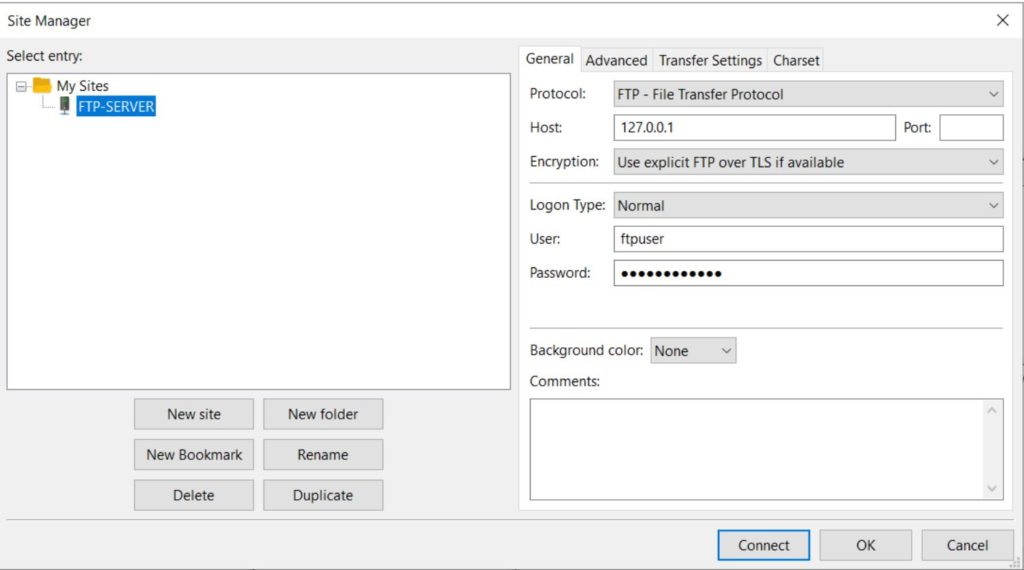
Click on the “New site” button. You will then be asked to type a name for it. Next type in the IP address for the server in the “Host” box. You can find the IP by opening a command prompt on the server and typing “ipconfig”. Afterwards type in the username and password you created earlier for the new user. Now click on the “Connect” button.

Verify TLS Certificate

accept cert for ftp

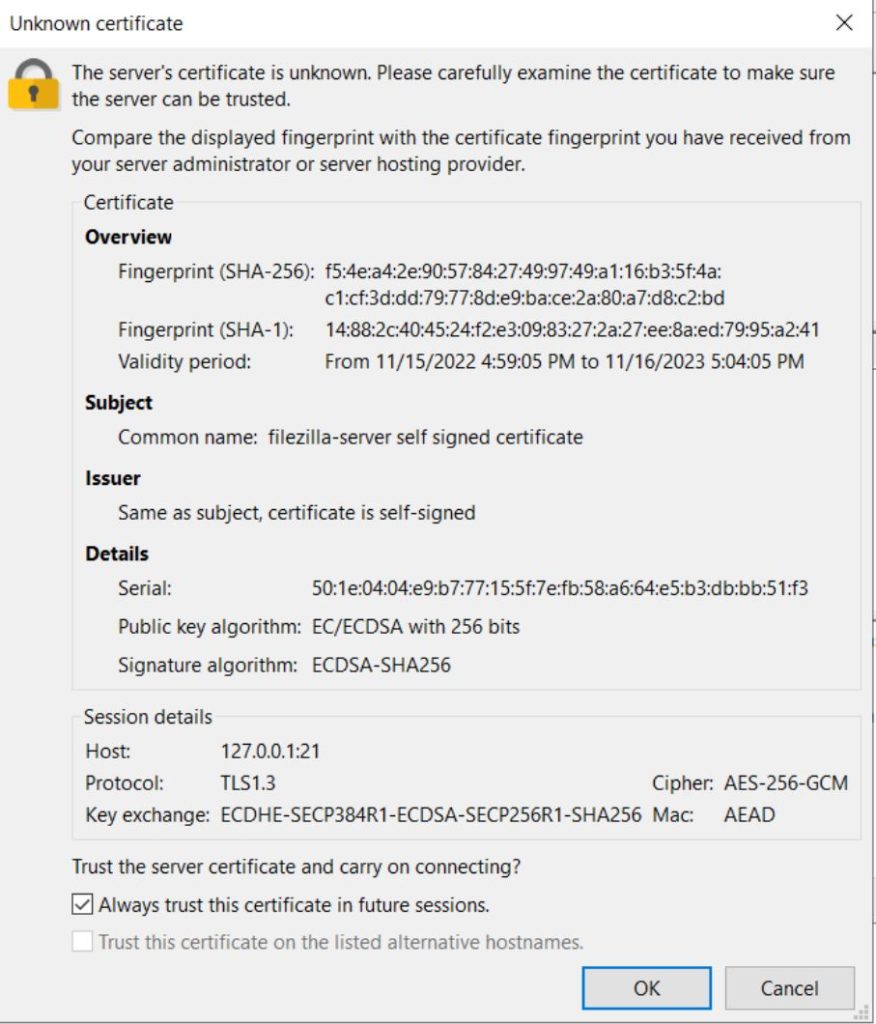
Since this is the first time connecting to the server it will ask us to verify the TLS certificate. Check the box to “always trust this certificate”, then click the “OK” button.

FTP Server Test Successful

ftp connection worked

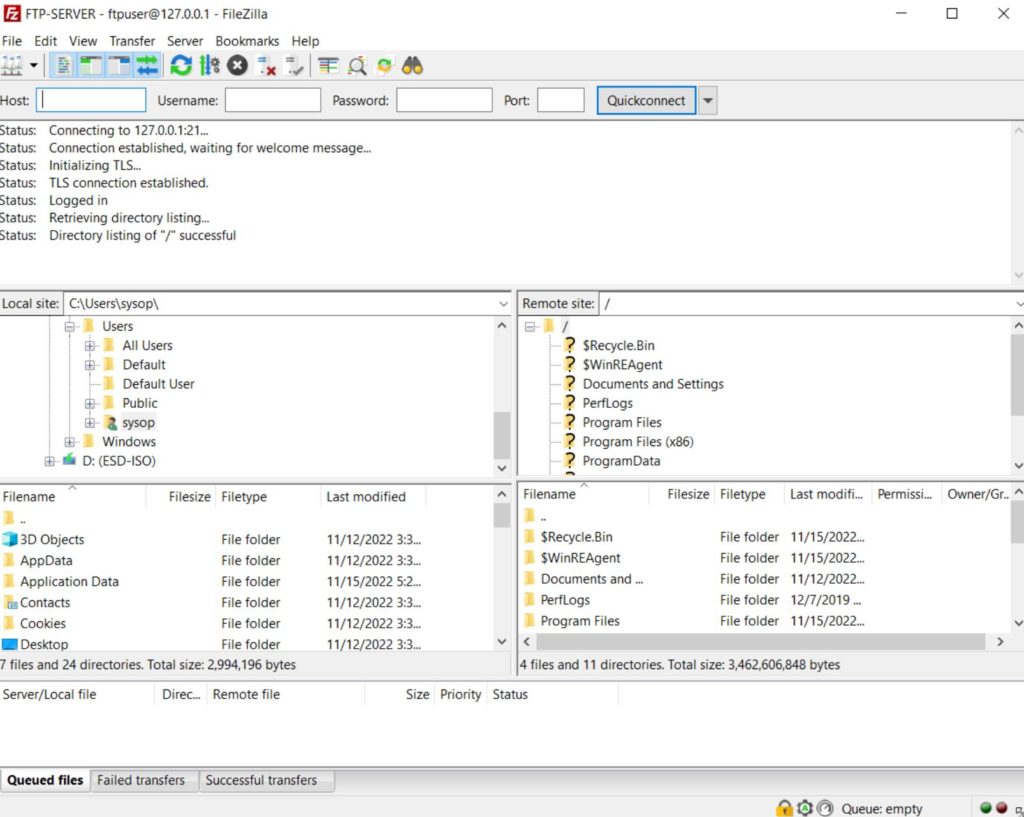
If all the steps were followed correctly you should now be connected to your new FTP server. You can test that it is working properly by copying a file to the server. If you want to access the server outside of your local network you will need to port forward the IP address of the server on port 22. The instructions for this vary depending on the model of your router. You should be able to find a good tutorial by Googling “YOUR ROUTER NAME port forwarding guide”. See are other articles below for additional server related tutorials.

Questions?

If you have any questions or comments feel free to leave them below.

Related Resources

View our 5 Reasons to Switch from Windows 10 to Linux.

Learn How to Permanently Disable Windows Defender.

Check out How to Setup OpenSSH with Keys on Ubuntu 22.04.

View our How to Mount an SMB (Samba) Share in Linux with cifs-utils tutorial.

Learn How to Create a Mapped Network Drive in Windows 10.

View all of our available online tools and converters at Formatswap.com.

How to Permanently Disable Windows Defender

Disabling Windows Defender on Windows 10. Crossed out Defender logo.

If you have ever tried to disable Windows Defender within Windows 10 you may have noticed it can sometimes be difficult. In this tutorial you will learn two different methods for disabling it. You can disable Defender using Control Panel, and Registry Editor if you are a more advanced user. This can be useful for many reasons, such as development of applications, cyber security, false positives and more.

Disable Windows Defender (Basic)

Open PC Settings

open windows 10 settings menu

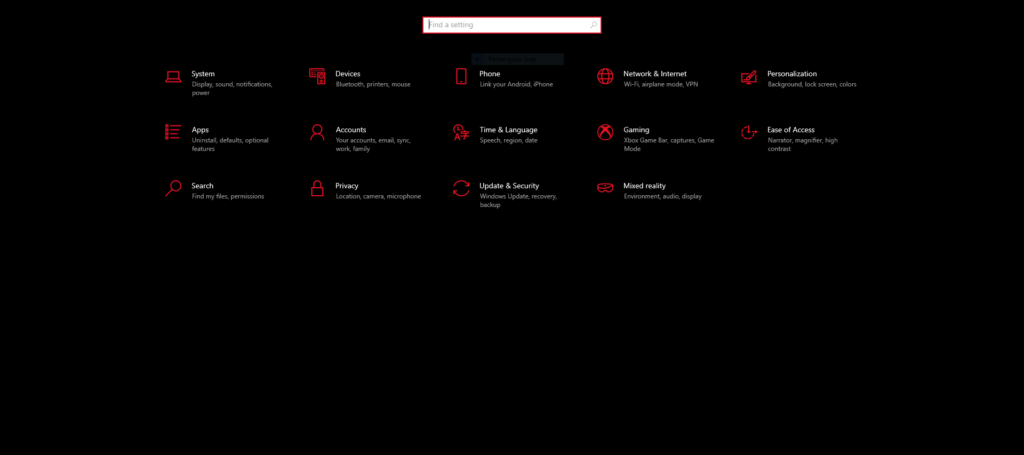
At your computer, open the Control Panel using the Windows button in the corner of your screen, then clicking on the gear icon in the bottom left corner.

Click Update & Security

navigate to the security settings

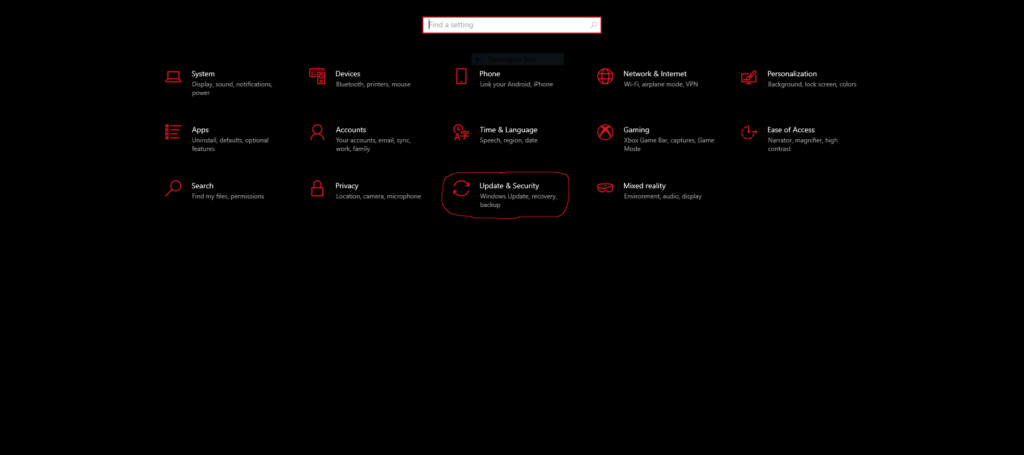
Once you are at the control panel, click the ‘Update & Security’ category.

Click Windows Security

Go to windows security tab

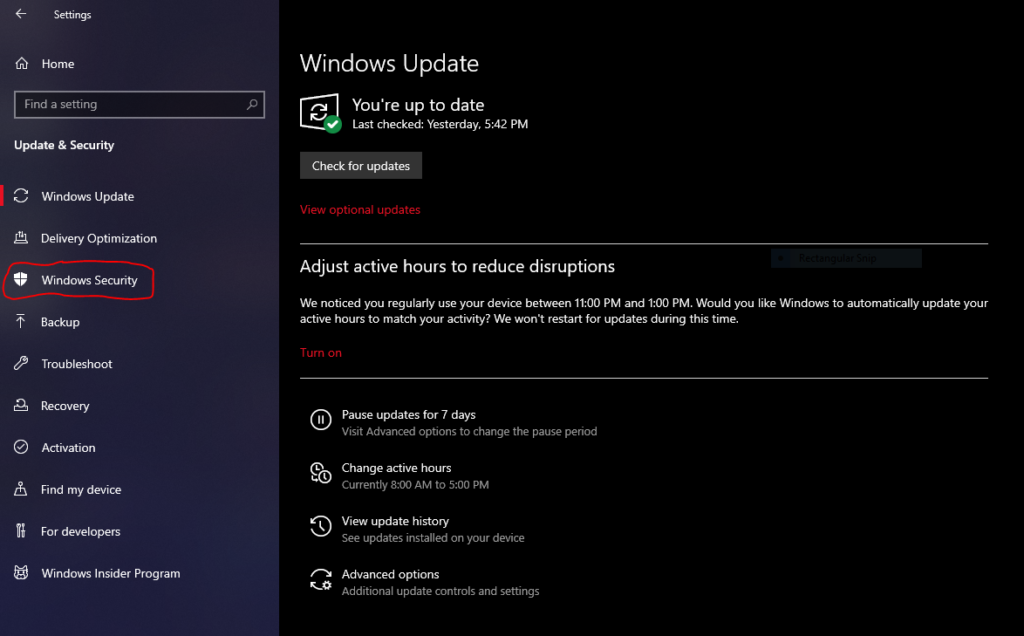
Select the ‘Windows Security’ option from the left hand side of Update & Security.

Click Manage Settings (Virus & Threat Protection)

manage virus & threat protection settings

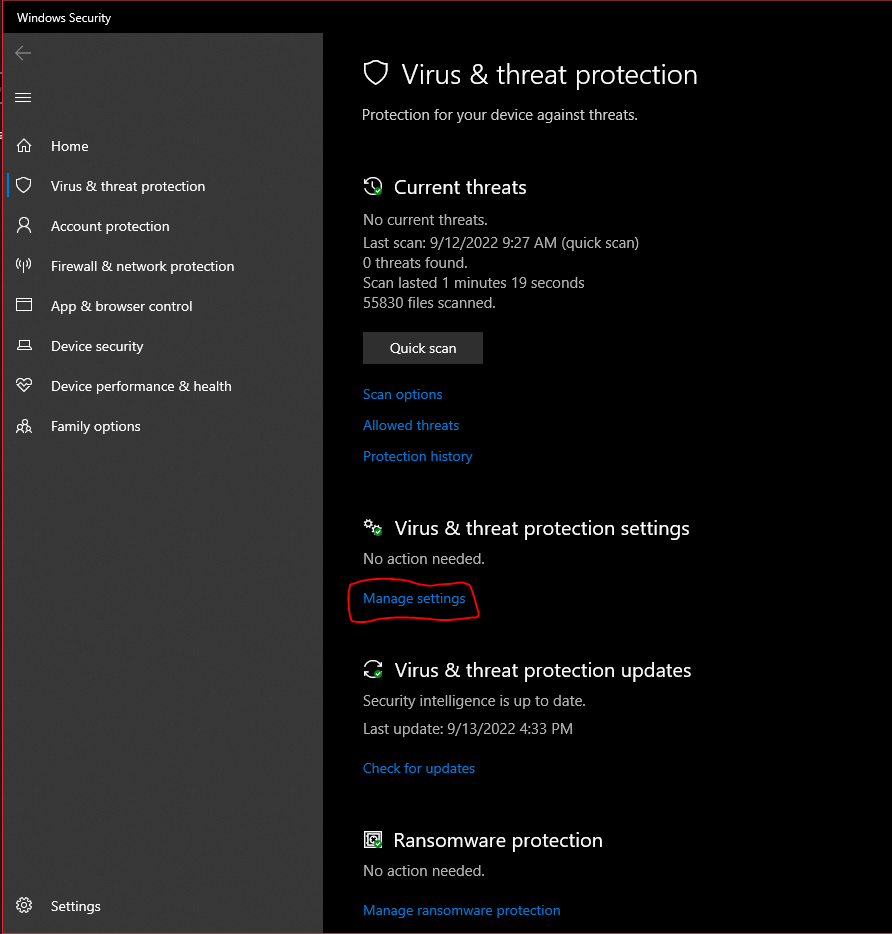
Then, find the ‘Manage settings’ text as shown above and click on it.

Disable Defender Protection Settings

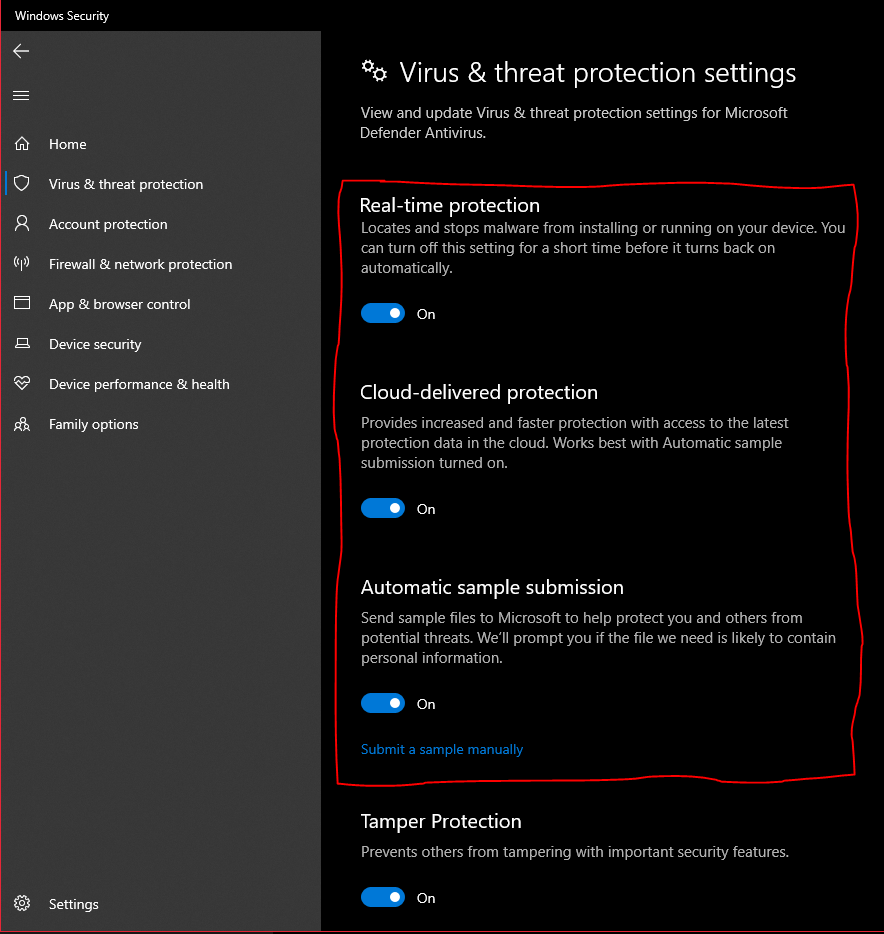
disable windows defender

You will want to disable the highlighted options above. The other slider selections are optional. You are done!

How to Disable Windows Defender Using Registry Editor (Advanced)

Sometimes, Defender can re-enable itself during updates and restarts. If you would like to make sure it doesn’t come back and don’t mind tinkering with your operating system a bit, you can disable it with your Registry Editor.

Open Run

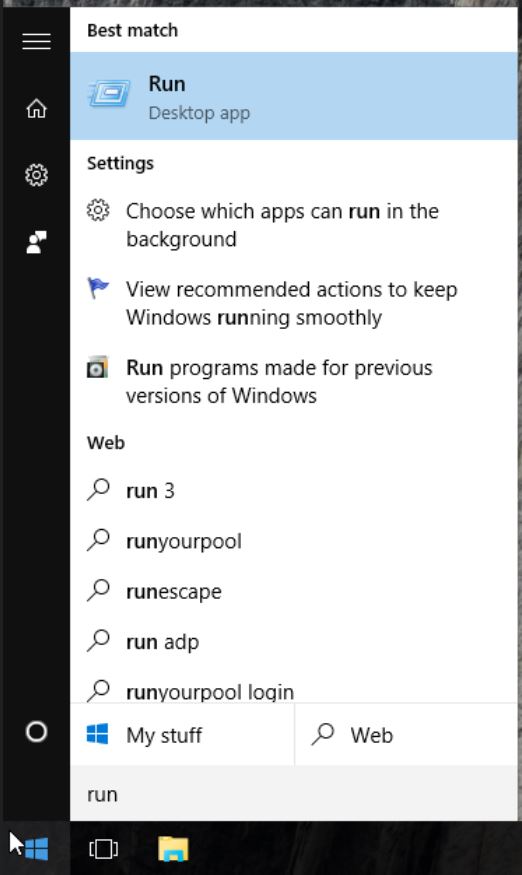
open start menu

First, you will open your ‘Run’ box either by searching for it or using Windows + R on your keyboard.

Open Registry Editor

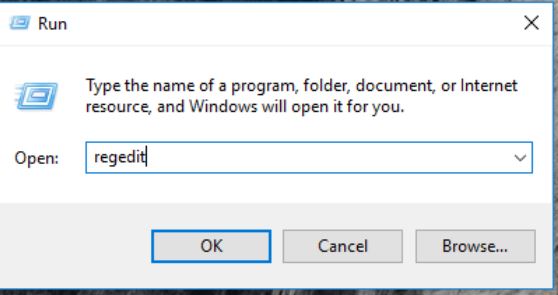
open regedit run dialog

You will type ‘regedit’ in the box and either click OK or press Enter.

Navigate to Folder

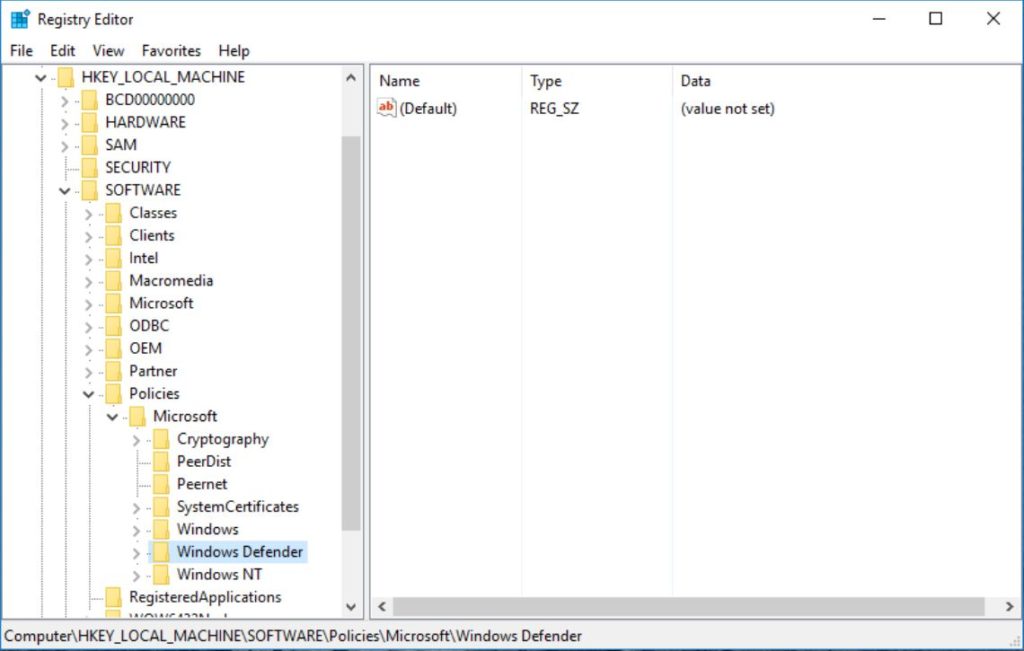
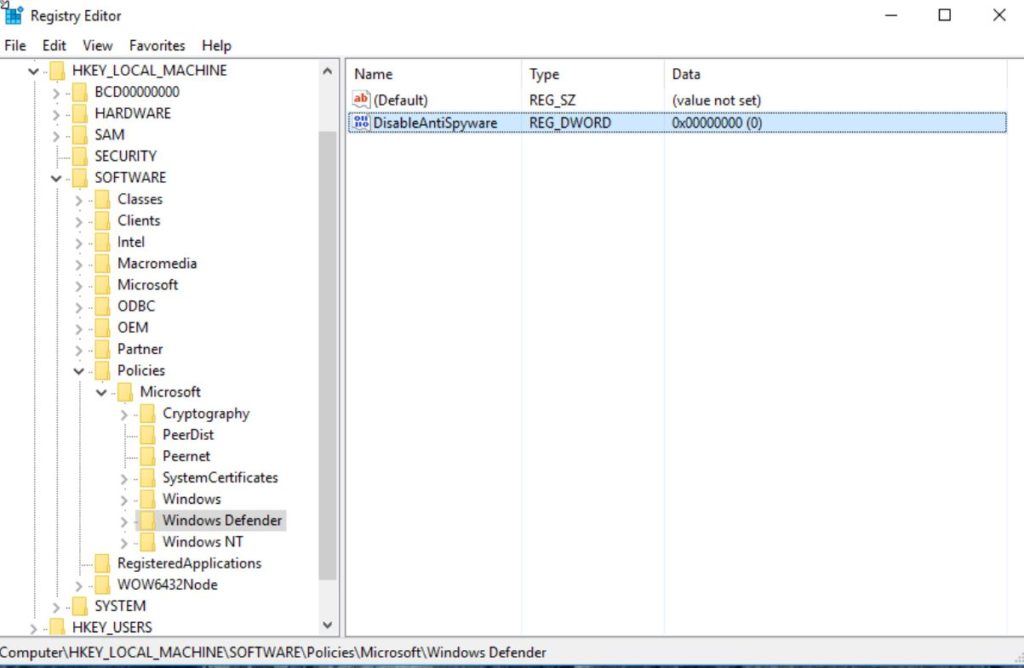
navigate to hkey local

Open the folders inside Registry Editor by using the arrows next to the folder icon. You will want to navigate to:

HKEY_LOCAL_MACHINE\SOFTWARE\Policies\Microsoft\Windows Defender

Add New Registry Value

add new dword value

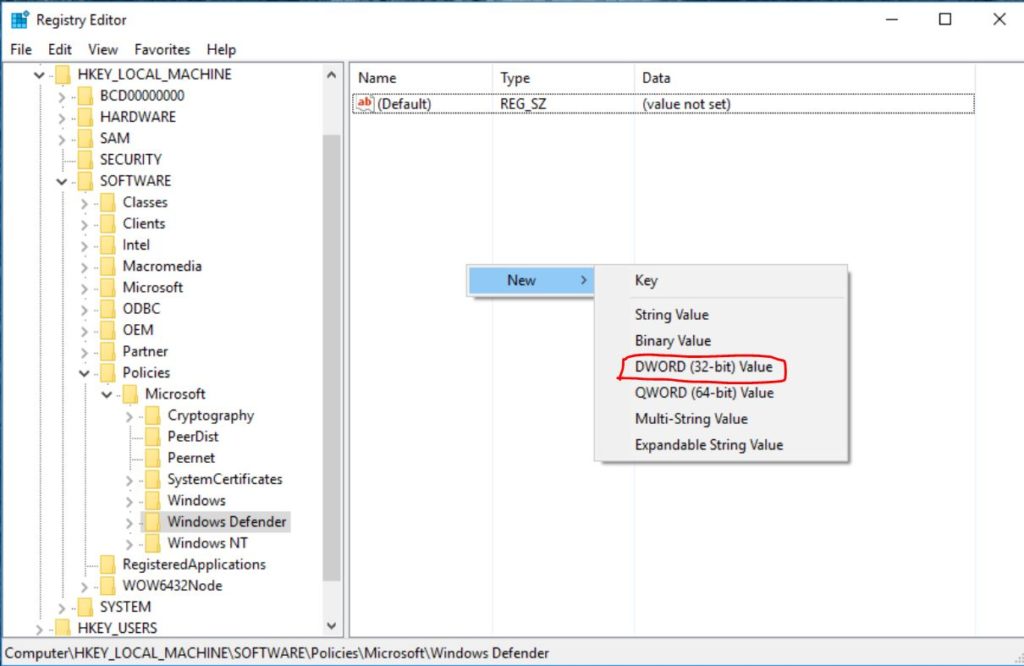
Once you select the Windows Defender folder, you will right click inside the blank space inside the right panel of the window and hover over New, then click the option that says ‘DWORD (32-bit Value)’.

Rename Registry Entry

rename regedit entry

You will want to set the name of the value to ‘DisableAntiSpyware’.

Edit the Registry Value

edit the regedit value

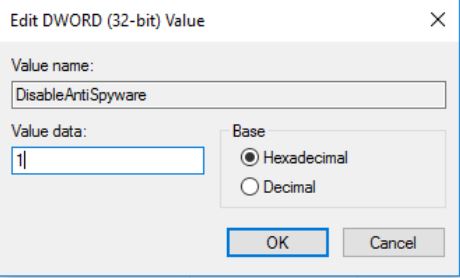
Then, double click on the 0x000… (value) portion of the pair you just created and change the Value data to 1. Double check to make sure that the Value name is the same as the one that you created and that the Base option is set to Hexadecimal.

Restart Windows

restart windows

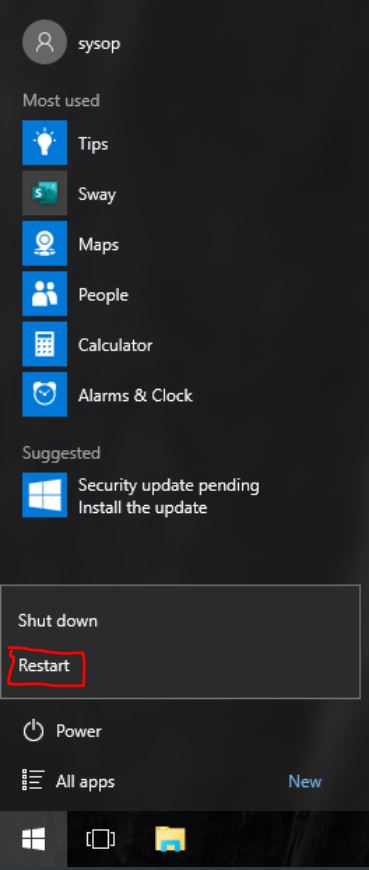
Finally, restart your computer and you have completed all the steps to disabling Windows Defender on Windows 10.

Questions?

If you have any questions or comments feel free to leave them below.

Related Resources

View our 5 Reasons to Switch from Windows 10 to Linux.

Learn How to Create a Mapped Network Drive in Windows 10.

Click here to learn How to Easily Create a Bootable Linux USB Drive using Rufus.

View our OS Installs Category.

Learn more cool things in Windows with our Windows Tutorials.

View all of our available online tools and converters at Formatswap.com.

How to Add a Network Location in Windows 10

add network location splash image

In this tutorial you will learn how to add a network location to Windows 10. This will allow you to access a file share remotely by connecting computers on the network. The main benefit to adding a network location is that it will be permanently saved in file explorer. This allows you to avoid typing the network address of the location each time. As well as easy management of multiple network shares. When you are finished you should have a new location added to the Windows Explorer Network Locations list.

Open File Explorer

file explorer window

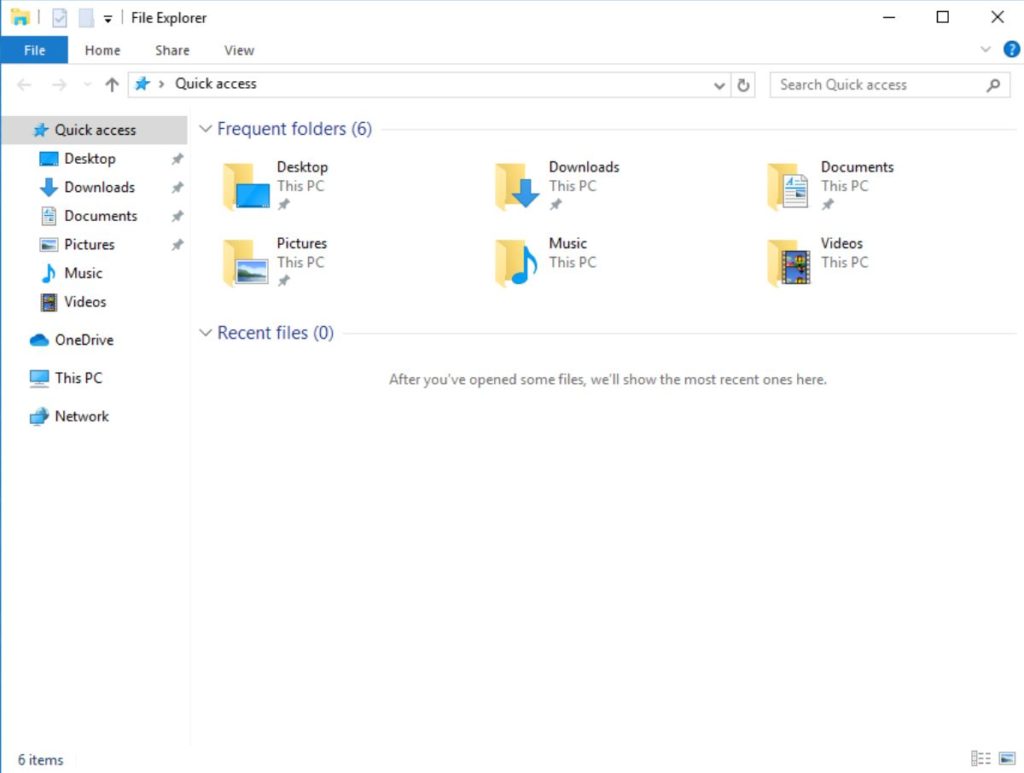
You can open File Explorer by clicking on the folder icon in the taskbar or by pressing “Win+E” on your keyboard.

Navigate to This PC

open "This PC"

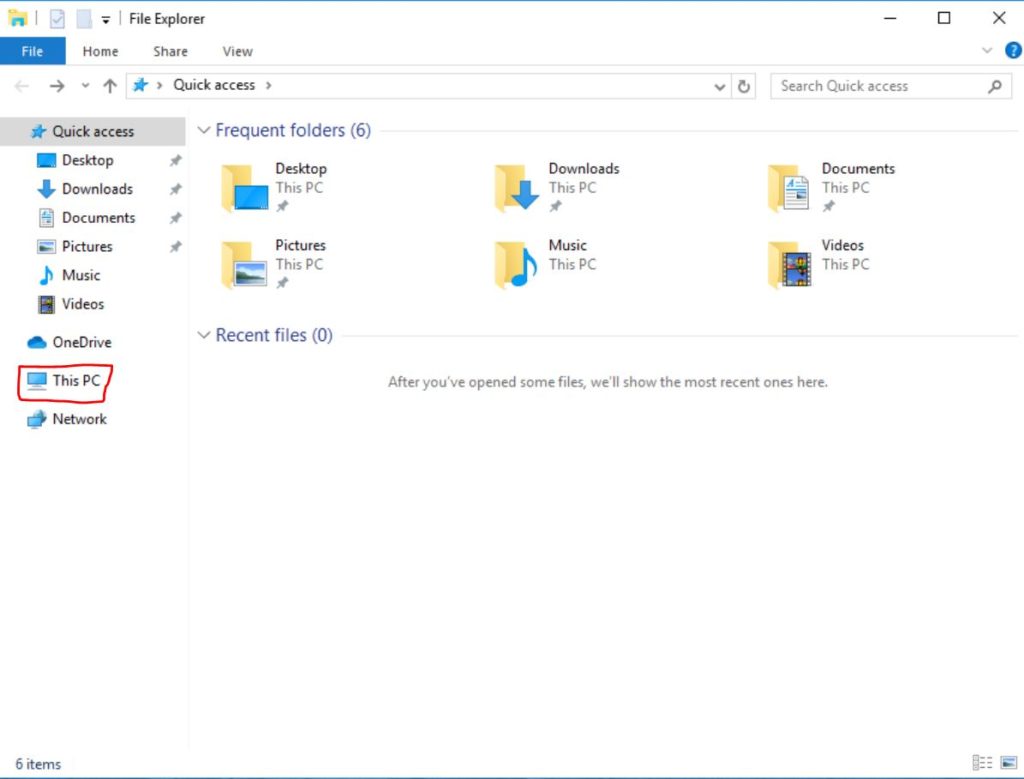
Now you will need to click on “This PC” (the computer icon on the left) in your File Explorer.

Open Add Network Location Dialog

add a network location

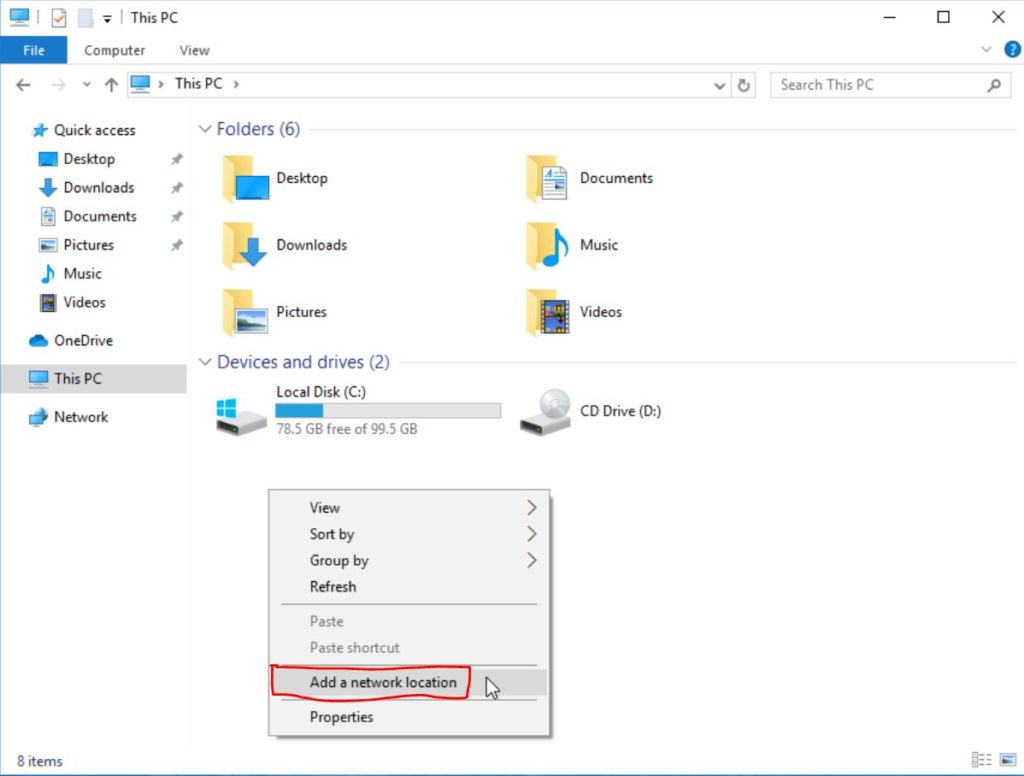
After navigating to the “This PC” window you have to right click then click on “Add a network location”.

Click Next

welcome to the add network location wizard

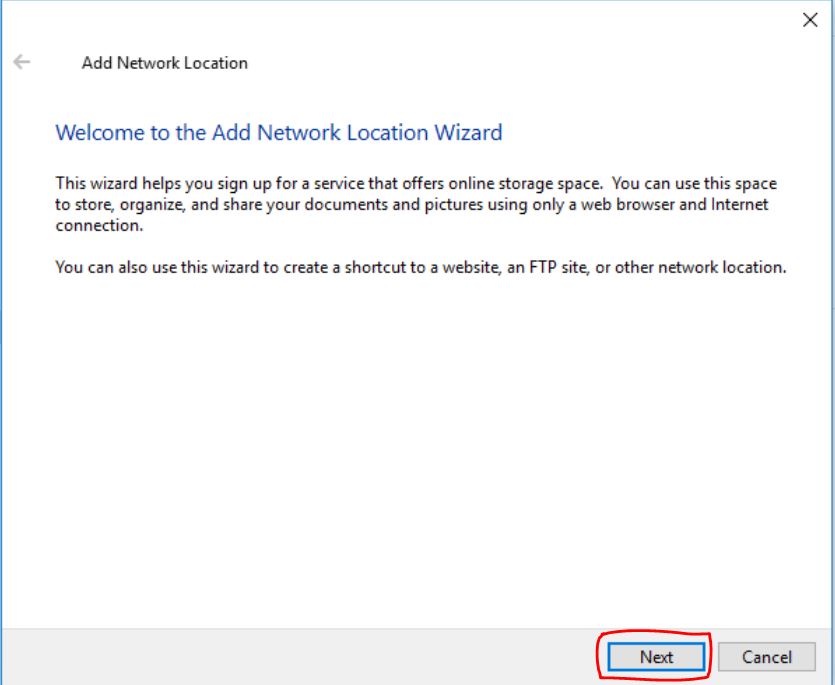
Now that the Add Network Location window is open press the “Next” button.

Set Network Location to Custom

set custom location

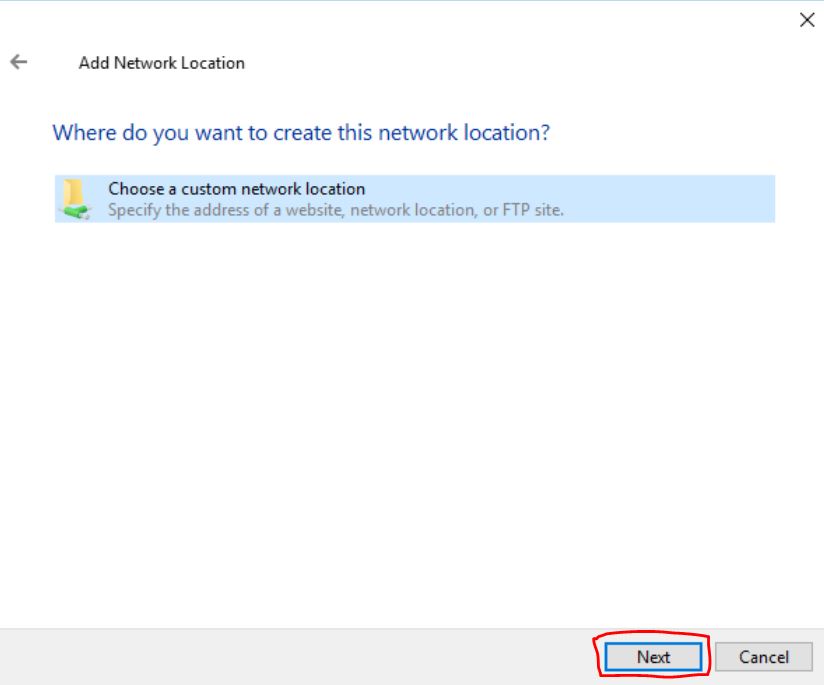
Afterwards click on “Choose a custom network location”. Then click “Next” to continue.

Enter Network Address

enter network address

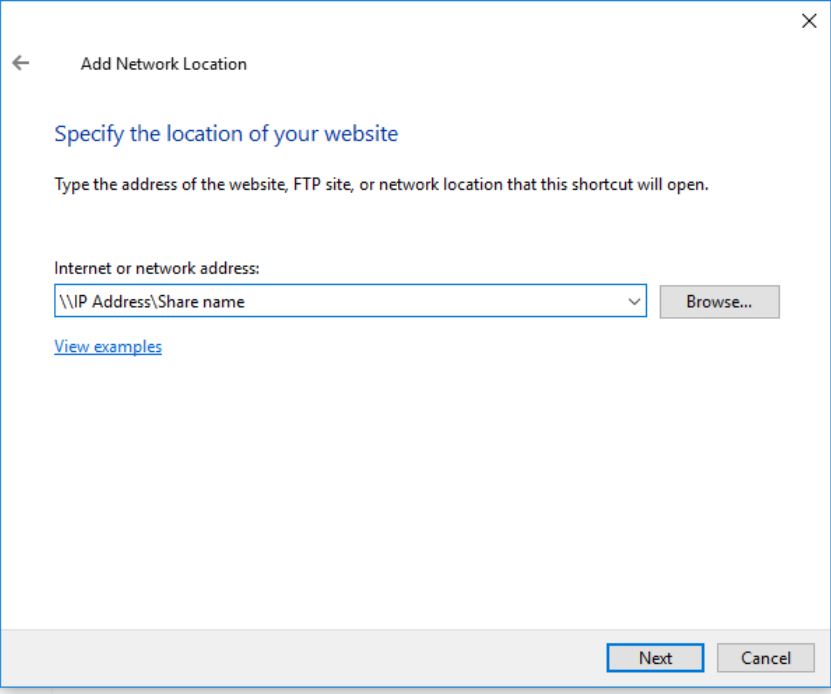
Now you will need to enter the IP address and the name of the share, then press “Next”.

Confirm Credentials

windows credentials dialog

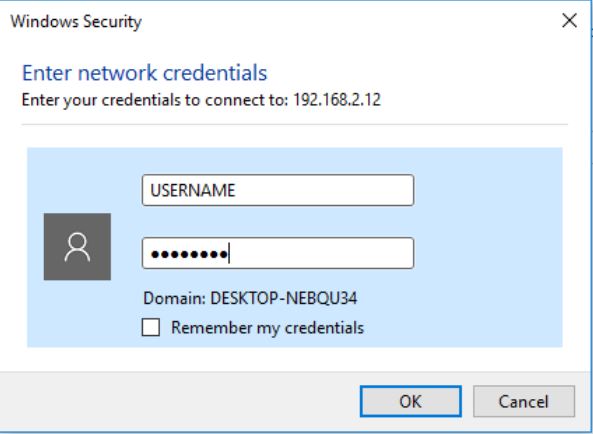
A window will open asking you to enter the shares credentials. Enter the credentials and press “Next” to continue.

Enter a Share Name

enter share location ip

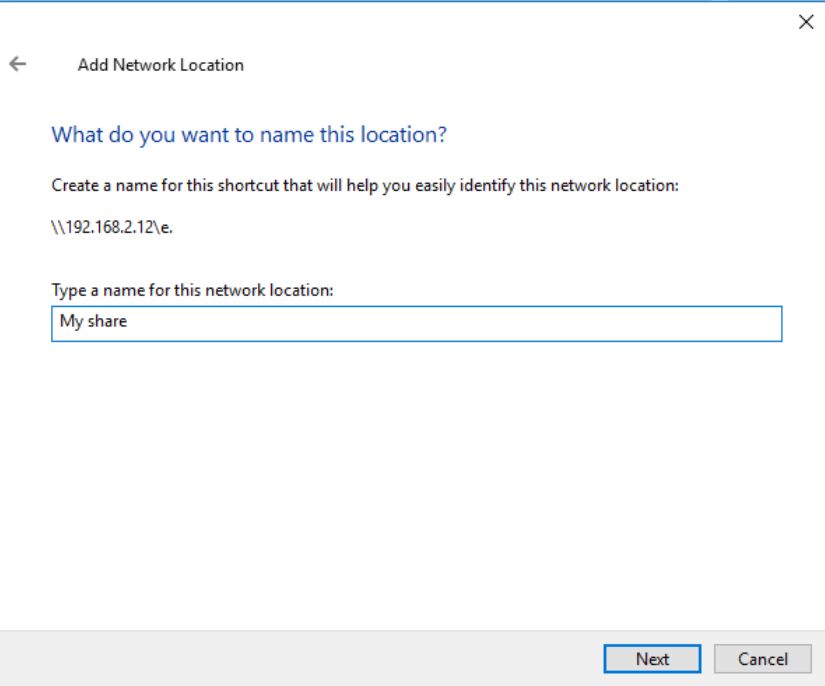
You will then be asked to type a name for the network share. I will be using “My share”. Then you will click on the “Next” button.

Network Location Added

network location added

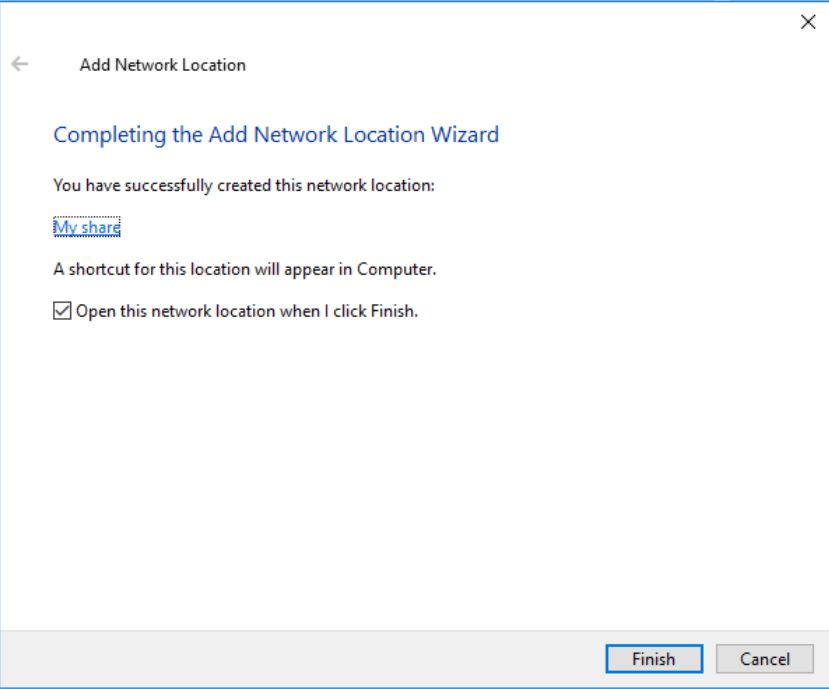
The Network Location has been successfully added. Click on the “Finish” button to open the share folder.

View in My PC

this pc file explorer

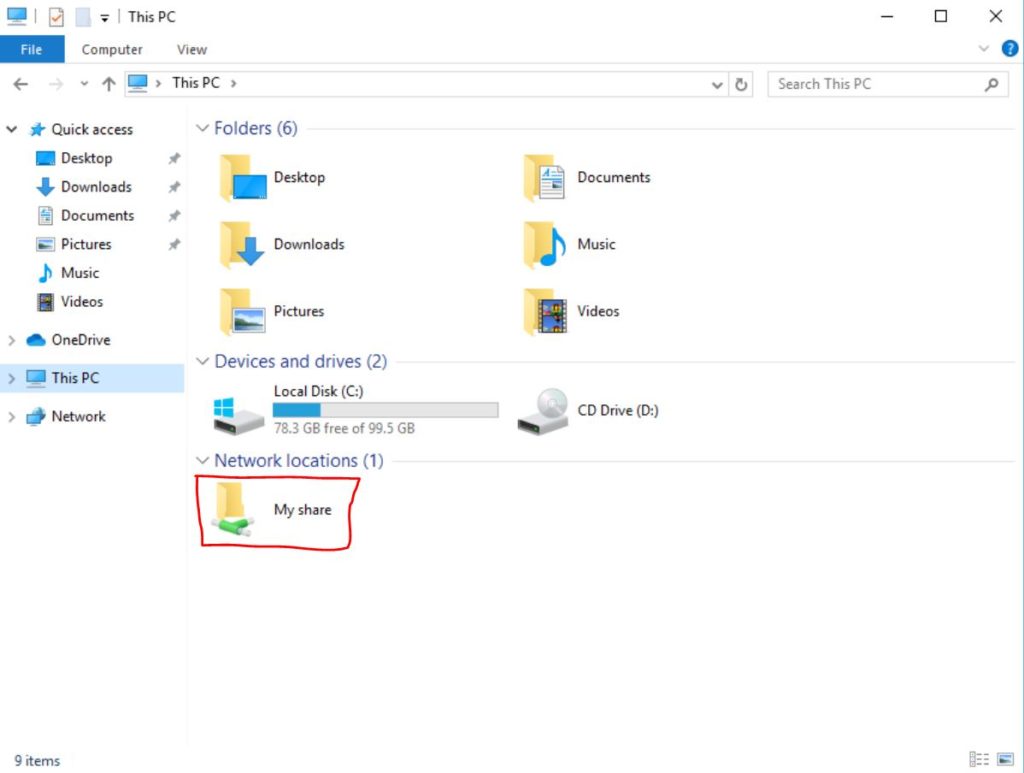
You can find the Network Share you just added by navigating to “This PC” in the left column of File Explorer. You will see the share listed under “Network locations”. You have now completed the tutorial. If you would like to learn how to create a network share continue reading below.

How to Create a Mapped Network Drive in Windows 10

If you want an in depth tutorial on creating mapped network shares in Windows 10 click the link below.

Map a Network Drive in Windows Tutorial

Questions?

If you have any questions or comments feel free to leave them below.

Related Resources

View our How to Create a Deepfake Video Using DeepFaceLab article.

Learn How to Install Ubuntu Server 22.04 [Step by Step].

Click here to learn How to install and configure Nginx – Ubuntu 20.04.

View our Programming Articles and Tutorials.

Learn more cool things in Linux with our Linux Tutorials.

View all of our available online tools and converters at Formatswap.com.
How to Create a Mapped Network Drive in Windows 10

mapped network drive splash screen

This tutorial will teach you how to create a network share in Windows 10. You can use any hard drive or folder on your computer to share. This will easily allow you to access any files you want on your local network. This allows you to avoid using USB flash drives or portable hard drives to transfer files. We will be using the file sharing feature built into the operating system. You will be able to successfully share your files by reading below.

Open File Explorer

open file explorer

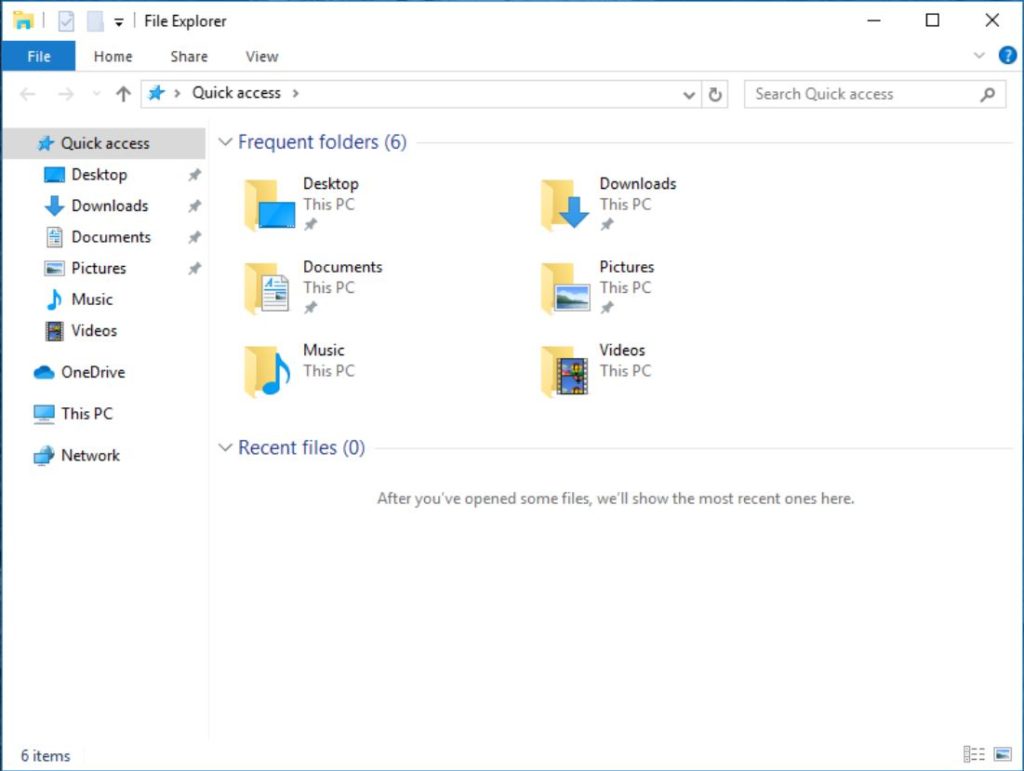
First, you will want to open your file explorer by clicking on the folder icon on your taskbar, or pressing Windows+E simultaneously on your keyboard.

Choose Drive or Folder to Map

choose drive to share

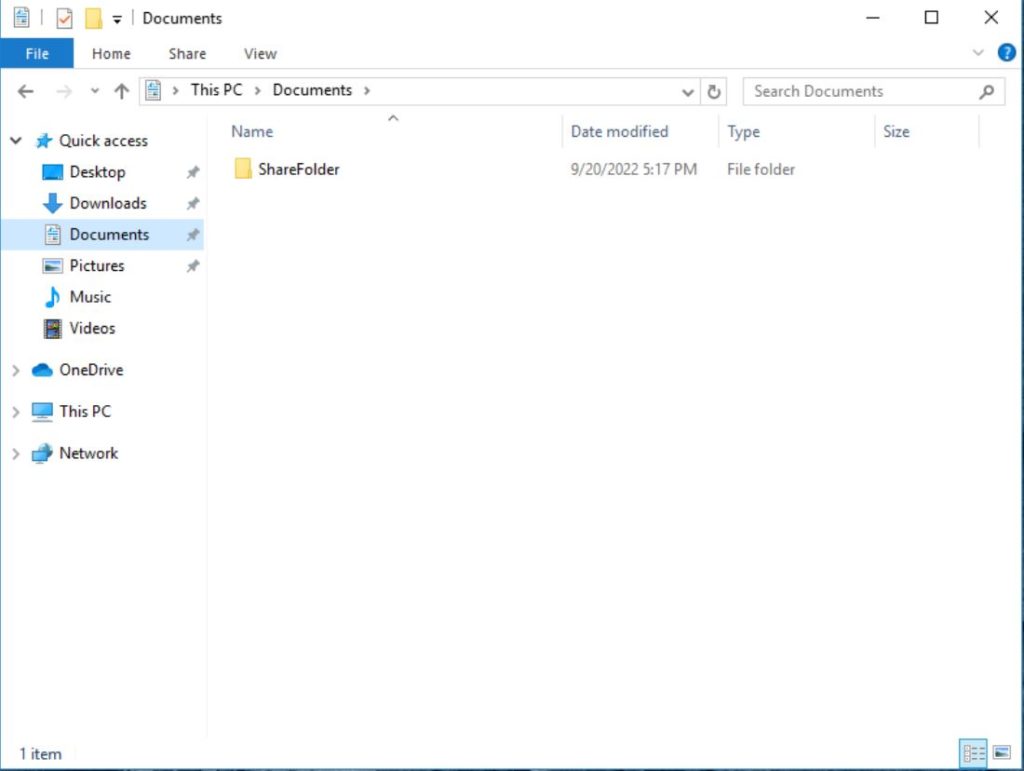
Next, you will navigate to the folder you are trying to share. If you are sharing a full hard drive, click on “This PC” in the left column.

Open Properties

windows explorer settings

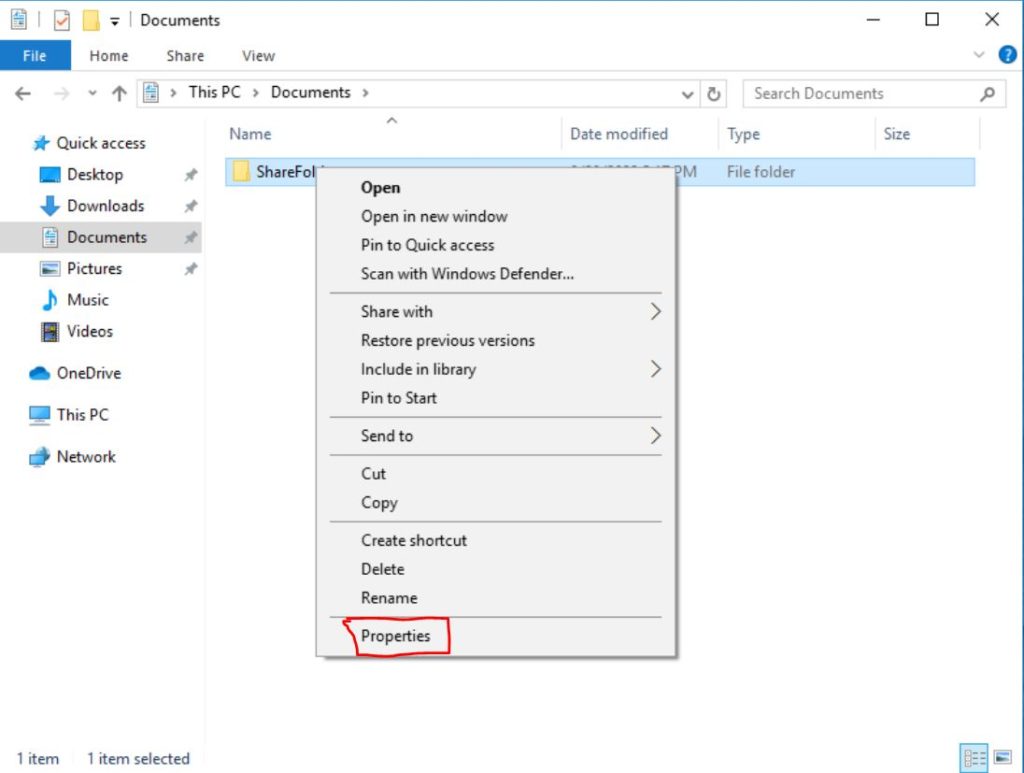
Right click on the folder or hard drive, and click on the ‘Properties’ option.

Navigate to Sharing Tab

sharing tab

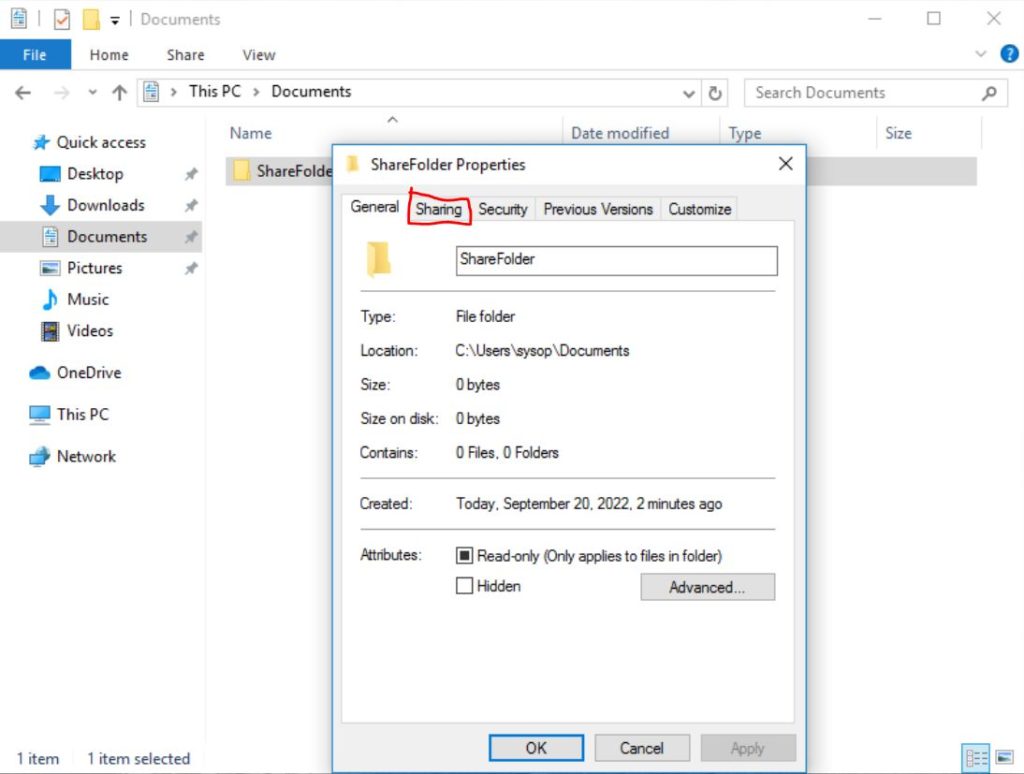
Once the folder or hard drives property tab opens, click on the ‘Sharing’ tab.

Advanced Sharing

advanced sharing button

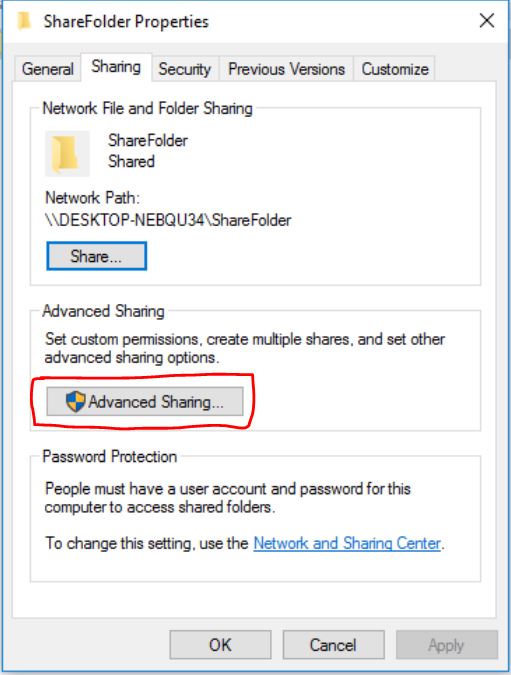
Click on the advanced sharing button.

Open Permissions Dialog

windows sharing permissions

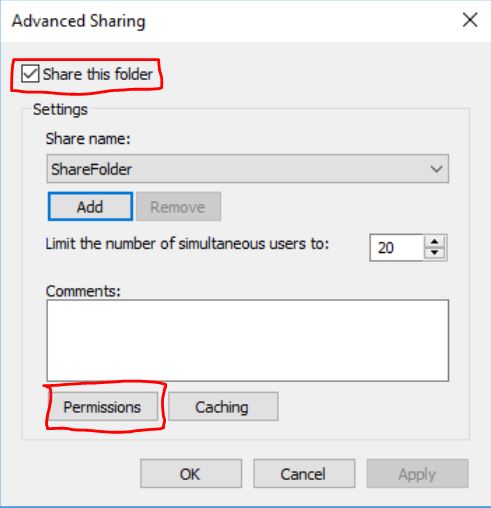
Click on the ‘Share this folder’ checkbox, then click the ‘Permissions’ button.

Set the Permissions

permissions for share folder

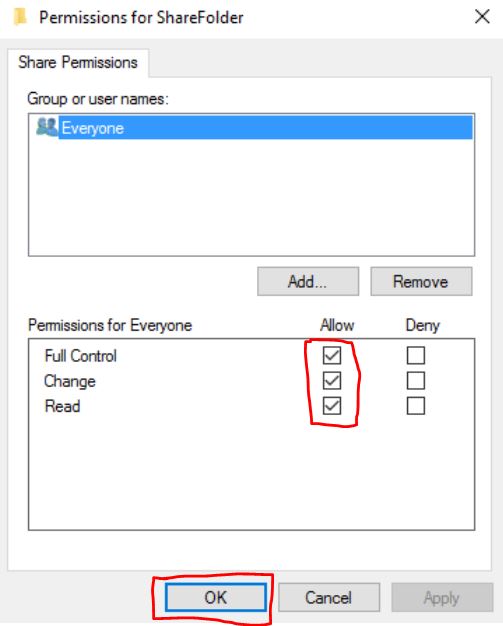
Select what file permissions either everyone accessing the folder has available, or certain users by clicking ‘Add’ and adding in new users. If you want full access to read and write files, select all of the check boxes on the left. Then click the “OK” button to continue.

Close Advanced Sharing

close share folder

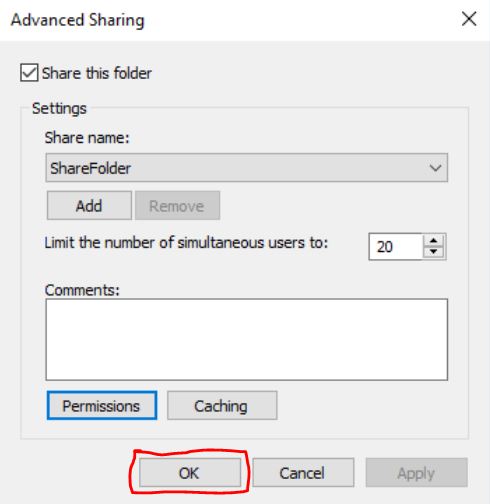
Click on the OK button to close the advanced sharing dialog window.

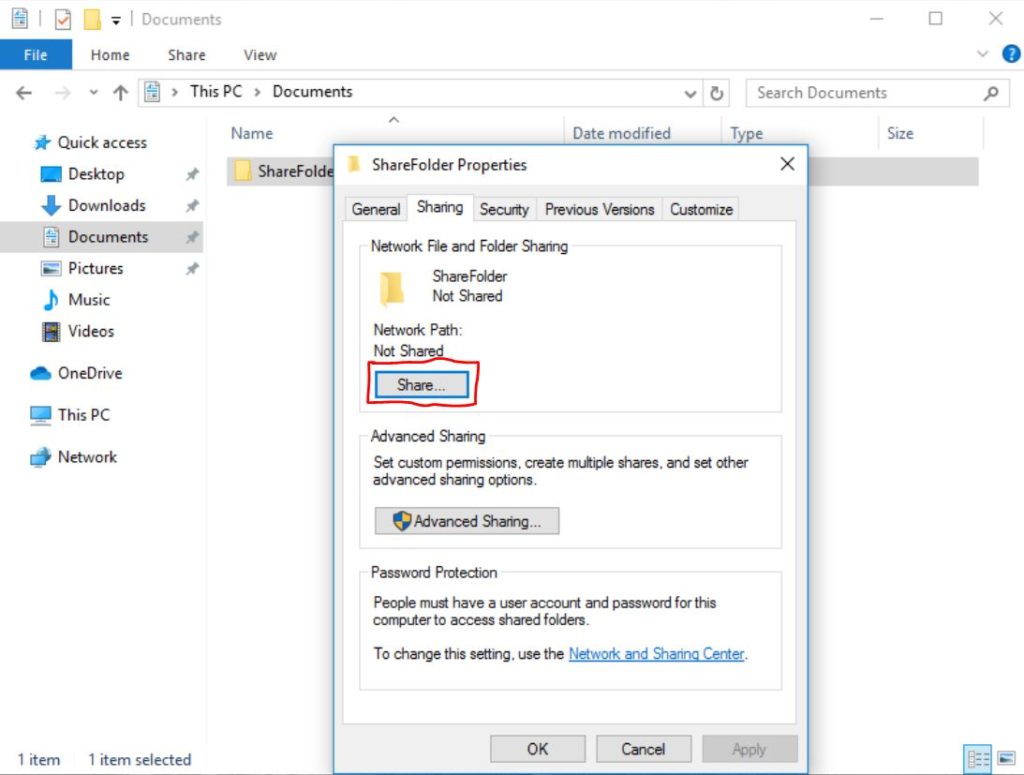
Open Share Dialog

navigate to share tab

Now that you have set up the sharing permissions you need to setup the share. To begin click on the “Share…” button.

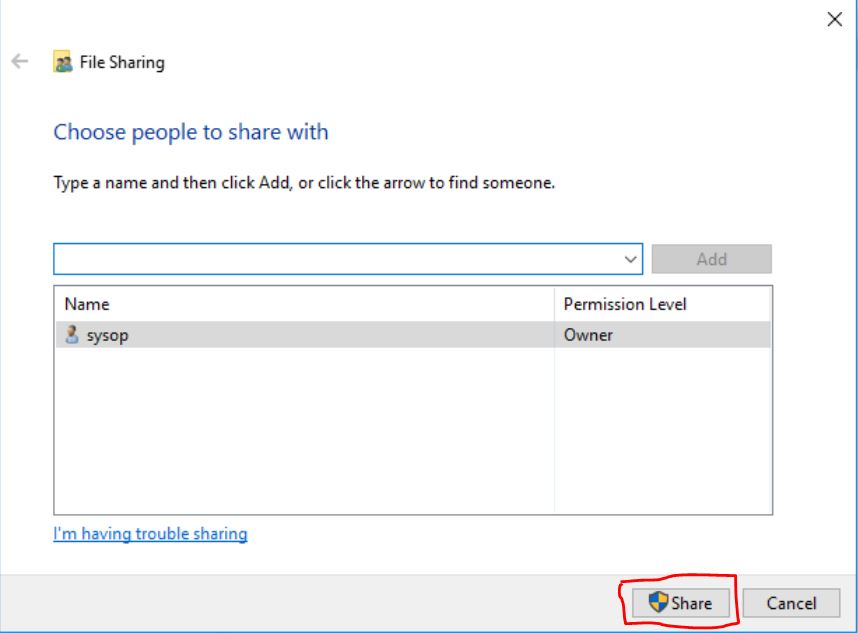
Choose User(s) to Share With

choose people for network share

Type in the user you want to use when accessing the folder from the network. You can also add other users if you have different users you would like to have access to the folder.

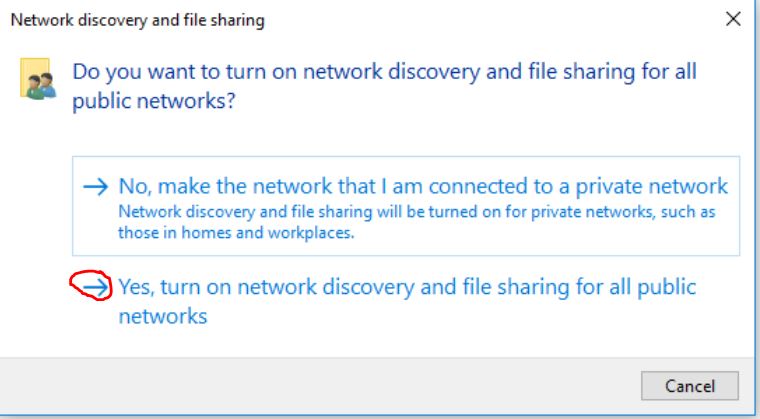
Confirm Network Discovery Dialog

confirm network discovery

After you click “Share” you will get the above dialog. This is asking you to turn on network discovery for file sharing. You need to enable this for the network share to function. Click on “Yes” to continue.

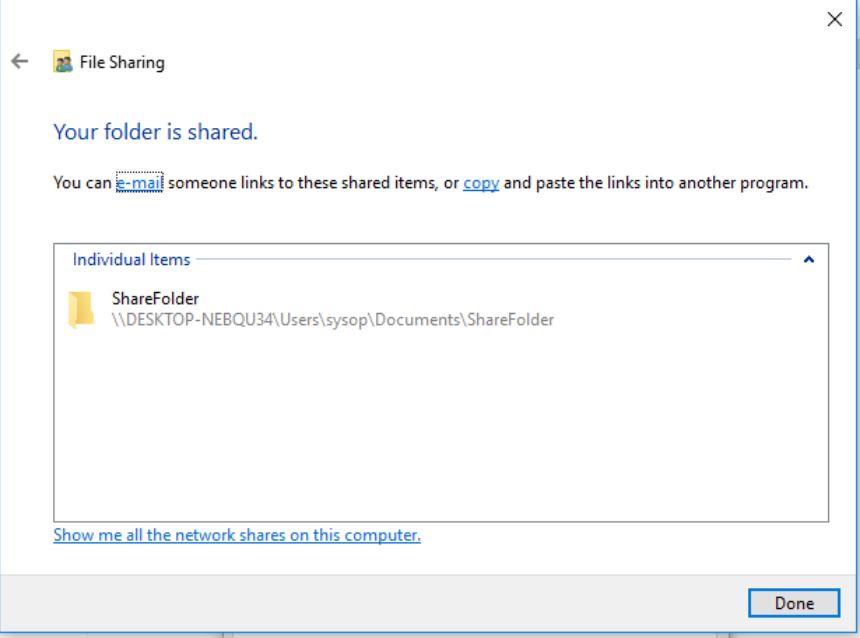
Network Sharing Completed

network sharing completed windows 10

Congratulations! You have now completed all the steps towards sharing a folder within your network. You can now access it from other computers by mounting a network share or accessing it directly by typing the above link to the folder. In this case, the folder URL would be:

\\DESKTOP-NEBQU34\Users\sysop\Documents\ShareFolder

You can mount a network share on another computer by following the steps below.

Mounting a Network Share (Full Guide)

If you want an in depth tutorial on mounting network shares in Windows 10 click the link below.

How to Add a Network Location in Windows 10

Questions?

If you have any questions or comments feel free to leave them below.

Related Resources

View our How to Create a Deepfake Video Using DeepFaceLab article.

Learn How to Install Ubuntu Server 22.04 [Step by Step].

Click here to learn How to Install MySQL on Ubuntu Server 22.04 LTS.

View our How to Setup a FTP Server with FileZilla in Windows guide.

Learn How to Setup OpenSSH with Keys on Ubuntu 22.04.

View all of our available online tools and converters at Formatswap.com.
How to Create a Deepfake Video Using DeepFaceLab

deep fake cover

In this tutorial you will learn how to create a deepfake video using DeepFaceLab. This application uses machine learning to swap almost any face from a video for one that you choose. DeepFaceLab is currently the best software by far for making deepfakes. In this tutorial we will be using the Windows 10 operating system. However the steps are pretty much the same if you are using Linux. So you should be able to utilize this tutorial with either operating system. It is advised that you have a powerful GPU such as a Nvidia GTX 1060 or better for creating deepfakes. If you want the best experience possible I would recommend you use a RTX 3080 or RTX 3090 graphics card. The software will still work with a low end GPU, but it could take multiple weeks to train your model. Having a high end GPU will also allow you to render the face swaps in a higher resolution. To learn how to create a deepfake continue reading below.

Download DeepFaceLab

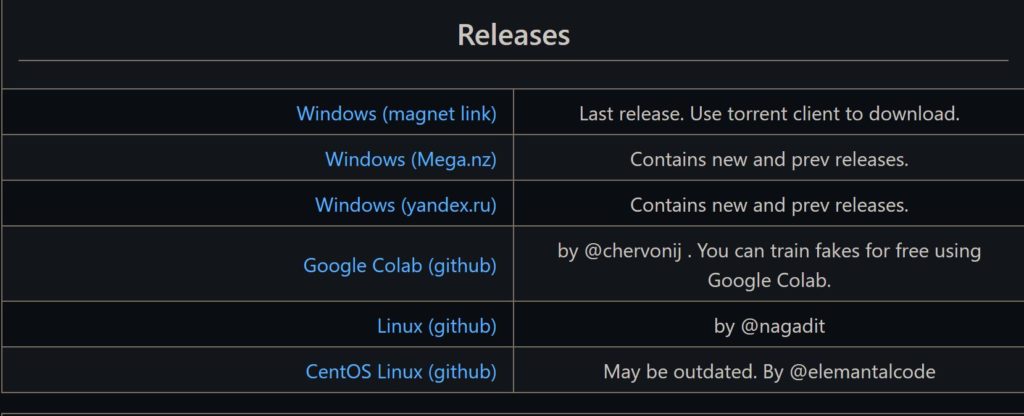
The first step is to download the latest version of DeepFaceLab. You can do so by going to the DeepFaceLab Github page and scrolling down to releases. Click on the Windows (Mega.nz) link to download the correct release for your graphics card. If you are installing in Linux you will have to follow the instructions provided on the Linux (github) page.

deepfacelab releases

Choose Version

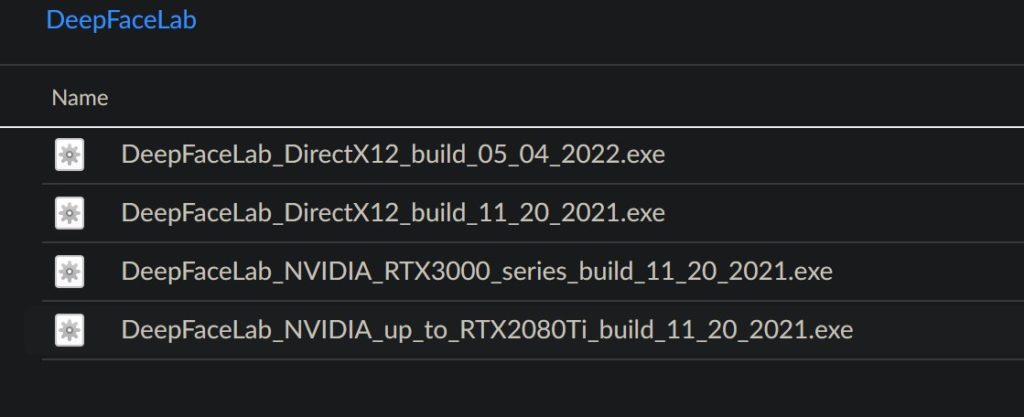
After navigating to the Mega.nz download link you will need to select a version of DeepFaceLab. This is based on which graphics card you have installed. In this tutorial I am using a GTX 1080 so I will download “DeepFaceLab_NVIDIA_up_to_RTX2080Ti_build_11_20_2021.exe”. Choose the version that is correct for your system.

deepfacelab choose version to download

Open the Workspace

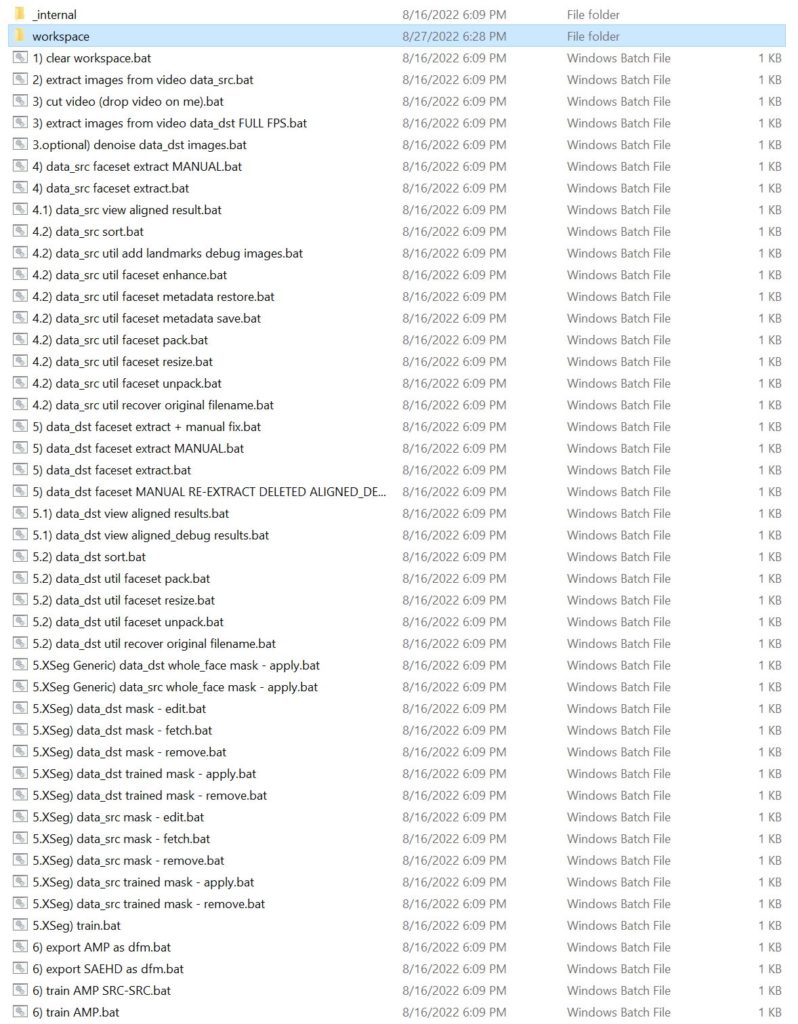
After downloading the application, extract the zip file and open the folder. Your folder should look similar to this.

open the workspace

Collect source videos

This is by far the most important step of getting a good result from the process. You need to select a video of your source (persons face you want to copy). As well as a destination video (where you want your source face copied to). You want to find a clip for each that is 5-10 minutes long with multiple angles of the faces. A good source for these videos are interviews on YouTube. Below are the two videos I am going to use. After you download the videos rename the source video to “data_src.mp4” and the destination video to “data_dst.mp4”. Then move both MP4 files into the “workspace” folder.

Source face:

Destination Face:

Extract images from source video

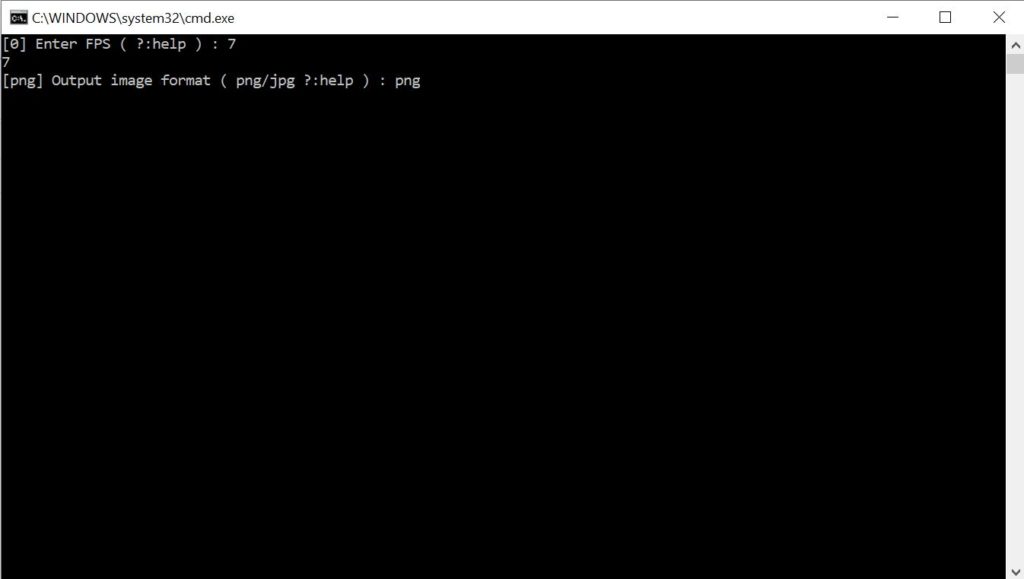
step 1 enter src fps

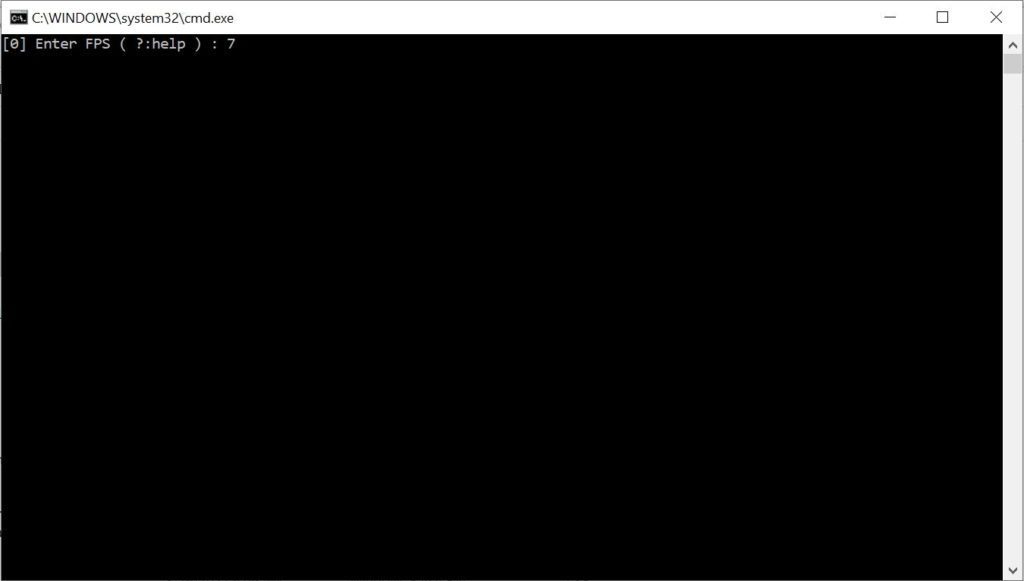
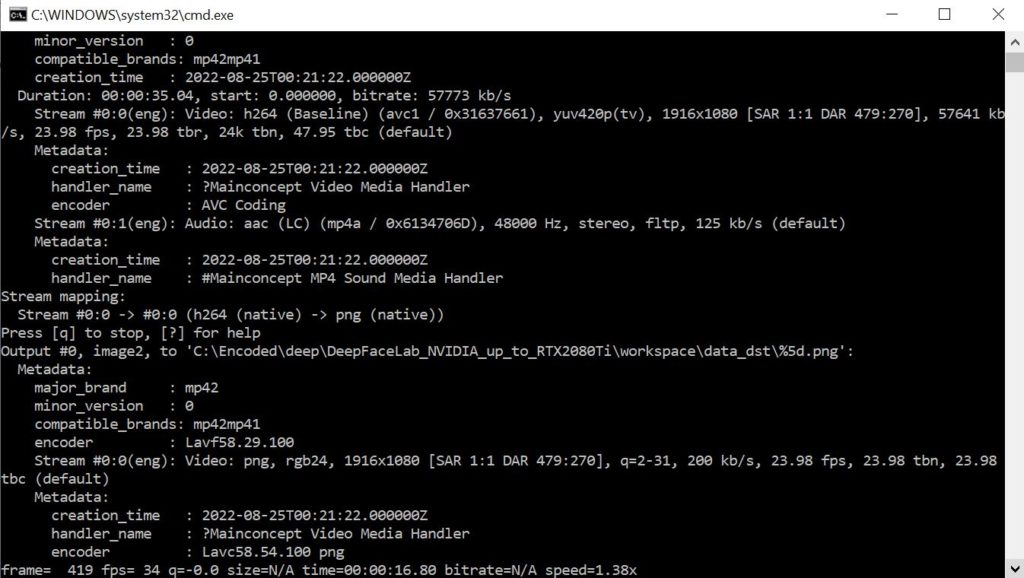
To start we will need to extract the image frames from the source video. Double click on “2) extract images from video data_src.bat”, you will then see the above window open. Type in 7 or 8 and press “Enter”.

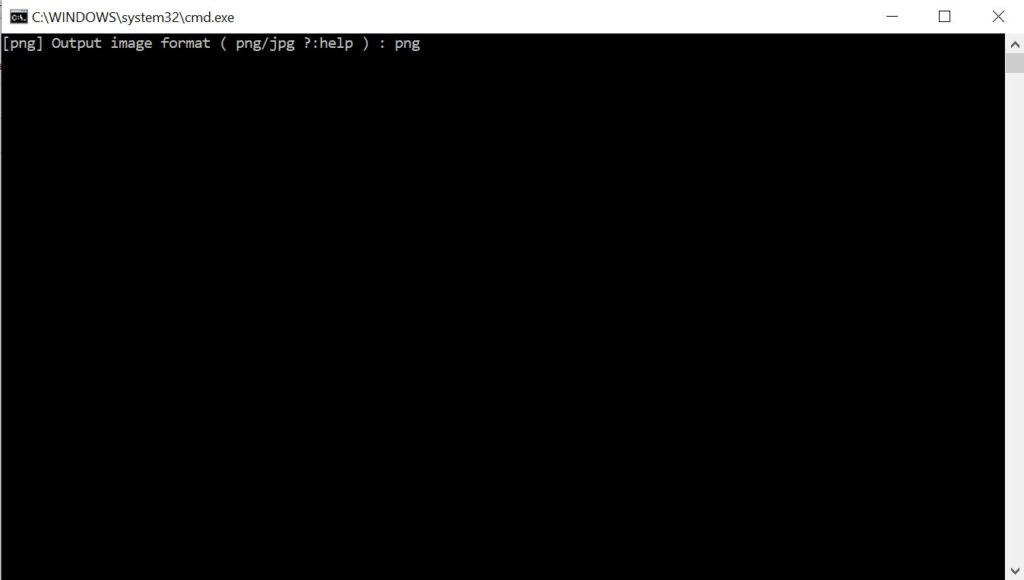
enter source output format

Next type in “png” and press “Enter”.

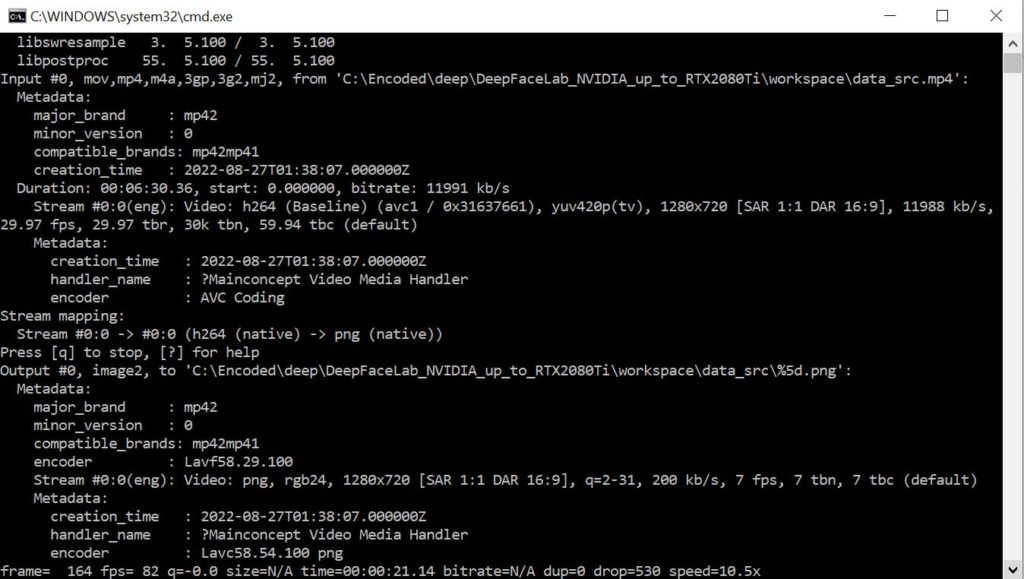
wait for source images to extract

Wait for the extraction process to complete.

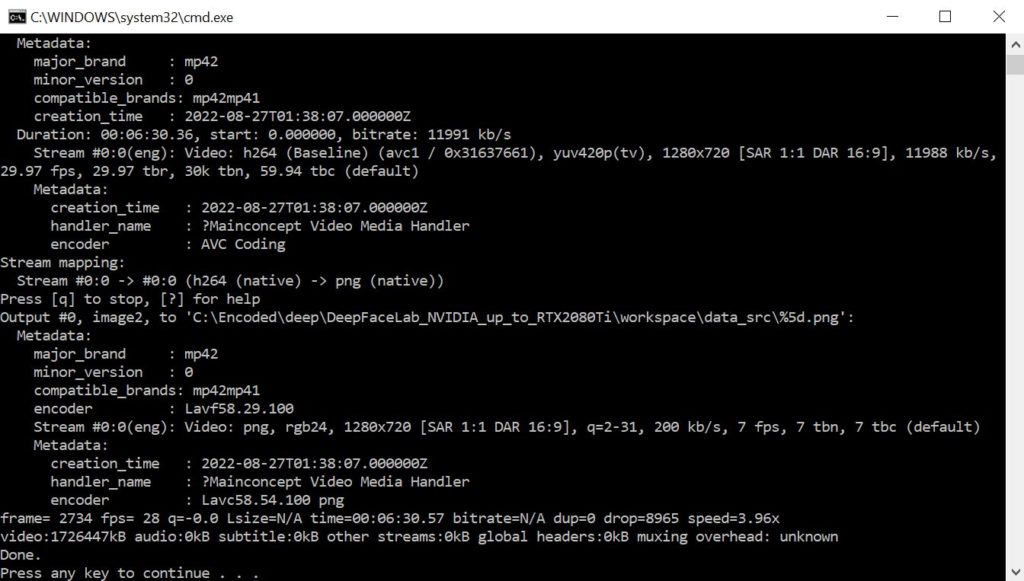
source extraction complete

Once you see this screen the process is complete and you can close the window.

Extract images from destination video

select destination output image format

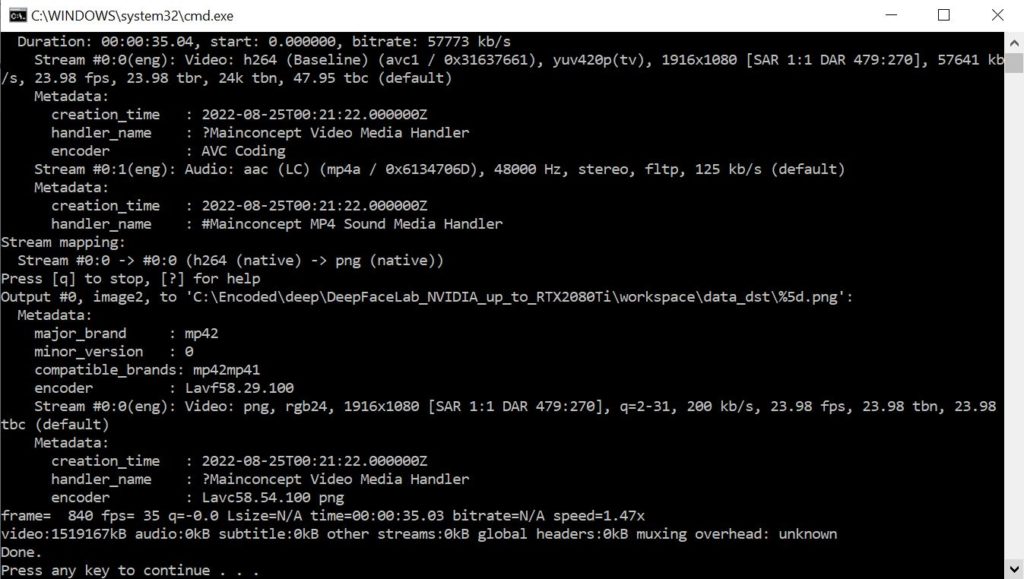
Next you need to extract every frame from the destination video as an image. Double click on “3) extract images from video data_dst FULL FPS.bat”. You will see the above window open. Type in “png” and press “Enter”.

wait for images to extract destination

Wait for all of the destination images to be extracted.

destination image extract complete

Once you see this screen the process is complete and you can close the window.

Extract the source video’s faceset

select gpu source video face extract

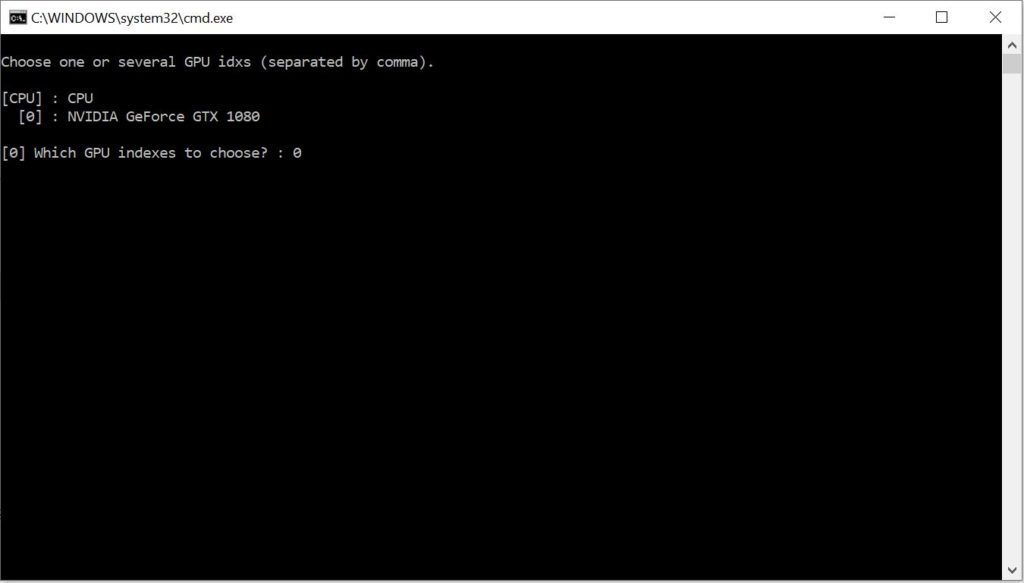
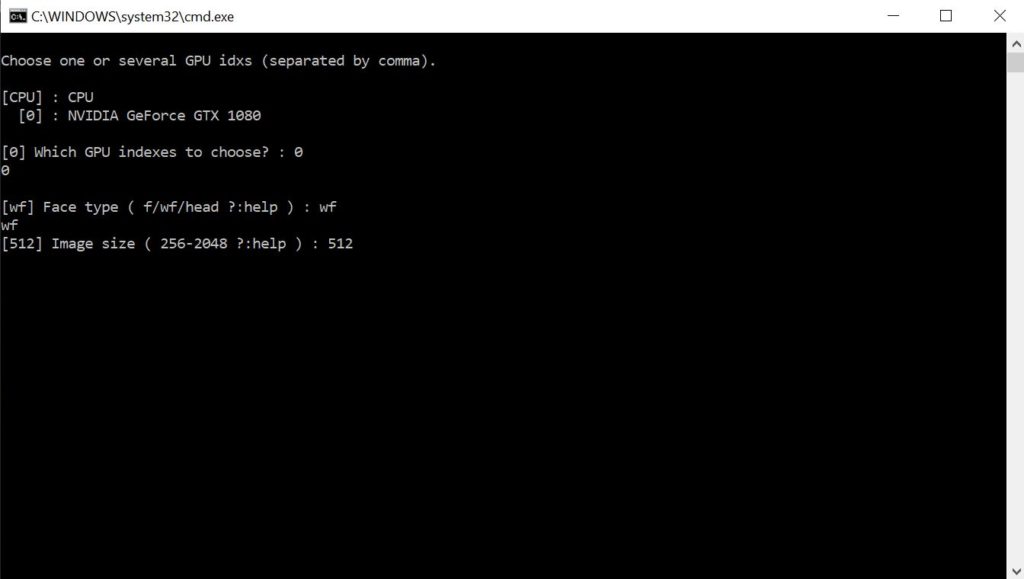
Next you will need to extract the source video’s faceset images. To begin double click on “4) data_src faceset extract.bat”. It will open the window you see above. Select your GPU device and press “Enter”.

select face extract type source

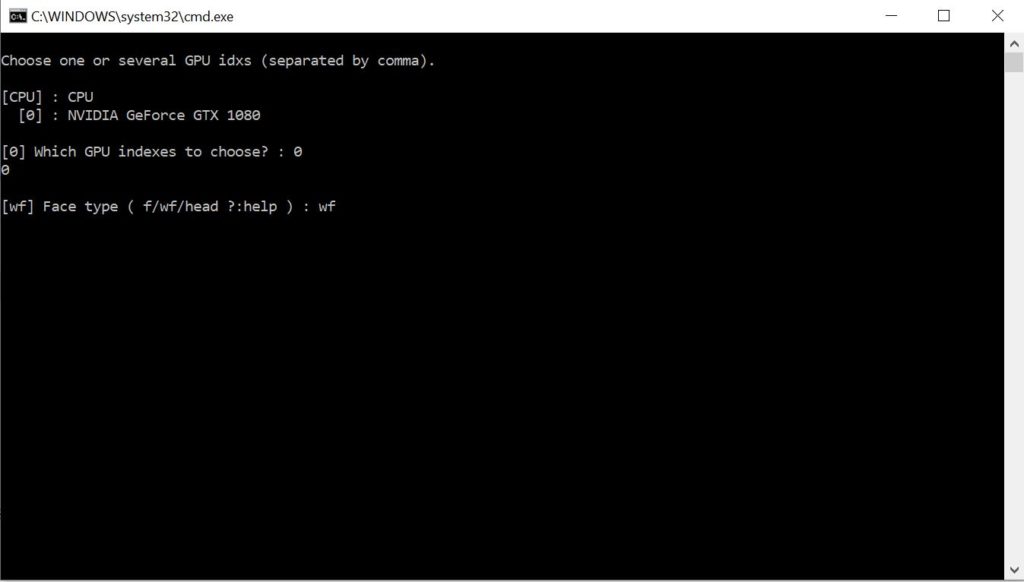
Afterwards you will be asked which face type to use. Type in the default option “wf” (whole face) and press “Enter”.

extracted source face image size

Then you will select the faces image size. Type in “512” and press “Enter”.

extracted source face jpeg quality

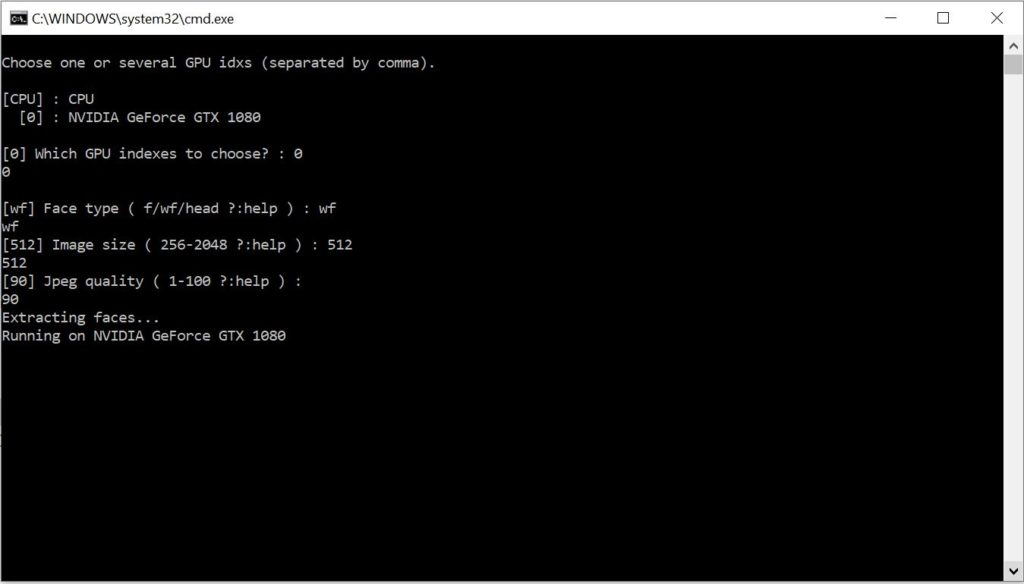
Next set the jpeg quality to “90”. Once you press “Enter” the face extraction process will start.

wait for source faces to extract

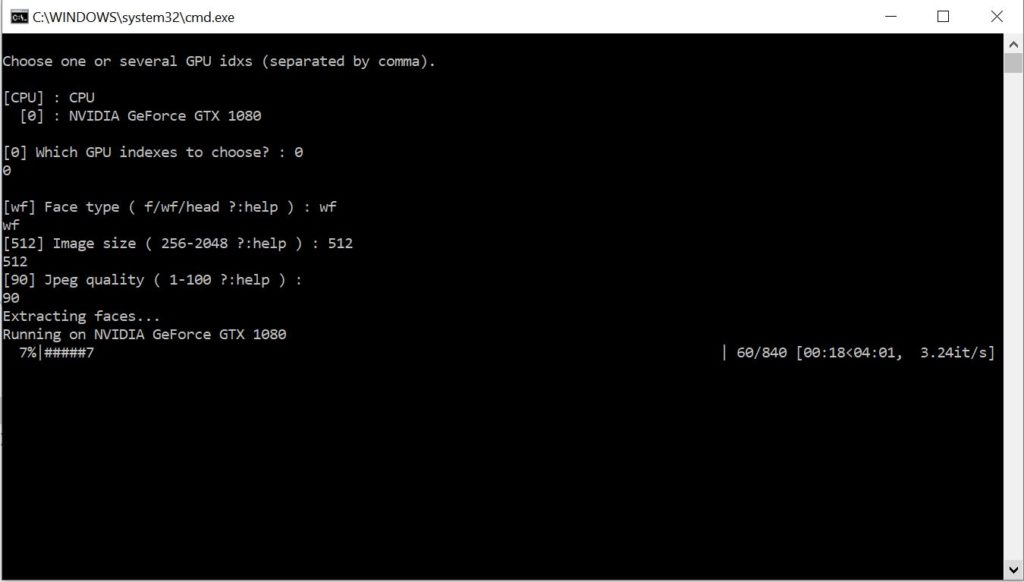
Wait for the extraction process to complete.

source video face extraction complete

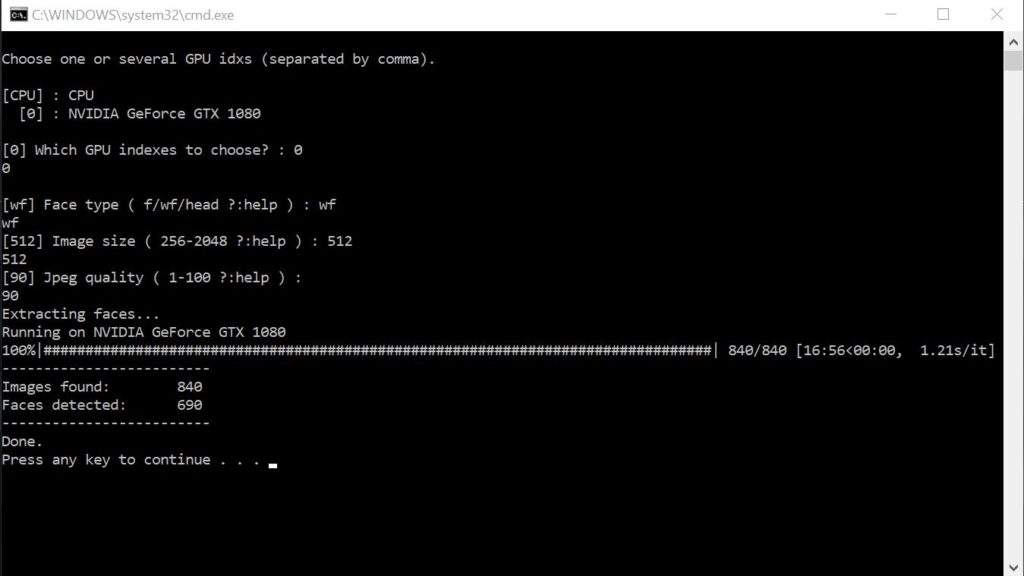
You will see this screen once the source face extraction is complete. Press “any key” to exit and close the window.

Extract the destination video’s faceset

select gpu source video face extract

The destination video face extraction process will be similar to the source extraction. To begin double click on “5) data_dst faceset extract.bat”. Once the window opens, select the GPU device and press “Enter”.

select face extract type source

Type in “wf” and press “Enter” to use the whole face.

extracted source face image size

Set the face image size to “512” then press “Enter” to continue.

extracted source face jpeg quality

Finally set the jpeg quality to “90” and press “Enter”.

wait for source faces to extract

Wait for the destination face extraction process to complete.

source video face extraction complete

At completion you will see this screen. You can press “any key” to save and exit. At this point you have both of your videos faces extracted and ready for use in the deepfake video.

Sort the source and destination faceset’s

run the sorting tool

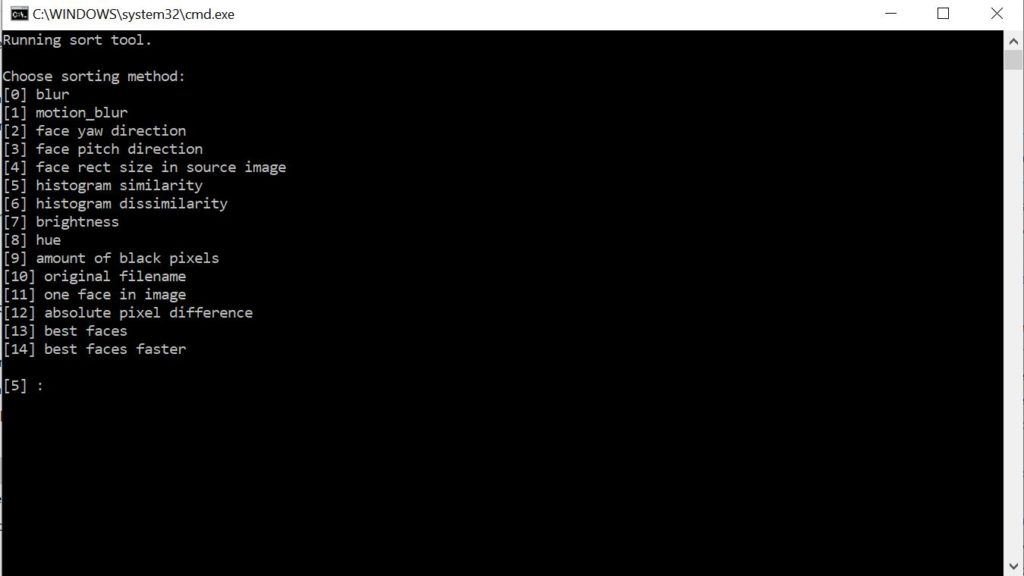
In this step we will be sorting the faces by similarity to make it easier to remove blurry and unwanted faces. To sort the source faces double click on “4.2) data_src sort.bat”. You will see the above screen. Type in “5” and press “Enter”.

wait for sort tool

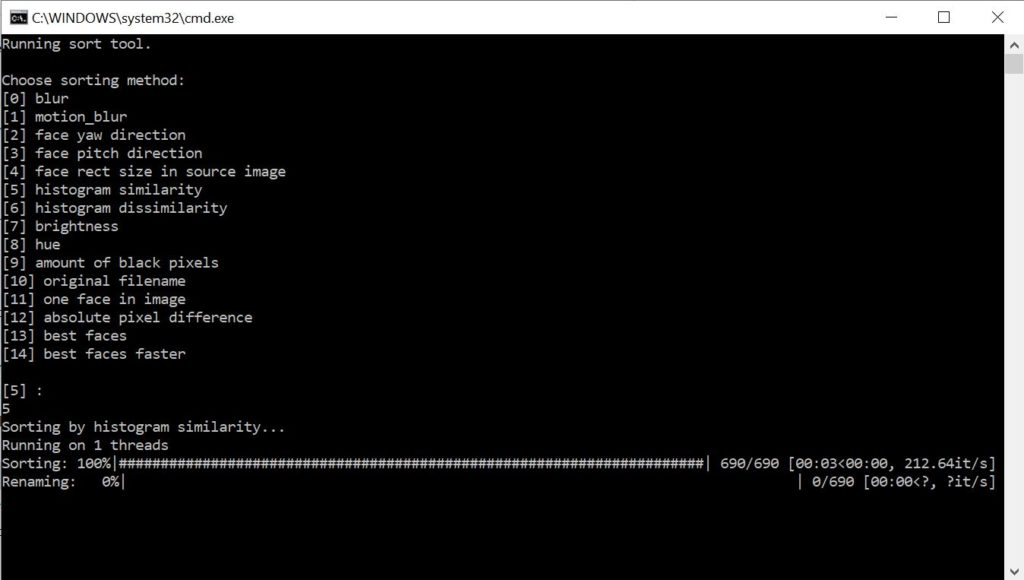
Wait for the sorting process to complete.

sort tool complete

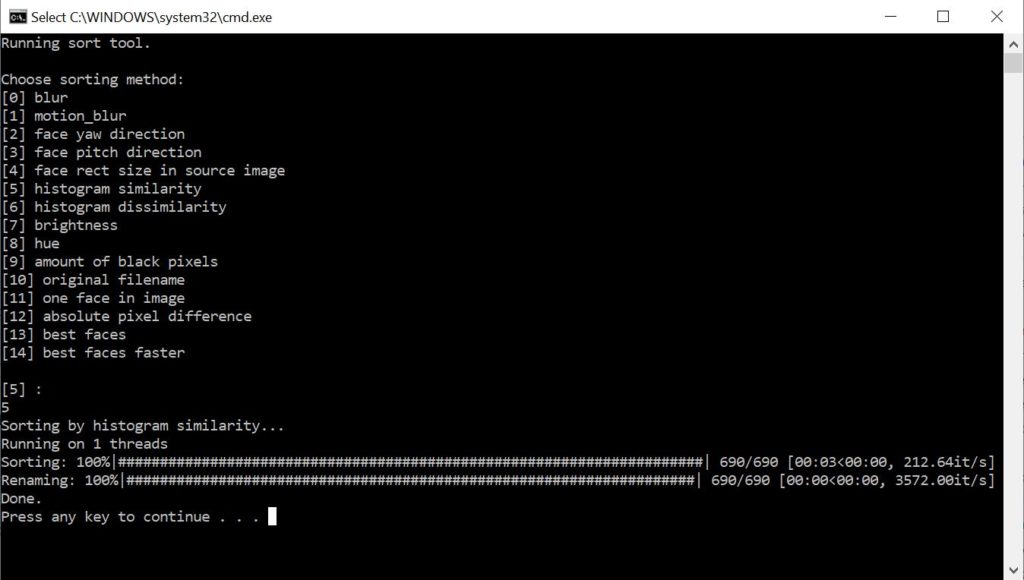
The source faces are now sorting by similarity. You now need to sort the destination faces. Double click on “5.2) data_dst sort.bat”. After the terminal window opens repeat the same steps above that you used to sort the source face.

Remove unwanted face images

bad faces examples

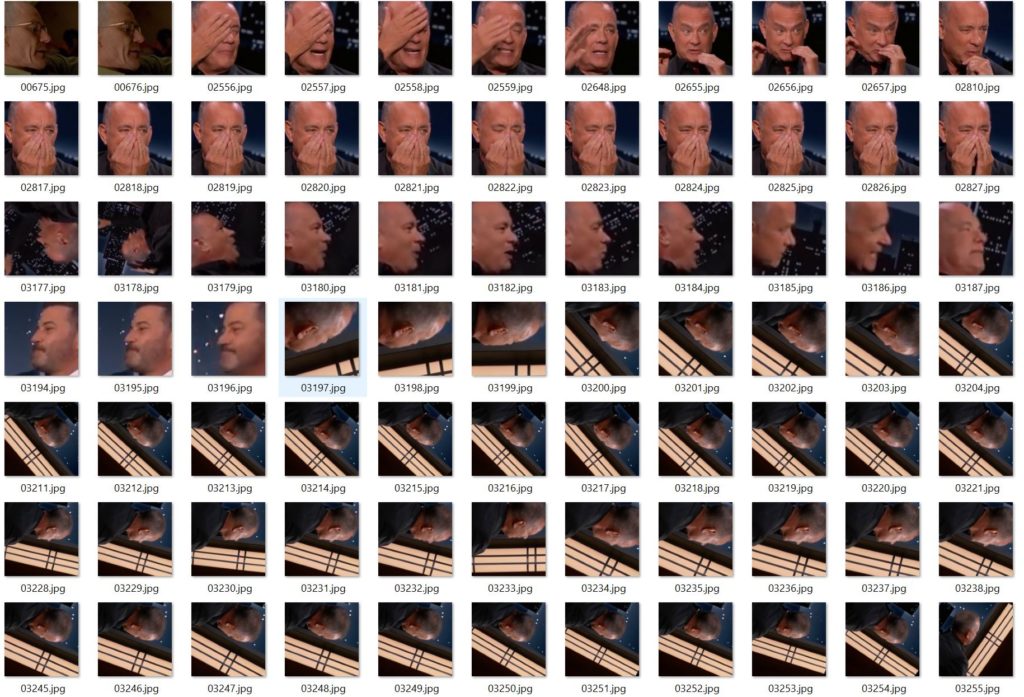
This is the last step before beginning to train the model. It is very important to complete this step to obtain a good result. Open the “workspace” folder and navigate to the “data_src” folder. Finally open the “aligned” folder and delete all images that do not contain a face, are blurry, or have hands in front of the face. After you complete this step, repeat the same by navigating to the “data_dst” then the “aligned” folder. Above are some examples of bad photos that I would remove. Use your best judgement when deciding which photos to remove.

Train the deepfake model

set model name

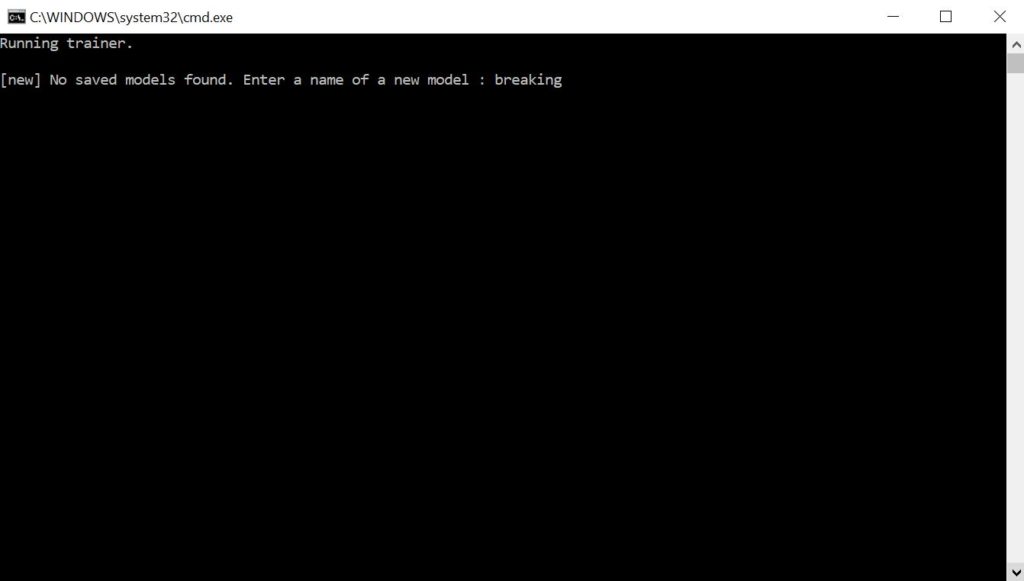
Now you will need to train the model. There are a few training batch files to choose from. If you are new to making deepfakes I would recommend the Quick96 model. To get started double click on “6) train Quick96.bat”.

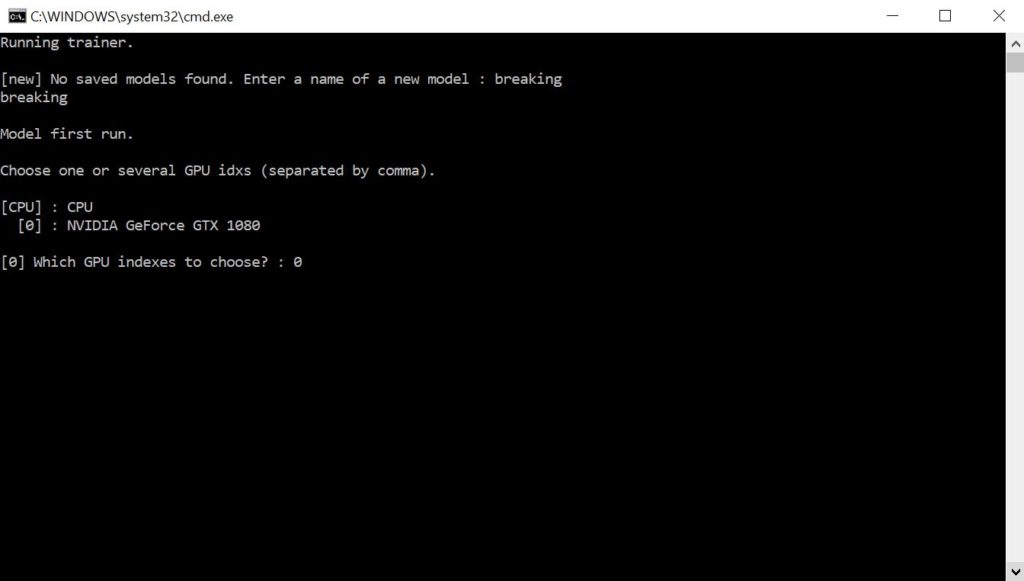
select gpu for training

Select the GPU device to use for training. If you have multiple GPU’s you will see them here. Unfortunately you are currently only able to use one GPU at a time. Once you press “Enter” the model training will begin. Now you will need to wait for the model to train. Within 24 hours you should start to see the faces in the preview window. I recommend you train the model for at least 7 days to get high quality results. If you need to use your computer for something else you can press “CTRL+C” to save and exit. The next time you open the Quick86 trainer it will resume from the last saved iteration.

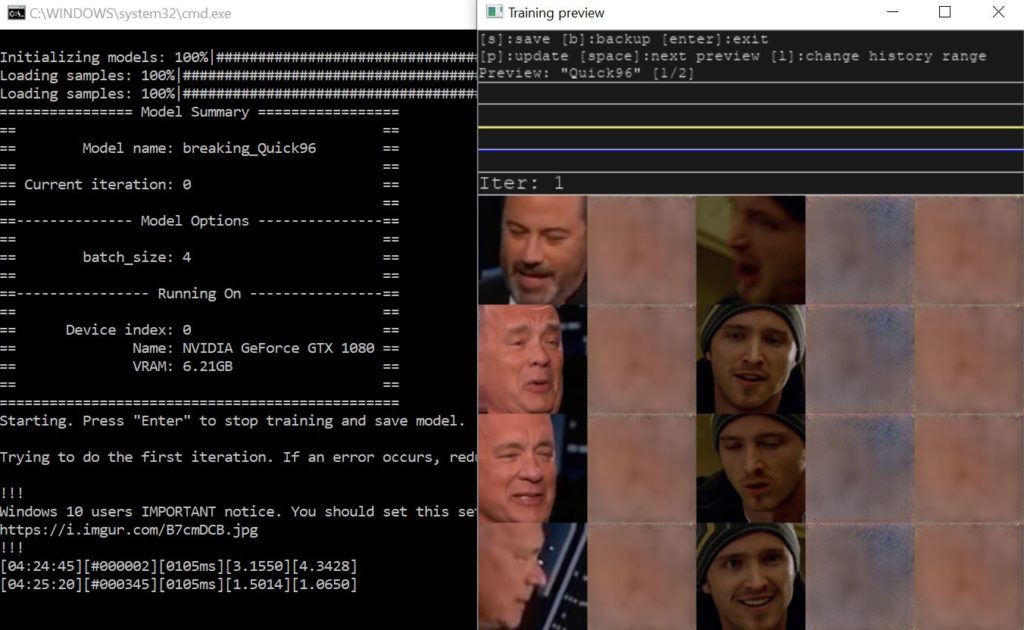
train it 1

Preview at 1 iteration.

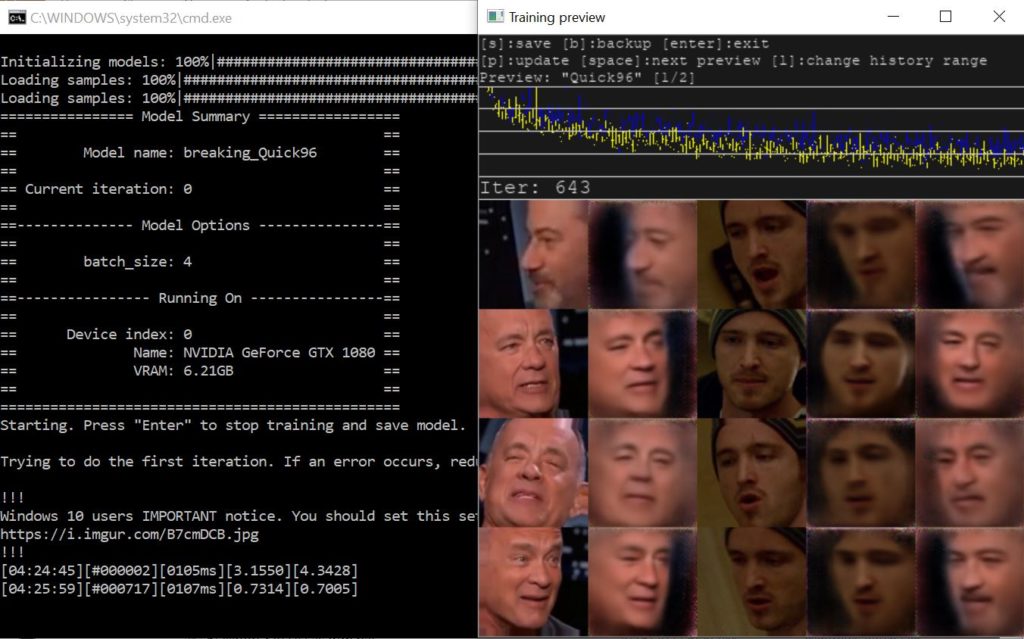
train it 650

Preview at 643 iterations.

train it 2500

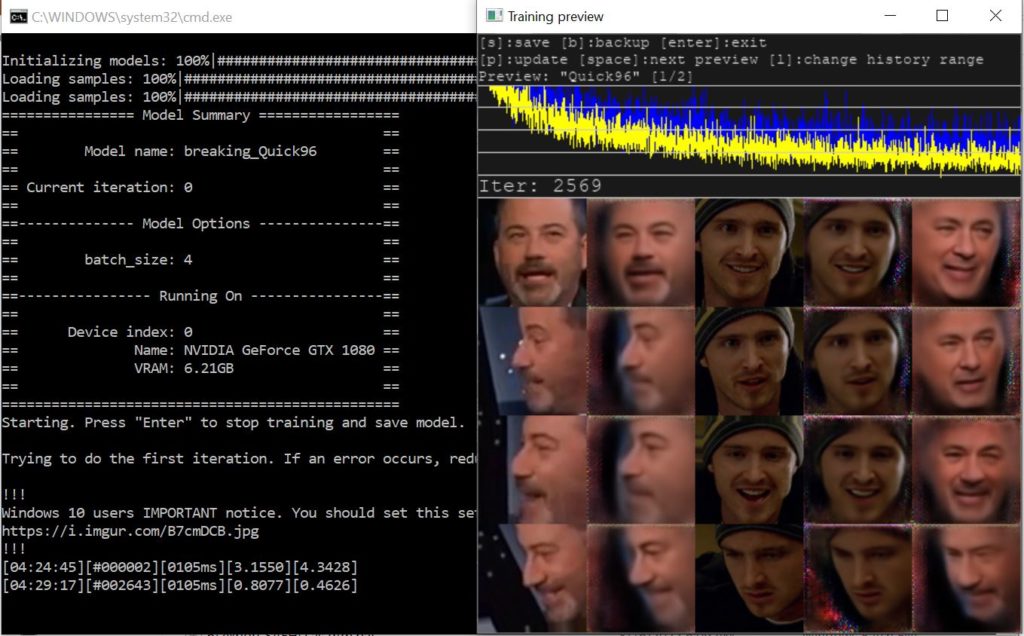
Preview at 2,569 iterations.

train it 400000

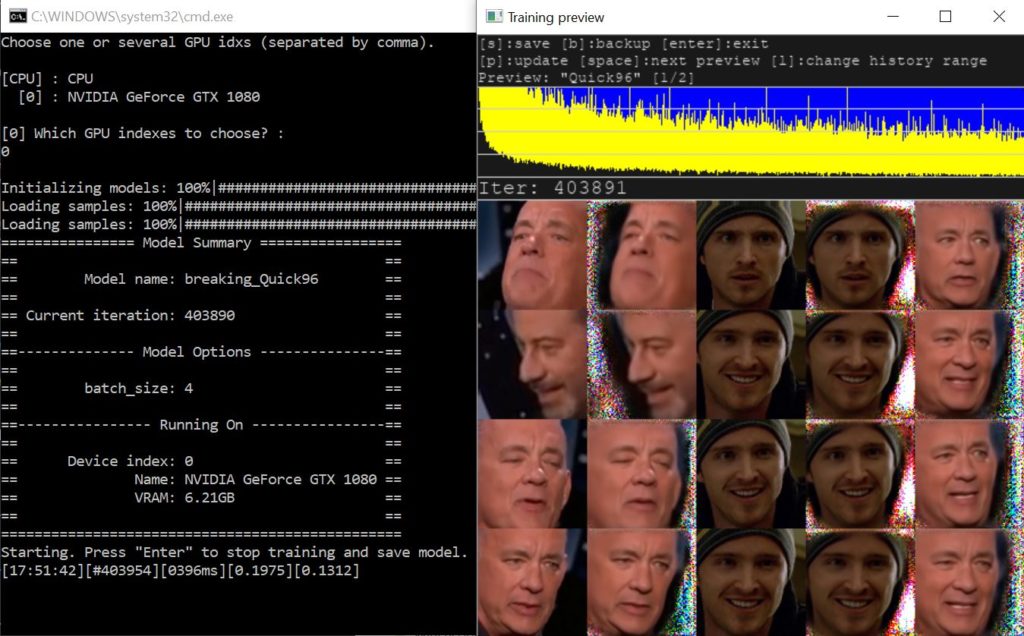
Preview at 403,891 iterations.

Merge the deepfake video

select model

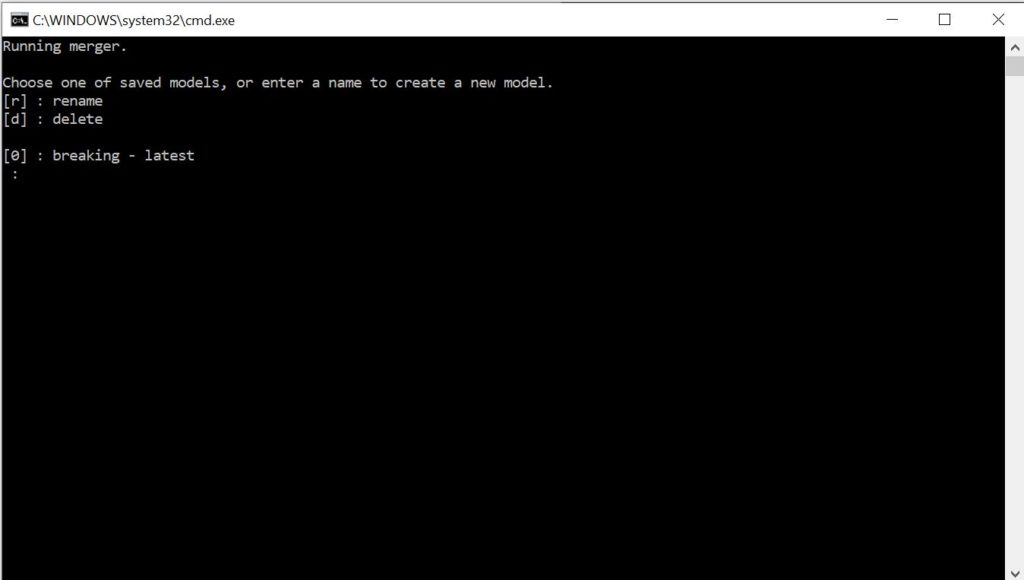
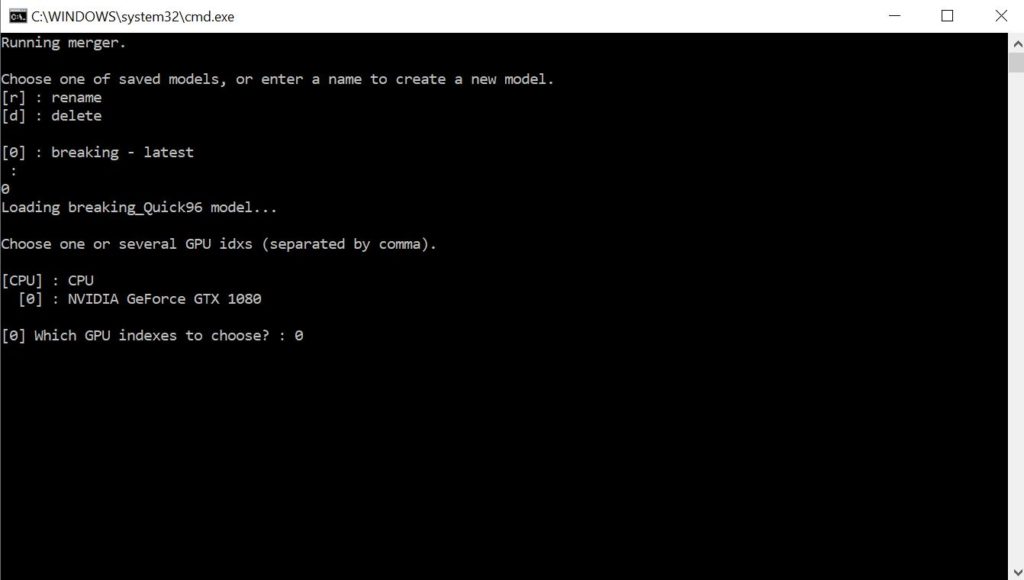
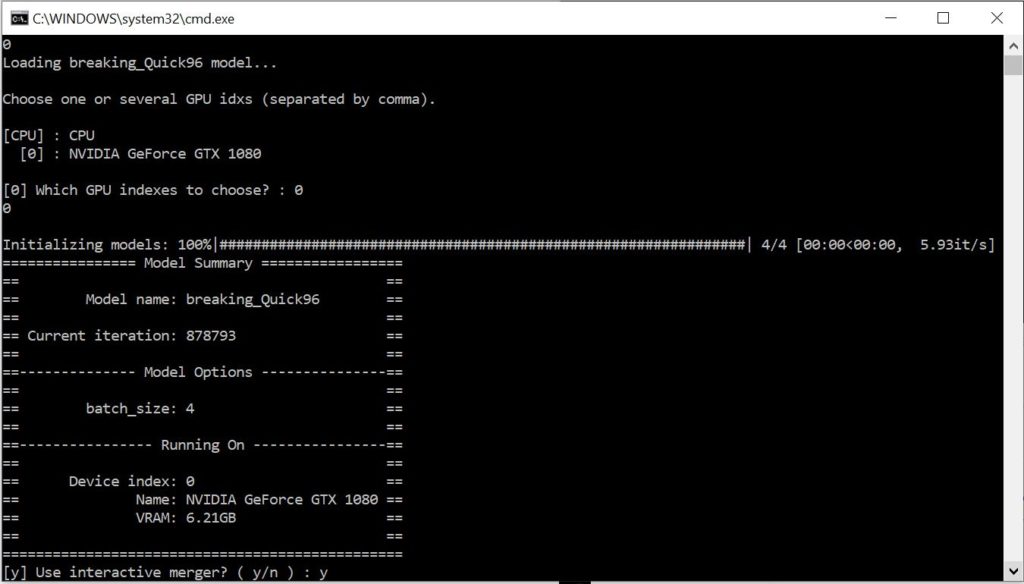
Next you will need to merge the faces into each frame of the video. This replaces the destination face with the source face for each frame. The merging process will also allow you to adjust the blur, erode mask, and color matching profile. This will allow you to get a more realistic final result. “Double click on “7) merge Quick96.bat”. Then type “0” and press “Enter” to load the model.

select gpu

Select the GPU device to use for the merging process.

use interactive merger

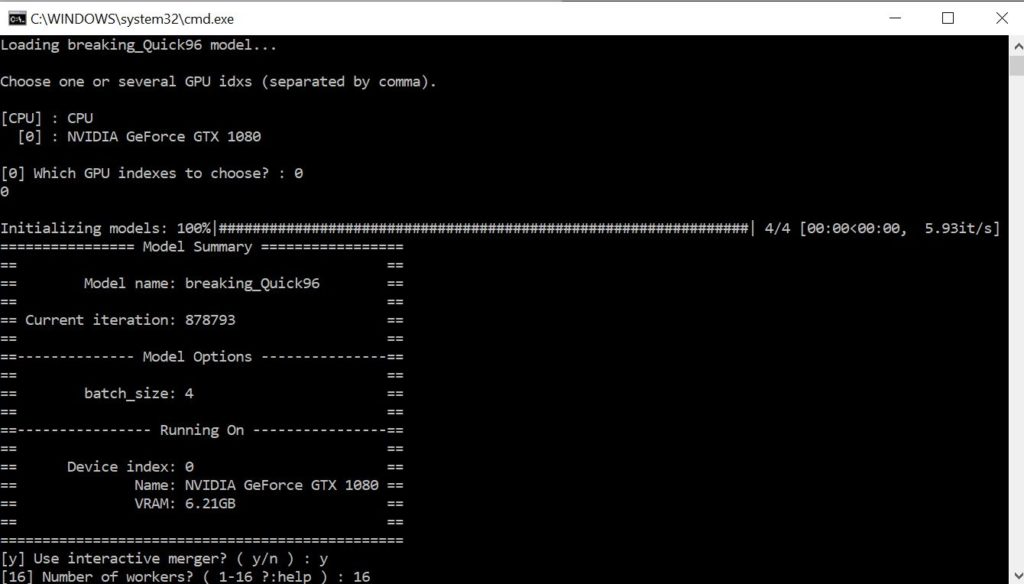
Type “y” and press “Enter” to use the interactive merger tool. The interactive merger allows you to visualize the changes you are making.

select amount of workers

Set the number of workers to “16” and press “Enter”. If you have any issues with the interactive merger opening you should reduce the number of workers.

controls

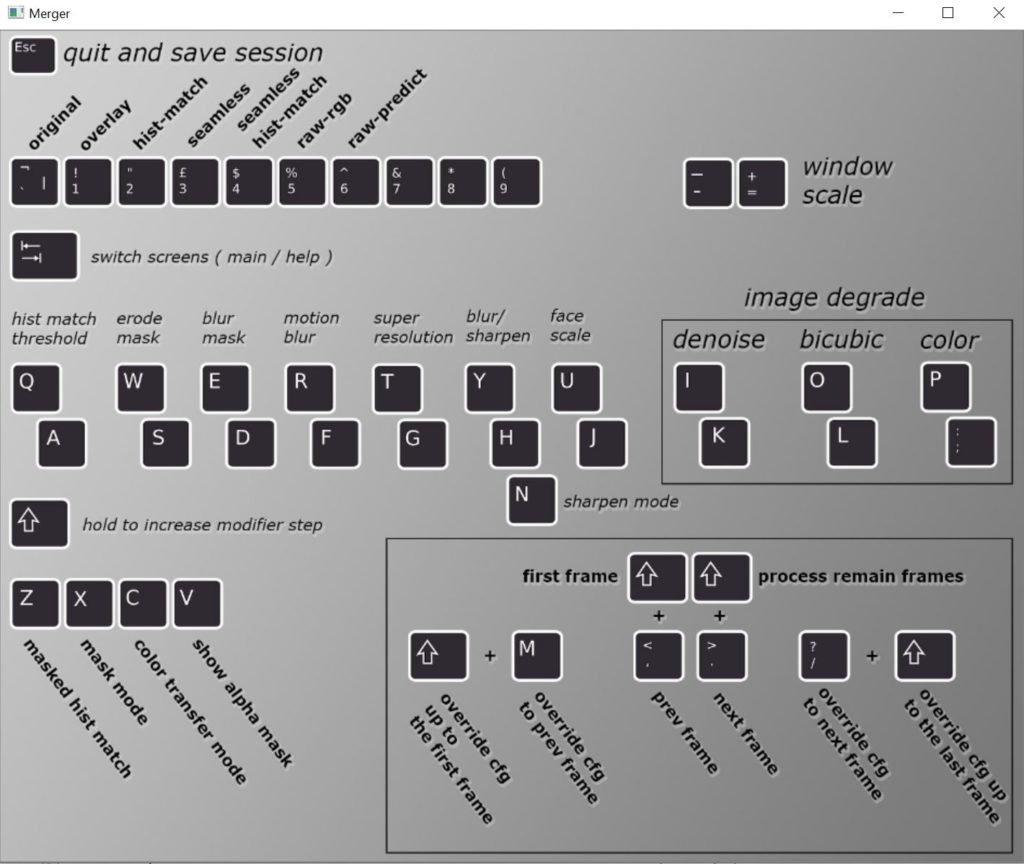
The above screen will open. These are the different shortcut keys for the merge tool. You are able to adjust many parameters, but we will be changing just a few of them. To begin click anywhere in the gray box and press “Tab”.

set erode and blur

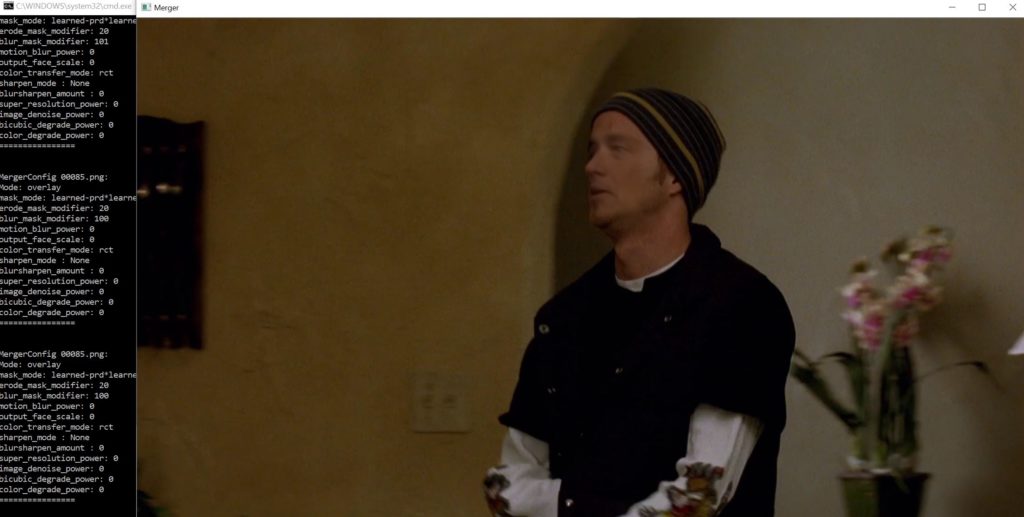
You will then see the videos first frame as well as different values in the terminal. If you just see a black screen use the less than symbol “>” until you get to the first frame to show the face. Now you will have to change the erode_mask_modifier as well as the blur_mask modifier. This will help the face seem more realistic during scenes with heavy movement. To do this press the “W” key 20 times. Then press the “E” key 100 times. After doing this your values will be set. To start the merge press shift plus forward slash “SHIFT+/”, then press shift plus the less than key “SHIFT+>”.

wait until merge is 100%

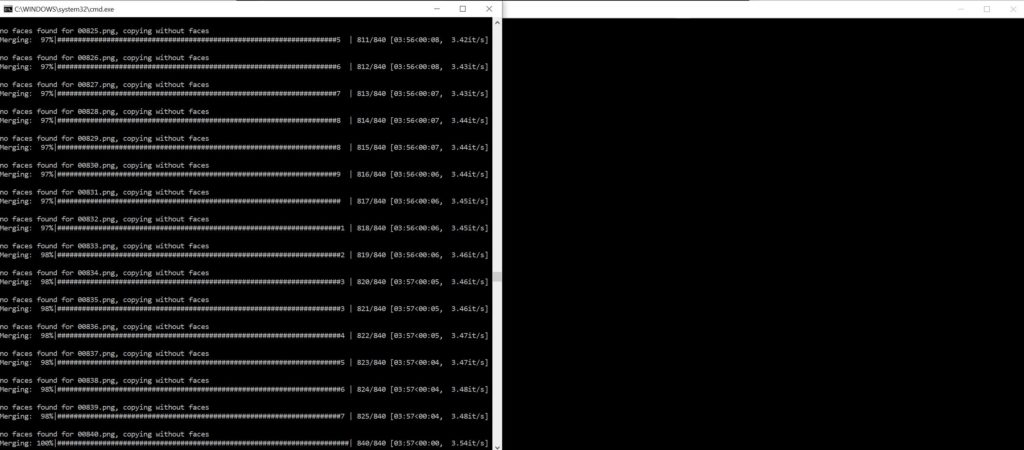
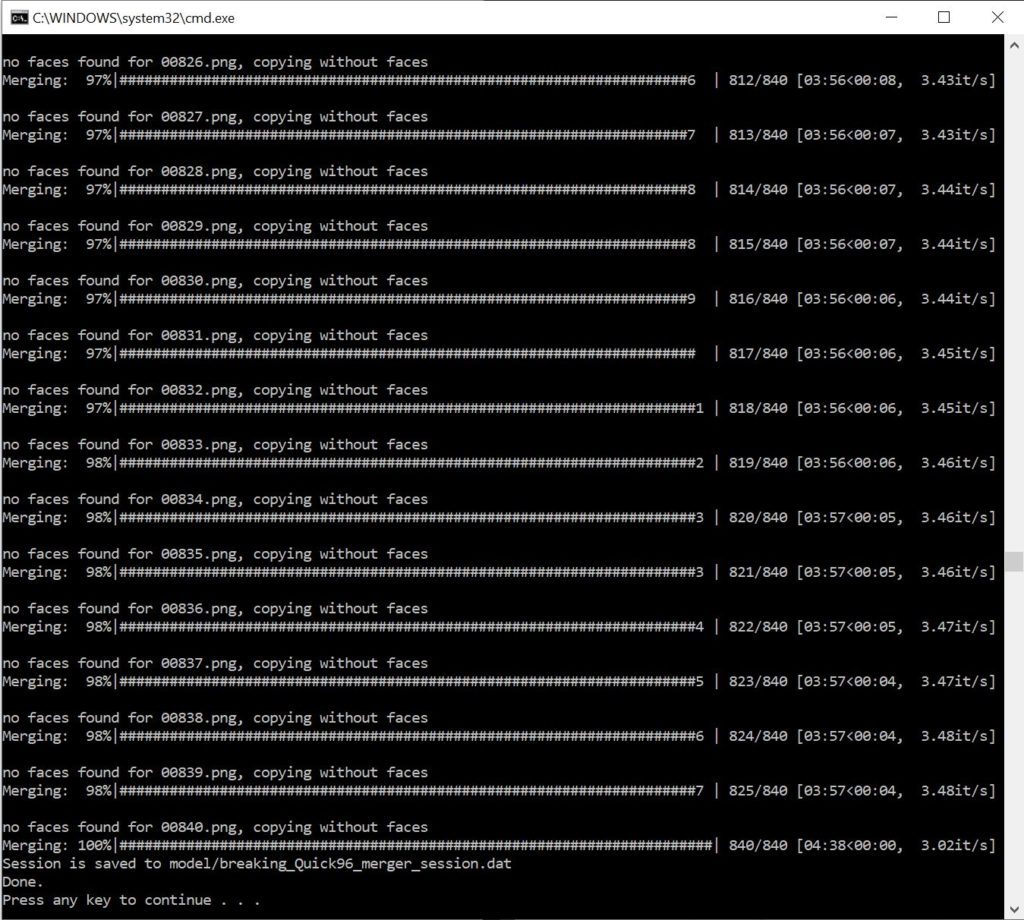
You will see the “merging” progress bar fill up. Once it gets to 100% the merge is complete.

press esc to save

After the video has finished merging click on the video output window and press “Escape” to save and close the merge.

Export the video file

export deepfake mp4

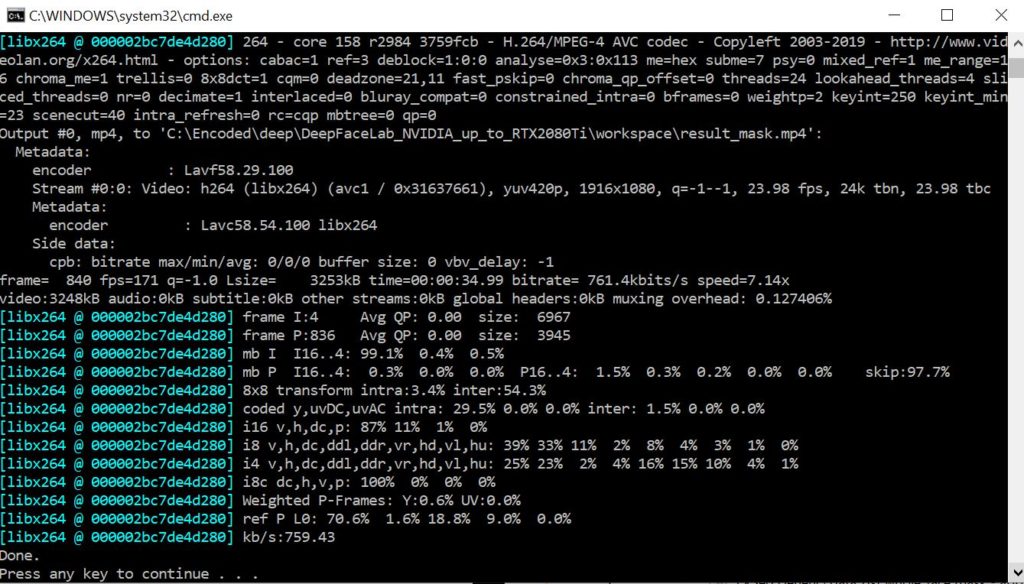
The final step is to export the video as a MP4 file. Double click on “8) merged to mp4 lossless.bat” to begin the process. Once you see the above screen you have completed the deepfake tutorial. Navigate to “workspace” to find your video file. It will be saved as “result.mp4”.

This is the result of the process after training for 1,000,000 iterations. If you want a better result you can train for longer, use a RTX 3090 graphics card, and or provide more source video material to improve the models quality.

Questions?

If you have any questions or comments feel free to leave them below.

Related Resources

View our Deep Learning Image Style Transfer Tutorial Using Neural Style Pt.

Check our our The Best Mechanical Gaming Keyboards to Purchase in 2023 article.

Learn How to Install Ubuntu Server 22.04 [Step by Step].

Click here to learn How to Install MySQL on Ubuntu Server 22.04 LTS.

View our other Machine Learning Tutorials.

Learn How to Mount an SMB (Samba) Share in Linux with cifs-utils.

View all of our available online tools and converters at Formatswap.com.
Affiliate Disclaimer:

This website may contain affiliate links. This means we may receive a small commission if you purchase through our links. However, this does not impact our reviews and comparisons, as we only promote products we personally believe in. We are independently owned and the opinions expressed here are our own.

How to Easily Create a Bootable Linux Installation USB Drive Using Rufus

create bootable usb with rufus splash image

In this tutorial you will learn how to create bootable USB drives using Rufus. One of the main benefits of using Rufus is that it is free, open source, and easy to use. Rufus is a good lightweight alternative to Unetbootin. Additionally with this universal USB installer you can easily create installation drives for Linux, Mac OS, and Windows. It is compatible with most .ISO files and bootable image formats, as well as raw disk image file support. Rufus also supports the creation of bootable FreeDOS installations.

Download Rufus

The first step will be to download Rufus. You will want to navigate to the Rufus Download Page. Then scroll down to the Download section and click on “Rufus 3.20” to download the application.

Download Rufus

After you download Rufus, double click on “rufus-3.2.0.exe” to launch the application. At this point you will also want to plug in your USB flash drive.

Select Installation ISO File

Select Installation ISO File

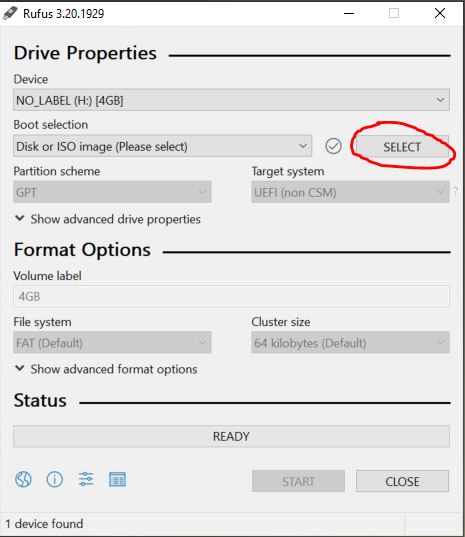
Next you will select the iso file that you want to flash to the USB drive. Click on the “SELECT” button. You will then get a file selection dialog, navigate to where your iso is and select it. In this example I will be using “ubuntu-22.04-live-server-amd64”. If you wish to download the ISO you can do so on the Ubuntu website.

Select Storage Device

Select Storage Device

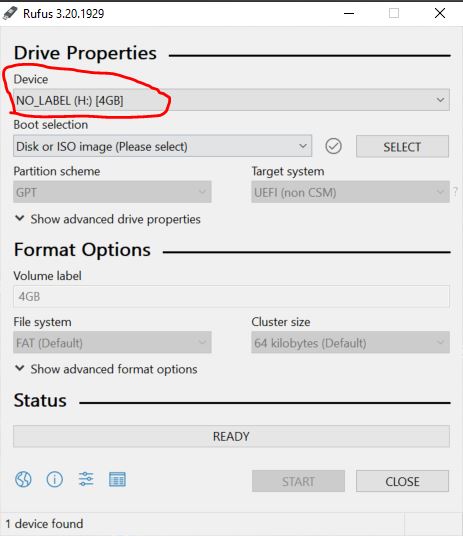
Afterwards you will need to select the storage device you want to use. This will be the flash drive that you plugged in a few moments ago. Select it from the drop down list then continue. *WARNING* be careful to select the right drive as all of the data will be deleted.

Set Boot Selection

Set Boot Selection

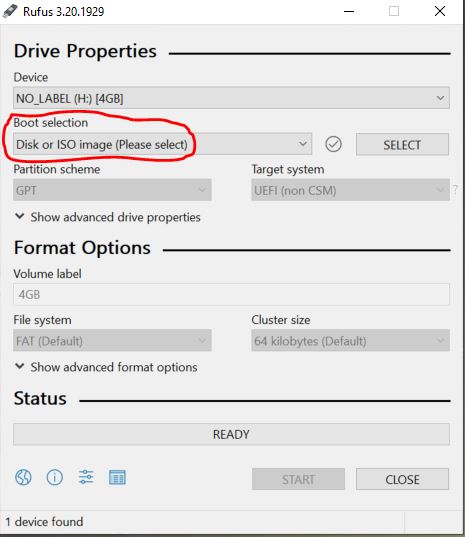
Now you will select the “Boot selection” I recommend keeping this option at the default “Disk or ISO image”.

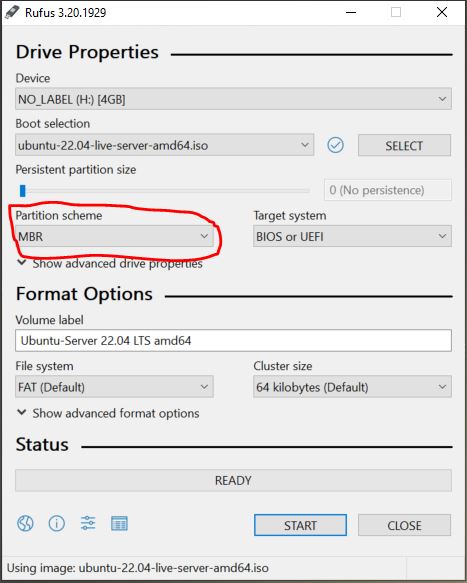
Choose Partition Scheme

Choose Partition Scheme

Next choose the partition scheme. Usually you can keep this at the default unless you have a very old PC. If you end up having issues change this option and re-flash. We will be keeping it at “MBR”.

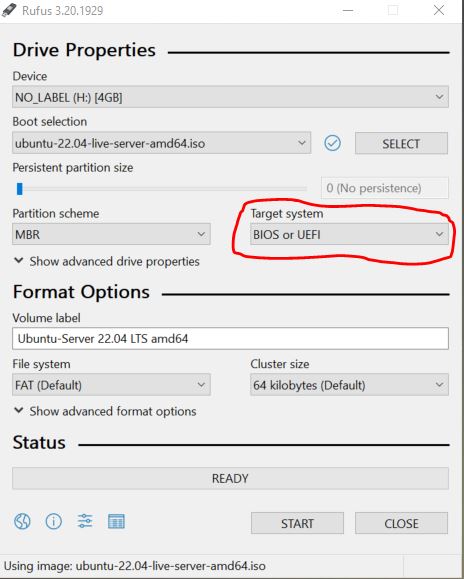
Choose Target System

Choose Target System

The next option is the “Target system” I would leave it at “BIOS or UEFI” unless you have a specific reason to change it. This option will work for almost every PC.

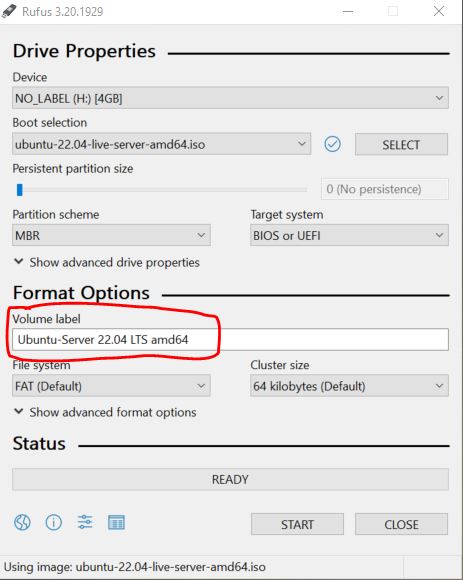
Create a Volume Label (optional)

Create a Volume Label (optional)

This step is optional but if you want to give your flash drive a name just type it in this box. This name will show up in the file explorer after you complete the process.

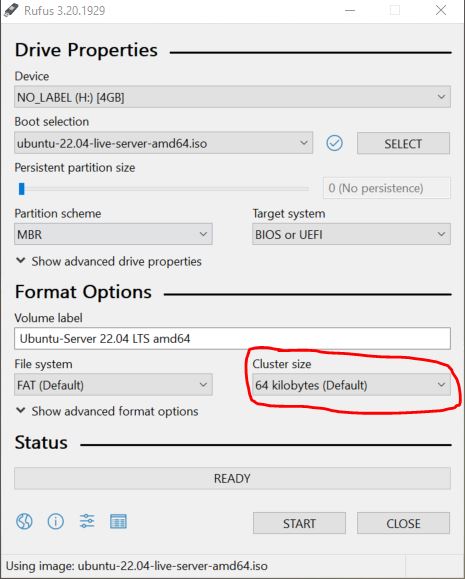
Set Cluster Size

Set Cluster Size rufus

For the cluster size you can keep it and the default of “64 kilobytes”. This will work for most flash drives.

Set File System

Set File System rufus

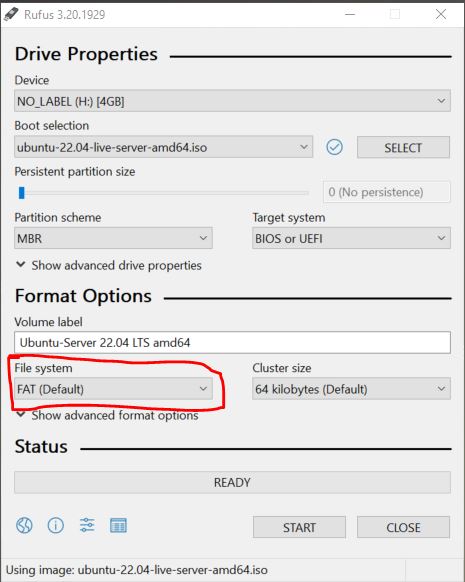
Finally select the file system. Most people use either NTFS or FAT file formatting. I will be using FAT for this tutorial.

Start Flashing Process

Start Flashing Process rufus

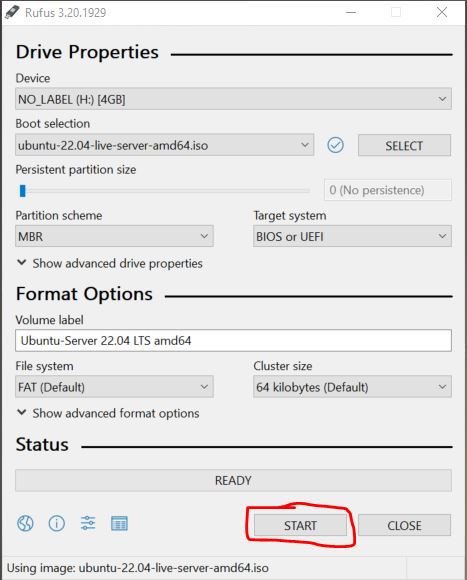
Finally we can start the ISO flashing process. Click on the start button to begin flashing your USB drive.

Confirm Rufus Drive Flashing Process

Confirm Drive Flashing

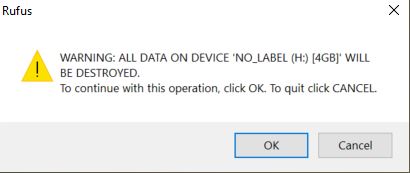
This window will ask you to confirm that you really want to flash the USB drive.

Wait for Flashing to Complete

Wait for Flashing to Complete

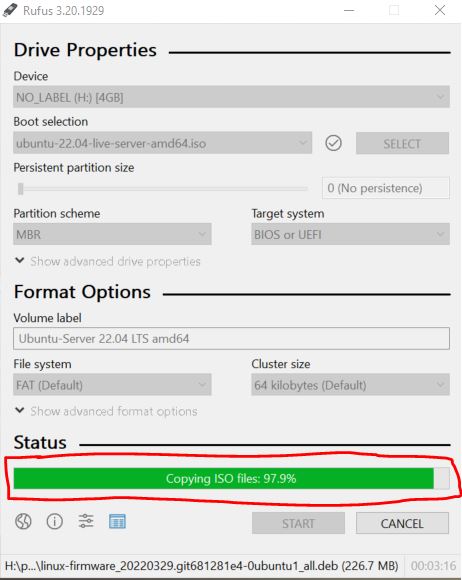
Now you will have to wait for the flashing process to begin. This can take a while so go make yourself a cup of coffee while you wait.

Rufus Flashing Complete

Flashing Complete

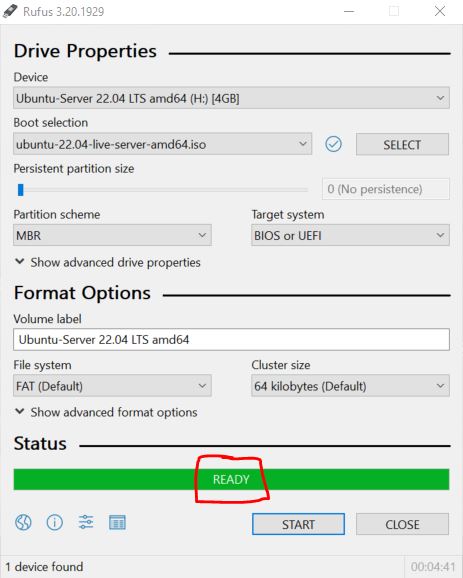
When the flashing process completes you will see a green bar at the bottom, as well as the word “READY”. Your installation media is now ready to be used. You can now eject your flash drive and close Rufus.

Additional Questions?

If you have any additional questions or thoughts feel free to comment them below.

Related Resources

View our list of The Top 5 Programming Languages to Learn in 2022.

Check our our The Best Mechanical Gaming Keyboards to Purchase in 2023 article.

Learn How to Install Ubuntu Server 22.04 [Step by Step].

Click here to learn How to Install MySQL on Ubuntu Server 22.04 LTS.

View our How to Setup OpenSSH with Keys on Ubuntu 22.04 tutorial.

Learn How to install Kali Linux 2022.3 [step by step].

View all of our available online tools and converters at Formatswap.com.
Affiliate Disclaimer:

This website may contain affiliate links. This means we may receive a small commission if you purchase through our links. However, this does not impact our reviews and comparisons, as we only promote products we personally believe in. We are independently owned and the opinions expressed here are our own.

5 Reasons to Switch from Windows 10 to Linux

switch from windows to linux

If you are sick of constant forced updates, user data tracking, and malware attacks you may want to consider making the switch to the Linux operating system. One of the benefits of switching from Windows 10 to Linux is the wide variety of distributions to choose from. A distribution is a flavor of Linux which contains the GNU shell, various preinstalled programs, the Linux kernel, system utilities and just about everything you will see in your operating system. This allows for the user to decide for themselves which distribution most closely matches what they will use their computer for. Are you looking to make the switch? Here are some reasons to do so.
1. Security

Many Linux distributions take a security first approach. This means that security settings are enabled by default. Also unlike Windows 10 and Windows 11, Linux does not collect and track user data. You are able to take full control of your data privacy. Linux has constant and automatic security updates ensuring you are always secure.

2. Price (FREE)

Another benefit to using Linux versus Windows as your operating system is that it is free. Microsoft Windows 10 and 11 are also “free”, but you pay with your data being collected and sold to advertisers. With Linux you get everything Windows offers but for free and with privacy.

3. Software

More than 15,000 developers have contributed to the Linux operating system. With this comes a robust range of great software. The best part is all of the software is free to use in Linux. This is because the operating system is opensource. This means anyone can contribute there time and code to improving Linux. More and more popular software companies are releasing Linux compatible versions of their software. This also includes the gaming industry. As of 2021 there are over 7,500 Linux compatible titles on the Steam game store.
4. Hardware Compatibility

Linux is well known for being the operating system that helps to breath new life into older computers. Linux can run on almost any hardware developed in the past 30 years. If you have an old PC in the closet you can install Linux breathing new life into it. The reason Linux works so well on low performance machines is the low resource usage of the operating system. On average Linux only uses a quarter of the system resources compared to the average Windows machine.

5. Customization

With Linux you can make your operating system truly yours with advanced customization. You are able to customize almost every aspect of the system. Most Linux distributions come with a wide range of themes that are able to be installed. You can also install new icon packs and fonts. This allows you to personalize your operating system with just a few easy clicks. Whether you are looking to customize your system for aesthetic purposes, or just productivity (or a little of both). Then Linux is for you.

Download Linux

If you are looking for an overview and or download links to some of the best Linux distributions, read this article: The 5 Best Linux Distributions to Install in 2022

Related Resources

View our list of The Top 5 Programming Languages to Learn in 2022.

If you want to learn how to generate images with neural networks click HERE.

View our Programming Articles and Tutorials.

Click here to learn How to Install MySQL on Ubuntu 22.04 LTS.

Learn more cool things in Linux with our Linux Tutorials.

View all of our available online tools and converters at Formatswap.com.