How to Install an Nginx RTMP Server in Ubuntu 22.04

nginx rtmp splash

In this tutorial, you will learn how to install the Nginx web server and enable the RTMP (Real-Time Messaging Protocol) module on any Ubuntu-based distribution. The RTMP protocol is a robust and efficient means of transmitting live video streams from your computer to the internet. This makes it an indispensable tool for content creators and streamers. With this tutorial, you can master the installation and configuration of Nginx with the RTMP module. This will allow you to broadcast your live video streams with ease.

Nginx is an open-source web server that is known for its efficiency, scalability, and reliability. It is widely used by web developers and system administrators to serve dynamic web content, reverse proxy, load balance, and cache HTTP requests. The Nginx RTMP module supports live streaming, making it an all-in-one solution for web developers and content creators.

RTMP is widely used by video streaming services such as YouTube, Twitch, and Facebook Live. With Nginx and the RTMP module, you can create your own video streaming service or broadcast your content on existing platforms. Whether you are a web developer looking to add live streaming to your website or a content creator looking to broadcast your content to a global audience. This tutorial is an excellent starting point to get you up and running with Nginx and the RTMP module.

Update and Upgrade Ubuntu
update and upgrade ubuntu

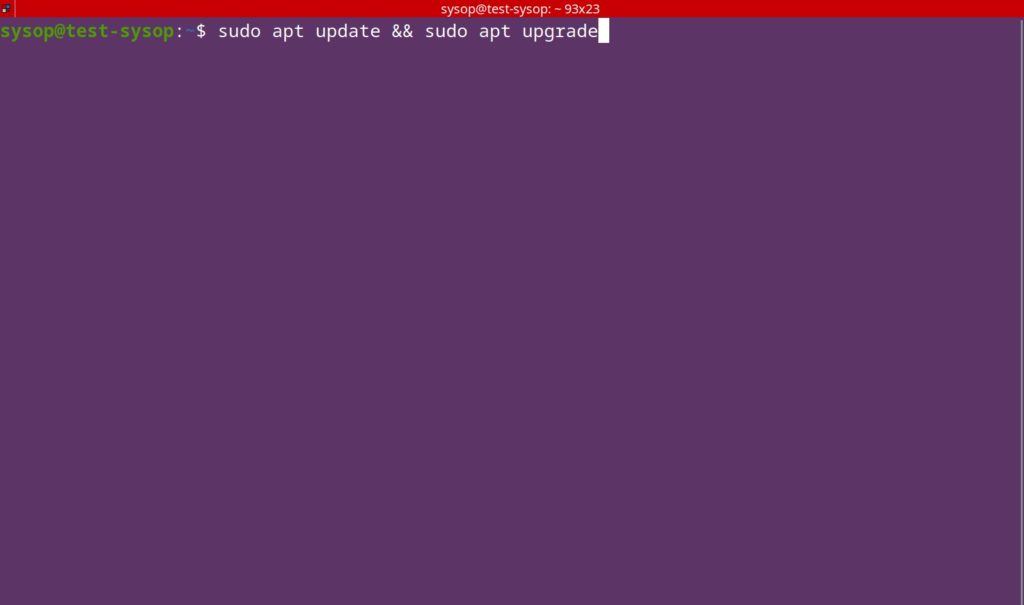
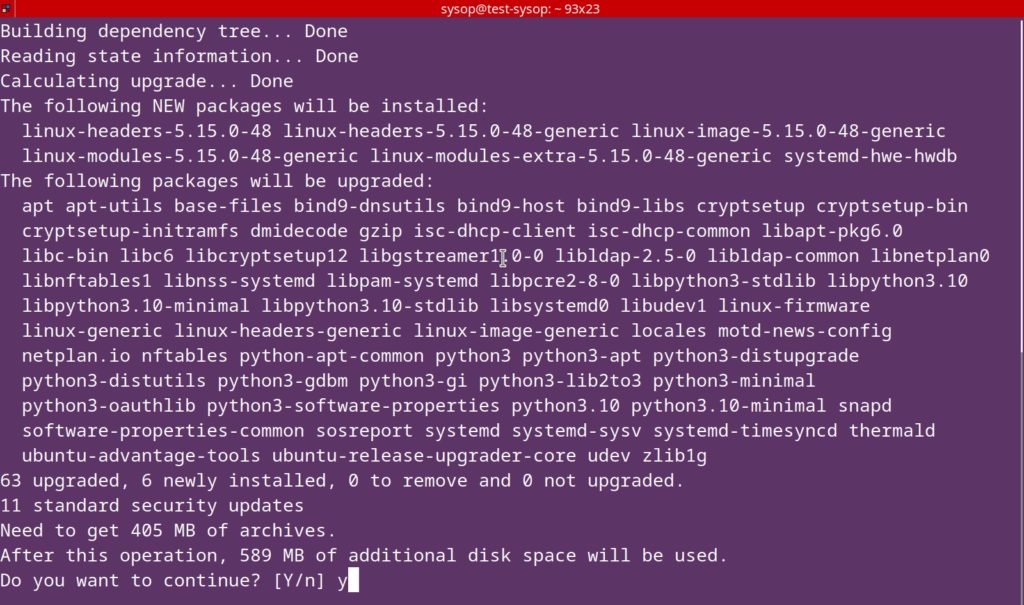
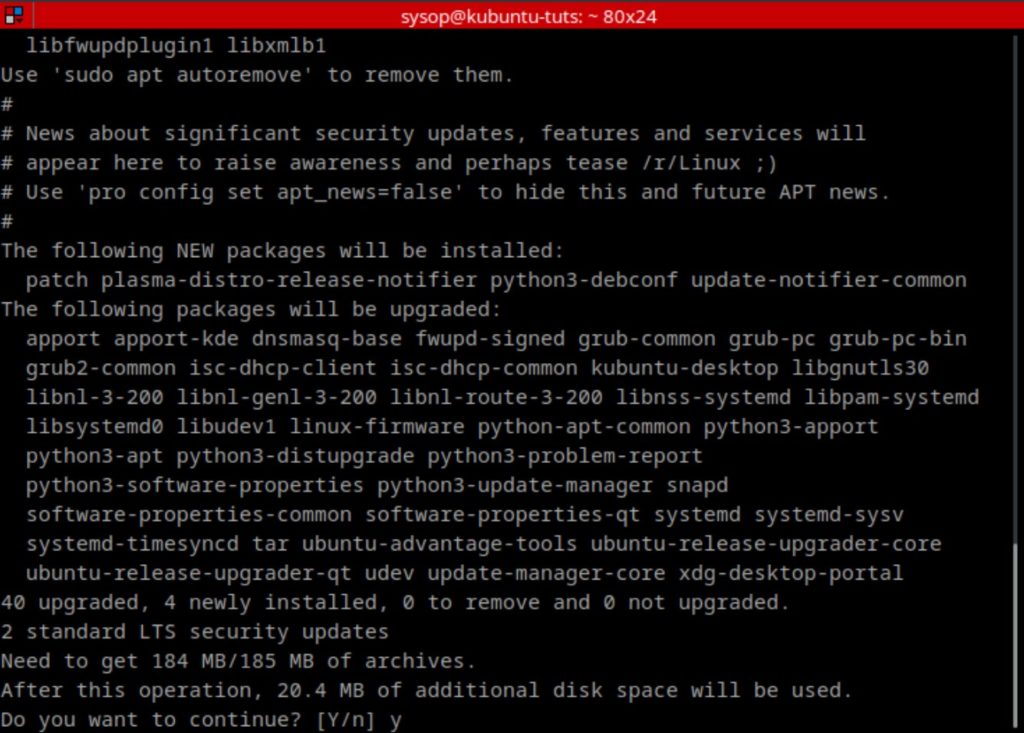
The first thing you will need to do is update and upgrade Ubuntu. You can do this with the following apt command.

sudo apt update && sudo apt upgrade

Install Nginx Web Server

install nginx web server

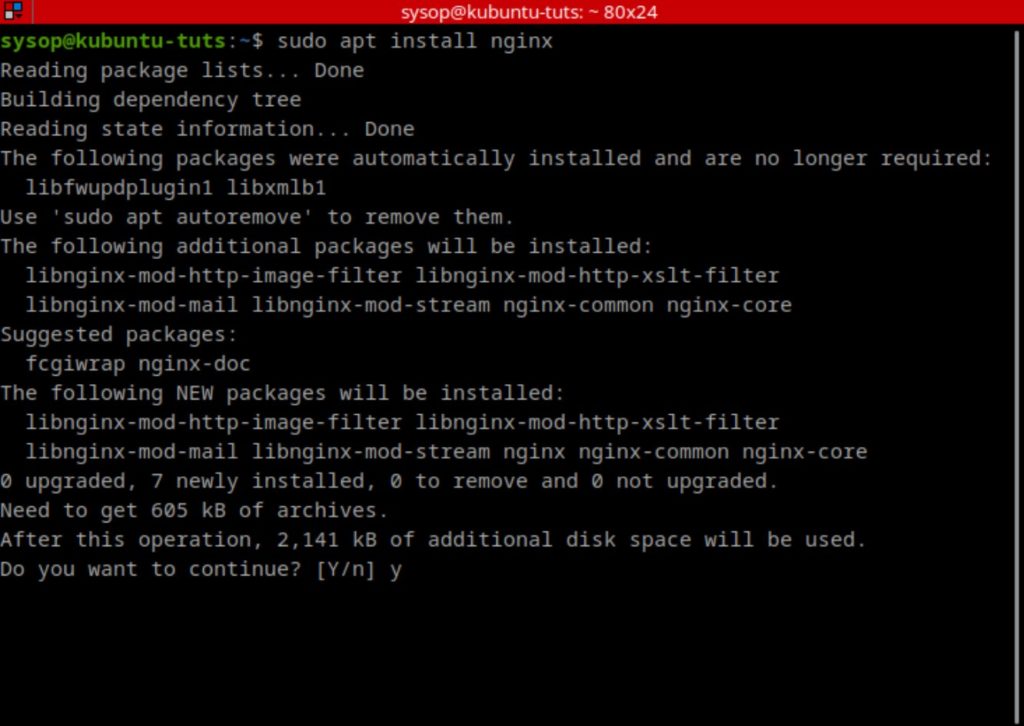
Next install nginx using apt.

sudo apt install nginx

Enable the Ubuntu Universe Repository

enable universal repository

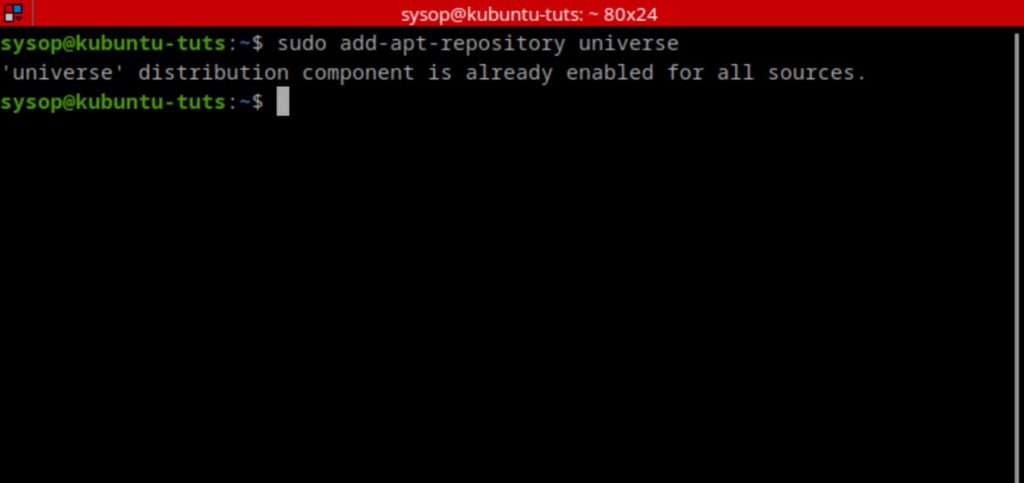
We will now need to enable the Ubuntu Universe Repository. It is usually enabled by default but it is a good idea to verify. This will allow us to install the Nginx rtmp module.

sudo add-apt-repository universe

Install the Nginx RTMP Module

install nginx rtmp module

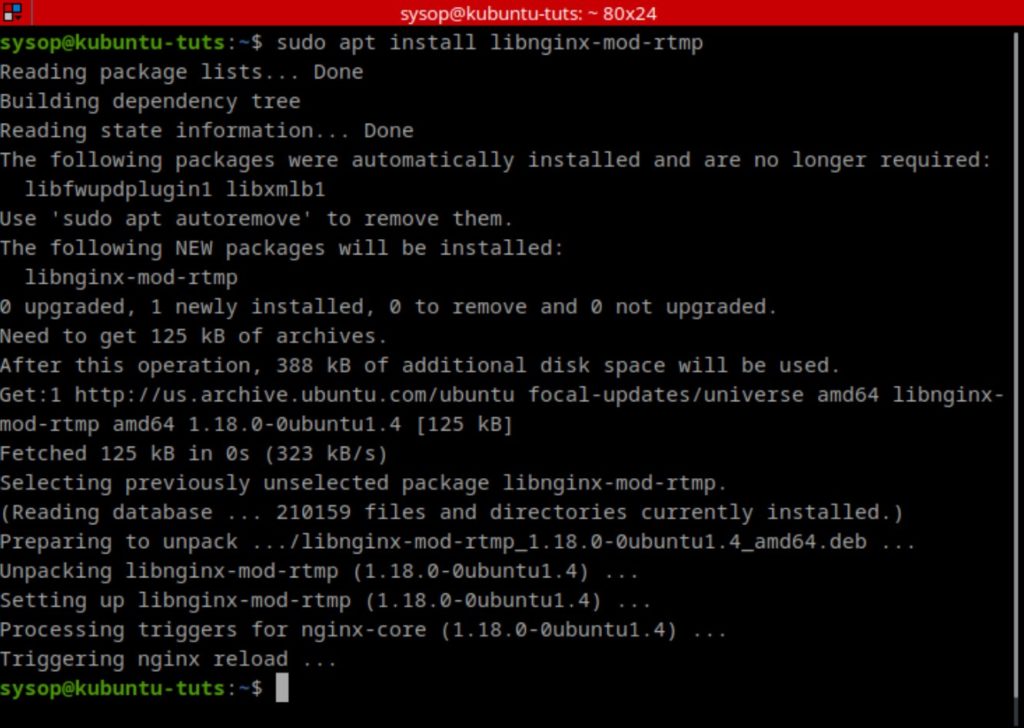
After you have enabled the repository, install the Nginx RTMP module using the command below. This will allow us to stream RTMP video using the Nginx web server.

sudo apt install libnginx-mod-rtmp

Open the Nginx Config File

open nginx config

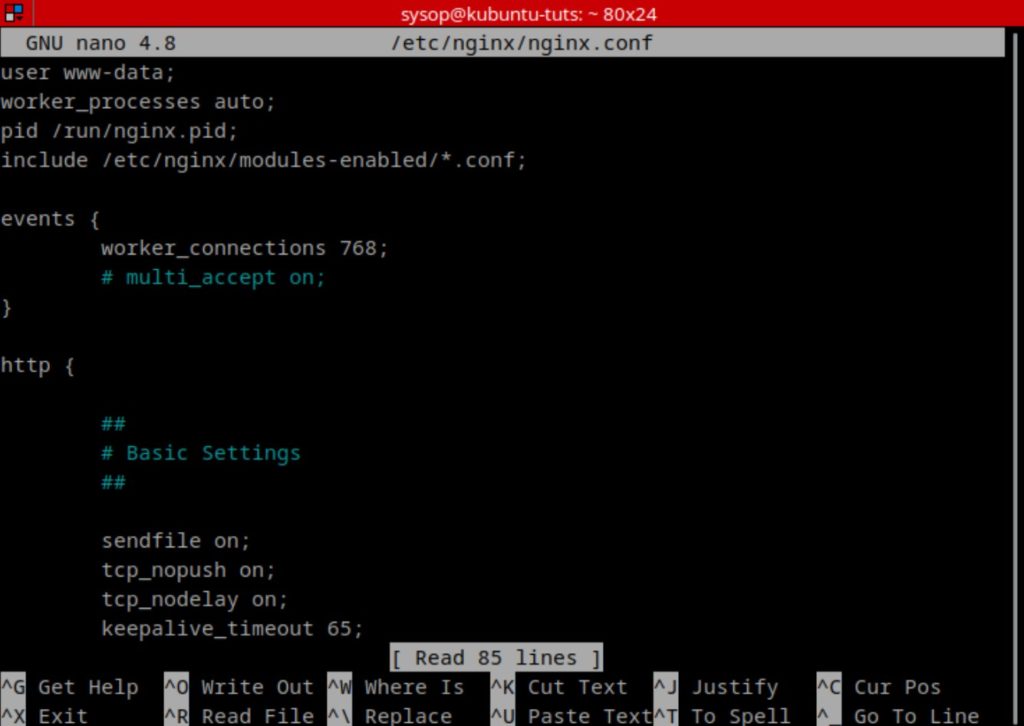
Now we will need to make a few configuration changes in the nginx config file. Open it using the nano text editor.

sudo nano /etc/nginx/nginx.conf

Add Lines to Config

edit nginx config

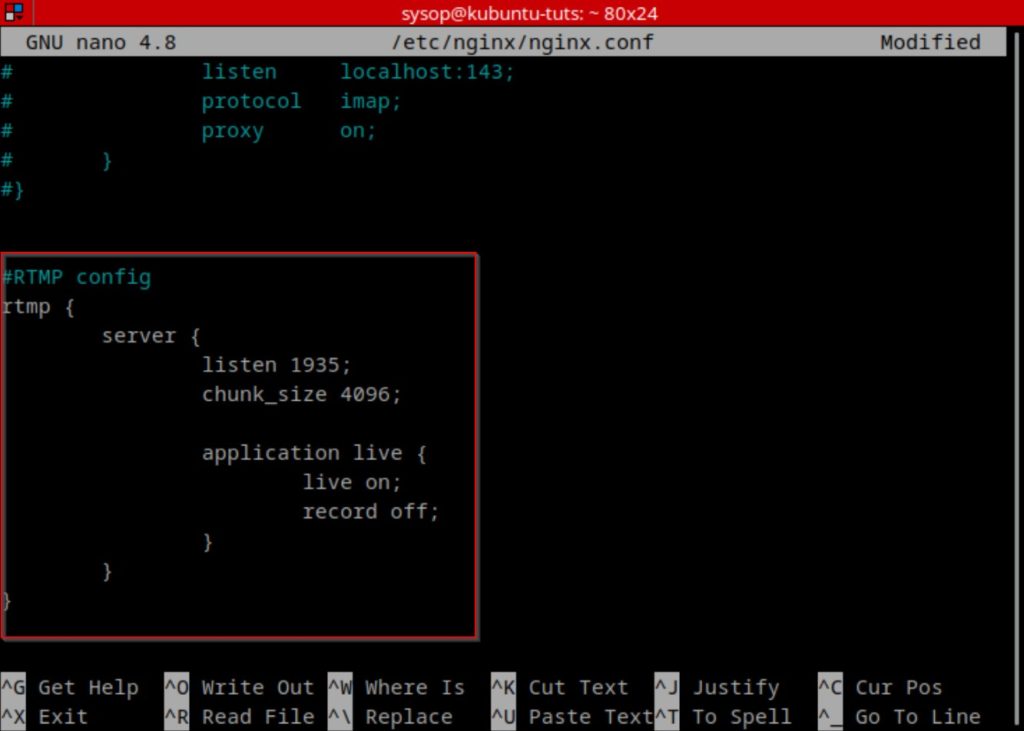
Once you have opened the config file, scroll to the bottom and add the following lines. After adding them, save and close the file.

rtmp {
	server {
		listen 1935;
		chunk_size 4096;

		application live {
			live on;
			record off;
		}
	}
}

Restart Nginx Web Server

restart nginx

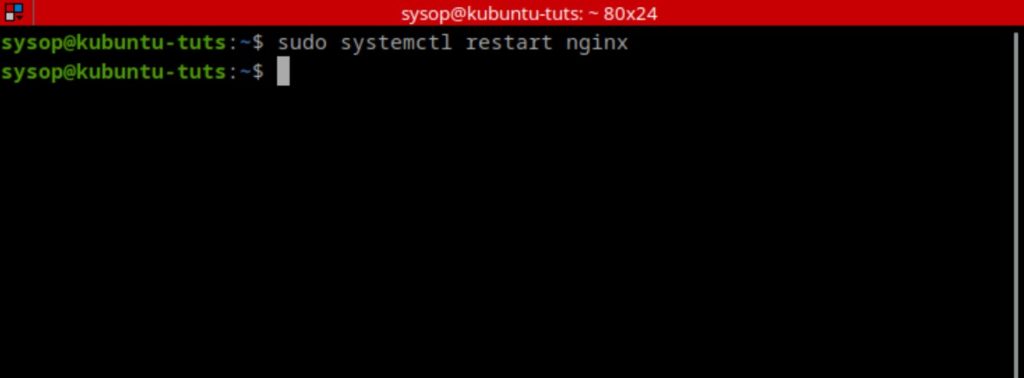
The last step of the installation process is to restart Nginx. Do this using the following systemctl command.

sudo systemctl restart nginx

Create a Test RTMP Stream with OBS

At this point we have finished the installation and configuration of a RTMP streaming server using Nginx. We now need to test the server. In this article I will be using OBS Studio to demonstrate the test stream. Below you will see instructions for installing OBS on both Windows and Linux. Choose the option that matches the OS of the system you will be streaming from.

Install OBS Studio (Ubuntu)
install obs studio ubuntu

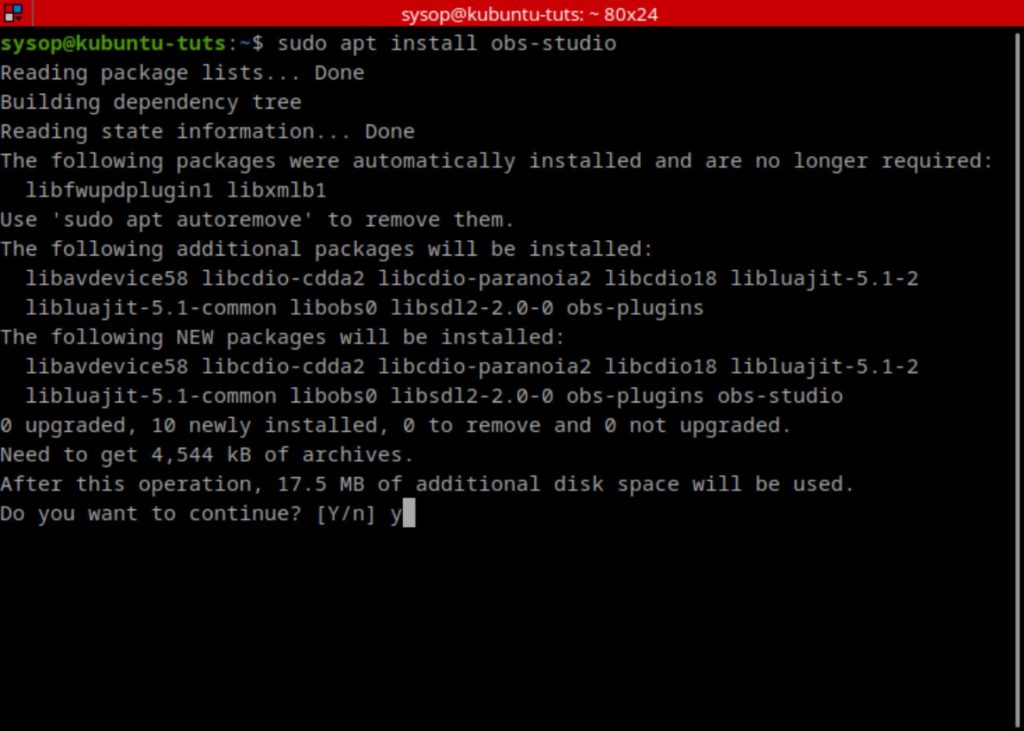
Run the following command to install OBS Studio on Ubuntu.

sudo apt install obs-studio

Install OBS Studio (Windows)

To install OBS on Windows download it from the link below. Then launch the installer and follow the prompts.

Download OBS Studio

Open OBS Studio

open obs

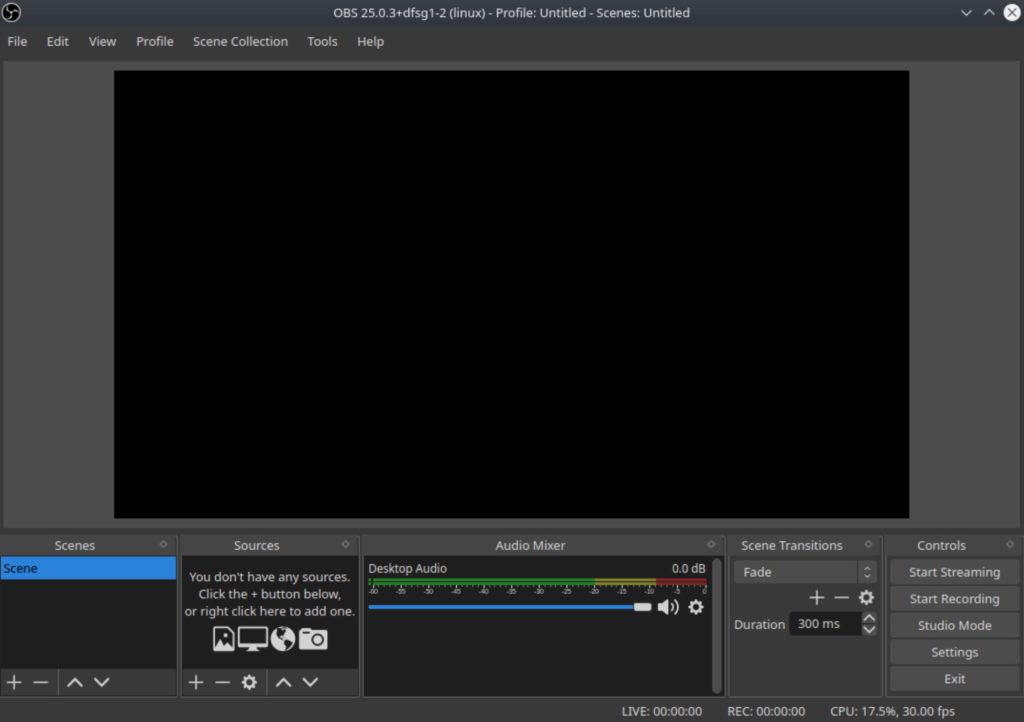
After you have finished installing OBS Studio we can test the stream. Launch the program to get started.

Add a New Source
add a new source obs

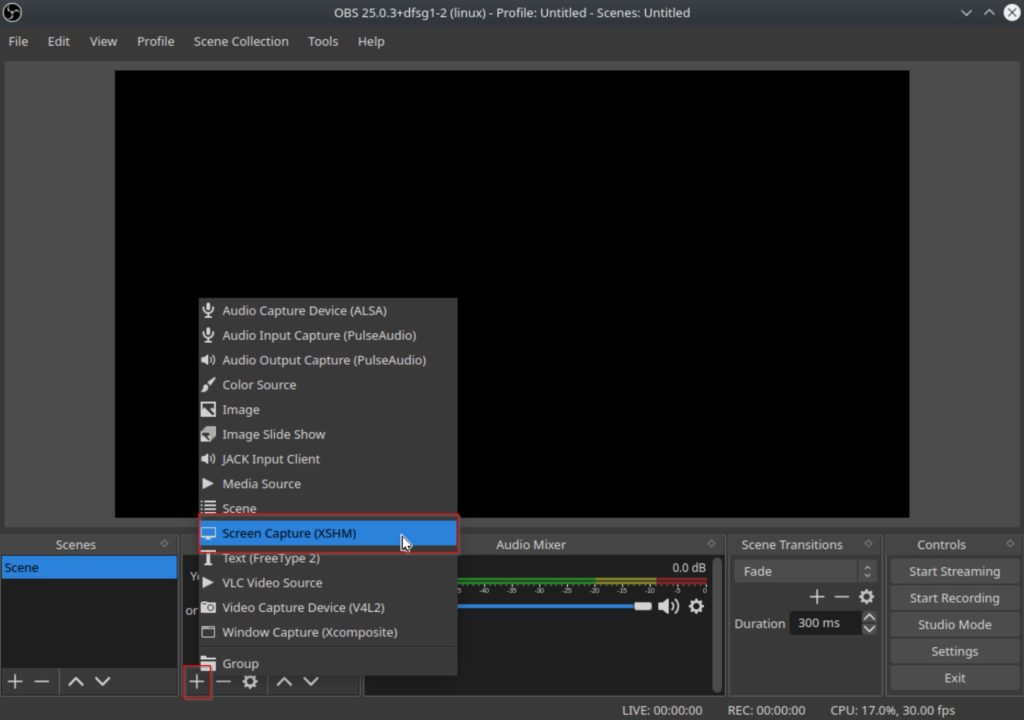
Next click on the “+” button in the lower left to add a new source. I will be using the screen capture for this example, however feel free to use any source.

Choose Display
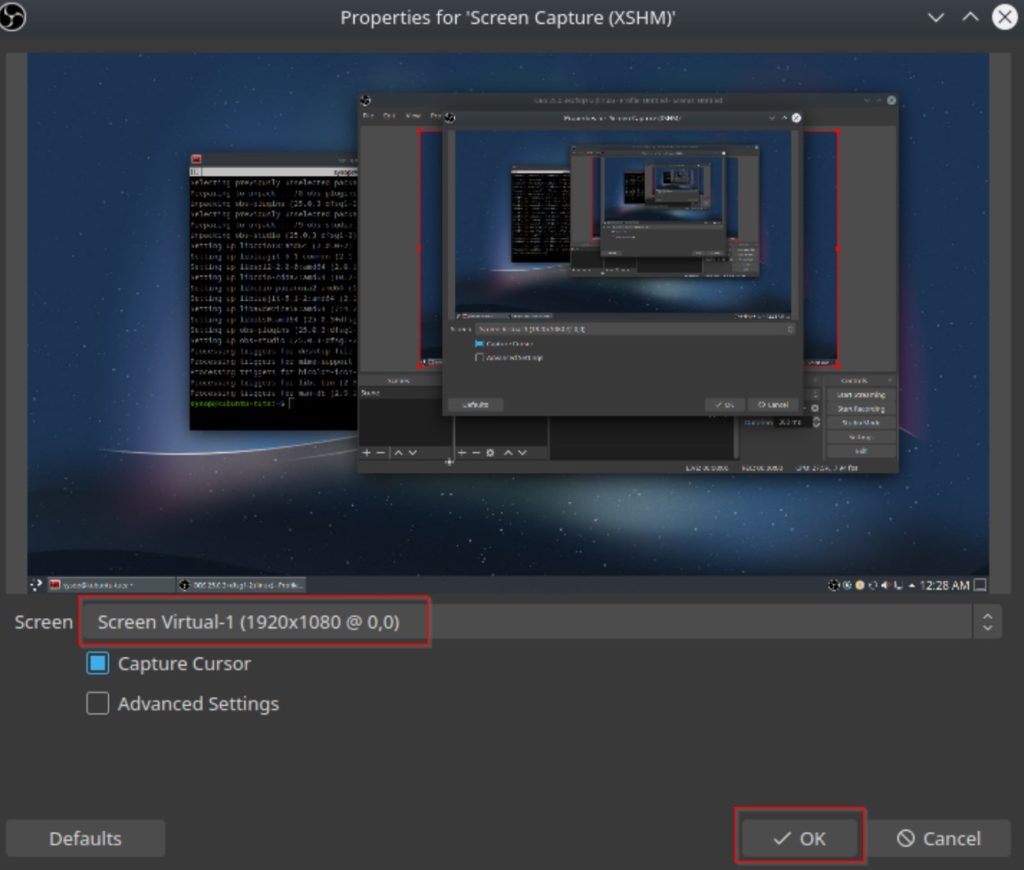
choose a display obs

Next it will ask which screen you would like to use. Generally it is on the correct option by default, but change it if it looks incorrect. Then click on the “OK” button.

Open OBS Settings Menu
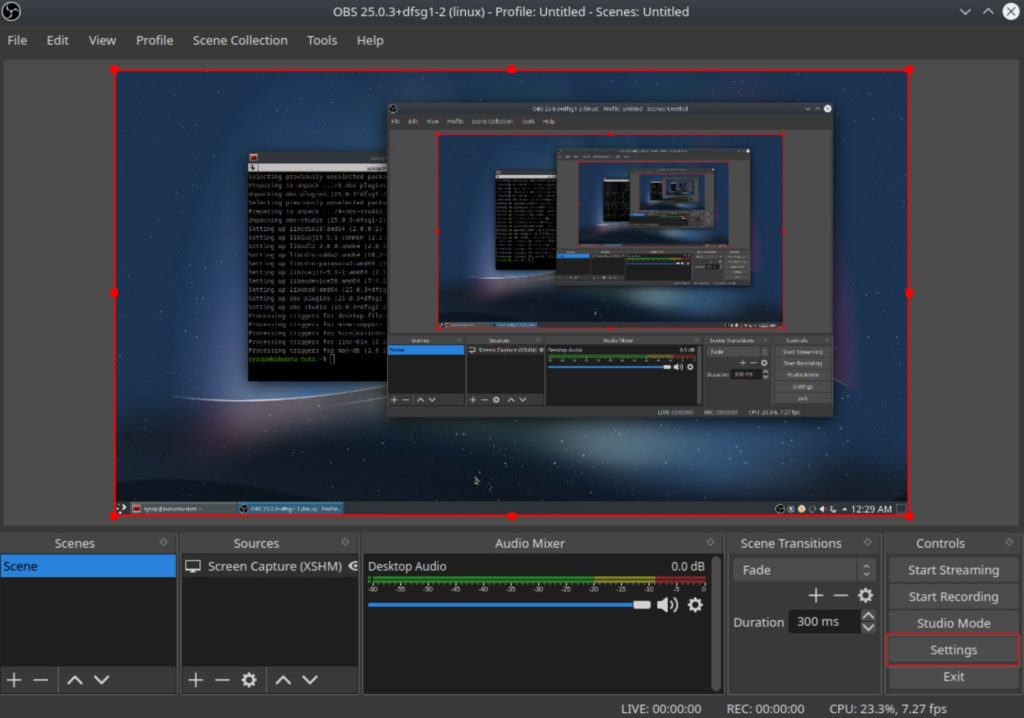
open settings menu obs

Then we will need to open the OBS settings menu. Click on “Settings” in the lower right hand corner.

Stream to a Custom RTMP Server with OBS
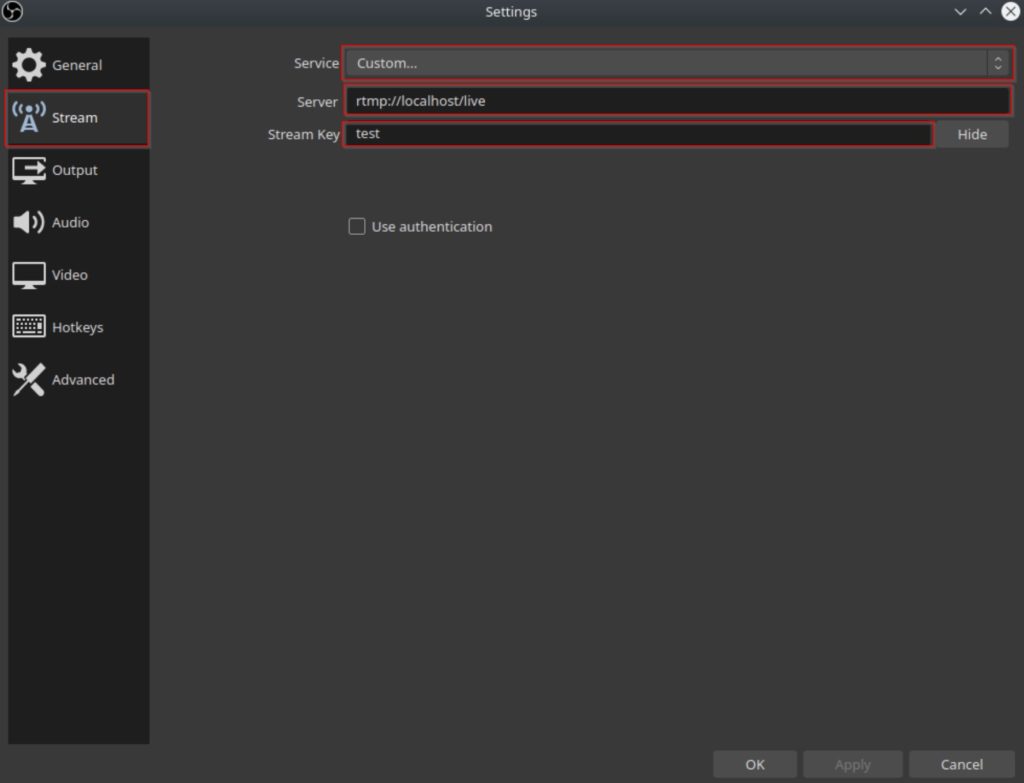
stream to a custom rtmp server obs

Once the settings menu opens click on the “Stream” tab on the left hand side. Once you are on the tab change all three fields highlighted in red. Change the service drop down to “Custom…”, the Server to “rtmp://NGINX_SERVER_IP/live”, and the Stream Key to “test”. Then click on “OK” to save the changes.

Start the Test Stream
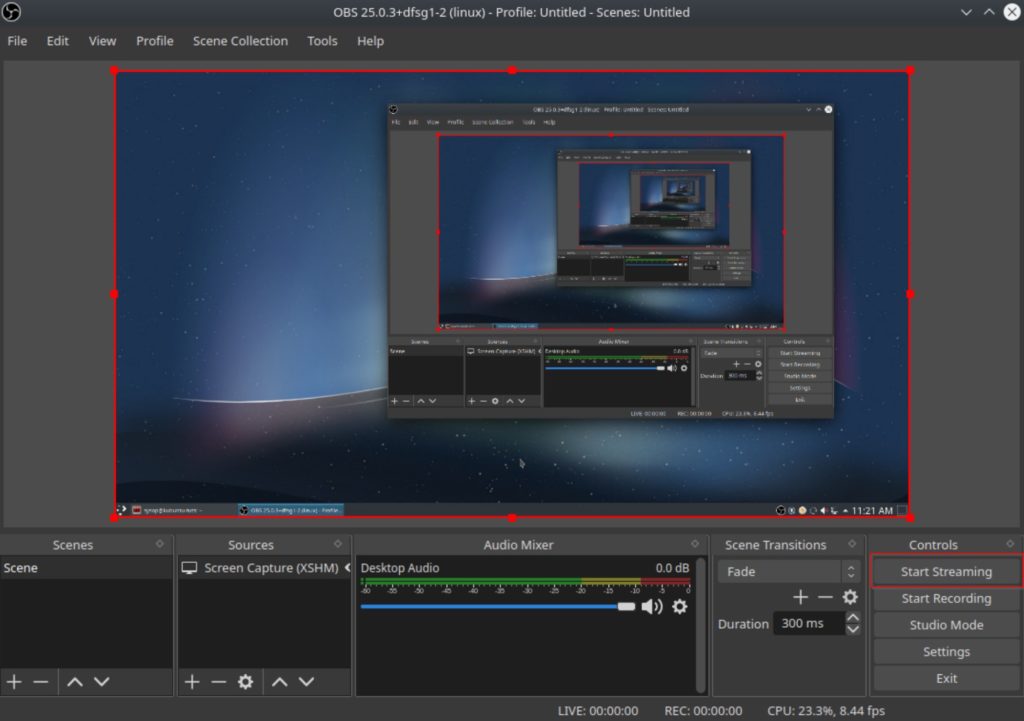
start streaming obs

After saving your streaming settings click on the “Start Streaming” button to begin the RTMP stream.

Open a Network Stream in VLC

open network stream vlc

Now we will test the RTMP stream using VLC Media Player. Launch the program then navigate to the “Media” tab in the top bar. Then click on “Open Network Stream…”.

Enter Network Stream URL
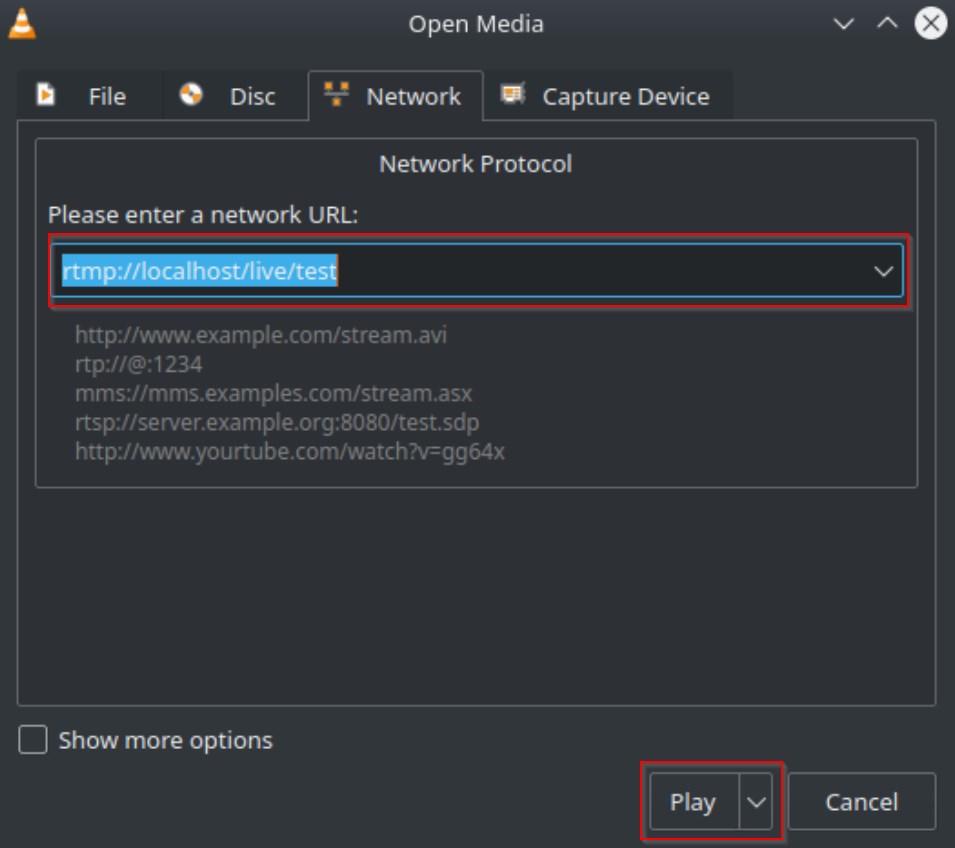
enter network url vlc

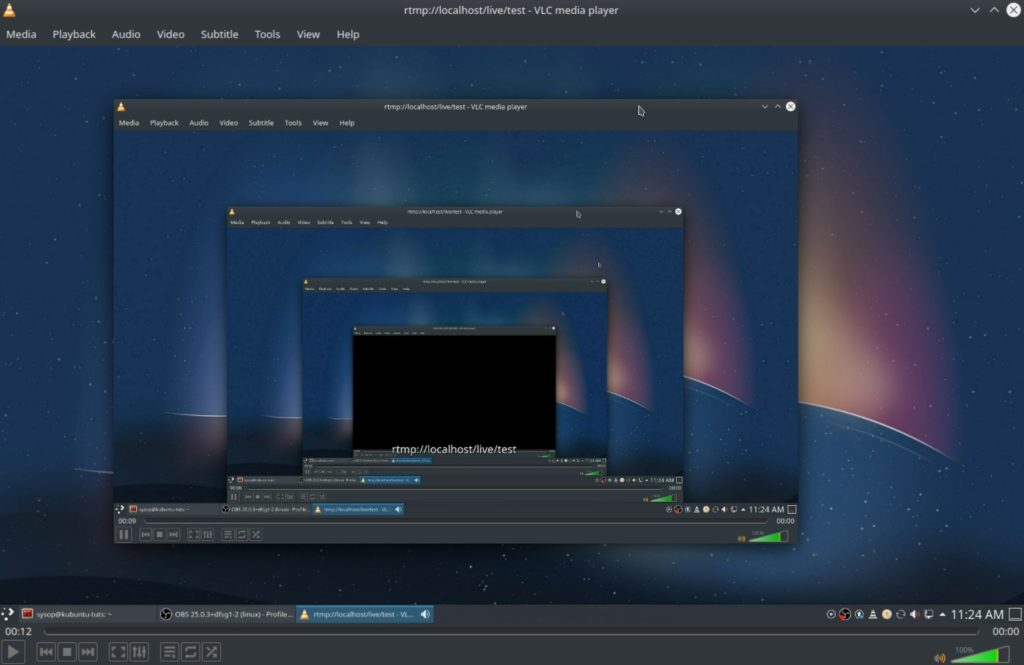
Enter the following into the box highlighted in red replacing “localhost” with your Nginx servers IP address. Then click on the “Play” button to start watching the stream.

rtmp://NGINX_SERVER_IP/live/test

Verify the RTMP Stream

verify rtmp stream

Verify that you can see your OBS stream. If you are able to see it then you have successfully streamed to a Nginx RTMP server using OBS Studio.

Questions?

If you have any questions or comments feel free to leave them below.

Related Resources

View our 5 Reasons to Switch from Windows 10 to Linux.

Learn How to Install Ubuntu Server 22.04 [Step by Step].

Check out our How to Easily Create a Bootable Linux USB Drive using Rufus article.

View our How to Setup an SFTP Server on Ubuntu 22.04 using OpenSSH tutorial.

Learn more cool things in Windows with our Linux Tutorials.

View all of our available online tools and converters at Formatswap.com.

How to Install and Configure Oh My Zsh in Linux

ohmyzsh splash

Using this tutorial you will learn how to install the popular bash shell alternative Oh My Zsh. Most Linux systems come preinstalled with the bash shell. Oh My Zsh adds many features compared to what you would find in this shell. Integrating Oh My Zsh into your workflow can provide numerous benefits. It’s easy to install, customize, and use, making it a must have tool for anyone looking to optimize their terminal experience. This will optimize and improve the speed and efficiency of your terminal based workflow.

Benefits of Oh My Zsh

One of the main benefits is spelling correction. While the standard bash shell offers this feature, Oh My Zsh does more efficiently and accurately. Another reason to use Oh my Zsh is the ability to easily install custom themes. There are hundreds of pre-built themes available for download on the projects GitHub page. Theming is also possible in the standard bash shell, however you are limited in the amount of customization you can easily achieve. The primary reason I recommend people switch to Oh My Zsh is its advanced command history ability. You can customize the shells history to your specific liking. This makes re-running past commands indefinitely easier. Don’t miss out on the chance to enhance your terminal with Oh My Zsh.

Update and Upgrade

update system

In this tutorial I will be using Ubuntu 22.04 to install the shell. However any Linux distribution that supports bash will support installing Oh My Zsh.

sudo apt update && sudo apt upgrade

Download and Install Curl

install curl

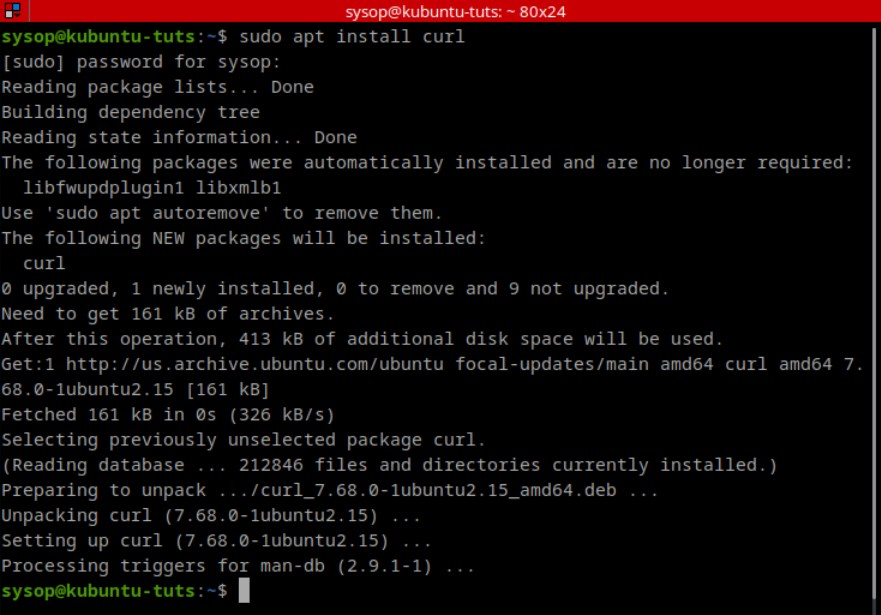
Next you will need to install the application curl. This will allow us to download and install Oh My Zsh using a curl command.

sudo apt install curl

Download and Install Zsh

install zsh

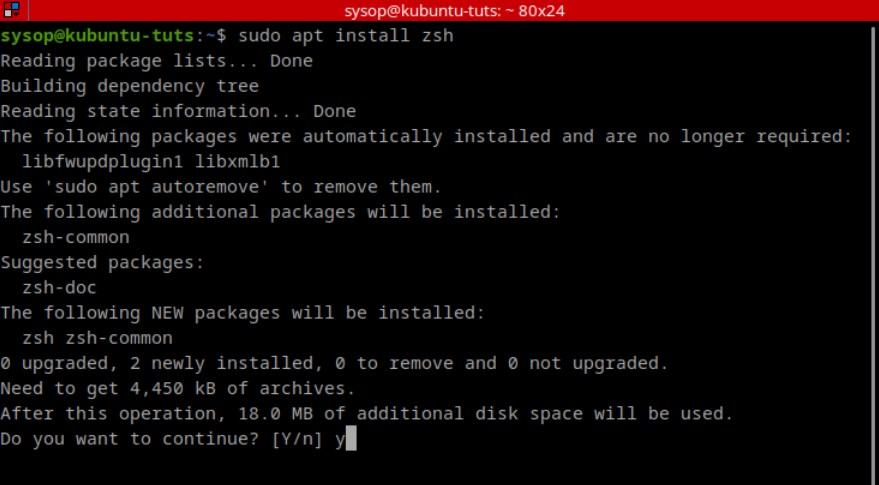
After installing curl you need to download the base zsh shell program. Install it by running the following apt command.

sudo apt install zsh

Installation Options

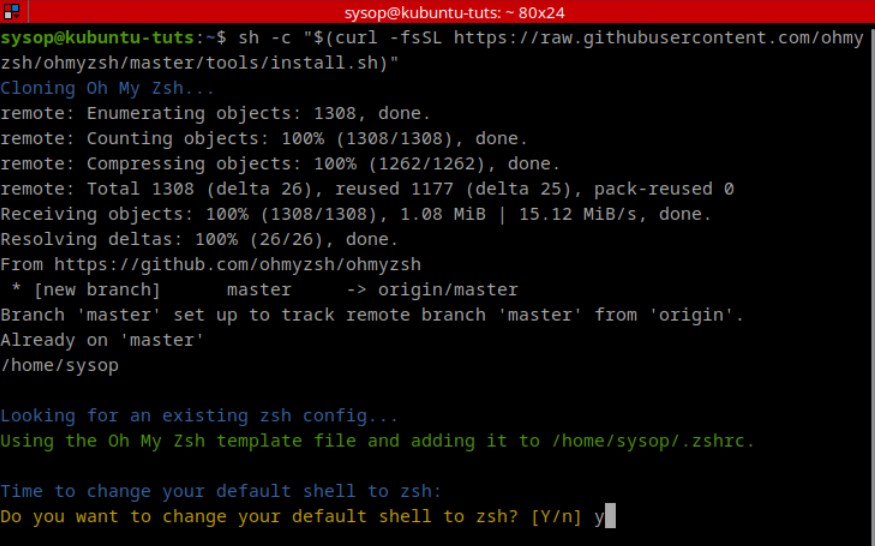
You are able to install Oh My Zsh using either the wget, fetch, or curl command. In this example I will be using wget. Use whichever method you prefer and run the command.

wget:

sh -c "$(wget -O- https://raw.githubusercontent.com/ohmyzsh/ohmyzsh/master/tools/install.sh)"

fetch:

sh -c "$(fetch -o - https://raw.githubusercontent.com/ohmyzsh/ohmyzsh/master/tools/install.sh)"

curl:

sh -c "$(curl -fsSL https://raw.githubusercontent.com/ohmyzsh/ohmyzsh/master/tools/install.sh)"

Download Oh My Zsh

download ohmyzsh

After running the command to download Oh My Zsh you will need to change it to your default shell. Type “y”, then press “Enter” to confirm the change.

sh -c "$(wget -O- https://raw.githubusercontent.com/ohmyzsh/ohmyzsh/master/tools/install.sh)"

Installation Successful

zsh successful install

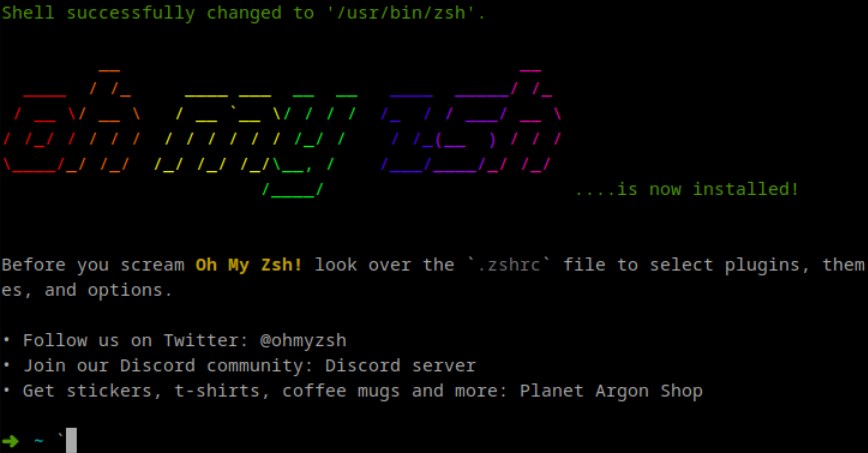
You will see the following screen after Oh My Zsh finishes the installation process. The shell is almost ready for use. We just need to verify the installation and make a few edits to the zshrc configuration file. Press “Ctrl+C” twice to exit the Oh My Zsh installer.

Verify the Zsh Installation

verify zsh

Run the “zsh –version” command and verify that you have zsh 5.8 or newer.

zsh --version

Set Default Shell to Zsh

set shell to zsh

Set zsh as the default shell using the “chsh” command.

chsh -s $(which zsh)

Logout to Apply Changes

logout linux

Now you will need to logout of your user account to apply the new changes. Run the “pkill” command below. Once you have logged out, log back in and reopen your terminal.

sudo pkill -SIGKILL -u [your username]

Verify Current Shell

verify current shell

Next verify that your shell is set to zsh using the command below. You should see “/usr/bin/zsh” as the commands output.

echo $SHELL

Verify Shell Version

verify shell version

Now verify that the correct version of zsh is set as your default shell. You should see version 5.8 or newer.

$SHELL --version

Open the Oh My Zsh Config File

nano ~/.zshrc

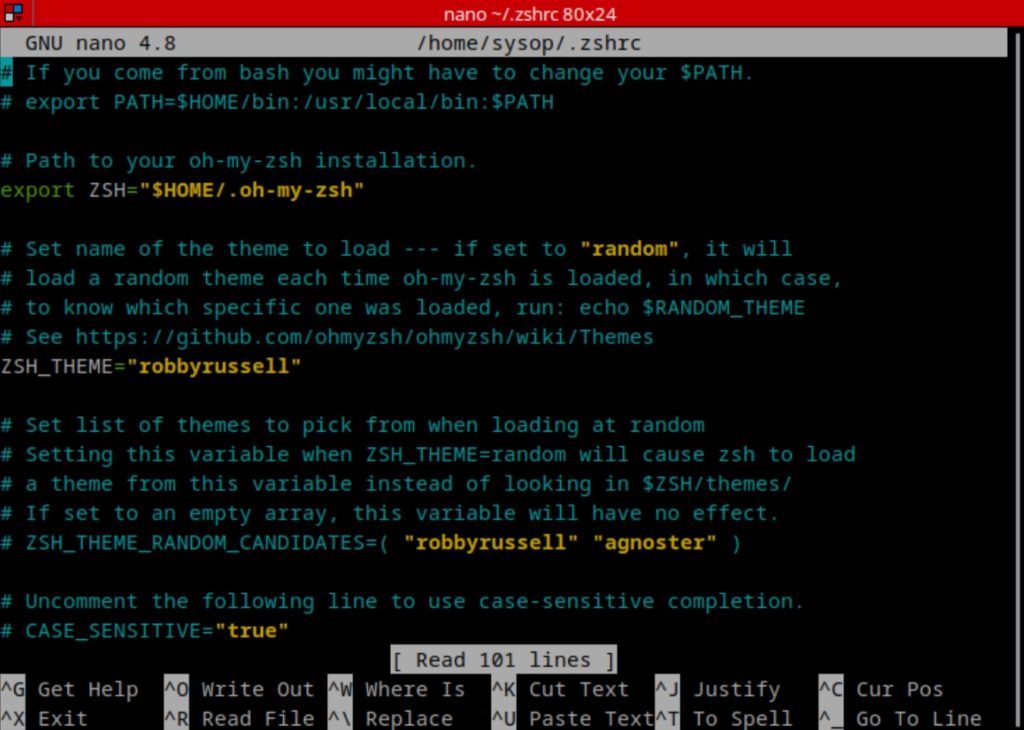
Next we will customize the shell using the “.zshrc” file located in the home directory. Open the Oh My Zsh configuration file using the command below.

nano ~/.zshrc

Set a Oh My Zsh Theme

set a theme oh my zsh

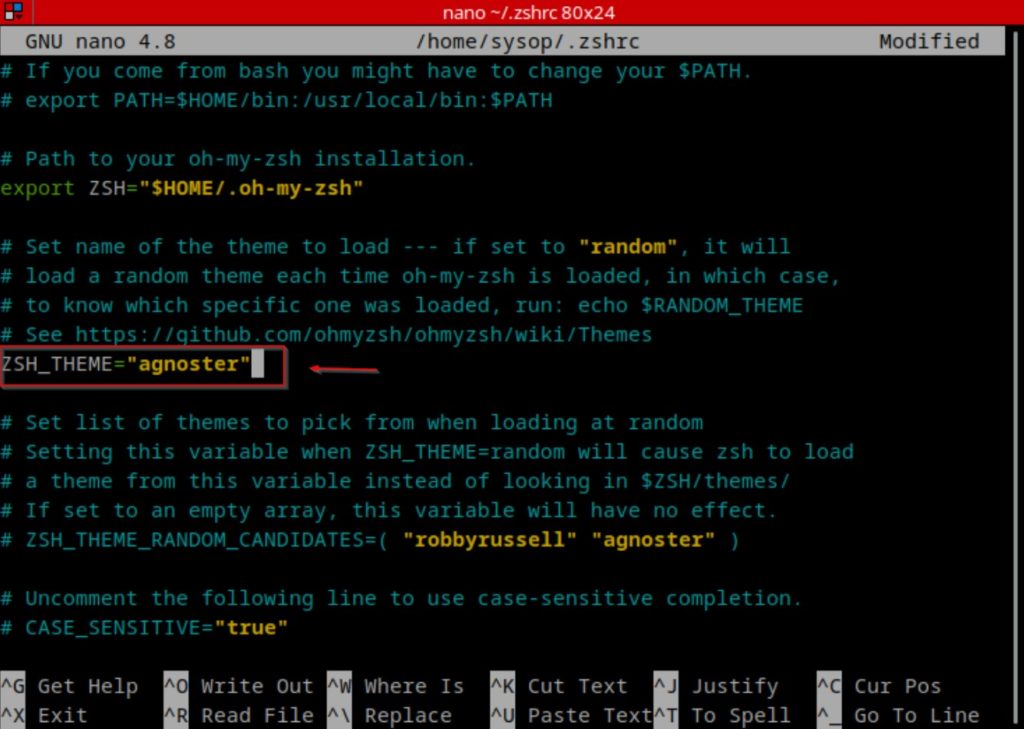
Now you will want to set a theme. Locate the “ZSH_THEME” and modify it to the theme name of your choice. Above I have set my theme to “agnoster” as it is one of my personal favorites. You can view the full list of available themes to choose from on the Oh My Zsh Github page. Save the file when you are finished with your changes.

Apply the Configuration

source the zshrc config file

Once you are finished editing the zshrc config file you will need to apply the changes. Run the command below, then reopen your terminal.

source ~/.zshrc

Verify Oh My Zsh Theme

test theme

If everything worked correctly you will see your new theme. You have now successfully installed Oh My Zsh, and configured a theme. If you are interested in adding plugins to echance your shells experience even further, visit the plugins page on the Oh My Zsh Wiki.

Conclusion

In conclusion, with the help of this article you now have the tools to effortlessly set up and customize Oh My Zsh in your Linux environment. Say goodbye to mundane terminal sessions and hello to a more productive, customizable, and user-friendly shell experience.

Questions?

If you have any questions or comments feel free to leave them below.

Recommended By Our Editors

View our 5 Reasons to Switch from Windows 10 to Linux.

Learn How to Configure a Firewall in Linux using UFW.

Check out How to Setup OpenSSH with Keys on Ubuntu 22.04.

View our Deep Learning Image Style Transfer Tutorial Using Neural Style Pt tutorial.

Learn How to Create a Mapped Network Drive in Windows 10.

View all of our available online tools and converters at Formatswap.com.

How to Setup an SFTP Server on Ubuntu 22.04 using OpenSSH

sftp splash

In this article you will learn how to enable and connect to the SFTP server in OpenSSH. With SFTP (Secure File Transfer Protocol) you can easily transfer files over the internet using SSH. We will be using Ubuntu 22.04 for our server, however any version of Linux should work.

This guide will use password authentication with IP firewall restriction. This will prevent anyone besides those who you want accessing the box via SSH or SFTP. If you want the highest level of security possible you will want to enable keys in OpenSSH before following this guide. Learn how to enable keys with our How to Setup OpenSSH with Keys on Ubuntu 22.04 tutorial.

SFTP vs FTP

It is important to mention that SFTP is not the same as FTP. One of the main differences is while they both transfer files, only SFTP encrypts the data during transit. Another difference is FTP is unable to benefit from public key files for authentication. Using public keys with SFTP increases security by encrypting the transfer data stream. If your aim is security then it is highly recommended you use SFTP versus FTP. Now that I have described the differences lets move on to configuring and connecting to an SFTP server in OpenSSH.

Update and Upgrade Ubuntu

update and upgrade ubuntu

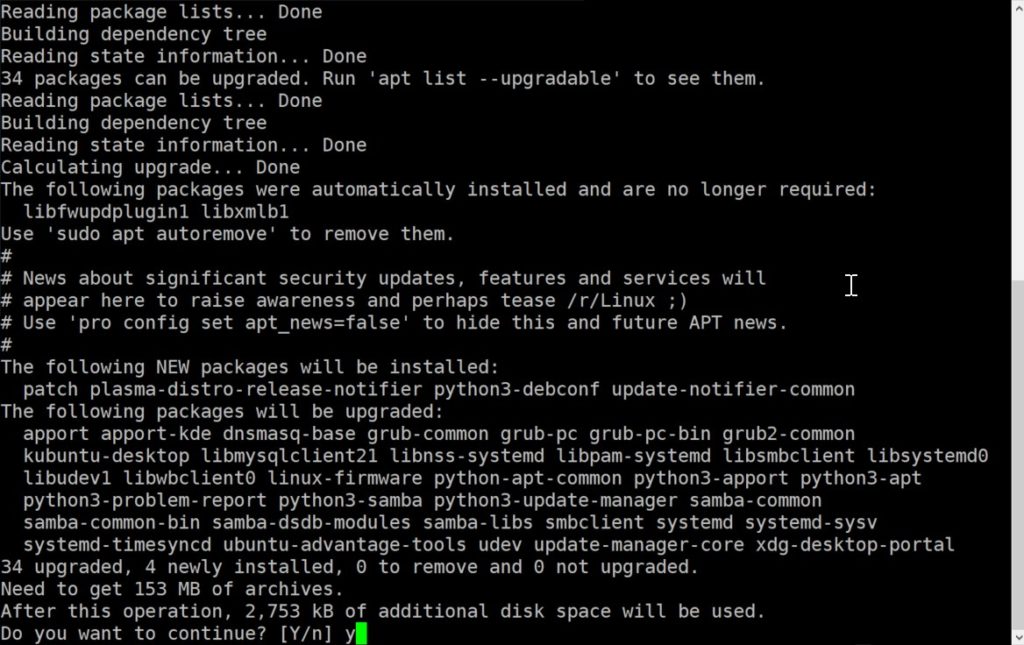
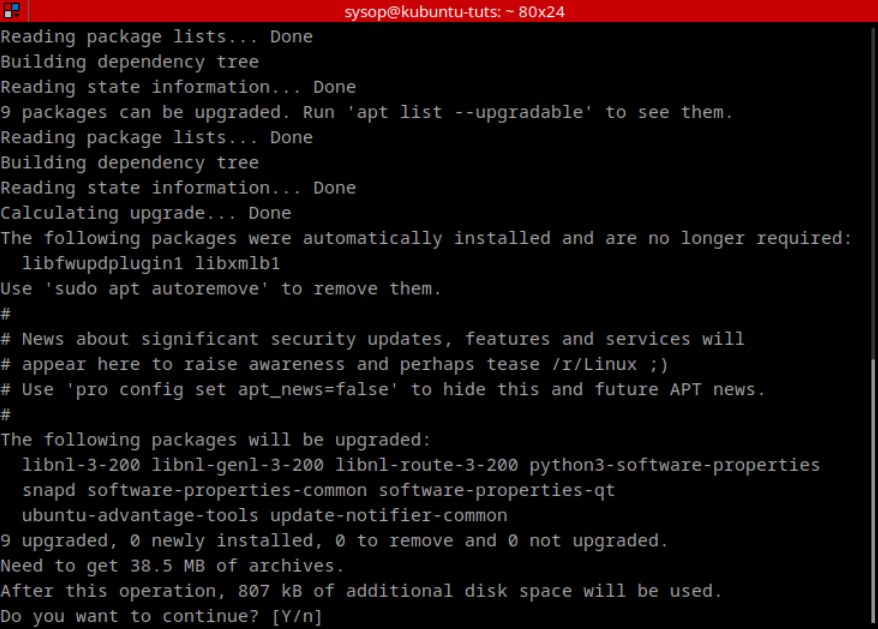
The first thing you need to do is update and upgrade your Ubuntu installation. Open a terminal and type the following command. Afterwards press “Y” to confirm.

sudo apt update && sudo apt upgrade

Install OpenSSH

install open-ssh

After your system has finished updating you will need to install the OpenSSH server software. OpenSSH provides encrypted file transfer for file transfers and remote logins. Install the software using the apt command.

sudo apt install openssh-server

View SSH Status

view ssh status

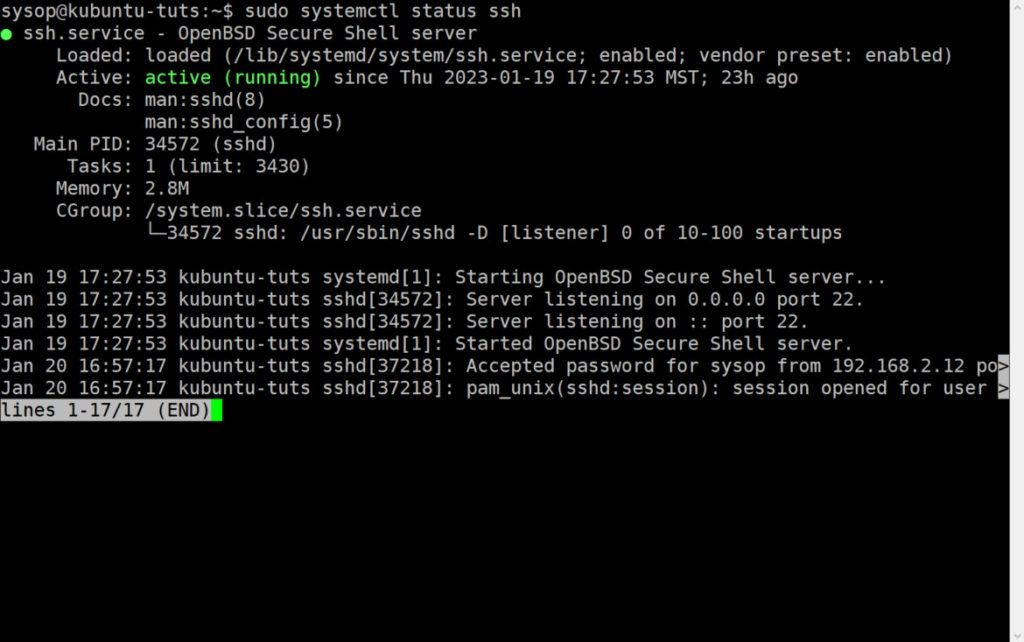
Next you need to verify that OpenSSH is installed on your system and actively running. Use the below command and confirm that you see “active (running)” on the third line.

sudo systemctl status ssh

If SSH does not show as active and running it may be disabled. Run the following command to enable and start the OpenSSH server.

sudo systemctl enable ssh && sudo systemctl start ssh

Create New User

create a new user

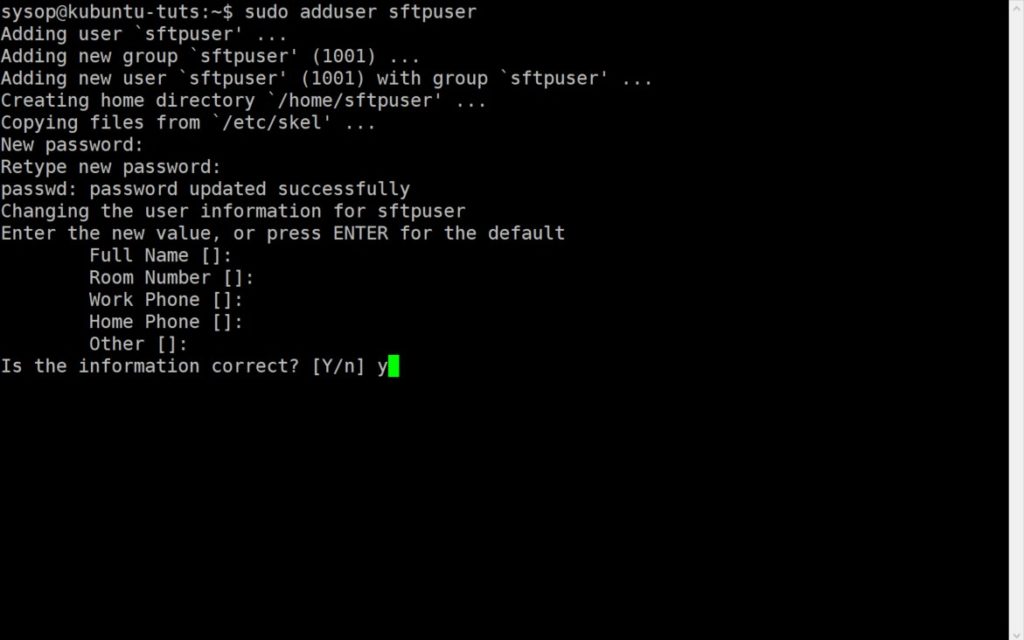
Now you will need to create a new user for logging into the SFTP server. Run the adduser command then type a password. You can skip the other fields if you wish. Finally press “Y” to confirm.

sudo adduser sftpuser

Create New Group

create a new group

Afterwards we will create a new group for our sftpuser. We will configure SSH to give SFTP access to any user in this group. Run the addgroup command to proceed.

sudo addgroup sftpusers

Add User to Group

add user to group

Next we need to add the user to the new group. Run the usermod command to add the sftpuser to the sftpusers group.

sudo usermod -a -G sftpusers sftpuser

Change User’s Home Permissions

change users home permissions

Then we will set new permissions on the sftpuser’s home directory. This will allow the SFTP server to access these files. First execute the chown command followed by the chmod command. The sftpuser’s home will be the folder you access when you connect to the SFTP server.

sudo chown root: /home/sftpuser
sudo chmod 777 /home/sftpuser

Edit the SSH Config File

Next we need to edit the sshd_config file and edit a few lines. Open the configuration file using the nano text editor as shown below.

sudo nano /etc/ssh/sshd_config

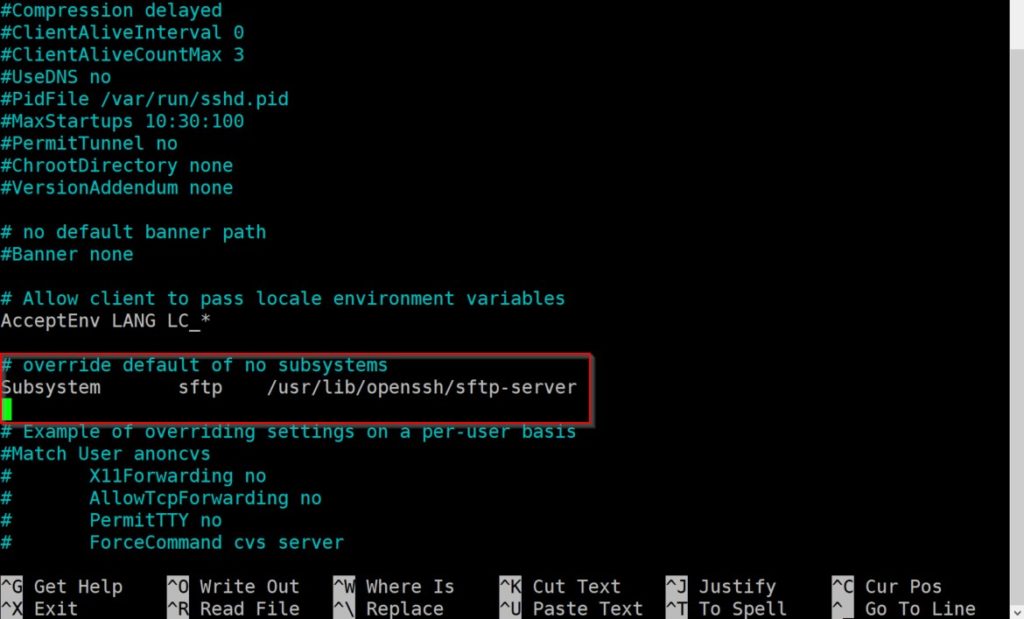
Locate the Subsytem Line

locate subsystem line

After you open the file scroll down and look for the Subsystem line. Once you locate the line comment it out using the “#” symbol as shown below.

#Subsystem      sftp    /usr/lib/openssh/sftp-server

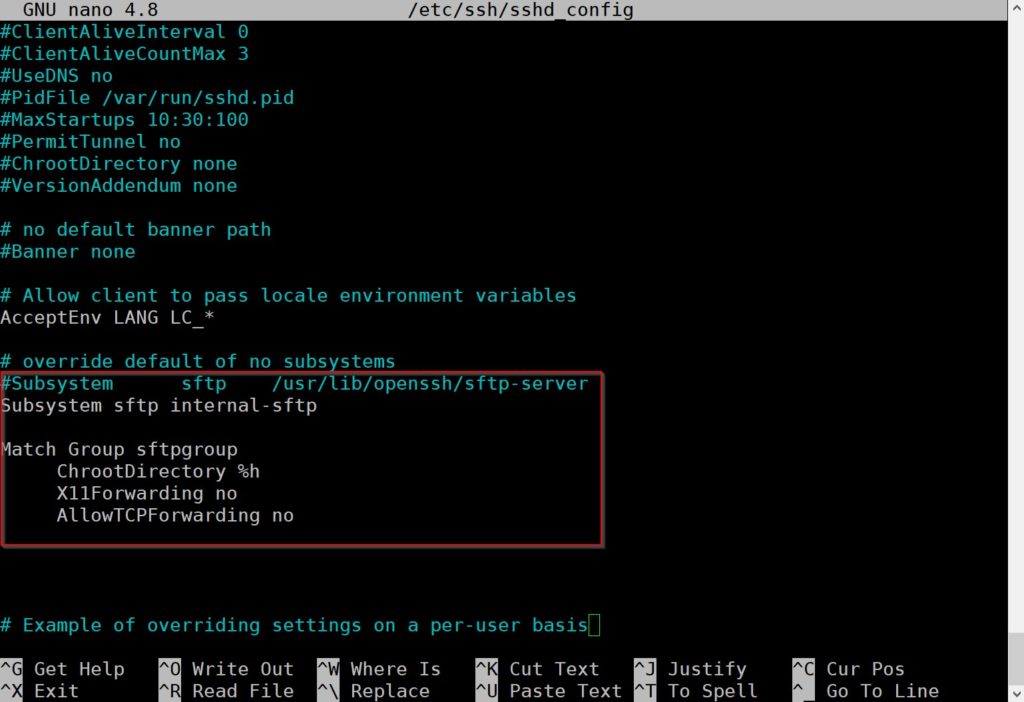
Add New Lines

Now that you have commented out the Subsystem line you need to add a few additional lines. Paste the following underneath the line you commented out. Your sshd_config file should match the screenshot above. After the lines have been added save and close the file using “Ctrl+X”.

Subsystem sftp internal-sftp

Match Group sftpgroup
     ChrootDirectory %h
     X11Forwarding no
     AllowTCPForwarding no

Restart SSH

restart ssh

To apply our changes we will restart ssh. Use the following service command.

sudo service ssh restart

Configure the Firewall

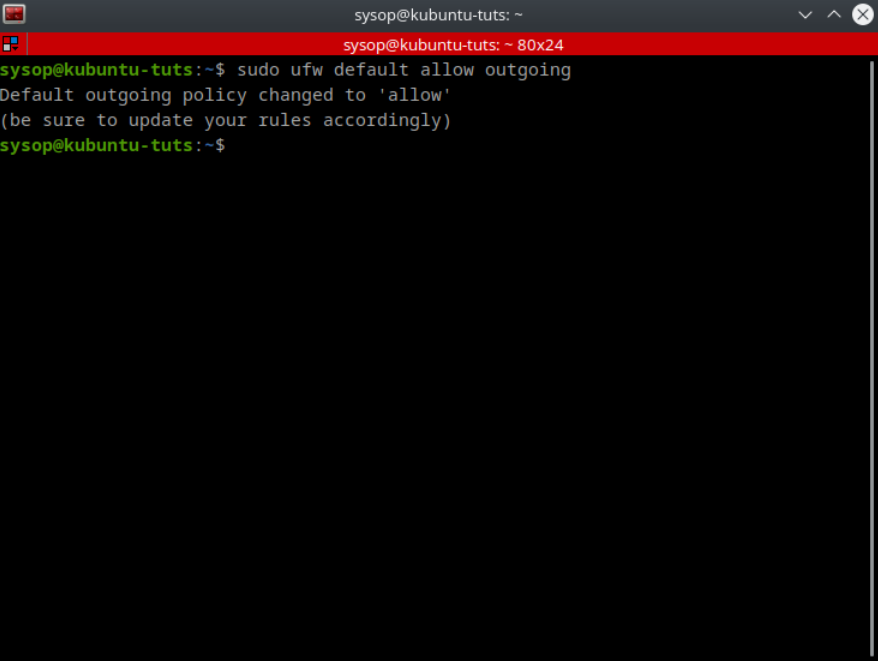
The next step is to configure the firewall using UFW to control access to our SFTP server. Start by denying all incoming traffic, and allowing all outgoing.

sudo ufw default deny incoming
sudo ufw default allow outgoing

Allow SSH (All IP’s)

allow ssh

You have two options when allowing SSH through the firewall. You can either allow any IP to access port 22 (not recommended). Or you can only allow specific IP(s) through the firewall. I recommend the section option as it offers higher security. If you want to allow any IP run the following command.

sudo ufw allow ssh

Allow SSH (Specific IP’s)

allow specfic ip

If you want to only allow specific IP’s to access the server run the following command for each IP you want to have access. You need to replace “IP-ADDRESS” with your own IP. This is highly recommended as it offers the highest level of security.

sudo ufw allow from IP-ADDRESS to any port ssh

Enable UFW

enable ufw

After you have allow the IP’s (or everyone) who you want to have access you will need to enable UFW. Run the following command.

sudo ufw enable

Check Firewall Status

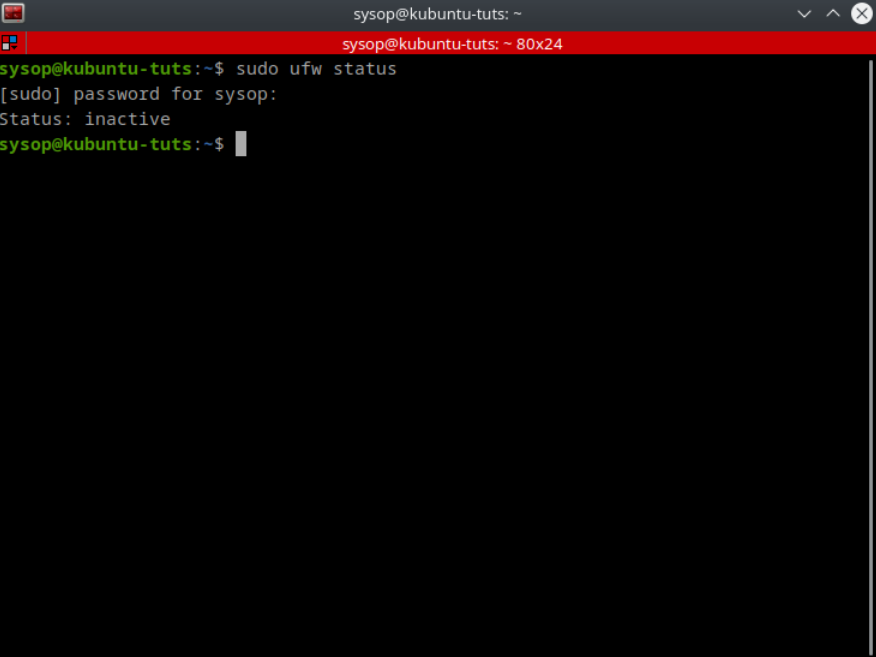
check firerwall status

The last step is to check the firewall status and verify your configuration. Check it using the ufw status command. If you allowed access to only specific IP’s you will see them in the “From” column.

sudo ufw status

Connecting to the SFTP Server

Finally we can test our connection to the SFTP server. The first thing you will need is a FTP client. I recommend downloading FileZilla. This is the software we will use in this tutorial. You can install it using the following apt command.

sudo apt install filezilla

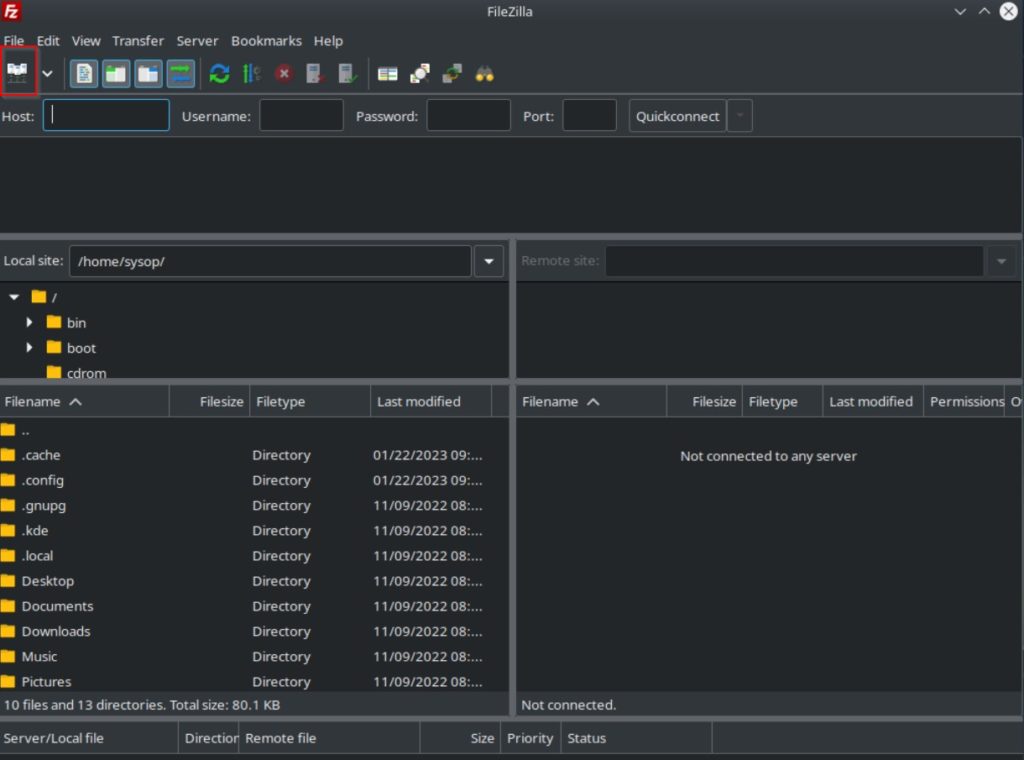
Edit Site List

edit filezilla site list

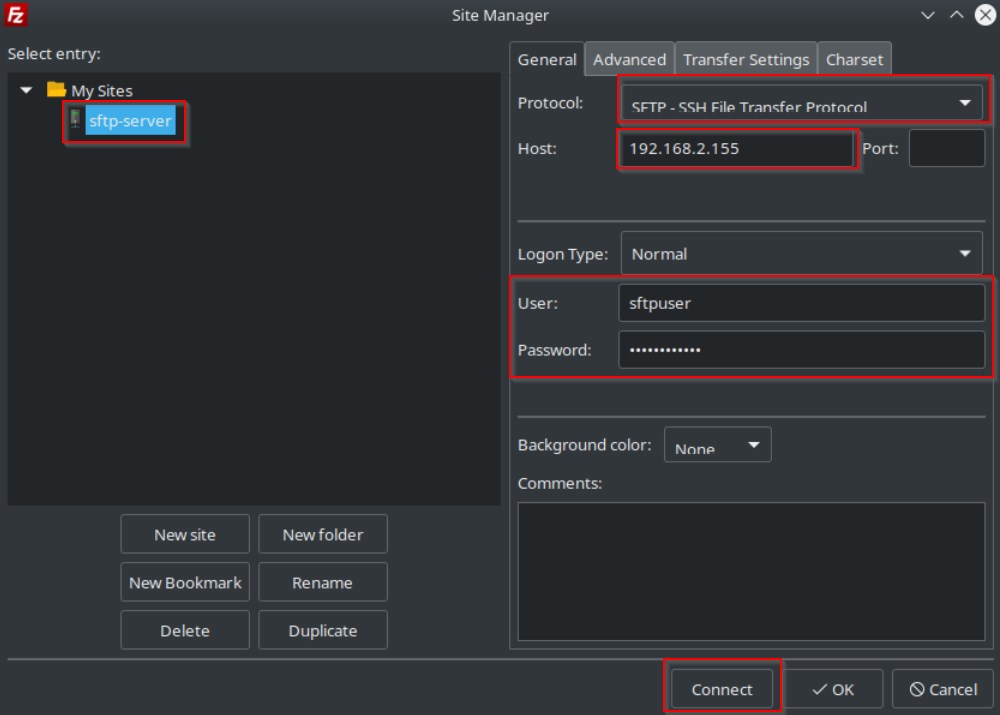
Open Filezilla and click on the site manager button in the upper left hand corner.

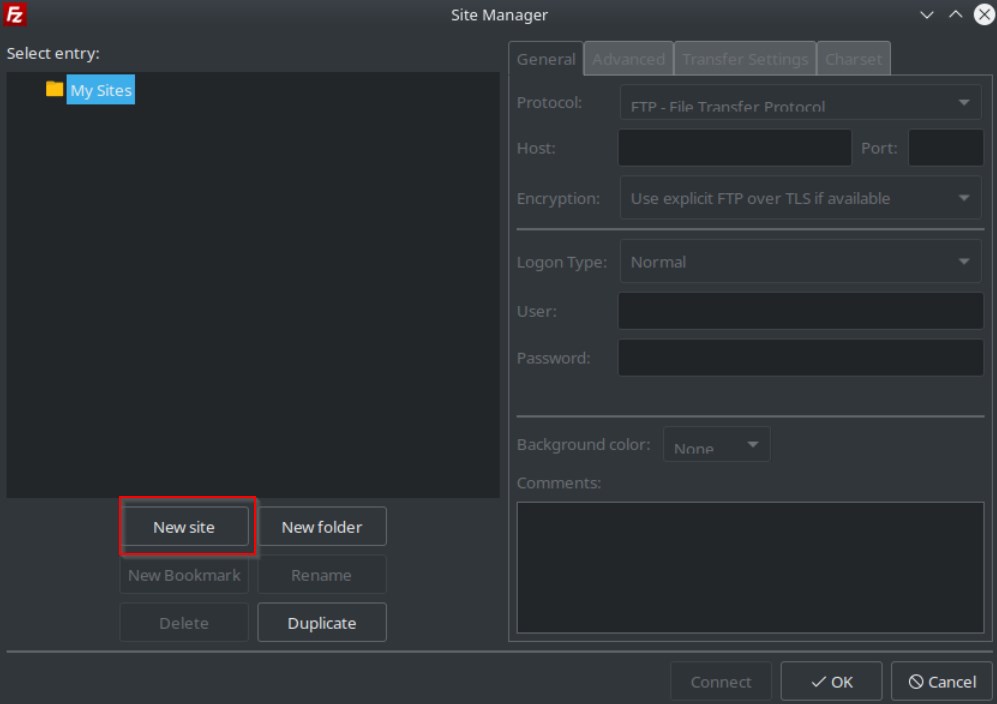
Add a New Site

add filezilla site

Type Connection Information

add filezilla connection information

Confirm Host Key Prompt

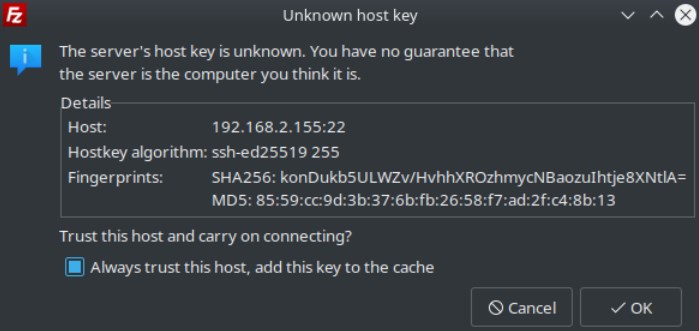
confirm filezilla hostkey

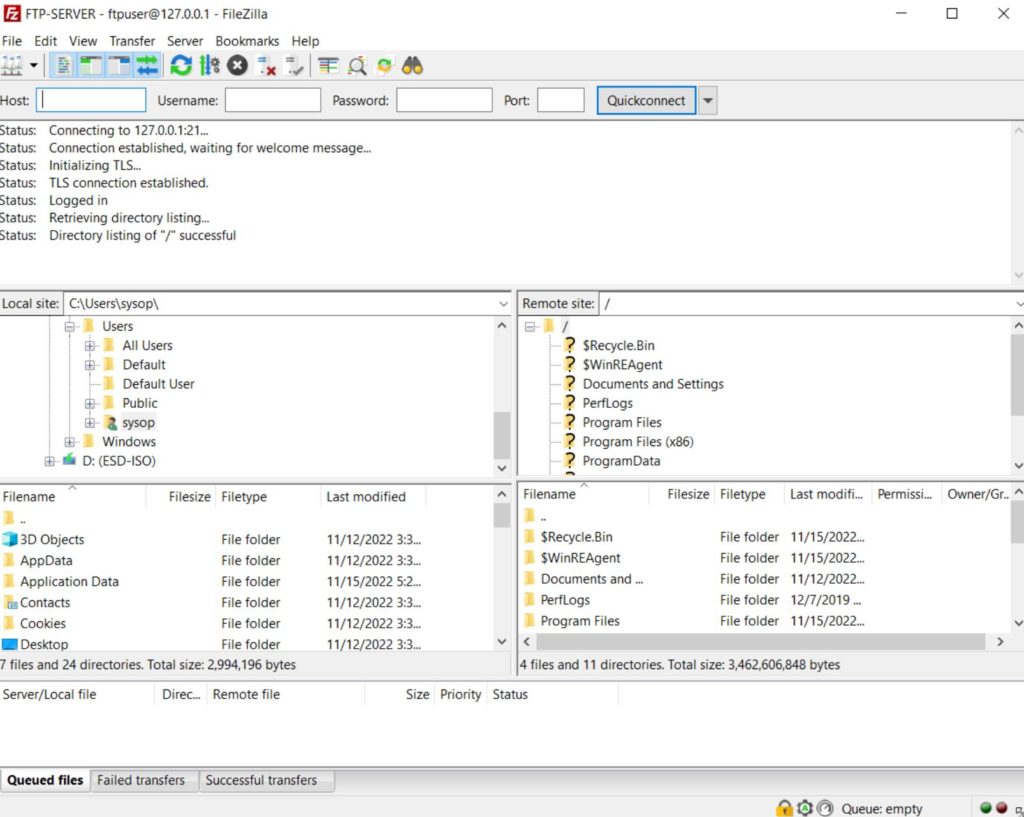
Verify Connection

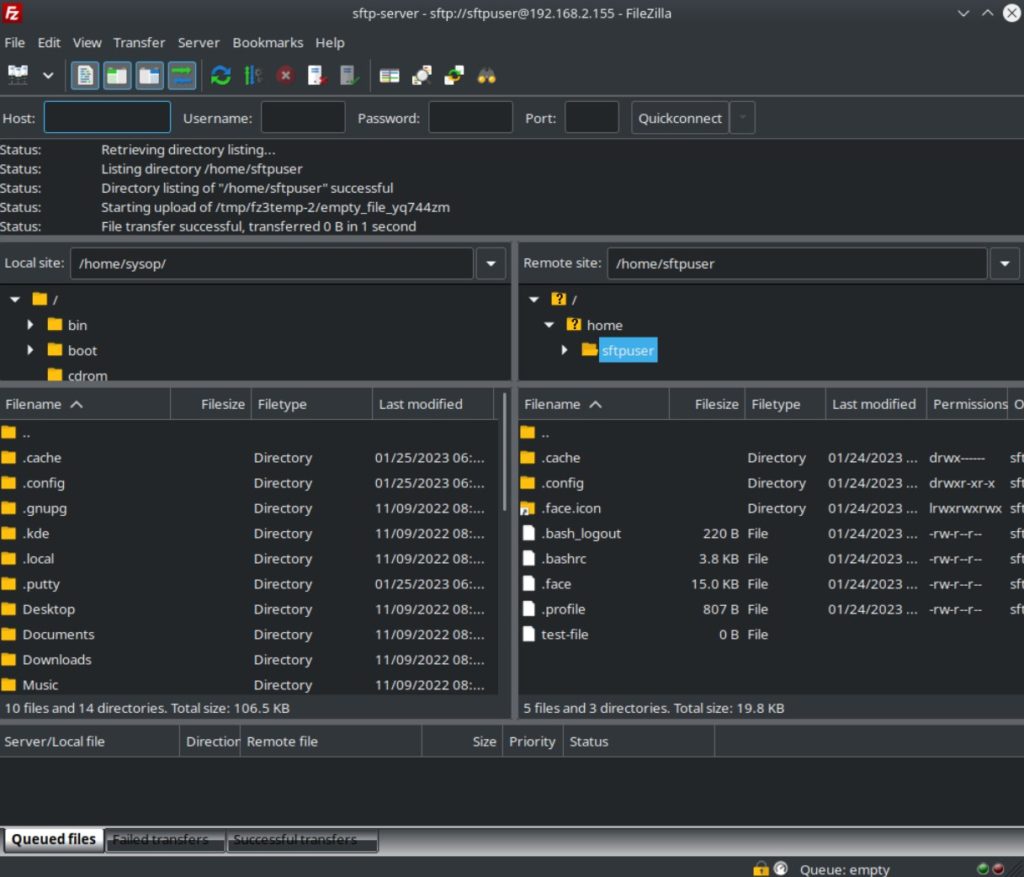
verify filezilla connection

Questions?

If you have any questions or comments feel free to leave them below.

Related Resources

View our 5 Reasons to Switch from Windows 10 to Linux.

Learn How to Install Ubuntu Server 22.04 [Step by Step].

Check out How to Setup OpenSSH with Keys on Ubuntu 22.04.

View our How to Mount an SMB (Samba) Share in Linux with cifs-utils tutorial.

Learn How to Use the Alias Command in Linux.

View all of our available online tools and converters at Formatswap.com.

How to Configure a Firewall in Linux using UFW

ufw linux firewall splash image

This tutorial will teach you how to install and configure UFW (Uncomplicated Firewall) in Linux. Firewalls are vital to keep your applications and systems secure. UFW provides a command line frontend interface for iptables using a few simple commands. It is designed to be easy to use and uncomplicated to configure. Using only Netfilter in iptables for firewalls can be a daunting task. UFW is a simple solution to using a firewall in Linux. In this tutorial we will be using Ubuntu 22.04 but any Ubuntu or Debian based Linux distribution will work.

Check if UFW is Installed

ufw status
sudo ufw status

The first thing you need to do is check if UFW is already installed. It is installed by default on most Linux distributions. You can check if UFW is currently installed by opening a terminal shell and running the “ufw status” command. If UFW is already installed you will see a similar output to what is above. It will say “Status: inactive”. If you get an error you will have to install UFW.

Install UFW

install ufw
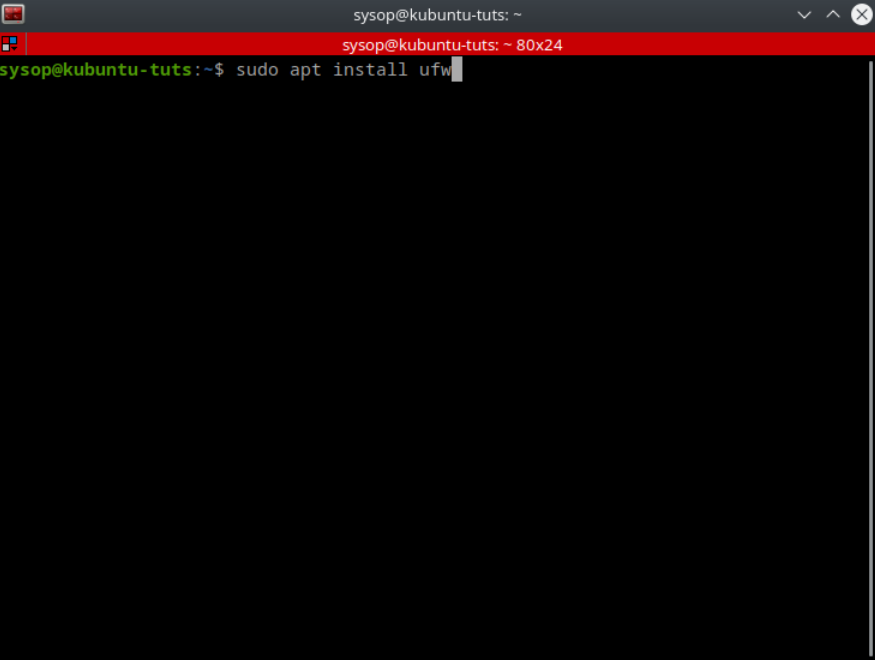
sudo apt install ufw

To install UFW run the command “sudo apt install ufw”. Then click yes on the confirmation dialog.

Deny Outgoing and Incoming Connections

ufw allow outgoing
sudo ufw default allow outgoing

The first thing you want to do when configuring the firewall is to deny all incoming and outgoing connections. To deny outgoing connections run the command “sudo ufw default deny outgoing”.

ufw allow deny incoming
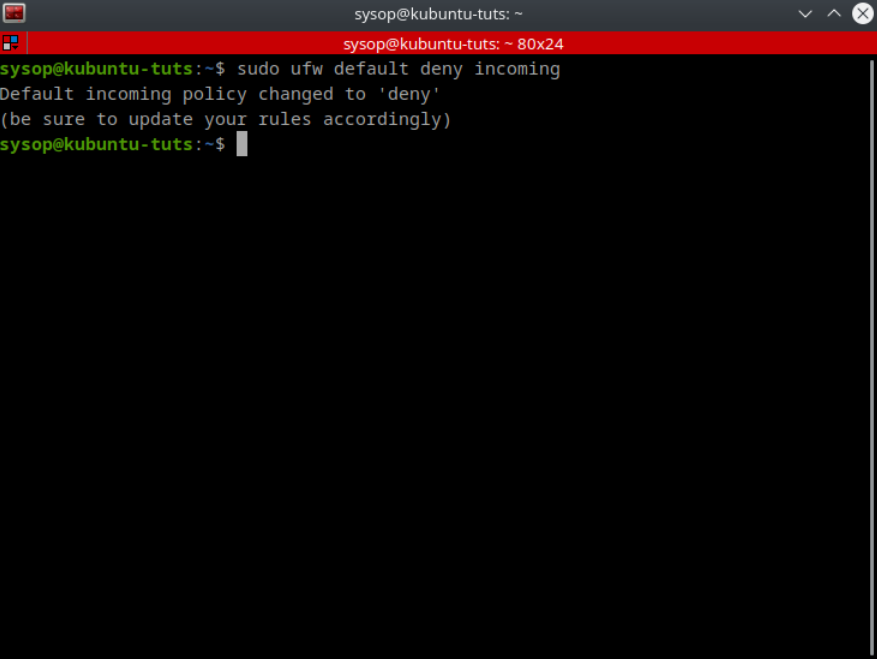
sudo ufw default deny incoming

Then repeat the same step using “sudo ufw default deny incoming” to deny the incoming connections.

Configure Firewall Rules

Allow a Program

allow ftp ufw
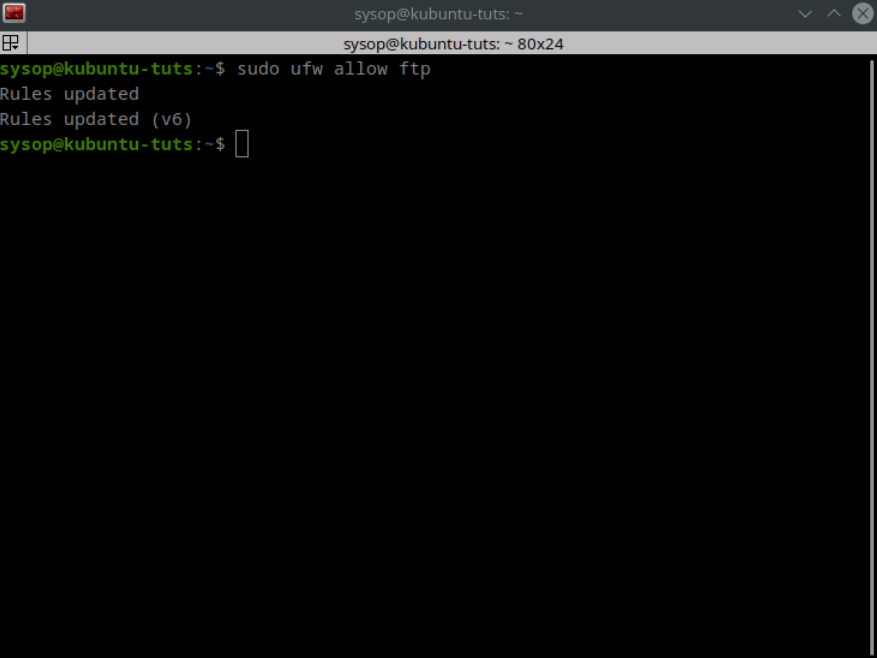
sudo ufw allow ftp

You can allow individual programs through the firewall using their names. Above I allow ftp using the command “sudo ufw allow ftp”.

Allow a Specific Port

allow port 21 ufw
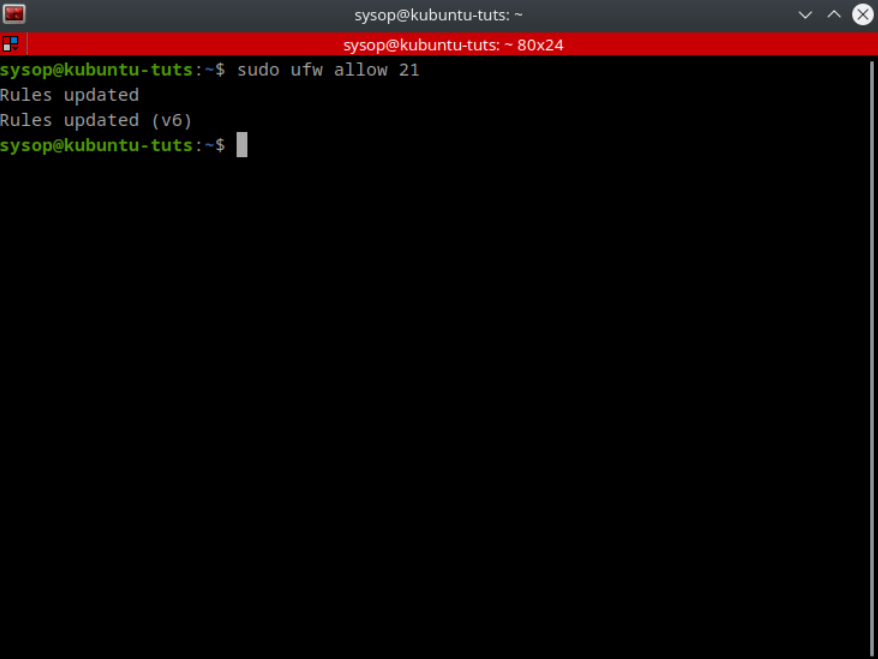
sudo ufw allow 21

To allow a specific port use the command “sudo ufw allow 21”. In the above example I am allowing the FTP port 21.

Deny a Specific Port

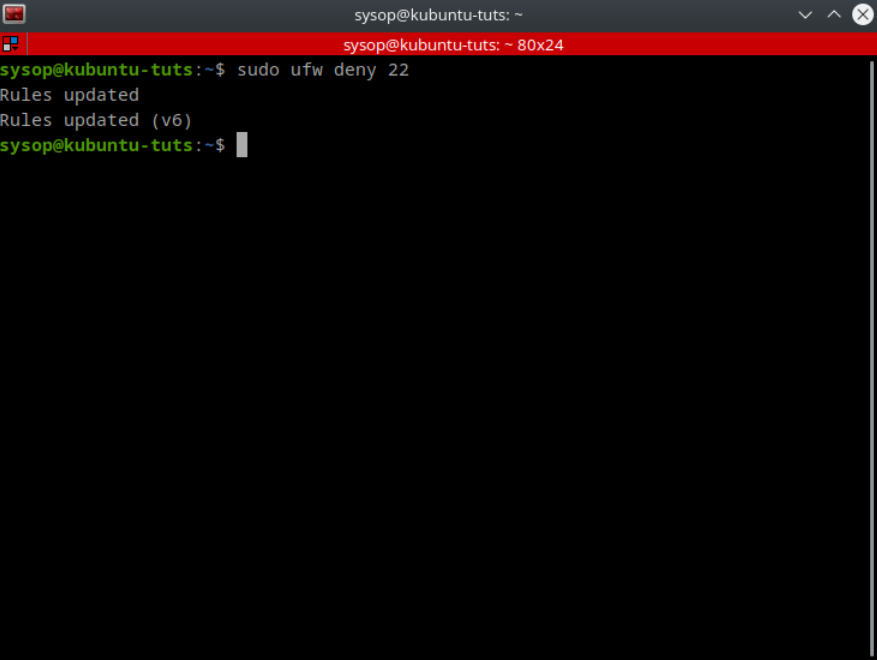
deny port 22 ufw
sudo ufw deny 22

You can also allow specific programs and ports. In the above example I deny port 22 using “sudo ufw deny 22”.

Allow a TCP Port

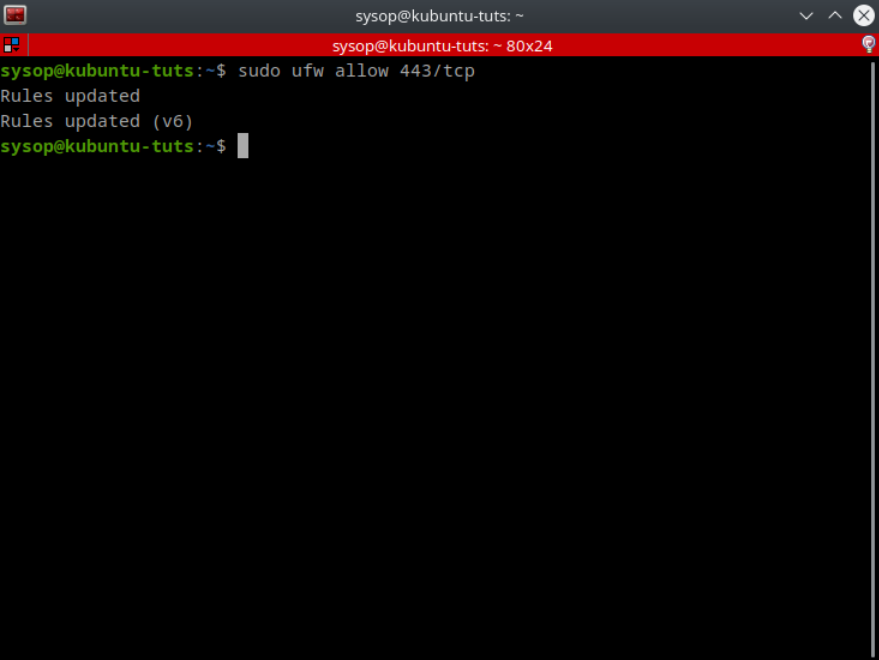
allow tcp port 443 ufw
sudo ufw allow 443/tcp

You can also allow or deny specific ports to be tcp or udp only. In the above example I allow only tcp traffic on port 443.

Allow a UDP Port

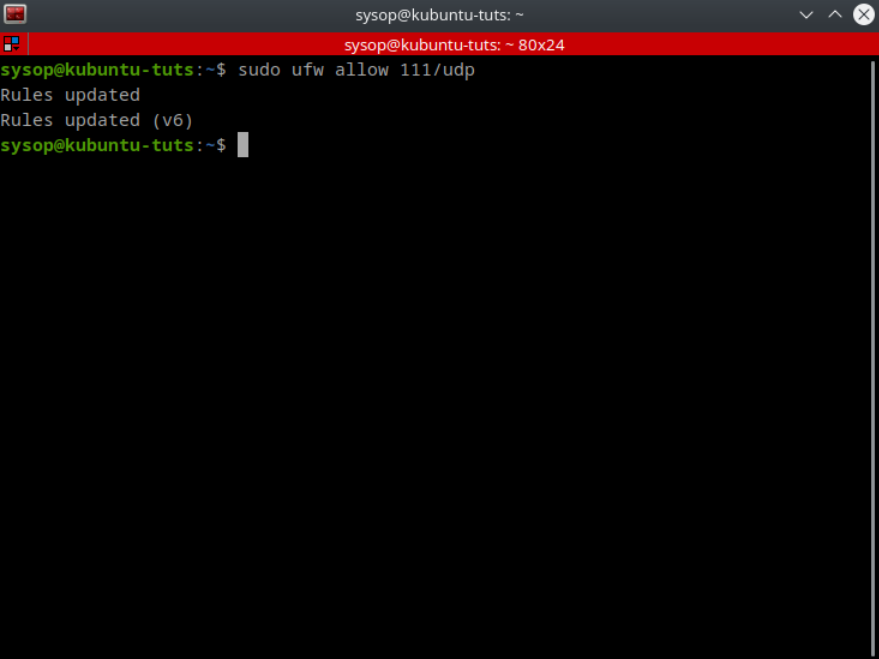
allow udp port 111 ufw
sudo ufw allow 111/udp

You can also allow any deny udp ports as shown above. By default it will allow or deny on both tcp and udp unless you specify one of the two.

Allow and Deny Access to IP Addresses

Sometimes you may want to only allow certain IP addresses access to your system. In this case you can setup a rule to control access on a per IP basis.

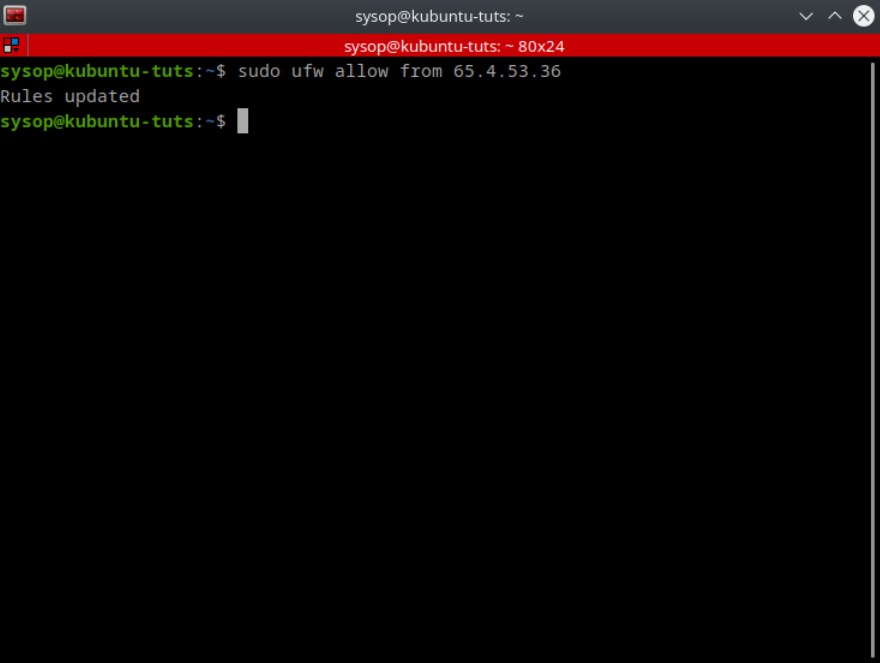
Allow an IP

allow an ip address

Using the above rule you are able to allow only specific IP addresses to access your system. This is the securest way to setup a FTP or SSH server that needs remote access.

Deny an IP

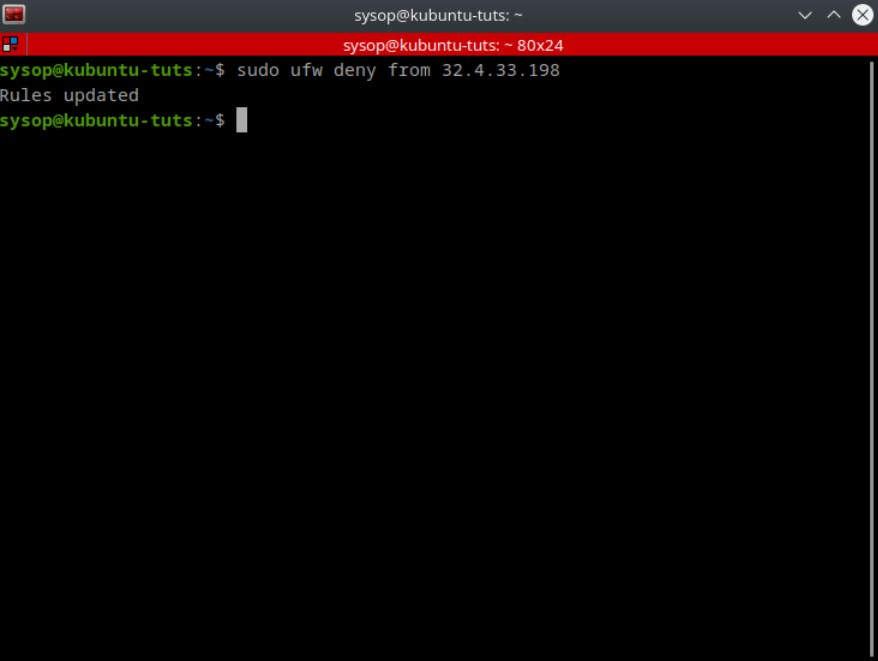
deny an ip address

This rule is useful in situations where you are allowing all IP addresses through the firewall, but just want to block certain ones.

Enable or Disable UFW Firewall Rules

Enable UFW

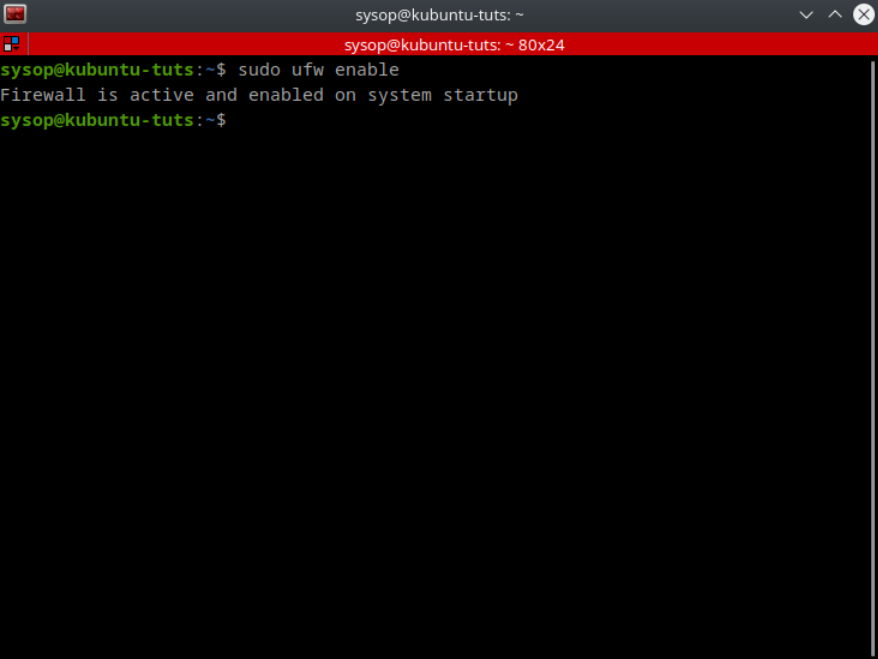
enable ufw
sudo ufw enable

Now you will need to enable the firewall to apply the rule set you created. To enable the UFW firewall type “sudo ufw enable”.

Disable UFW

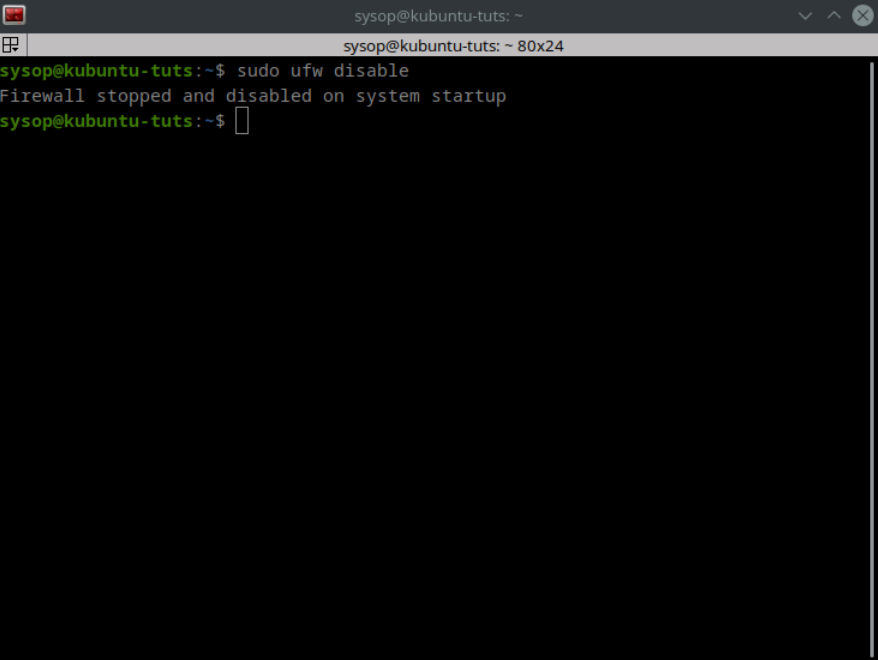
disable ufw
sudo ufw disable

If you need to disable the firewall you can run the command “sudo ufw disable”. This will keep the firewall disabled until you enable it again.

View the Firewalls Status

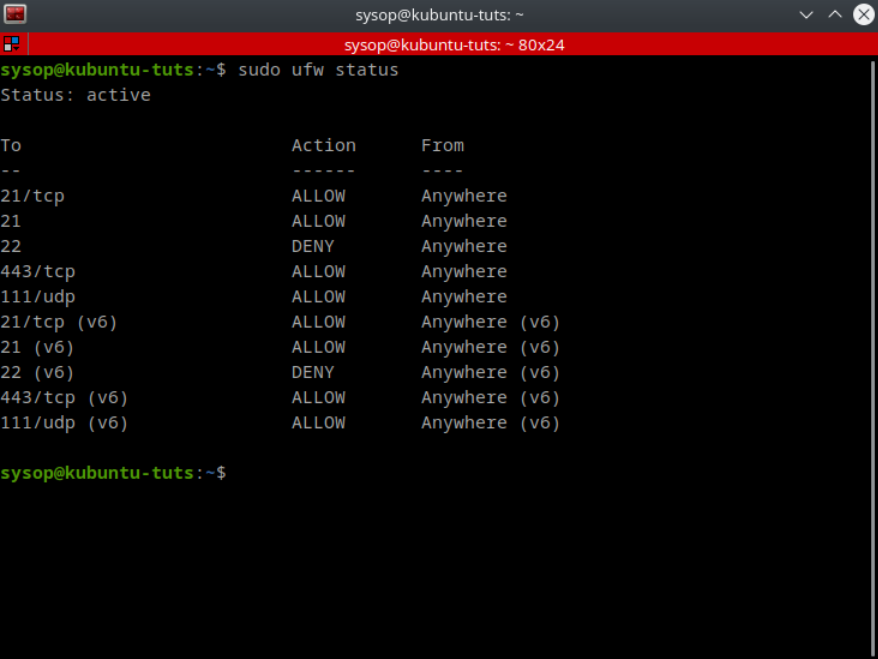
ufw view status
sudo ufw status

To view the status of the firewall type “sudo ufw status”. This will show you all of the ports and or programs that you are allowing or denying through the firewall. It will also show you whether UFW is active or inactive.

Advanced UFW Rules

ufw edit rules files
cd /etc/ufw/

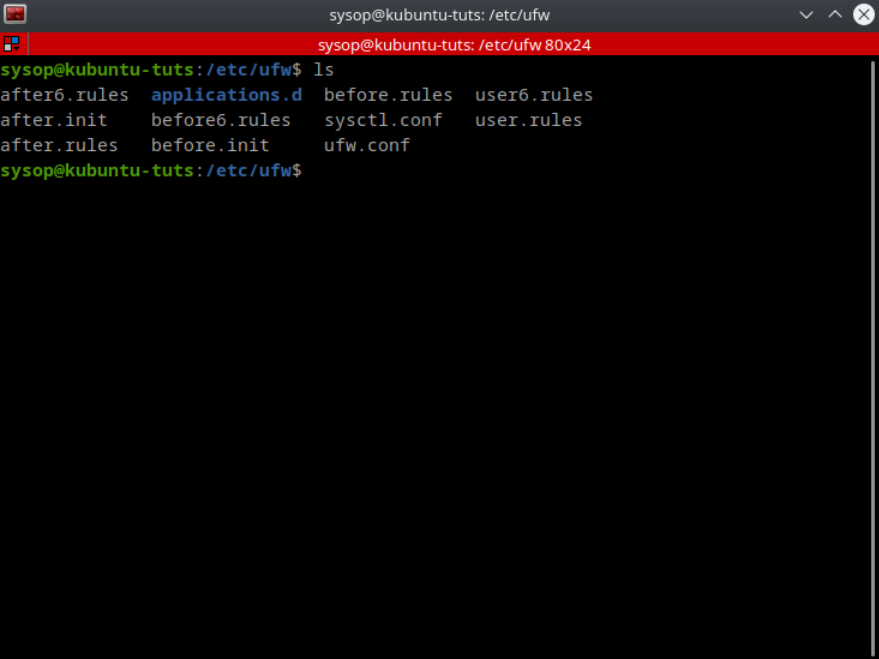
Most rules can be applied using the command line but sometimes you want more control over the rules. In this case you can directly edit the rules using the “before.rules” and “after.rules” files located in the “/etc/ufw/” directory. The before rules are applied before UFW is launched while the after rules apply after UFW is running.

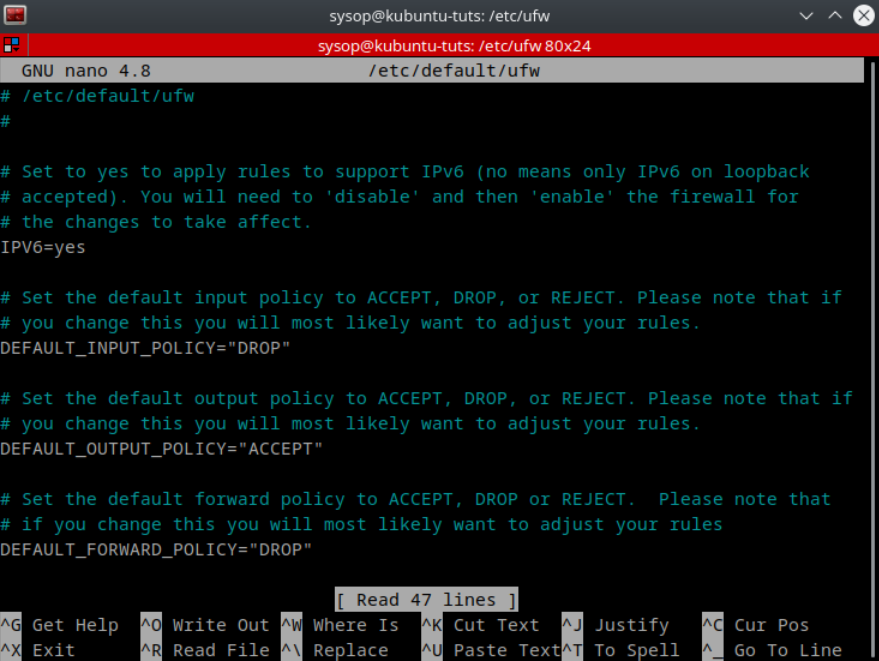
ufw edit config file
nano /etc/default/ufw

You can also edit the UFW configuration file located at “/etc/default/ufw” for more advanced configurations.

Enable Logging

ufw enable logging
sudo ufw logging on

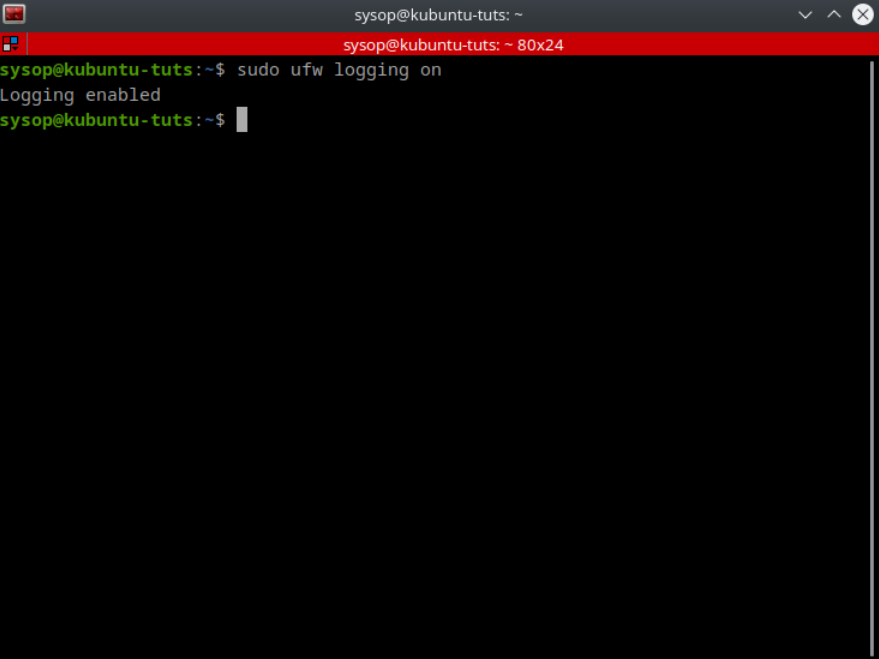
You can enable logging in UFW by running the command “sudo ufw logging on”. This will enable the logs in the lowest mode by default. If you want to specify the log level use the command “sudo ufw logging low|medium|high“.

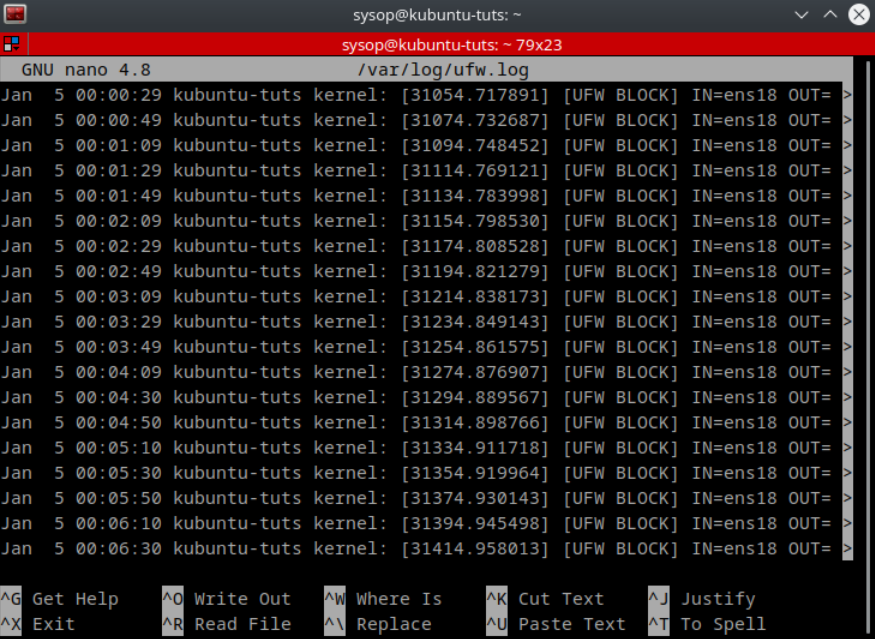
view of ufw log
nano /var/log/ufw.log

The UFW log file will be located at “/var/log/ufw.log” by default. I have set my logging level to low. Above is an example of what your log file may look like.

Additional Questions?

If you have any additional questions or thoughts feel free to comment them below.

Related Resources

View our How to install Kali Linux 2022.3 [step by step] tutorial.

Learn How to Use the Alias Command in Linux.

Check out our How to Add a Network Location in Windows 10 tutorial.

View our How to Setup a FTP Server with FileZilla in Windows tutorial.

Learn more cool things in Windows with our Windows Tutorials.

View all of our available online utilities and converters at Formatswap.com.

How to Setup a FTP Server with FileZilla in Windows

How to Setup a FTP Server with FileZilla in Windows

In this tutorial you will learn how to install a FTP server in Windows 10. However the same process will apply to Windows 7, Windows 11, and Windows Server 2008/2012. We will be using the FileZilla Server to set up the FTP service. FileZilla is by far the easiest FTP server application to set up and configure. One of the main benefits to setting up an FTP server is the ability to easily share files with others. It is useful anytime you want to transfer files from your computer to a server or vise versa. An FTP server is one of the most crucial tool to install on your servers.

Download FileZilla Server

download filezilla server

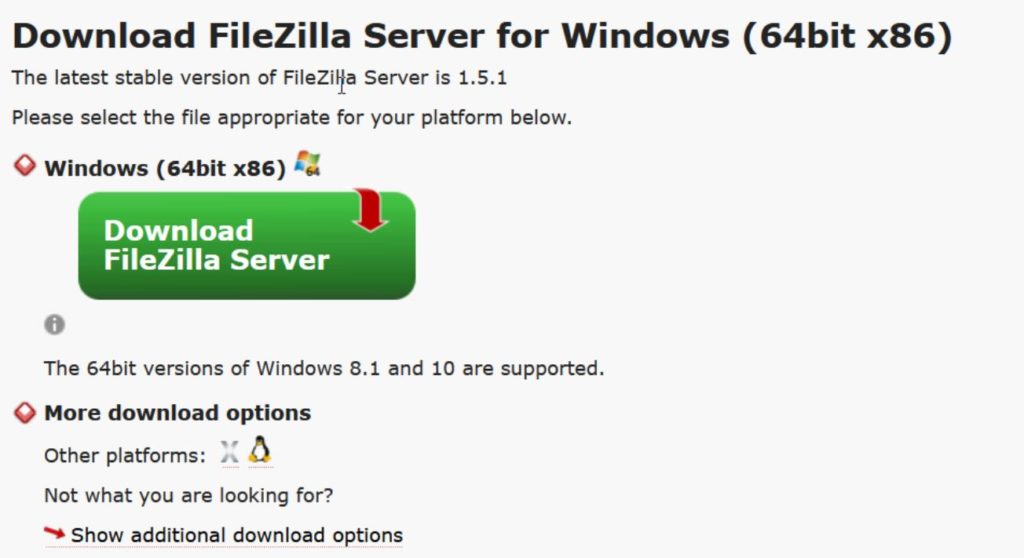
The first step will be downloading the FileZilla server installer. Navigate to the download page and download the latest release.

Download FileZilla

Launch the Installer

accept agreement

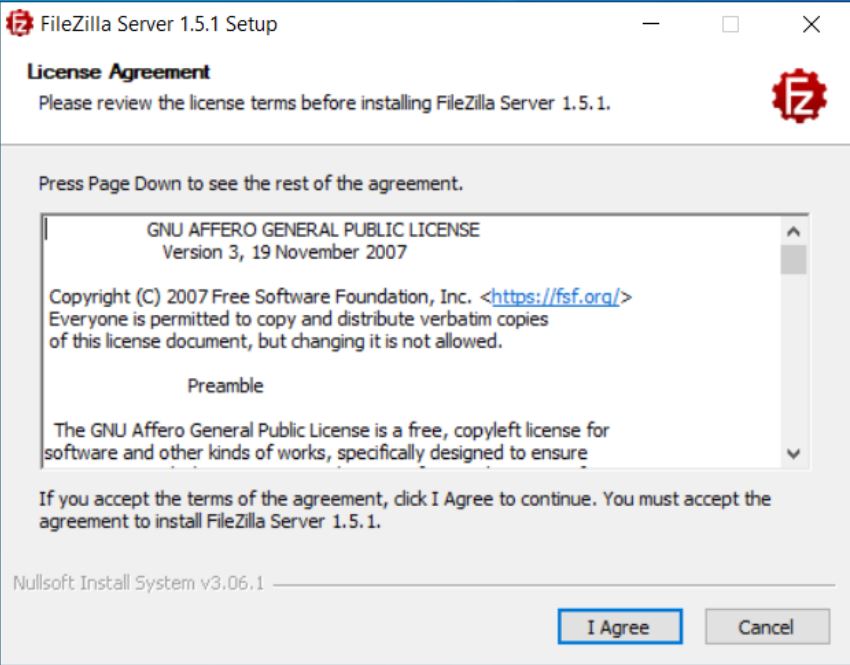
Now open the installer executable and follow the prompts.

Choose Installation Settings

set a default admin password

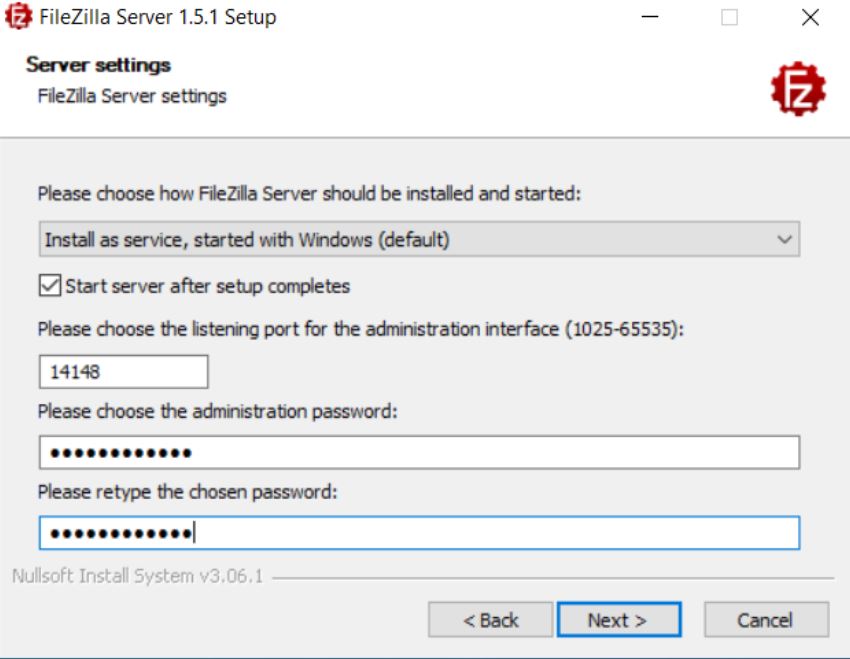
Once you get to this screen of the installer you will need to type an administrator password. You can also change the port that the admin interface runs on from this screen. You can use the default options for the rest of the process.

Installation Completed

filezilla server install finished

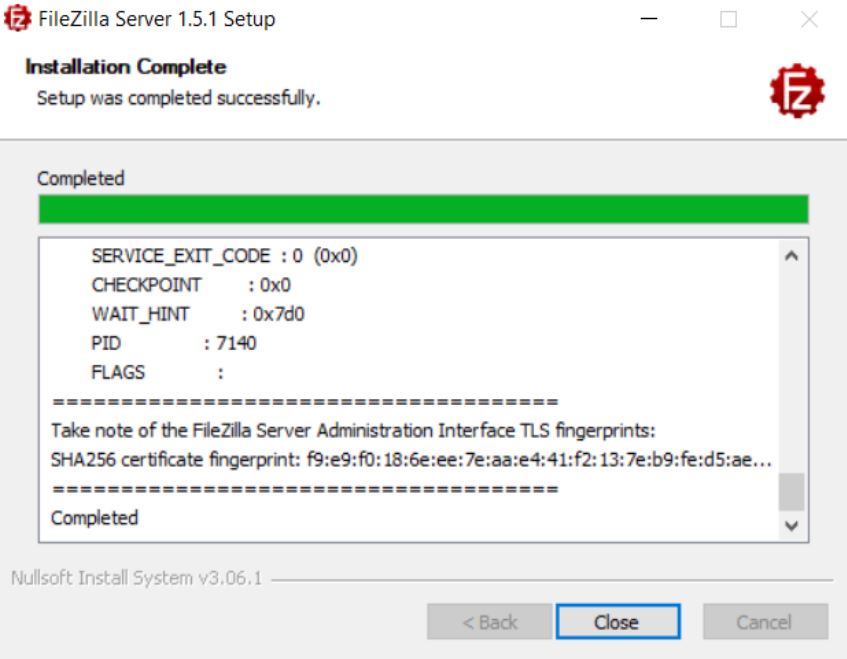
When this screen opens you have successfully completed the installation of FileZilla Server. Close the installer.

Connect to the Admin Interface

click connect

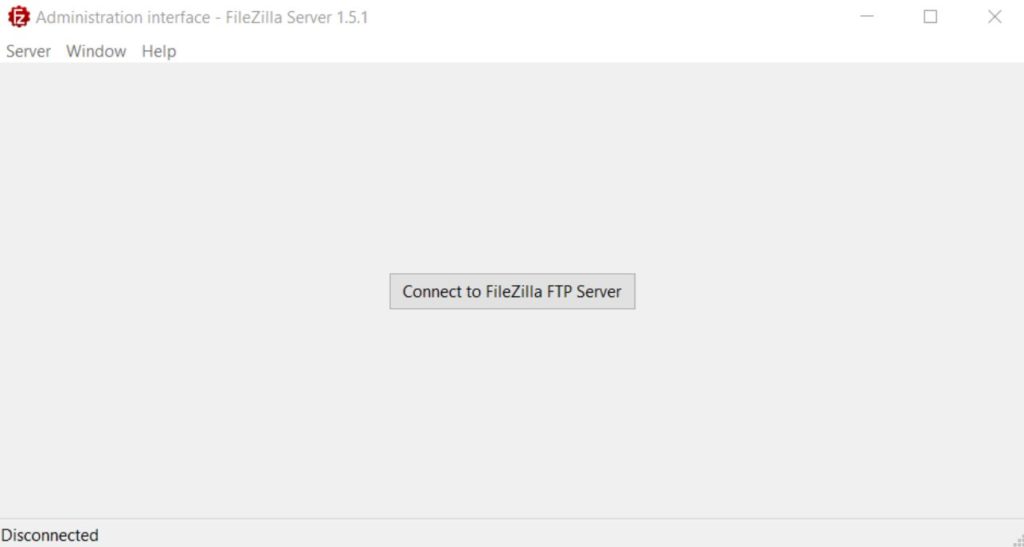
The administration interface will open once you have closed the installer. Click “Connect to the FileZilla FTP Server” to get started.

Input Connection Information

connect to ftp server

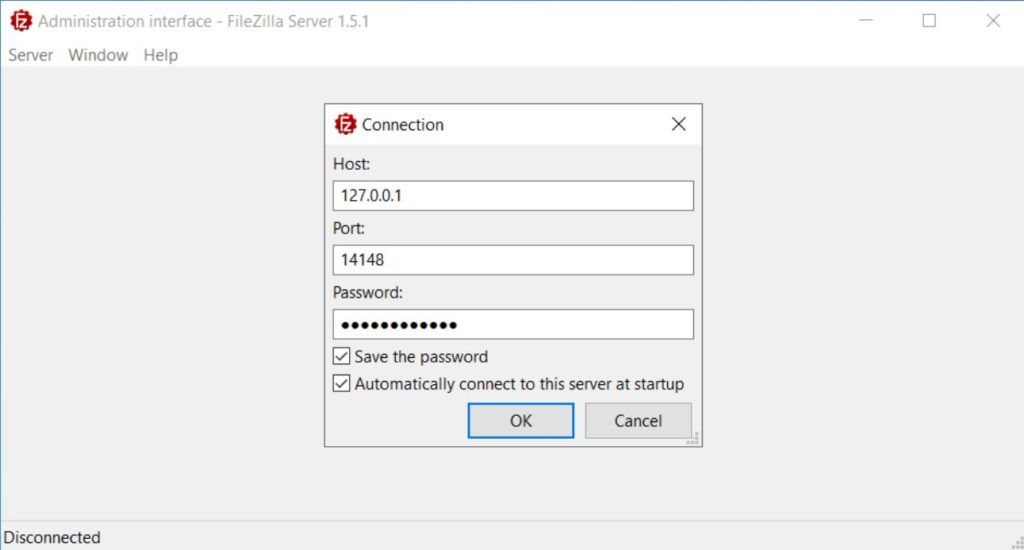
Type in the administration password that you entered during the installation. Then click on OK to continue.

Verify Server Fingerprint

verify fingerprint

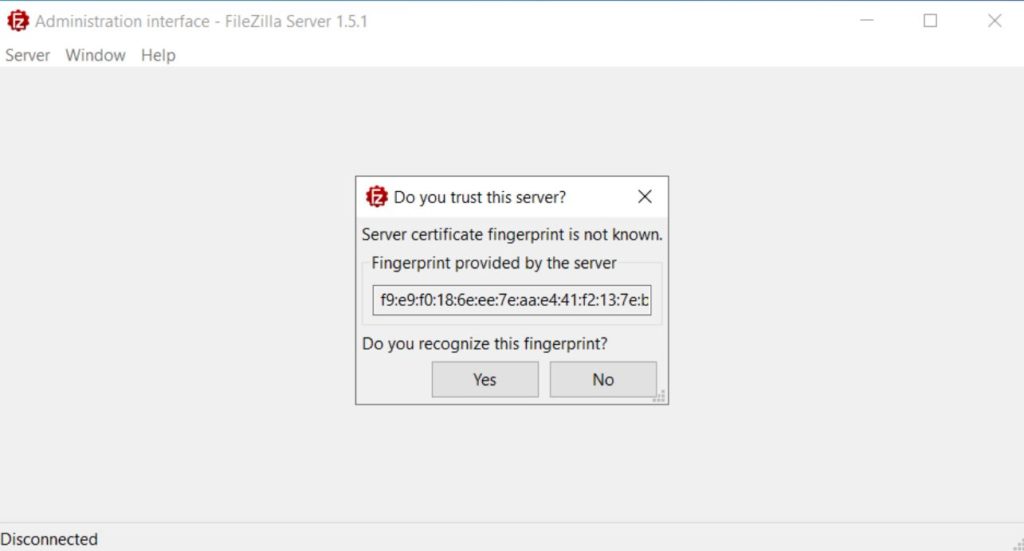
You will be asked to verify the certificate fingerprint since it is the first time you have opened it. Click “Yes” to verify.

Admin Interface Started

admin interface connected

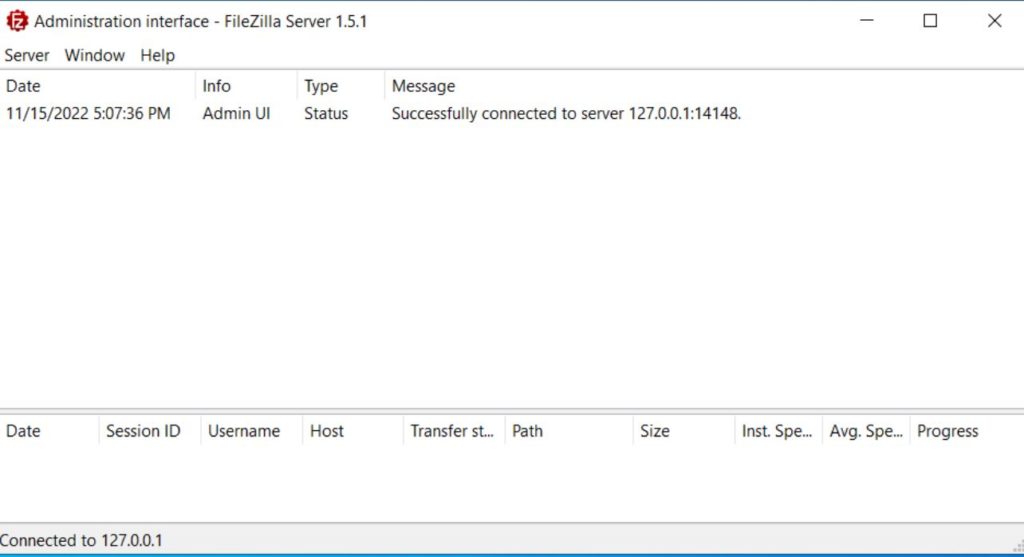
Afterwards you will be connected to the FileZilla FTP Server administrator interface. We now have to configure our users.

Open FTP Server Configuration

open filezilla server configuration

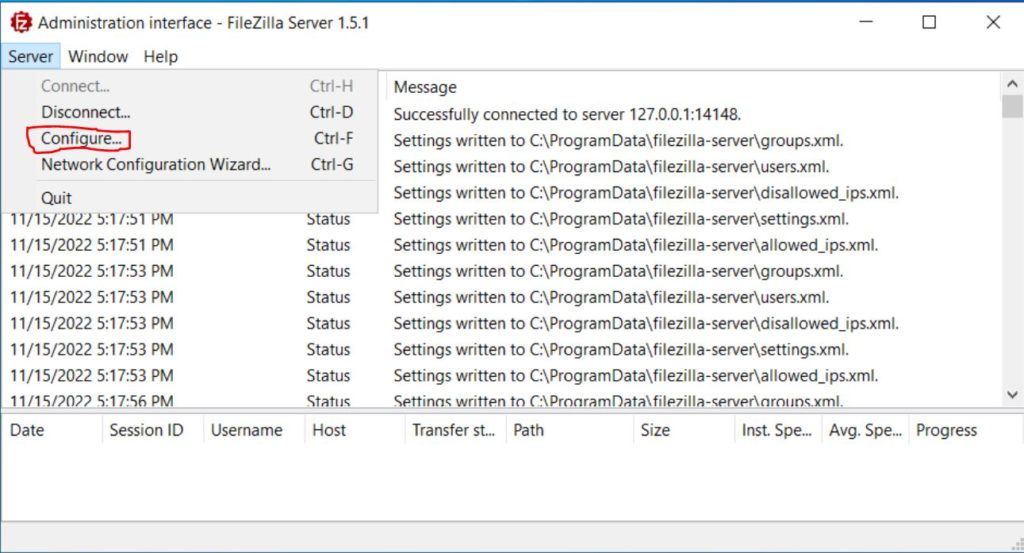
Click on “Server” in the top left corner and then click “Configure…”. This will open the server configuration screen.

Navigate to the Users Screen

navigate to users

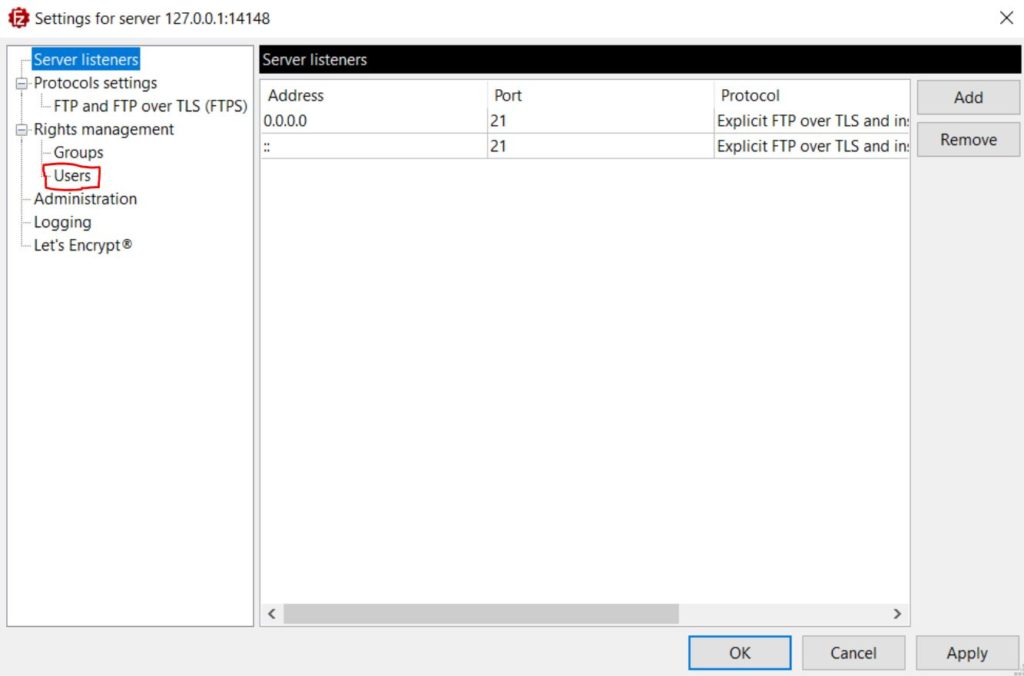
Once the server configuration opens, click on the “Users” row in the left column.

Add a New User

create a ftp user account

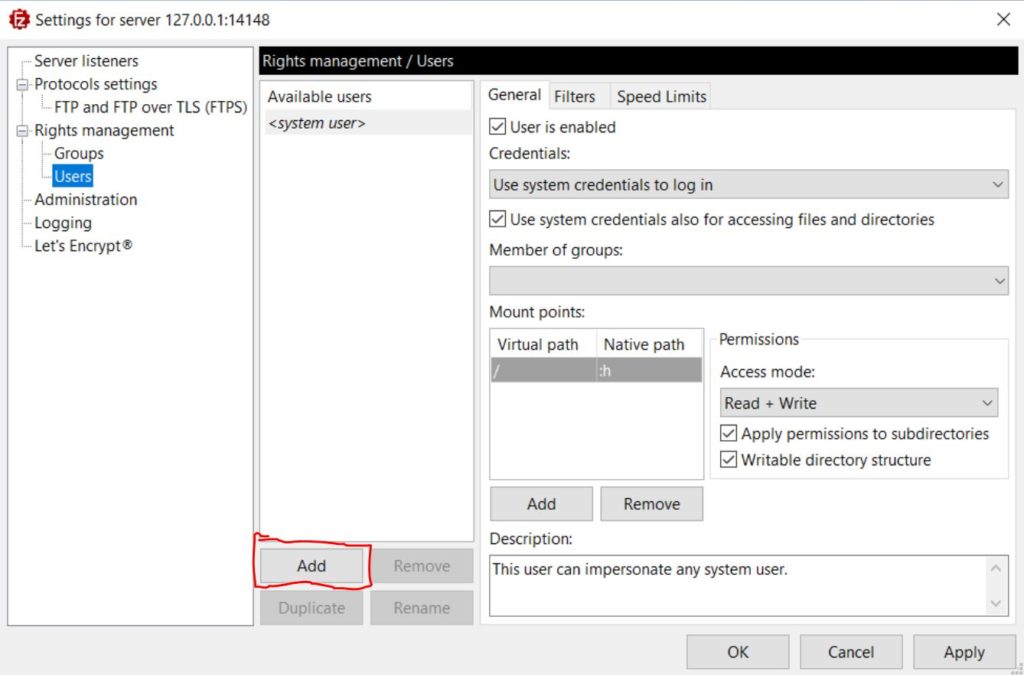
Next click on the “Add” button in the middle column to add a new user.

Configure the User and Mount Points

add ftp user details

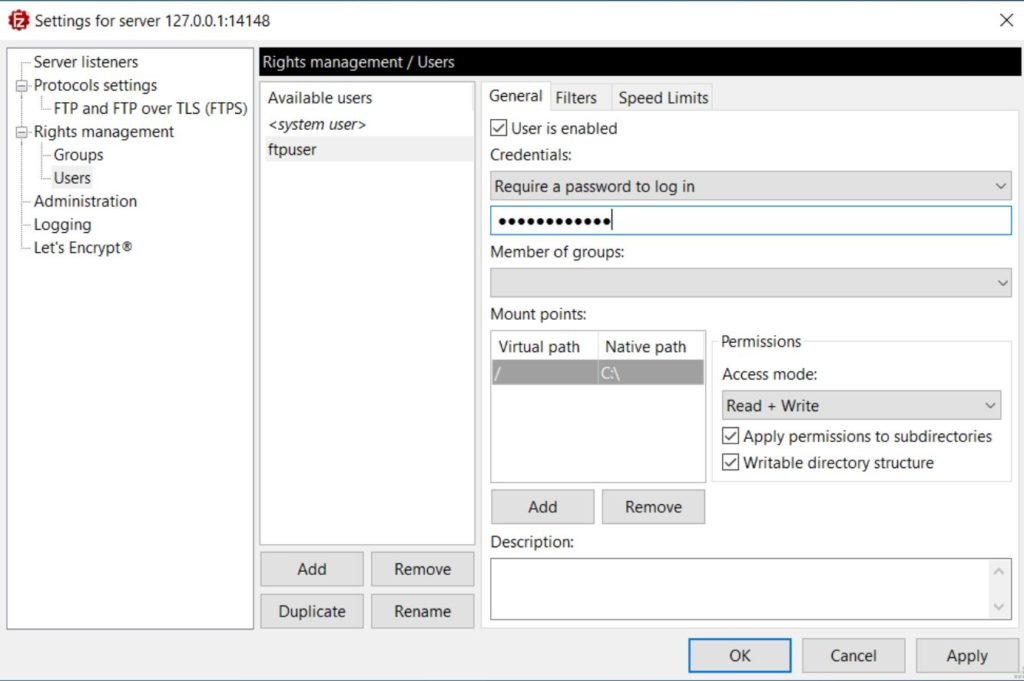
Type in a name for the new user. Then you will need to fill in a few fields in the left column. Type a password for the user, then set a “Virtual path” and a “Native path”. The virtual path can be anything you want. I recommend just forward slash. The Native path is the directory on the server which you want users to be able to read and write from. In my example I am using the “C:\” path to share the whole computer. Set this to any directory you wish. Once you click “Apply” and “OK” you will be done configuring the FTP server.

Open Windows Defender Firewall

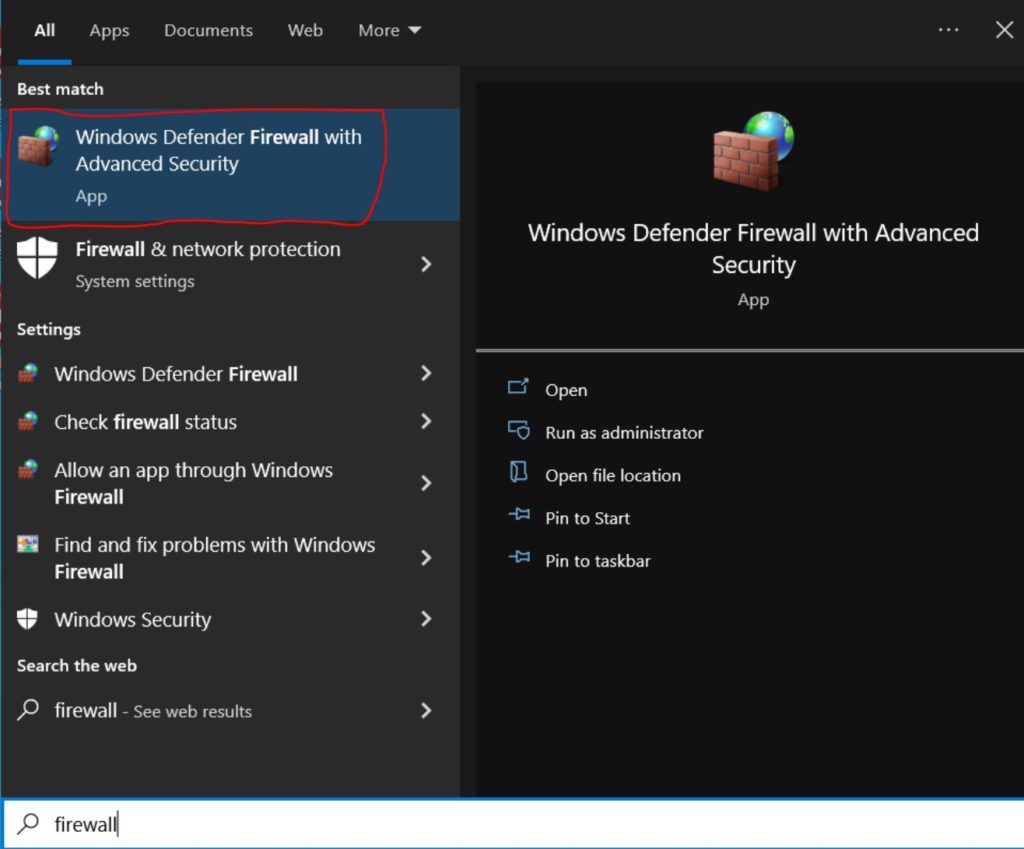
search for firewall

The next step is to configure the Windows Defender Firewall. Open the start menu and search for “firewall”. Then open the “Windows Defender Firewall with Advanced Security” application.

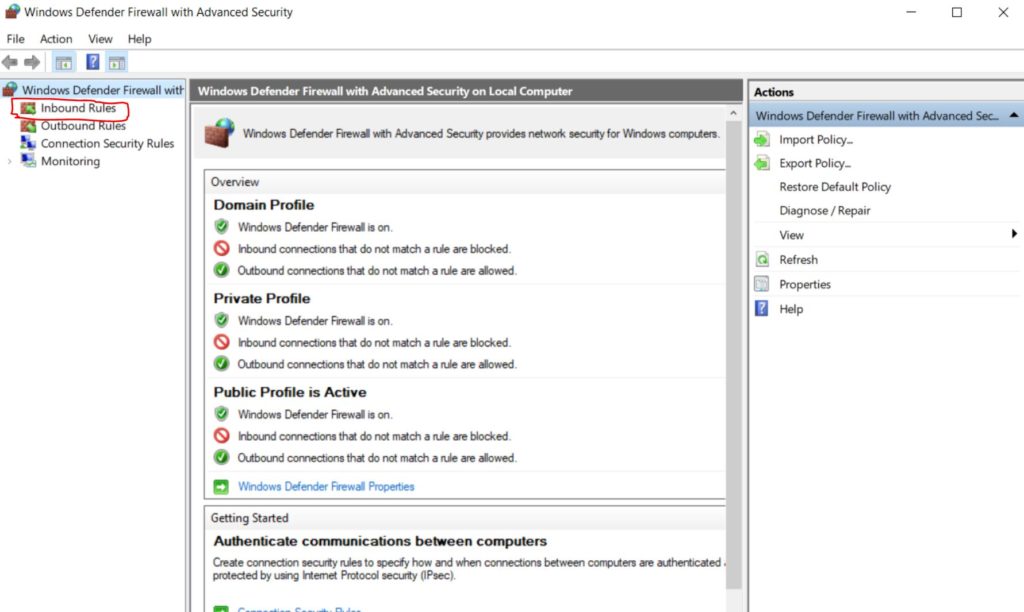
Navigate to Inbound Rules

navigate to inbound firewall rules

Once it has opened navigate to the “Inbound rules” by clicking on it in the left side column.

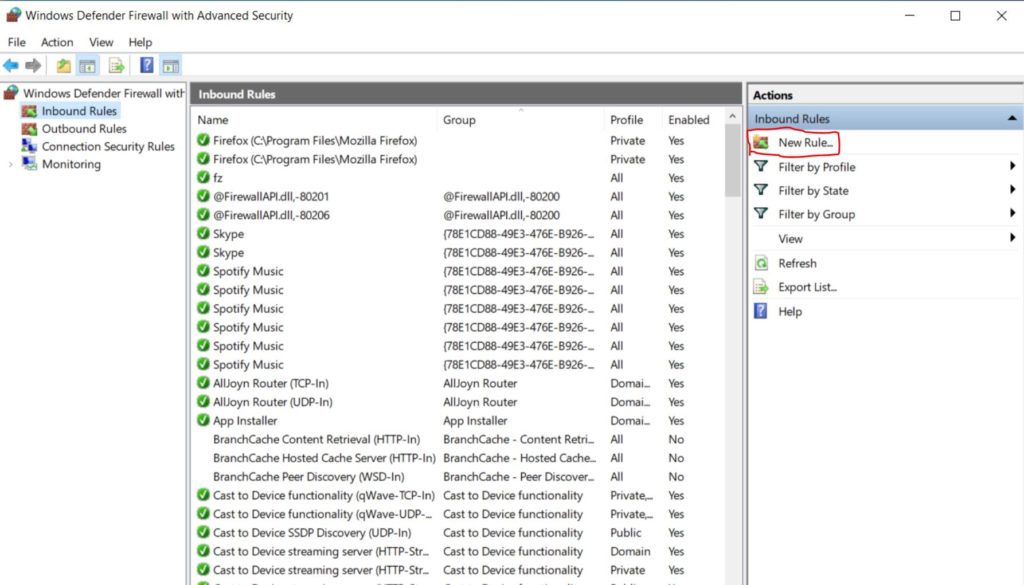
Create a New Inbound rule

add a new firewall rule

Next click on the “New Rule…” button in the right side column.

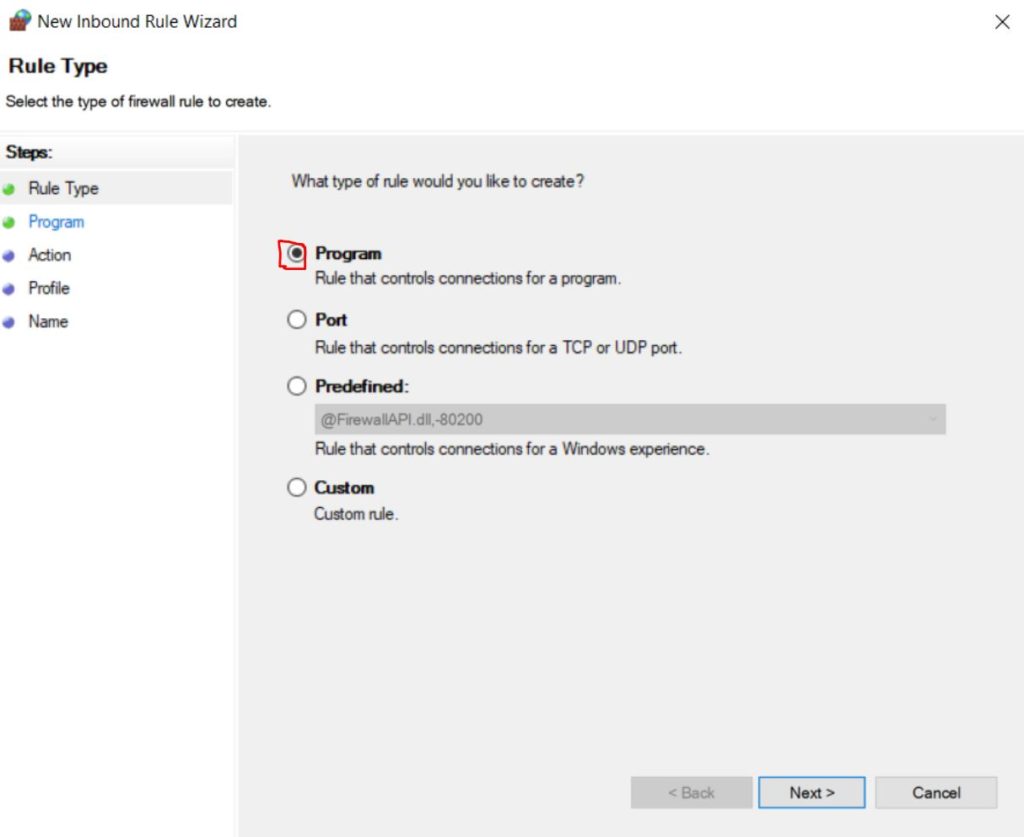
Choose the Firewall Rule Type

select program from list

Now you will be asked which type of firewall rule you would like to create. Select the “Program” option from the list.

Select a Program Path

click browse

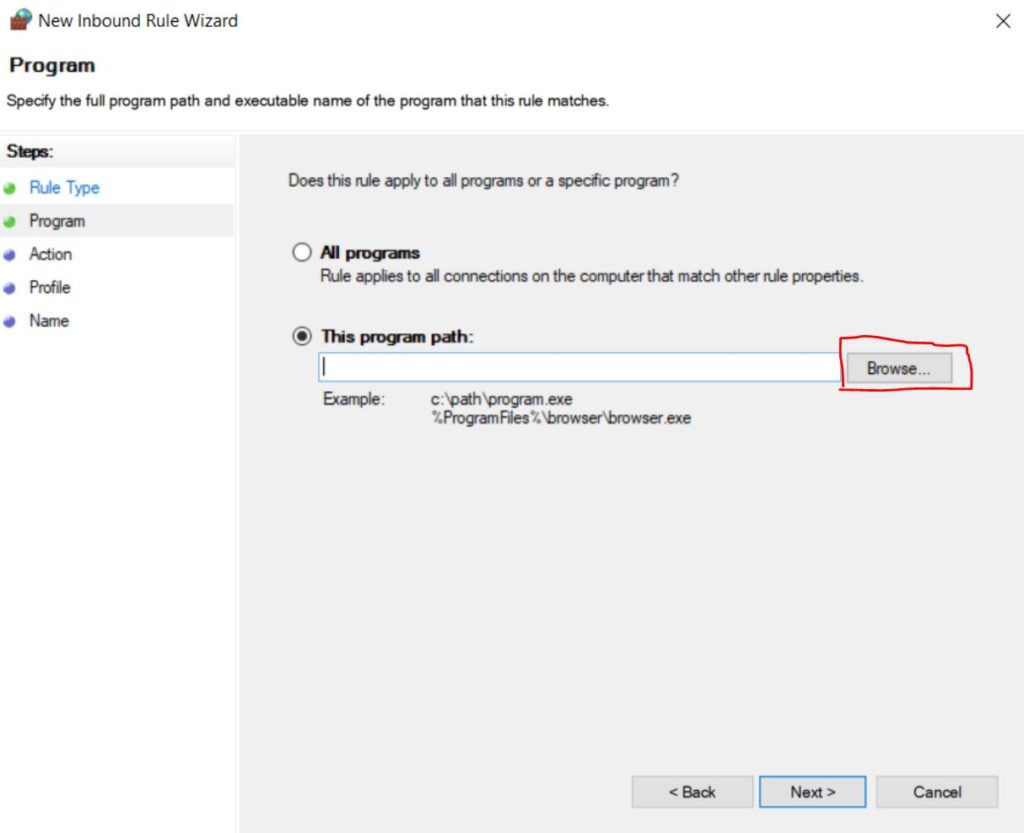
Click on the “This program path” radio button, then click “Browse…”.

Select the Program to Allow

select filezilla server

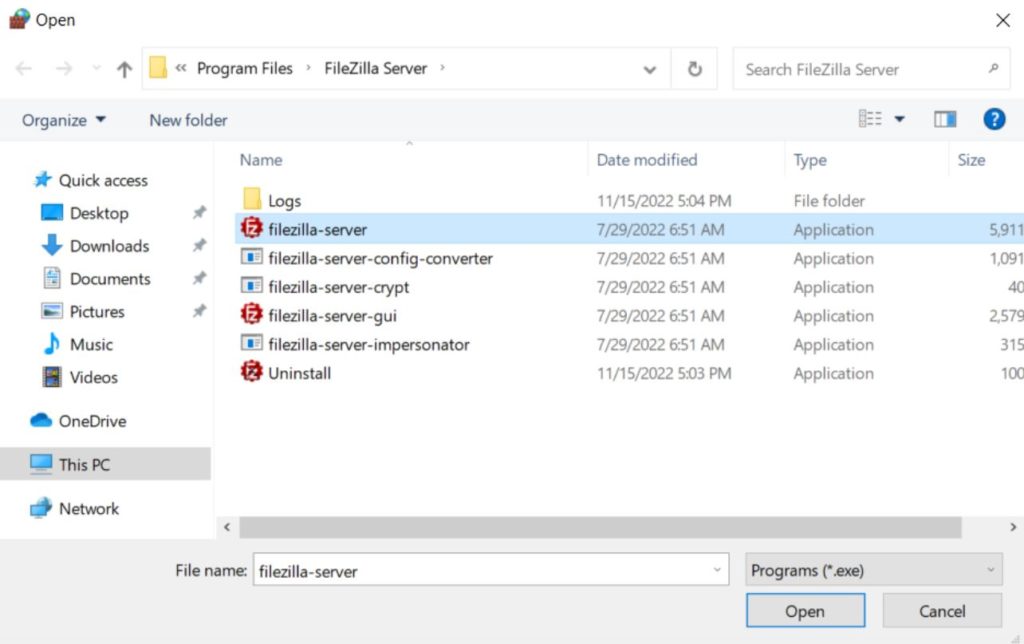
Navigate to the FileZilla Server installation folder. It is usually located at “C:\Program Files\FileZilla Server”. Once you find the folder click on the “filezilla-server” executable, then click the “Open” button.

Choose the Firewall Rules Action

set firewall to allow connection

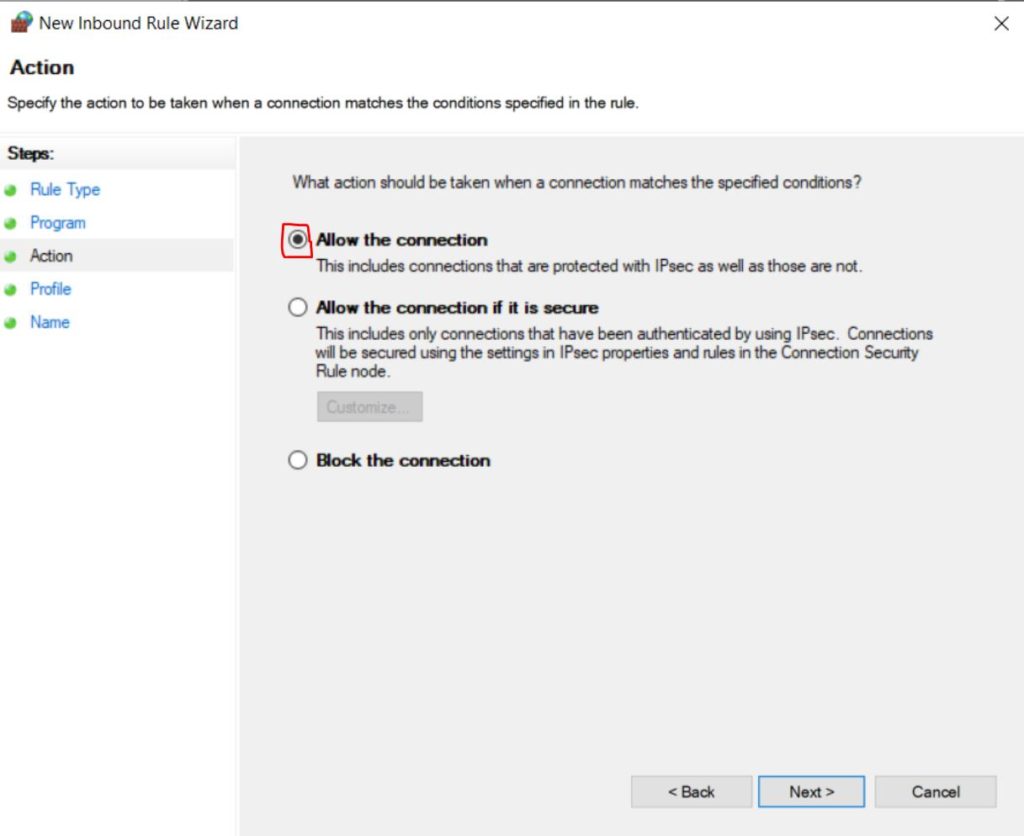
Next select the “Allow the connection” radio button. Then click the “Next” button.

Select Profile Rules

set firewall profile

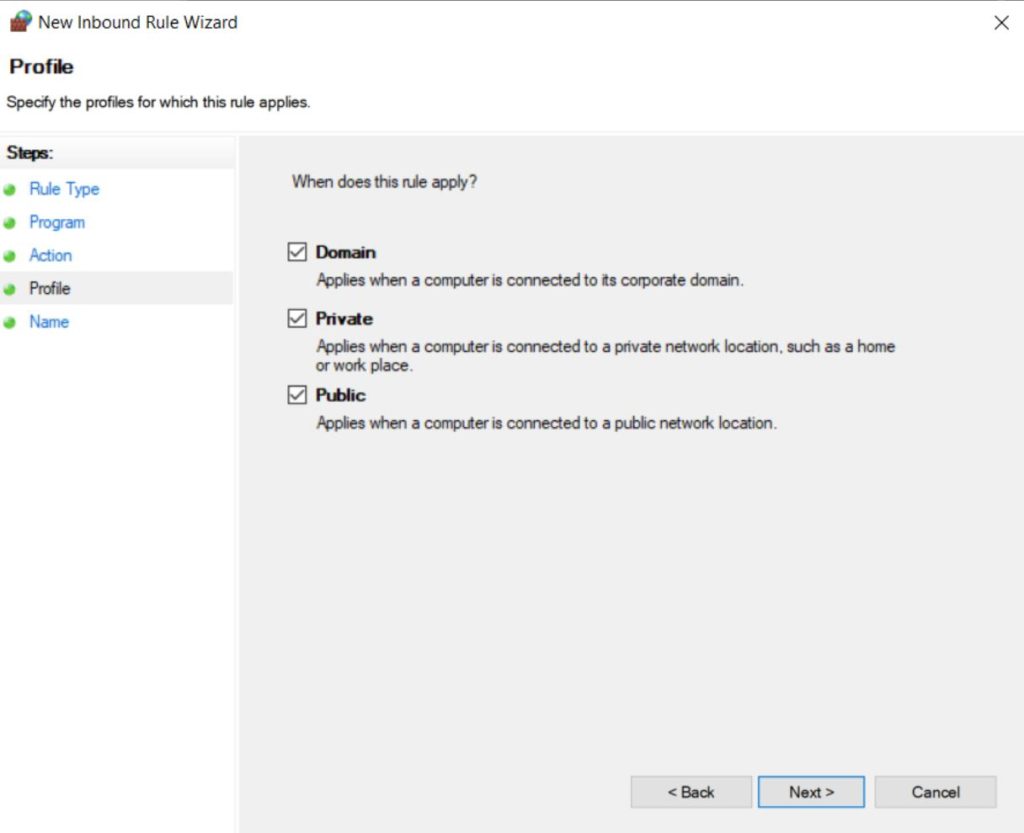
You can use the default settings on this screen. Click the “Next” button.

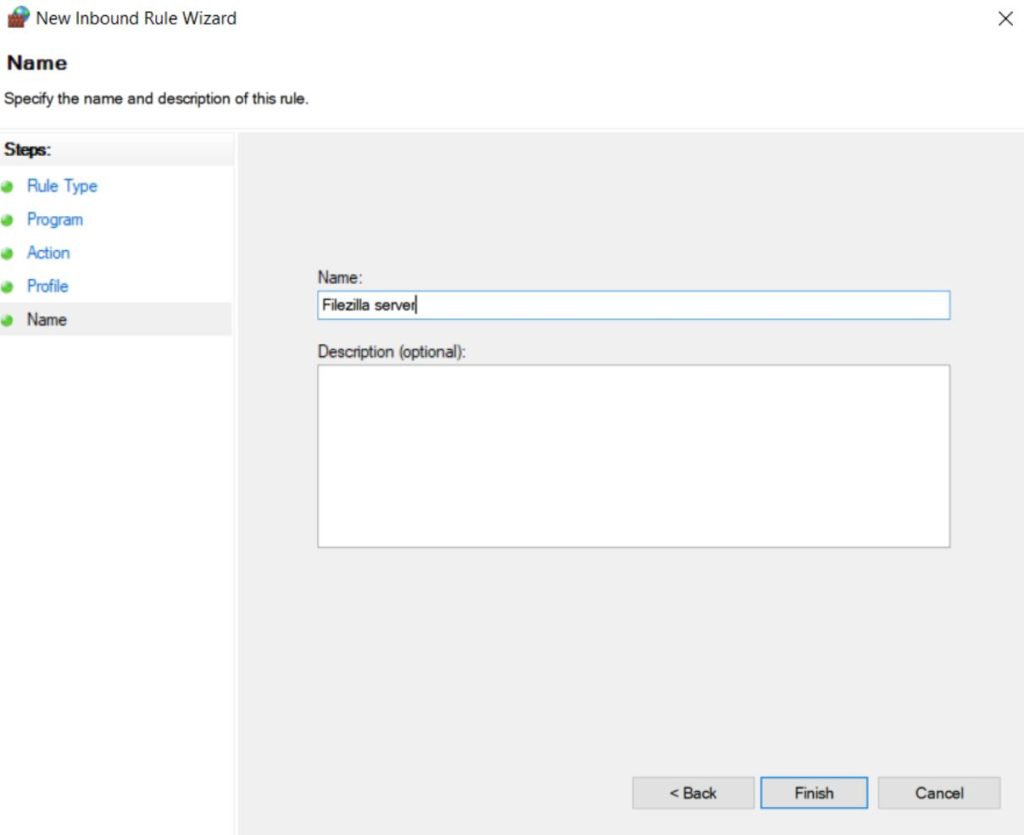
Select a Name for the Firewall Rule

set a name for firewall rule

Finally type in a name for the firewall rule. This can be anything you would like.

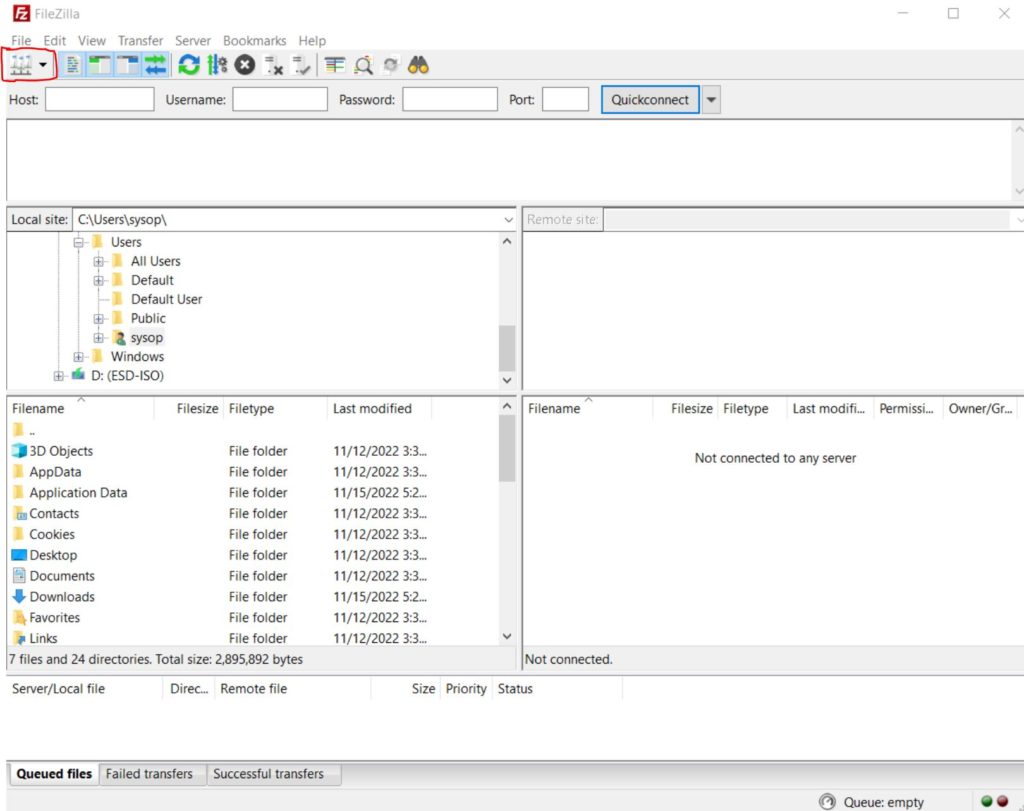
Open the FileZilla Site Manager

click site manager

At this point everything should be configured properly. We can now test the FTP connection. Open FileZilla (Client), then click on the “Site Manager” button in the upper left hand corner.

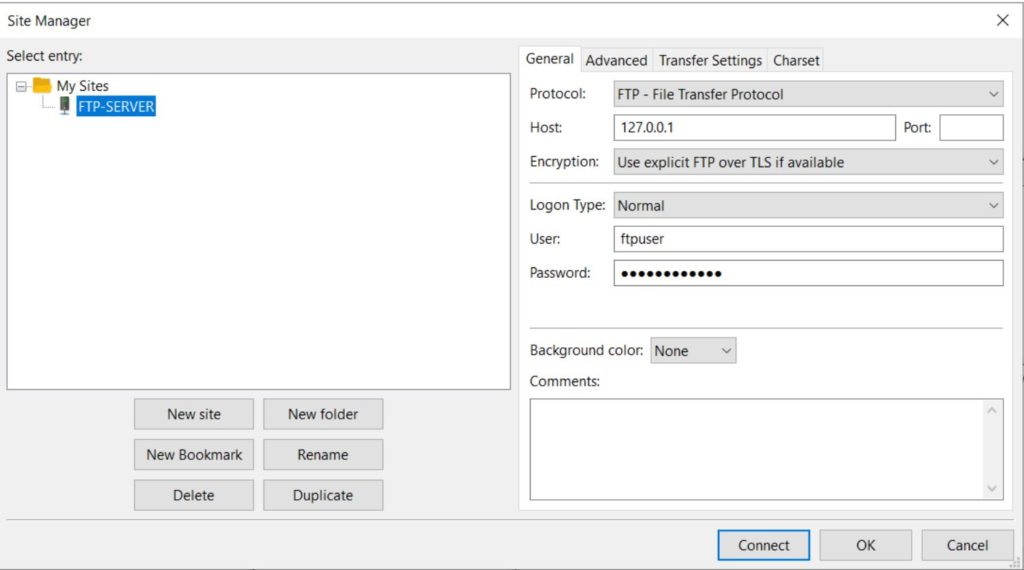
Add a New Site

add a new site to site manager

Click on the “New site” button. You will then be asked to type a name for it. Next type in the IP address for the server in the “Host” box. You can find the IP by opening a command prompt on the server and typing “ipconfig”. Afterwards type in the username and password you created earlier for the new user. Now click on the “Connect” button.

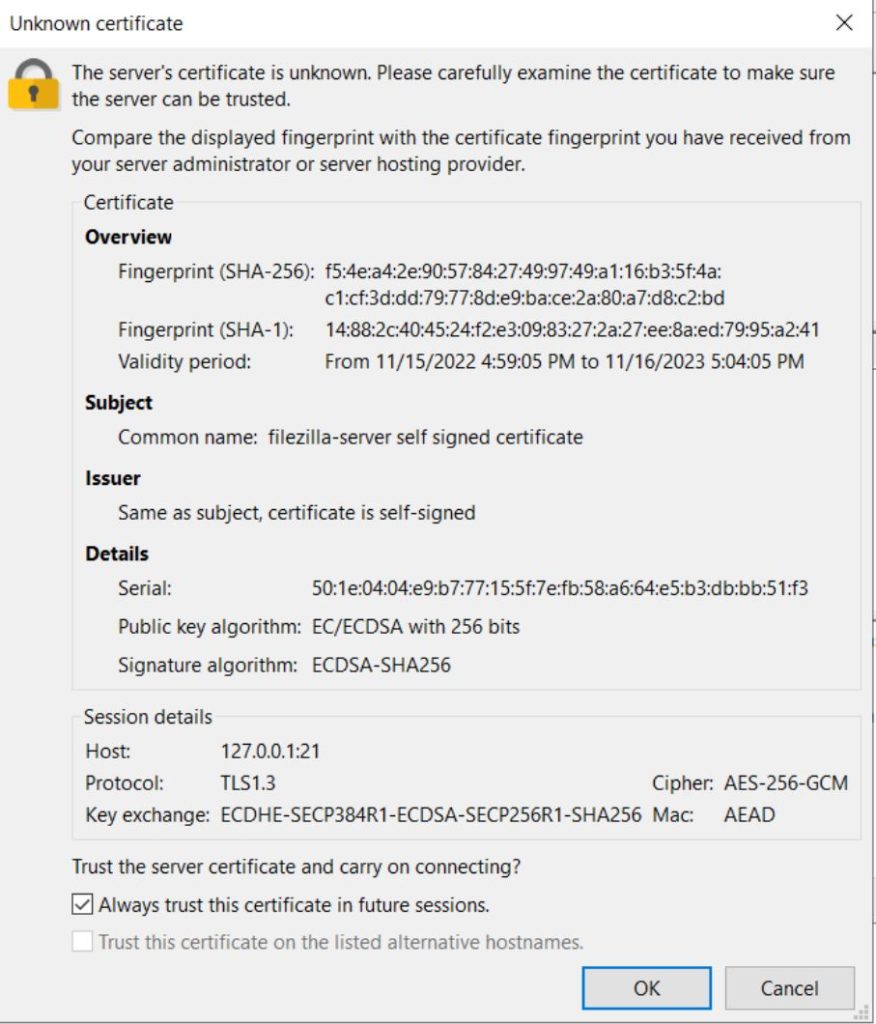
Verify TLS Certificate

accept cert for ftp

Since this is the first time connecting to the server it will ask us to verify the TLS certificate. Check the box to “always trust this certificate”, then click the “OK” button.

FTP Server Test Successful

ftp connection worked

If all the steps were followed correctly you should now be connected to your new FTP server. You can test that it is working properly by copying a file to the server. If you want to access the server outside of your local network you will need to port forward the IP address of the server on port 22. The instructions for this vary depending on the model of your router. You should be able to find a good tutorial by Googling “YOUR ROUTER NAME port forwarding guide”. See are other articles below for additional server related tutorials.

Questions?

If you have any questions or comments feel free to leave them below.

Related Resources

View our 5 Reasons to Switch from Windows 10 to Linux.

Learn How to Permanently Disable Windows Defender.

Check out How to Setup OpenSSH with Keys on Ubuntu 22.04.

View our How to Mount an SMB (Samba) Share in Linux with cifs-utils tutorial.

Learn How to Create a Mapped Network Drive in Windows 10.

View all of our available online tools and converters at Formatswap.com.

How to Setup OpenSSH with Keys on Ubuntu 22.04

ssh key splash

In this tutorial you will learn how to setup a SSH server to use a public key pair on Ubuntu. SSH is a secure protocol used for remotely administrating servers. We will be using OpenSSH to setup the server. SSH servers are great as they allow you to easily remote into any machine and execute commands. With public key authentication you get robust security. It is generally recommended that all users running an SSH server should enable key based authentication. You also don’t have to remember passwords when using key based authentication. For this tutorial we will be using Ubuntu 22.04 server, but you should be able to use any Linux operating system.

Generate Key Pair

generate key pair

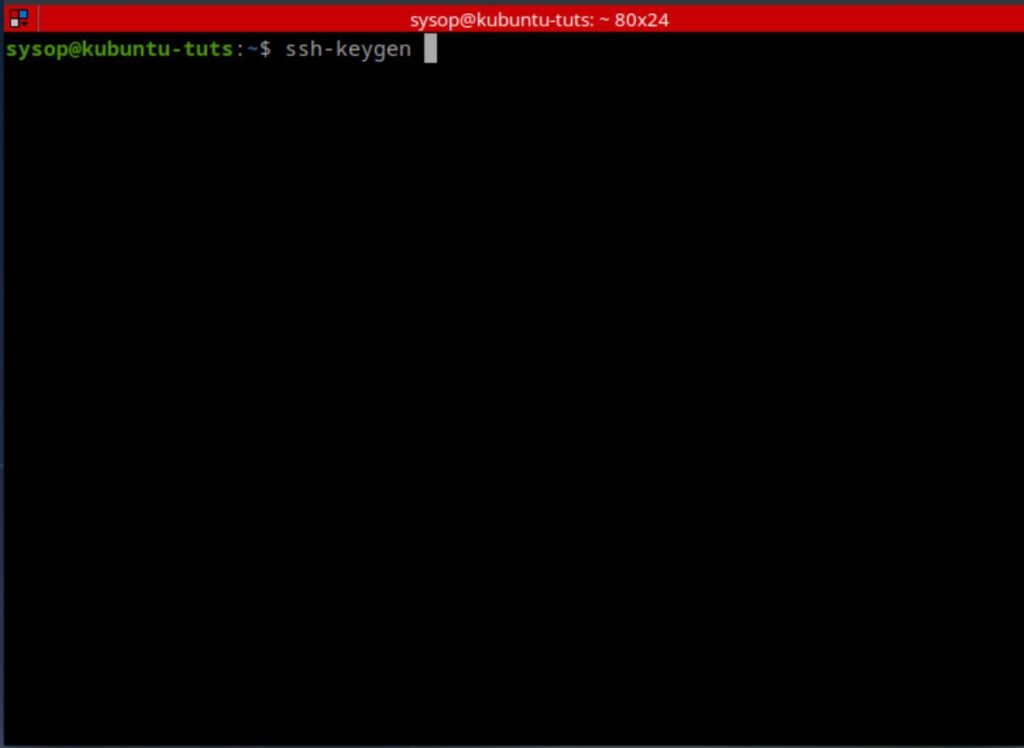
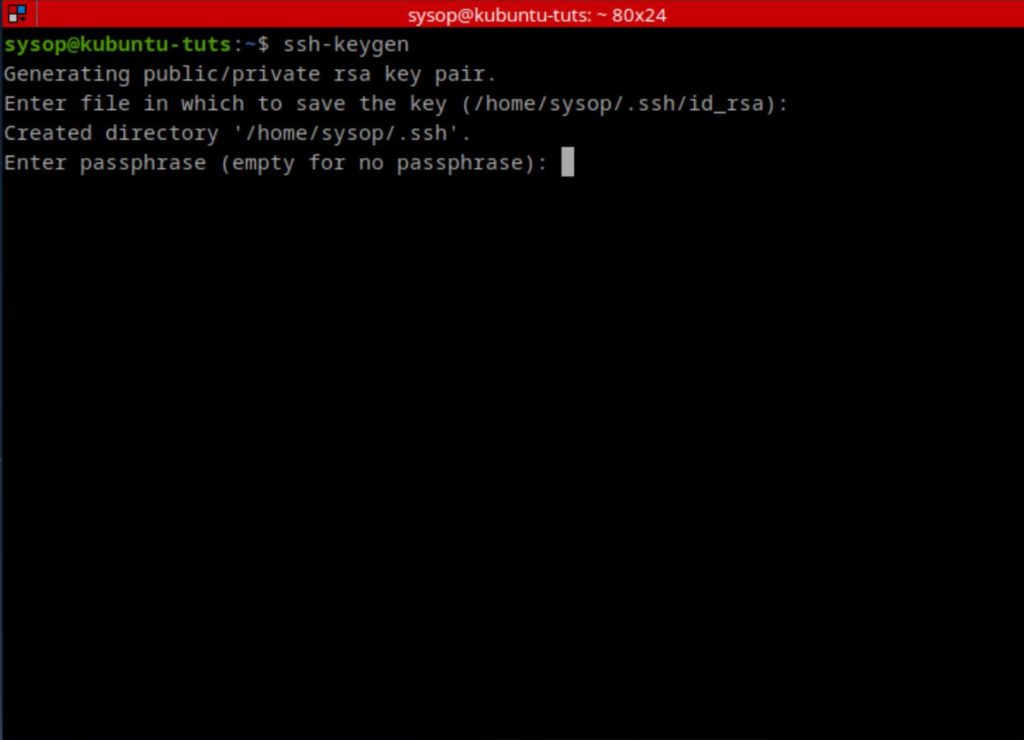
The first step is to generate a key pair on your client machine. Type “ssh-keygen” and press “Enter”. If you get an error you may have to install the Openssh server as shown below.

sudo apt install openssh-server

Select Key Save Location

select key save file location

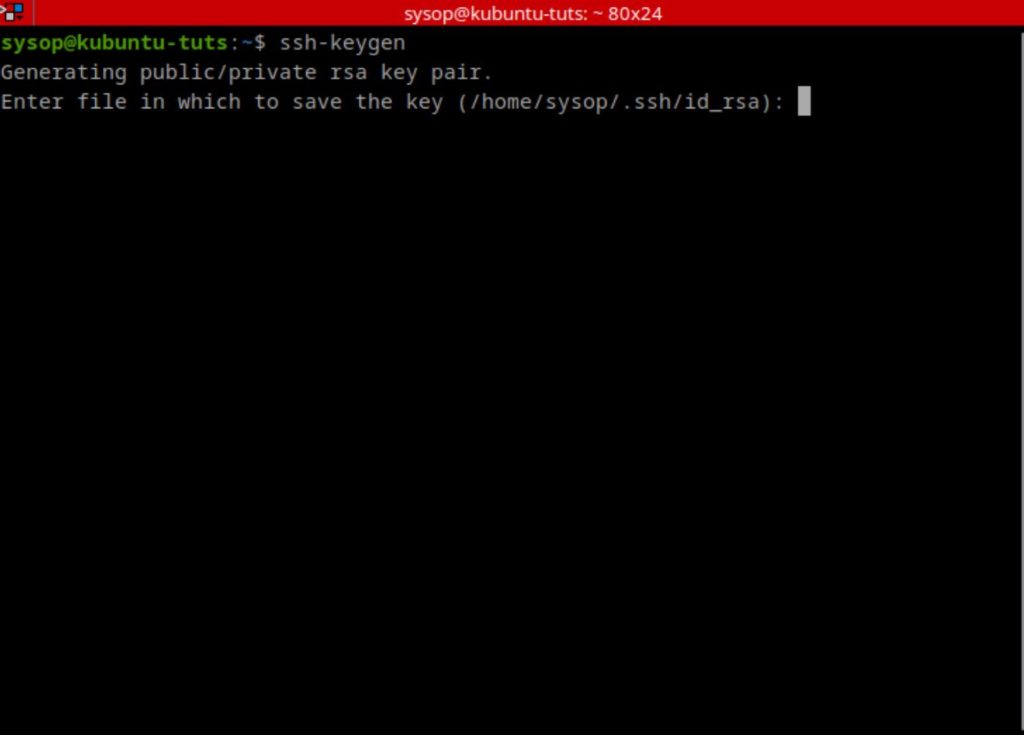
Next you will be asked to choose a save location for the key. Press “Enter” to use the default, or type a path and filename for the key.

Set a Key Password (optional)

select password

You will then be asked if you want to set a key on the password. This improves security but will require you to enter the password every time you connect to the SSH server. Either type a password or press the “Enter” key twice to not use a password.

Key Generated Successfully

key generated

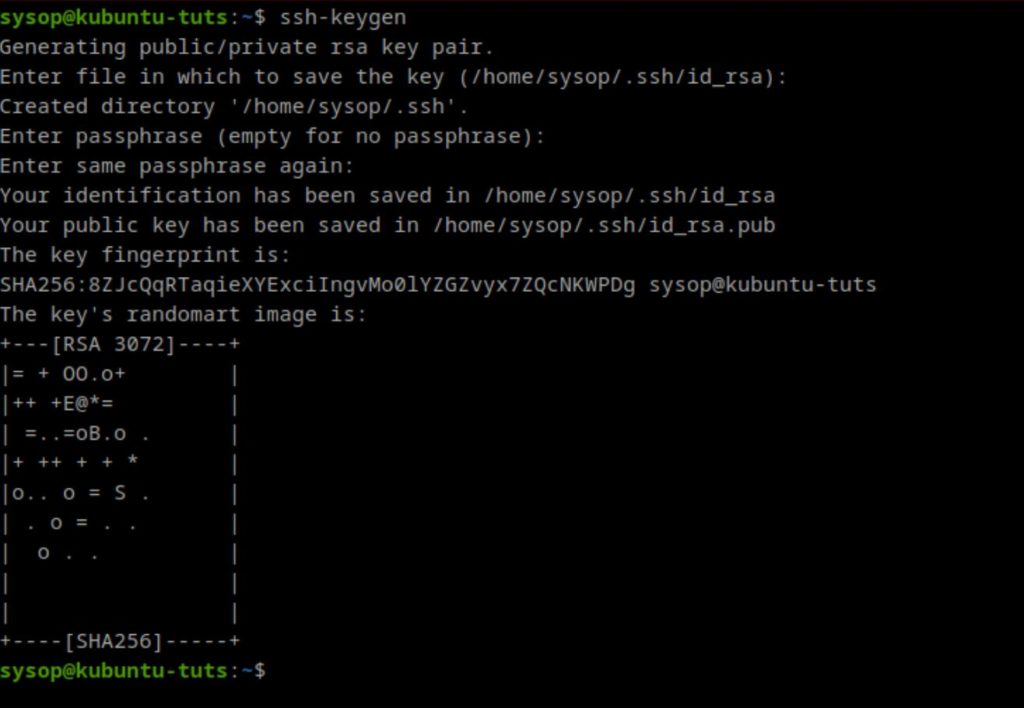
Now you will see a message telling you that the key pair has been generated successfully. It will also list the fingerprint and the save location for the key.

Copying Public Key

copy the public key

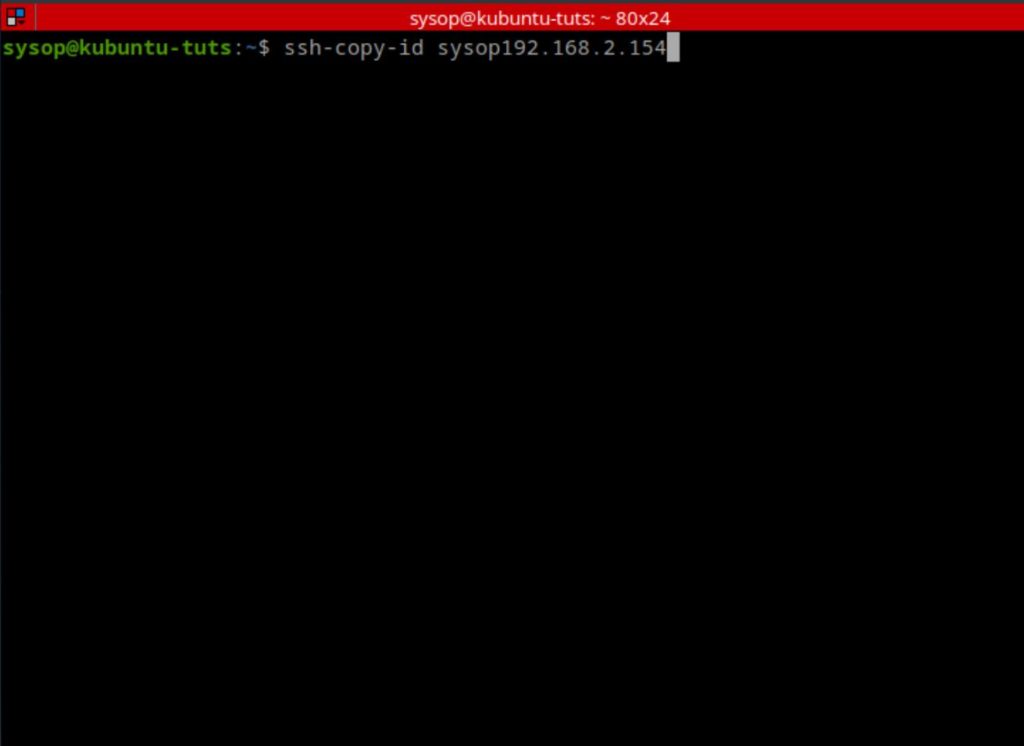
Next we will copy the newly created key to your SSH server. Type in the following command to copy the key.

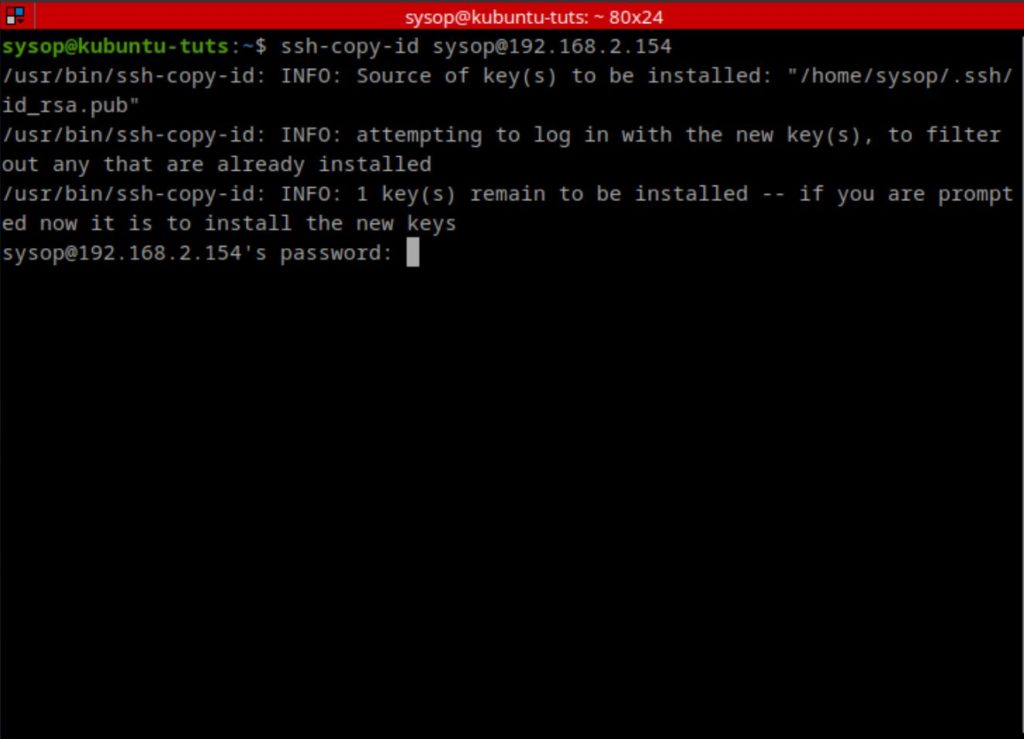
ssh-copy-id username@ssh-server-ipaddress

Enter the SSH Users Password

optionally select password for key

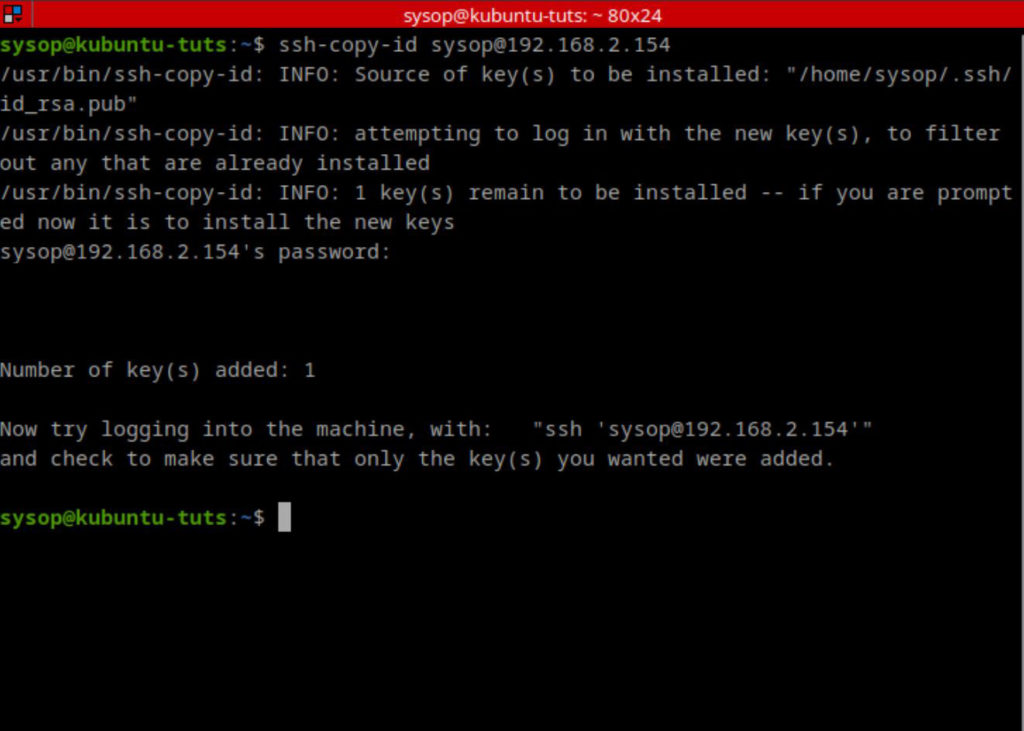
The server will then ask you to type in the password for the SSH user. Additionally if you set up a password on the key pair, you will also be prompted to type that.

Keys Successfully Added

keys added message

After typing your credentials you will be shown a screen telling you that the key has been successfully added.

SSH into the Server

ssh into the server

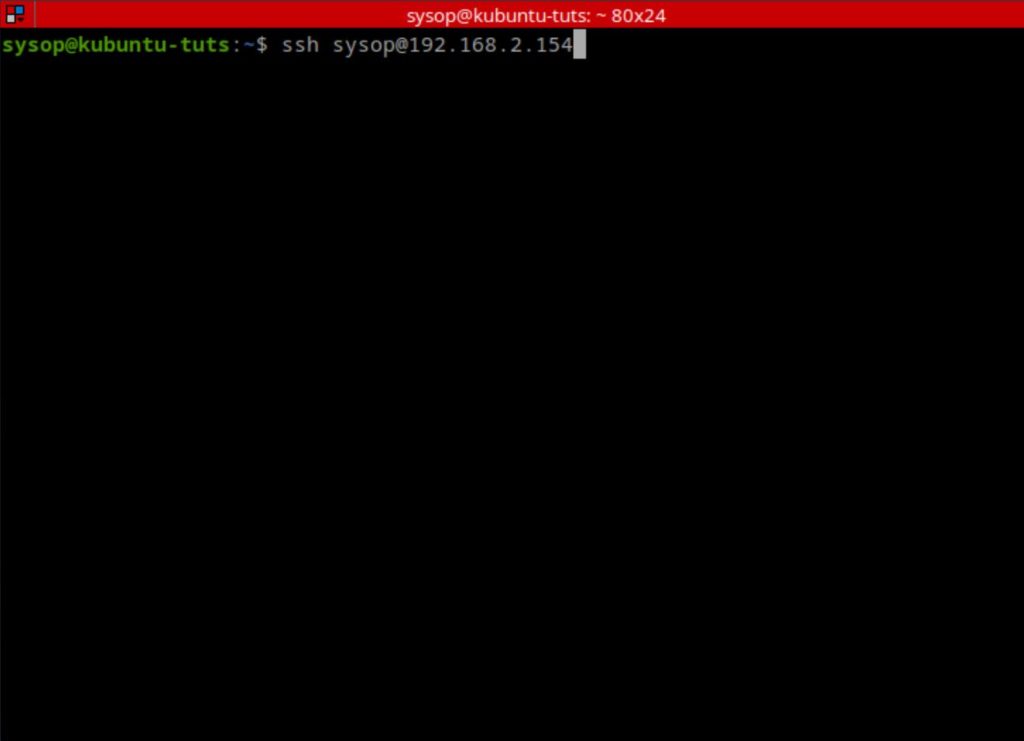
Now that the key has been added to the SSH server we need to connect back to the server. Connect to it using the SSH command as shown above.

Edit the OpenSSH Config File

edit the openssh config

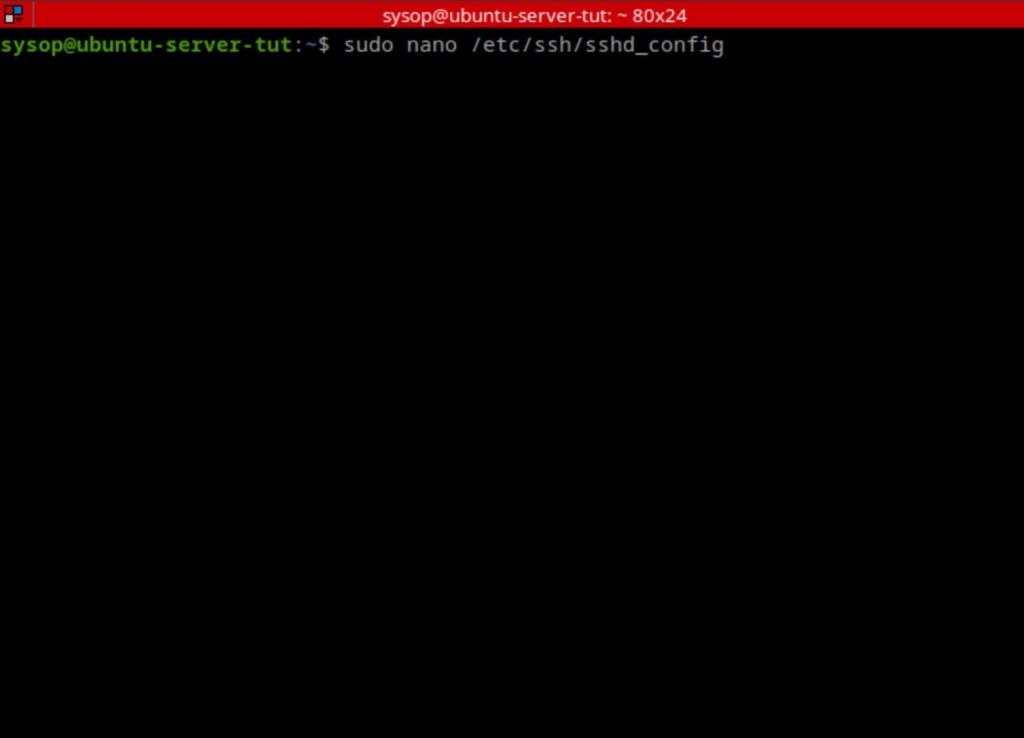
Once you are connected to the server you will need to edit a file. Open the sshd_config file using the nano text editor.

sudo nano /etc/ssh/sshd_config

Disable Password Authentication

disable password authentication

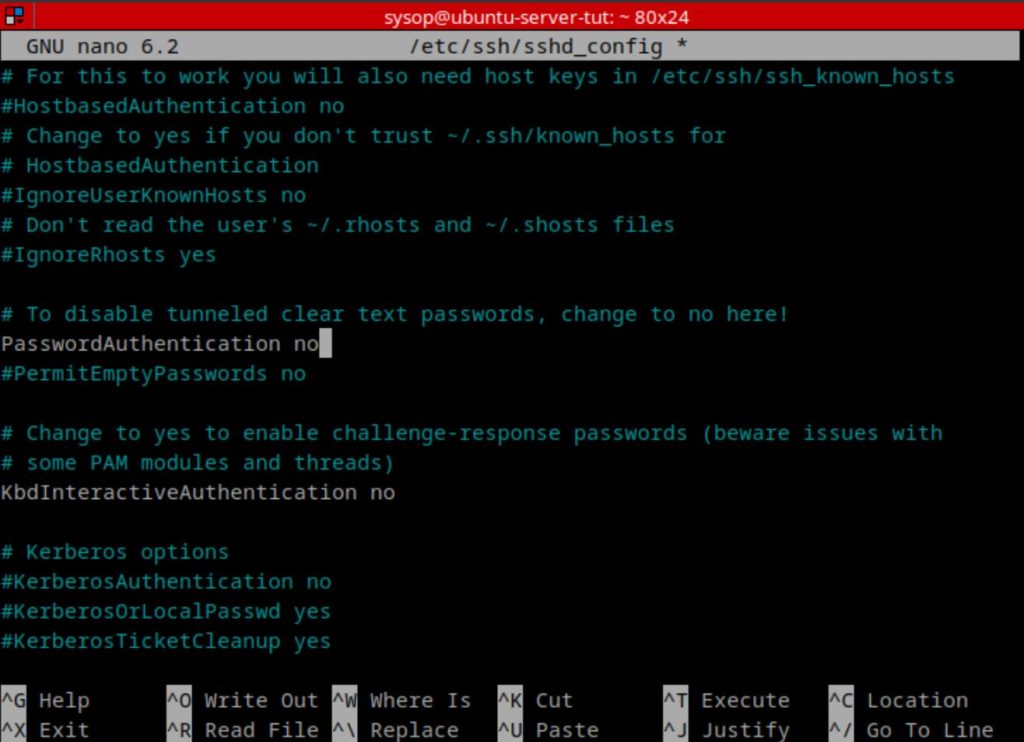
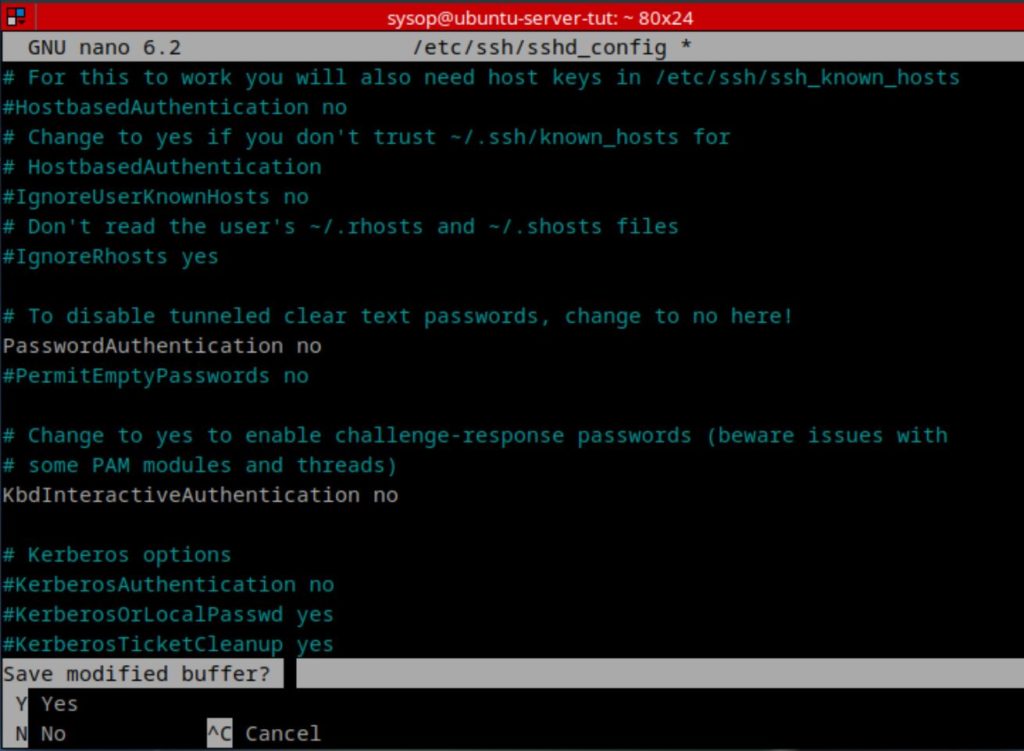
Now that the file is open, use “Ctrl+W” to search for the line “PasswordAuthentication”. Once you locate the line change it from “PasswordAuthentication yes” to “PasswordAuthentication no”. This will cause the SSH server to only log you in using your key.

Save OpenSSH Config File

save openssh config

Next simply press “Ctrl+x” then the “Y” key to save the config file.

Restart OpenSSH Server

restart openssh server

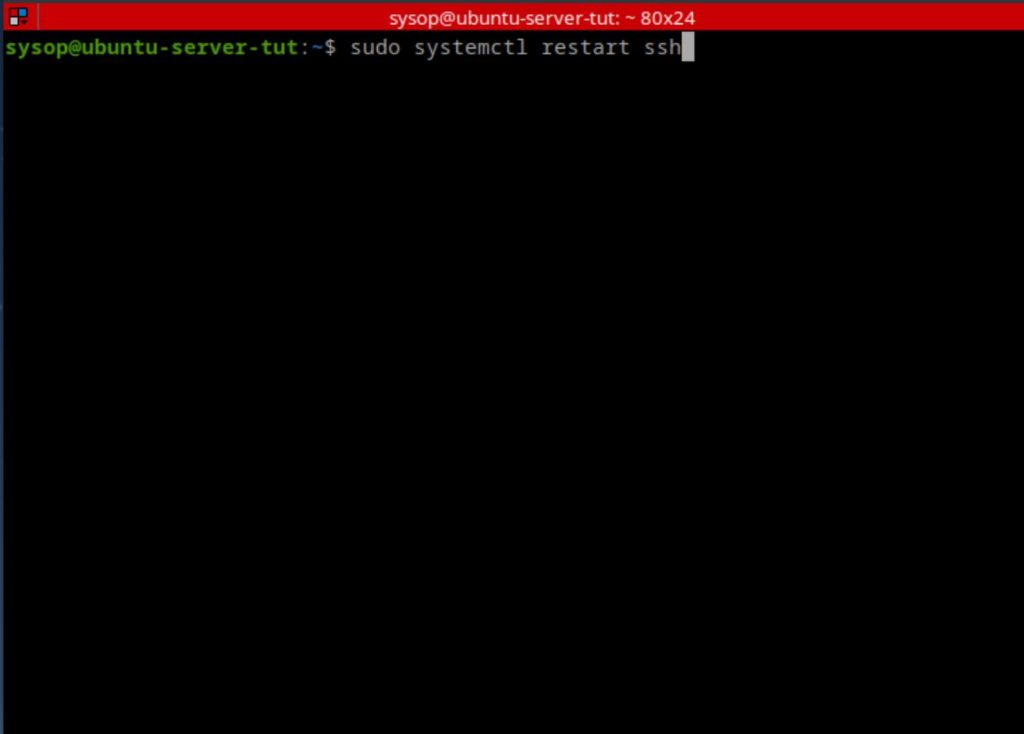
Finally we will need to restart the ssh service on the server. Run the following command to complete this action.

sudo systemctl restart ssh

After the SSH service restarts, you will need to disconnect from the SSH server.

Test the SSH Connection

test ssh connection

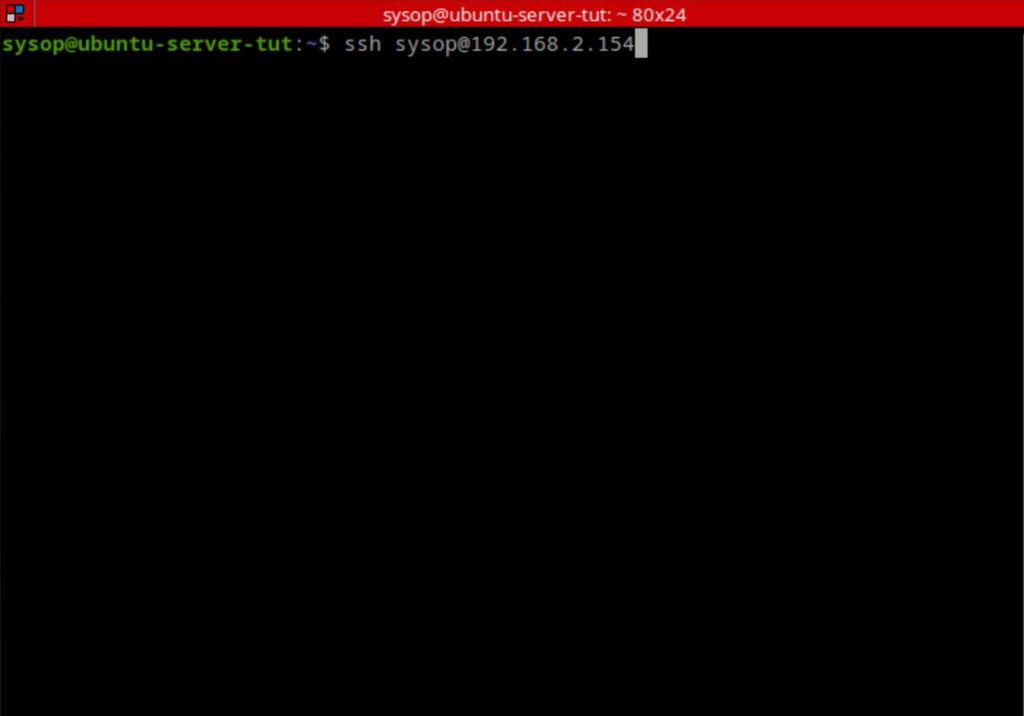
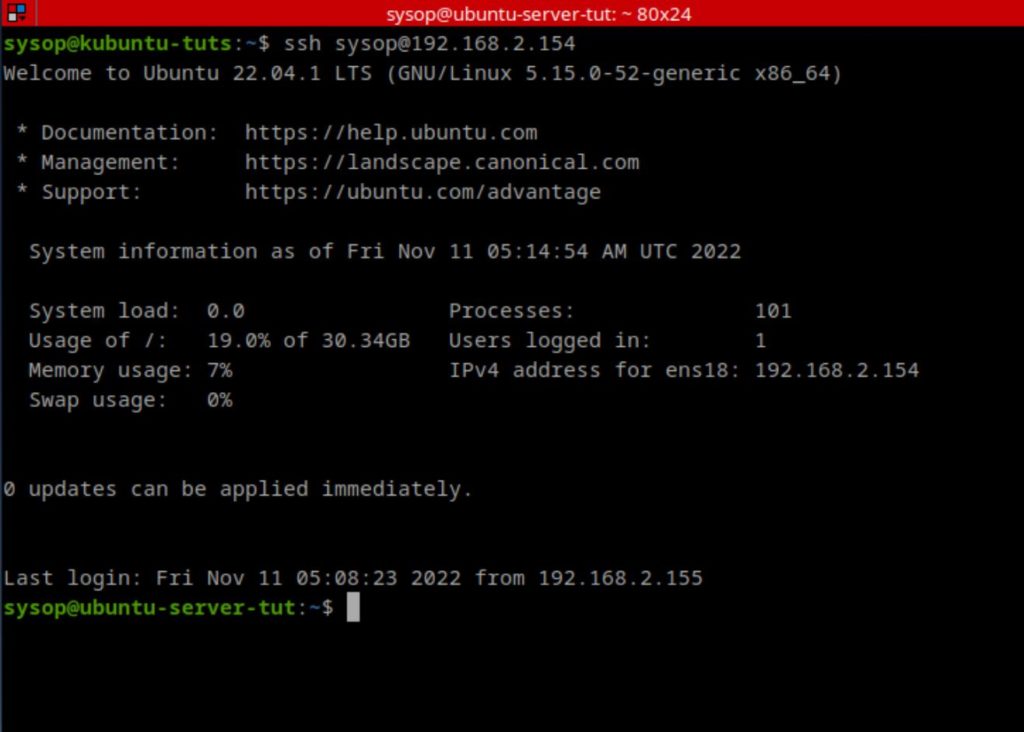
Now we will test that we are able to login to the SSH server using our key pair. Simply try to reconnect to the SSH server. You will be automatically logged in if you don’t have a password on the key pair. Else you will need to enter the password you created for the key.

OpenSSH with a Key Pair is Enabled

successful key ssh

If you are able to connect to the SSH server then you have successfully setup a key for OpenSSH. Remember to keep the key pair in a secure location. Anyone with access to it would be able to login to your server.

SFTP Server (optional)

You can also enable secure file transfer with SFTP using OpenSSH. If you would like to activate the server view our How to Setup an SFTP Server on Ubuntu 22.04 using OpenSSH tutorial.

Additional Questions?

If you have any additional questions or thoughts feel free to comment them below.

Related Resources

View our list of The Top 10 Programming Languages to Learn in 2022.

Learn How to Install Ubuntu Server 22.04 [Step by Step].

Click here to learn How to Install MySQL on Ubuntu Server 22.04 LTS.

View all of our Linux Articles and Tutorials.

Learn How to install and configure Nginx – Ubuntu 20.04.

View all of our available online tools and converters at Formatswap.com.

How to install Kali Linux 2022.3 [step by step]

install kali splash image

In this tutorial you will learn how to install the Debian based Kali Linux operating system. Kali is designed for digital forensics as well as penetration testing. Kali is very useful to have installed if you are currently in or entering into the cyber security field. One of the main benefits of Kali Linux are its approximately 600 penetration testing tools preinstalled.

Download Latest Kali Version

The first step is to download the latest version of Kali Linux from the official website.

Download Kali Linux 2022.3

Boot USB or Select ISO

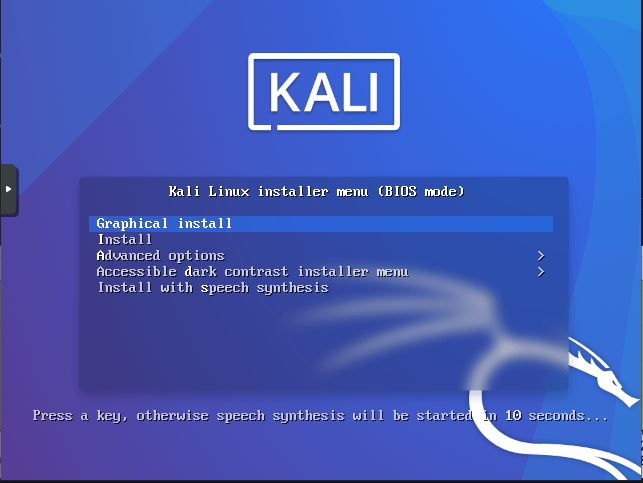
kali install screen

Next you will need to make a bootable USB drive using the Kali ISO file. You can read this tutorial on creating a bootable Linux USB drive using Rufus to learn more. After you create the bootable Kali USB drive, insert it into your computer and select the USB at boot. If you are using a virtual machine, simply select the Kali ISO as your boot device. Once you are booted into the installer, select “Graphical Install”.

Select System Language

kali select language

Now you will select the language you would like to use.

Select Location

select location

Next select your location.

Select Keyboard Layout

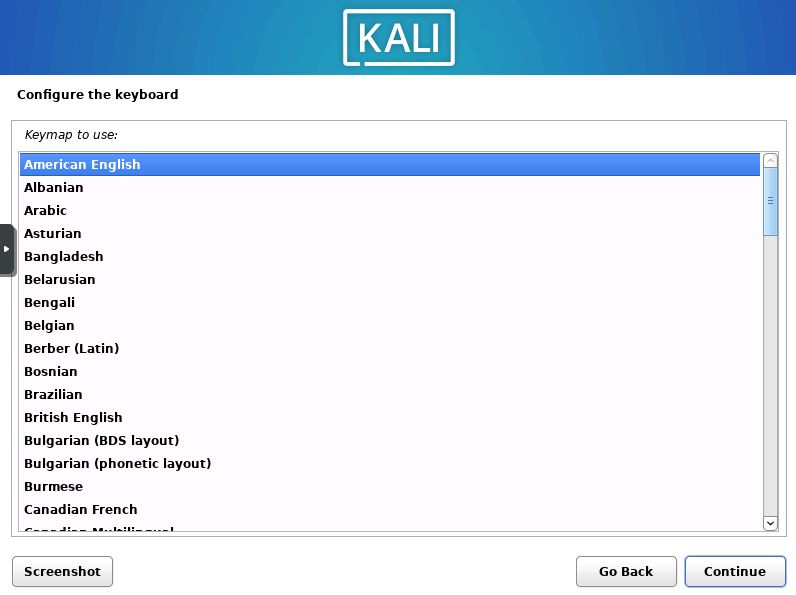
select keyboard layout

Afterwards you will need to select a keyboard layout.

Choose Hostname

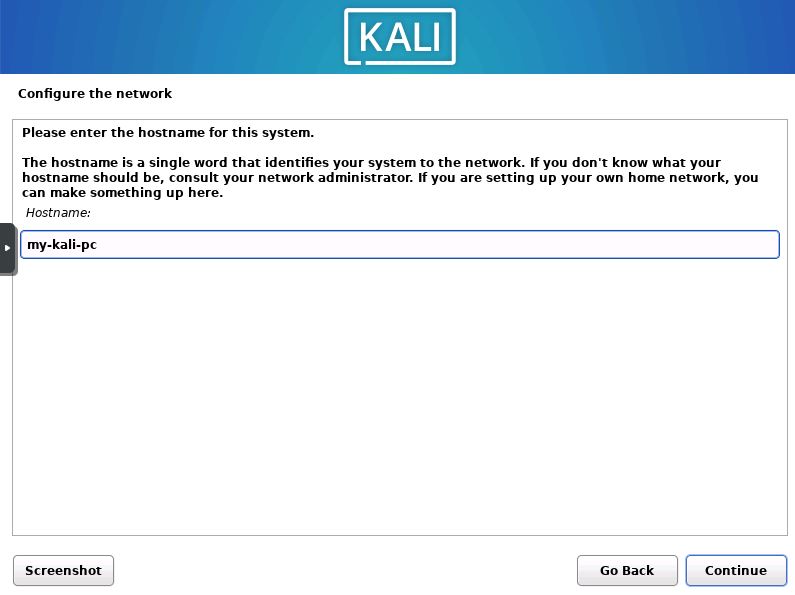
choose a hostname

Now you will choose a hostname for the installation. You can enter any name you would like into the box.

Enter Domain Name (optional)

enter a domain name

The next step is to select a domain name. This step is optional, and usually unused. So I will be skipping it.

Set Account Name

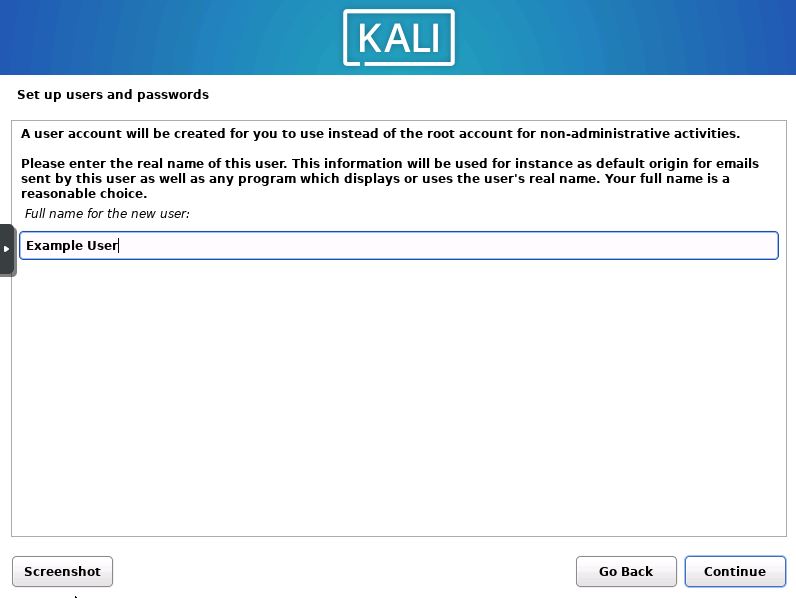
set up accouont

Now you will enter the full name for the new user, afterwards press the “Continue” button.

Enter a Username

choose a username

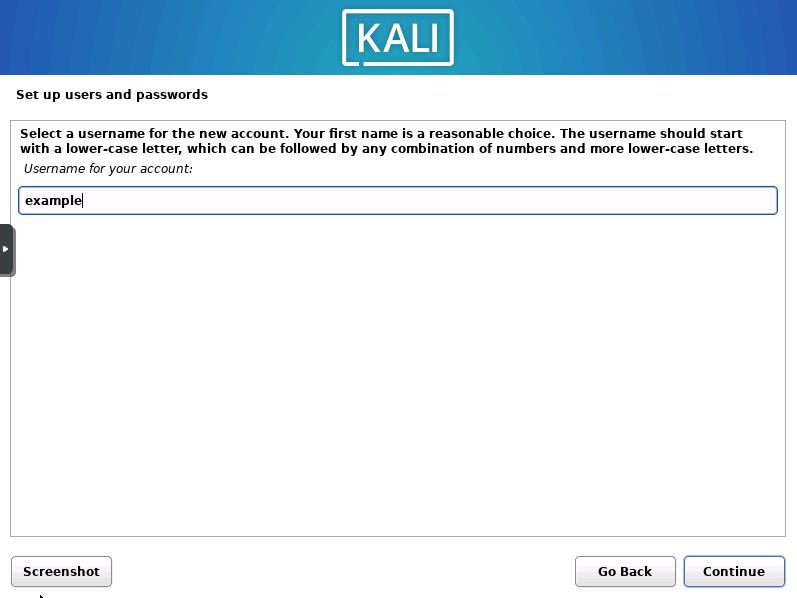
Next you will need to set the username for the account. Enter it into the box and then press “Continue”.

Choose a Password

choose a password

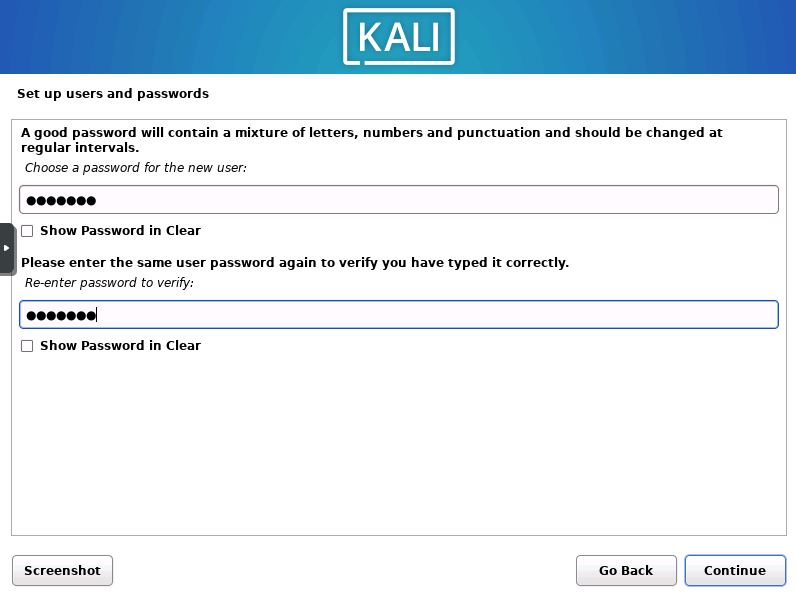
After setting the username you will need to create a password for the new user. Enter the password and confirmation password.

Select the Timezone

select a timezone

Now you will set the system timezone. This will set the clocks to the correct time.

Set Partitioning Method

partition the disks

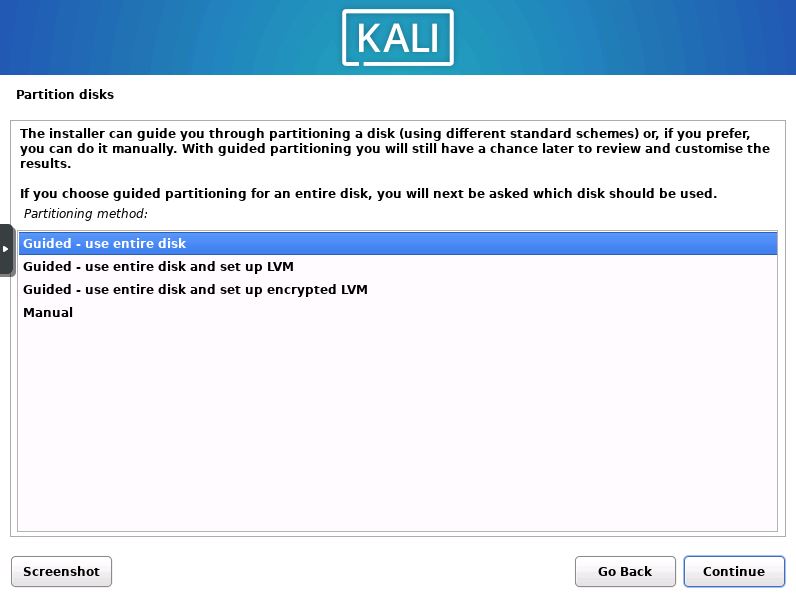
Next you will choose from four different partitioning schemes. Select “Guided – use entire disk” unless you want to encrypt the disk, then press “Continue”.

Select the Disk for Installation

select hdd

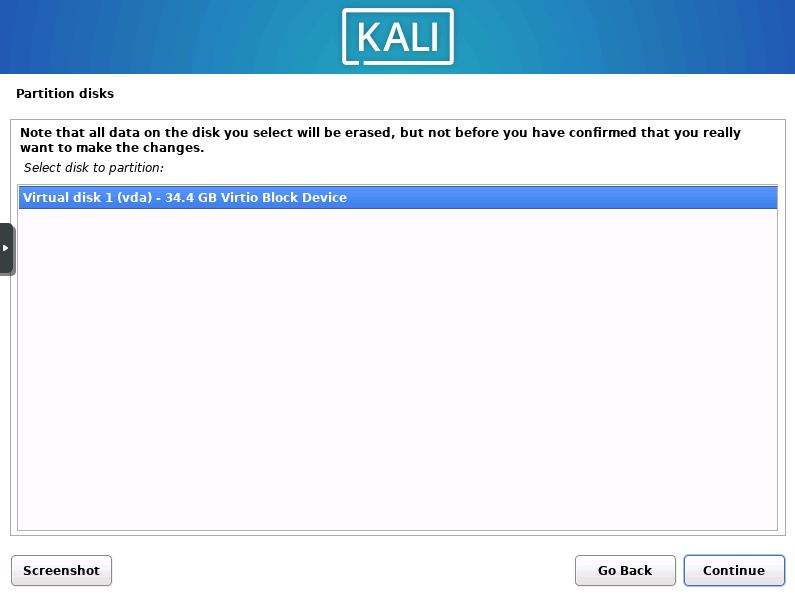
Now the installer will ask you which disk you would like to install Kali onto. (note, all data will be deleted from the selected device)

Choose Partition Scheme

partition scheme

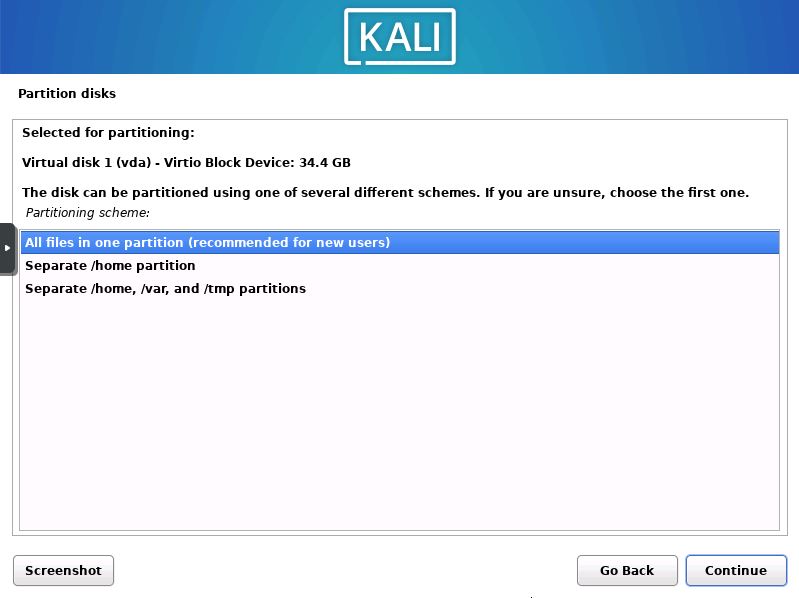
The installer will then ask if you would like a separate home partition, or all files in the same partition. I recommend new users choose the all files in one partition option.

Confirm Partition Changes

finish partitioning

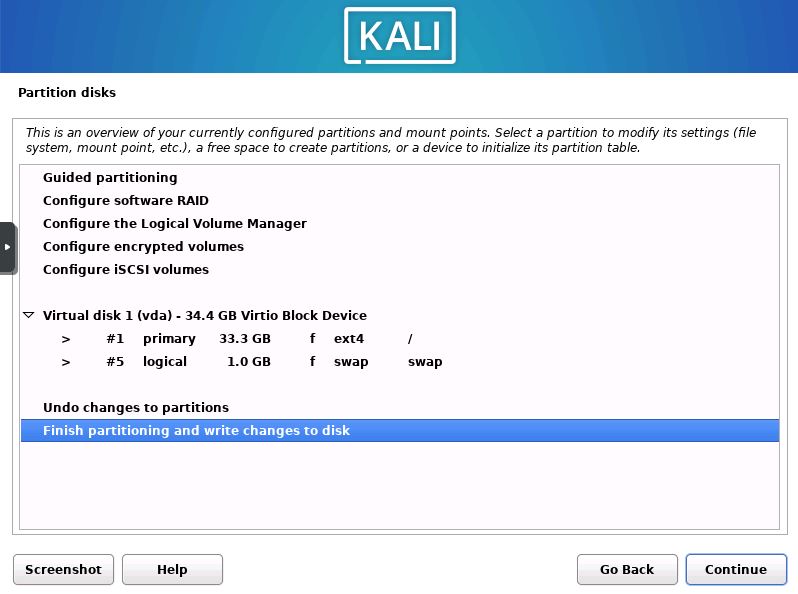
Now you will be shown a overview of the changes that are due to take place. Look them over then press “Finish partitioning and write changes”.

Confirm Write Changes

confirm write changes

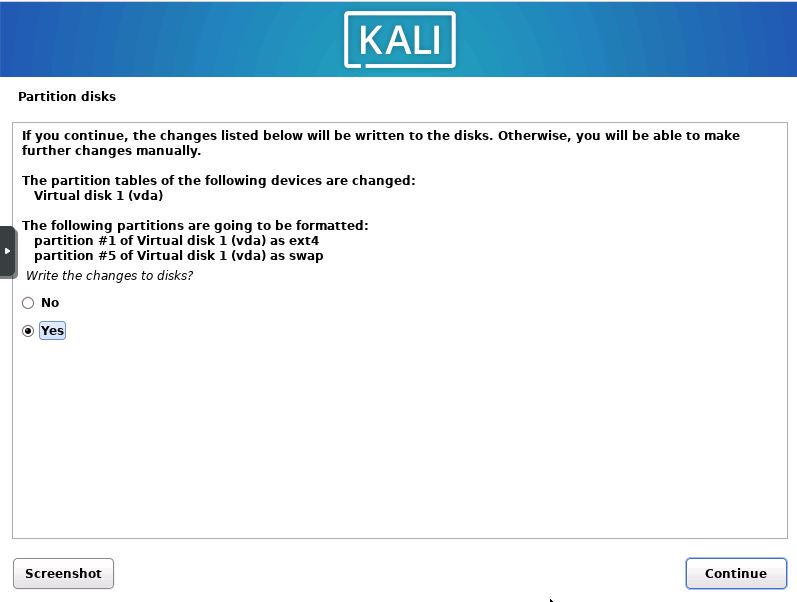
You will then be prompted with a confirmation asking if you want to write the changes to the disk. Click “Continue”.

Wait for the Base System to Install

install base system

Wait for the base system to finish installing. This can take a while depending on the performance of your computer.

Software Selection

select kali software to install

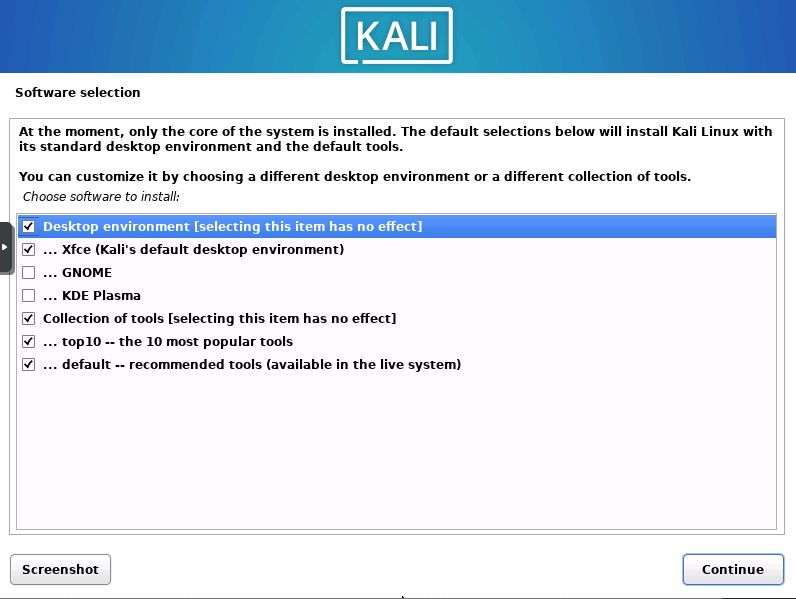
Now you will be asked which desktop environment you want. As well as what software you would like installed. I recommend keeping all options to default as displayed in the above screenshot.

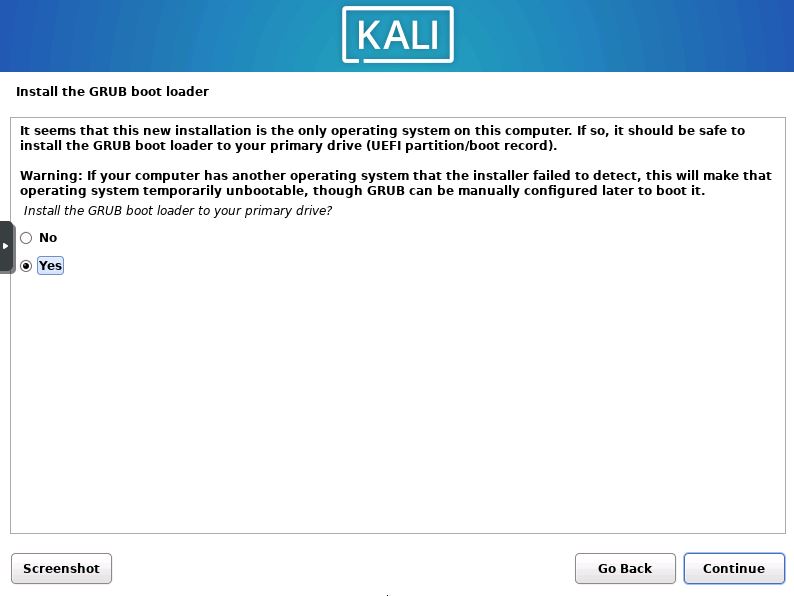
Install Grub

install grub bootloader kali

You will then receive a prompt asking you if you would like to install the Grub boot loader. Select the Yes checkbox and press “Continue”.

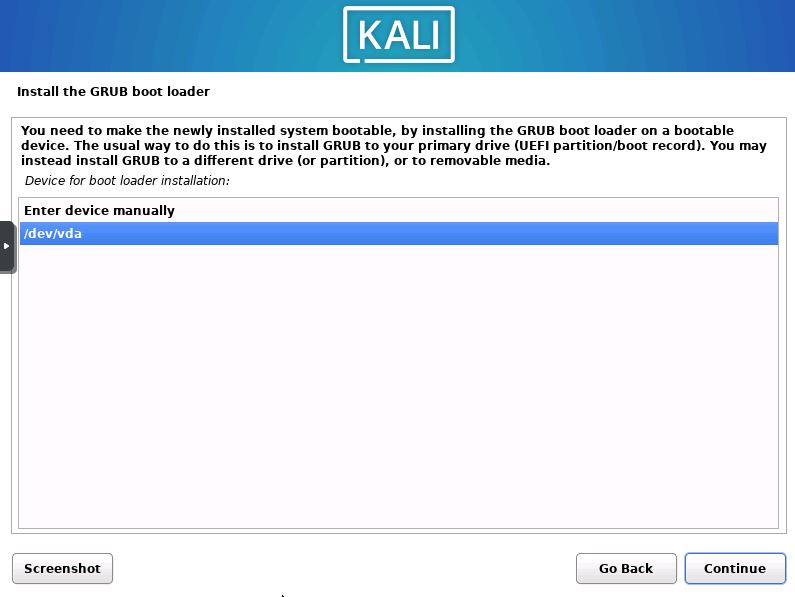
Select Grub Device

select a grub device

Now you will need to select which device to install Grub onto. Select the /dev/x device and then “Continue”.

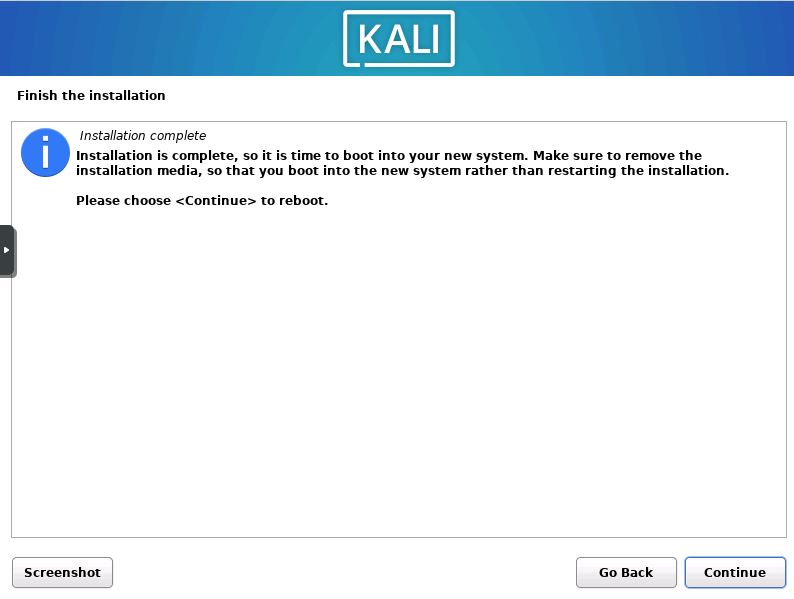
Reboot the System

reboot kali system

Once you see this screen you are almost ready to begin using Kali. Simply remove your installation media and reboot the system.

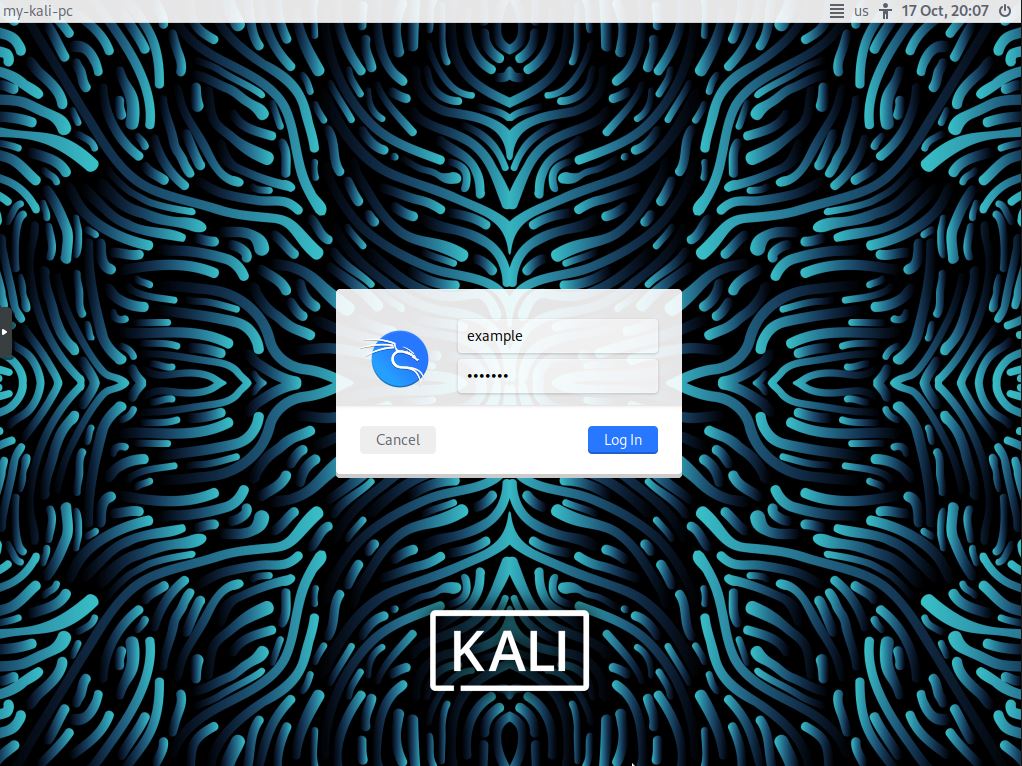
Installation Complete

test login to kali

Once the system has rebooted you will see the login screen. You have now completed the installation of Kali 2022.3. Enter the credentials that you created earlier to start using Kali.

Additional Questions?

If you have any additional questions or thoughts feel free to comment them below.

Related Resources

View our 5 Reasons to Switch from Windows 10 to Linux.

Learn How to Create a Mapped Network Drive in Windows 10.

Click here to learn How to Easily Create a Bootable Linux USB Drive using Rufus.

View our OS Installs Category.

Learn more cool things in Windows with our Windows Tutorials.

View all of our available online tools and converters at Formatswap.com.

How to Mount an SMB (Samba) Share in Linux with cifs-utils

cifs-utils header image

In this tutorial you will learn how to use the CIFS-UTILS program to mount network shares. You will also learn how mount the file shares at boot. This allows you to avoid typing your credentials, as well as avoiding the use of the mount command when you turn on the system. With CIFS-UTILS you will be able to easily access files from a SMB share on your network. I will be using Ubuntu 22.04 LTS throughout this tutorial. However it is fine if you have a different version, as this guide will work on any Ubuntu based Linux distribution.

Update and Upgrade Ubuntu

update and upgrade ubuntu

The first thing you will need to do is update and upgrade your Ubuntu installation. Type in the following command and press Enter.

sudo apt update && sudo apt upgrade
install cifs utils

Now you will see a window asking you if you want to continue. Press “Y” and then Enter.

Install CIFS-UTILS

install cifs utils

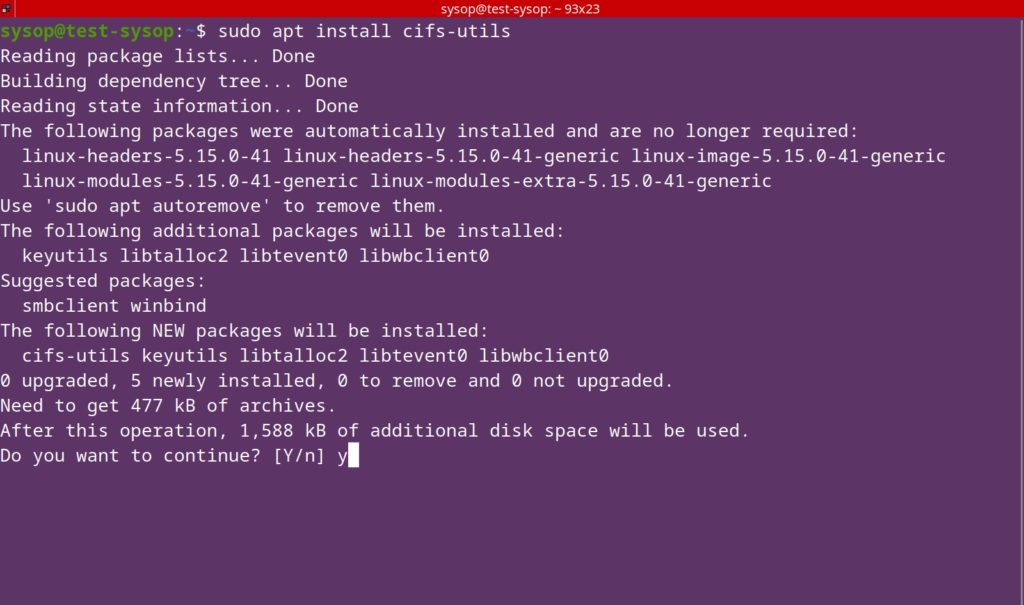
Afterwards you will need to install cifs-utils. This is a program that allows you to easily mount different file shares on Linux. Type in the following command to install it.

sudo apt install cifs-utils

Create a Mount Directory

make share mount folder

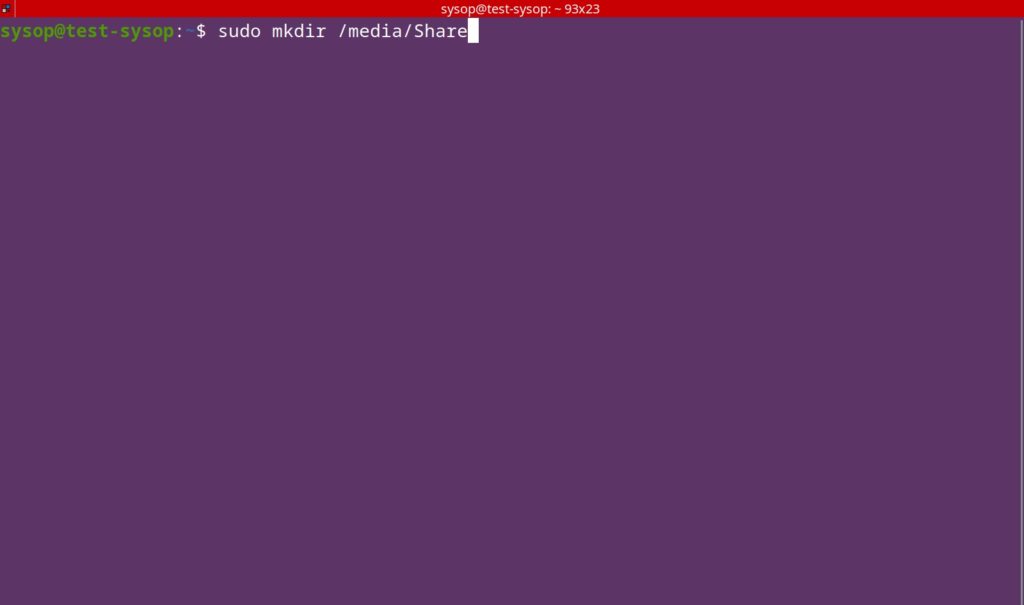
Next you need to create a folder to mount the SMB share. You can create a folder in either /mnt/ or /media/.

sudo mkdir /media/Share
or
sudo mkdir /mnt/Share

Navigate to the Home Folder

cd to home folder

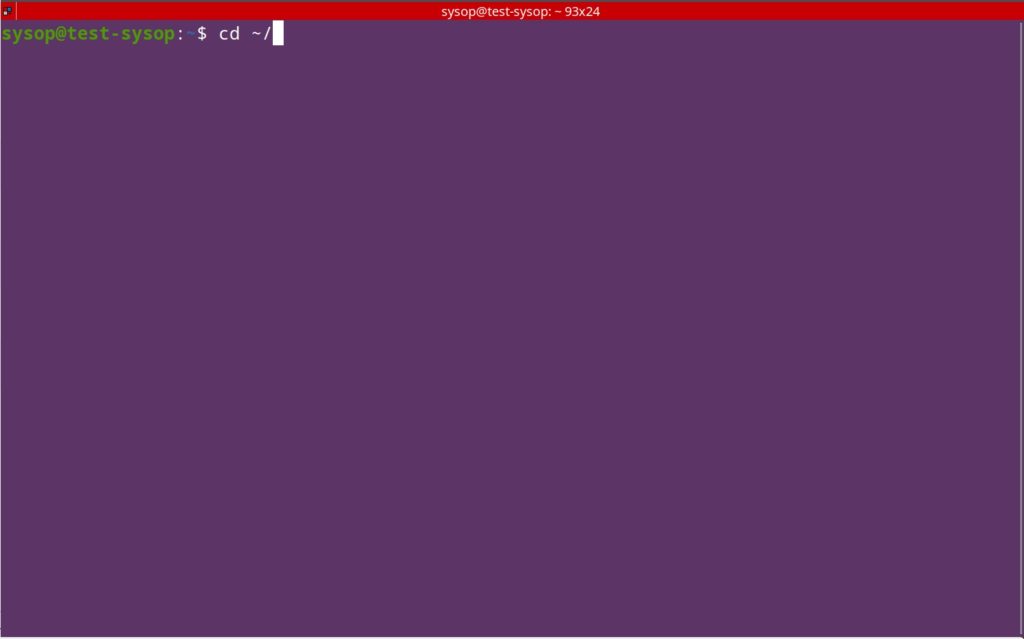
Now navigate to your home folder.

cd ~/

Create the Credentials File

create creds file

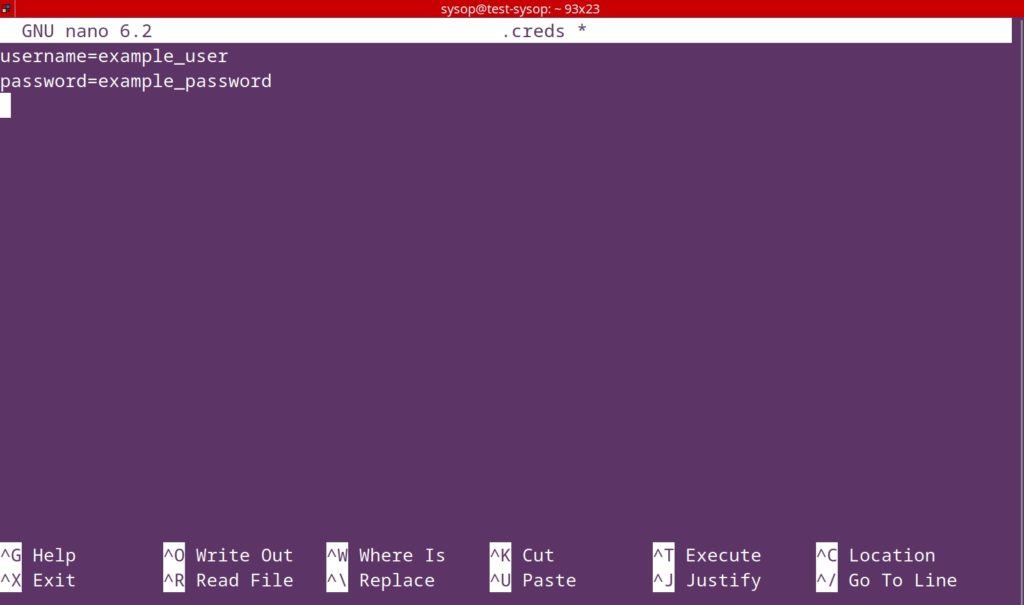
Once you are in the home folder you need to create a credentials file. A credentials file is vastly more secured versus providing the password and username in plain text.

nano .creds
enter user and pass cifs-utils

Now type your username and password in the format above. Once you have typed your credentials, press “Ctrl+X” then “Y” to save and quit the text editor.

Apply Permissions

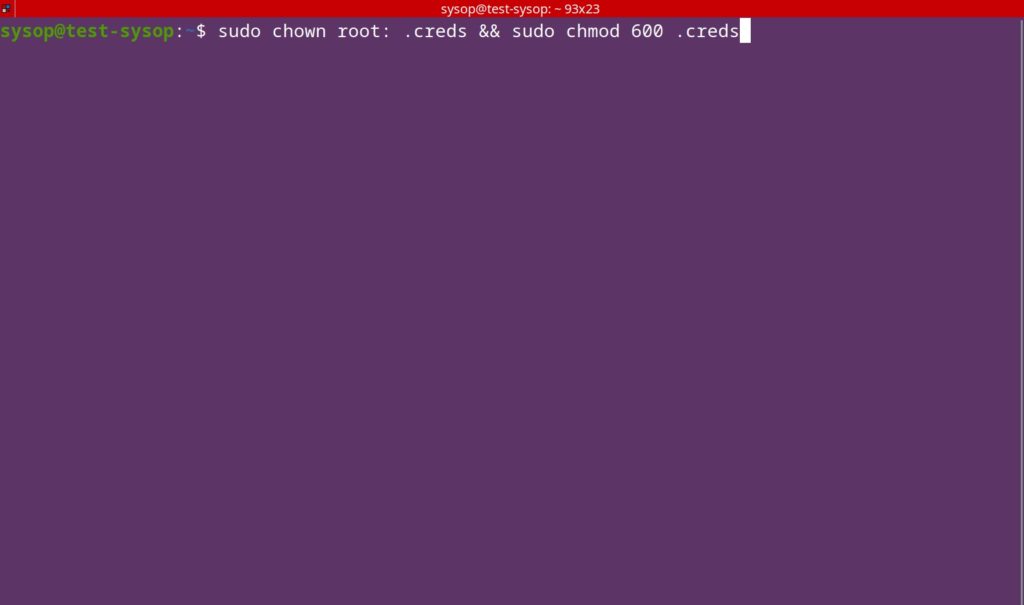
apply permissions to creds file

Next we will apply the permissions to the credentials file. For security reasons you only want root to be able to read and write the file. Enter the command below to apply the changes.

sudo chown root: .creds && sudo chmod 600 .creds

Mount the SMB Share

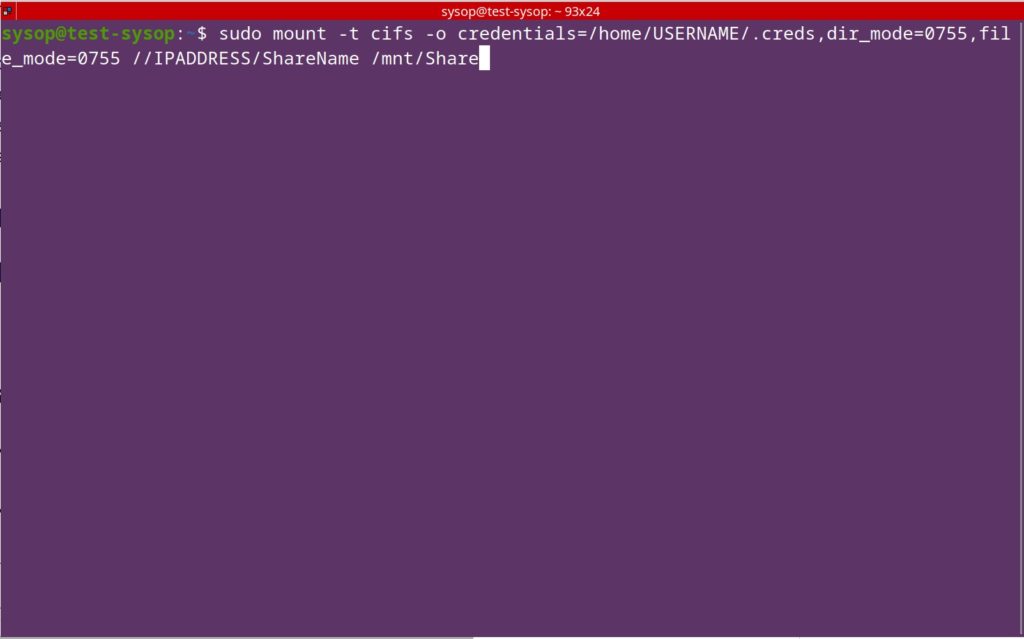
mount smb share

Finally you will mount the SMB network share. Enter the below cifs mount command replacing the credential directory, IP address, mount location, and share name with your own.

sudo mount -t cifs -o credentials=/home/USERNAME/.creds,dir_mode=0755,file_mode=0755 //IPADDRESS/ShareName /mnt/Share

After you run the command you can navigate to the mount folder to view the network share that you have added. You have now successfully mounted a SMB network share using cifs-utils.

Auto Mounting

If you only use the mount command, your network share will no longer be mounted when you reboot. We will edit the fstab file and add a few entries. This is the file that defines what file systems are mounted at boot. Continue reading below to make the share persistent.

Edit the fstab File

edit fstab file

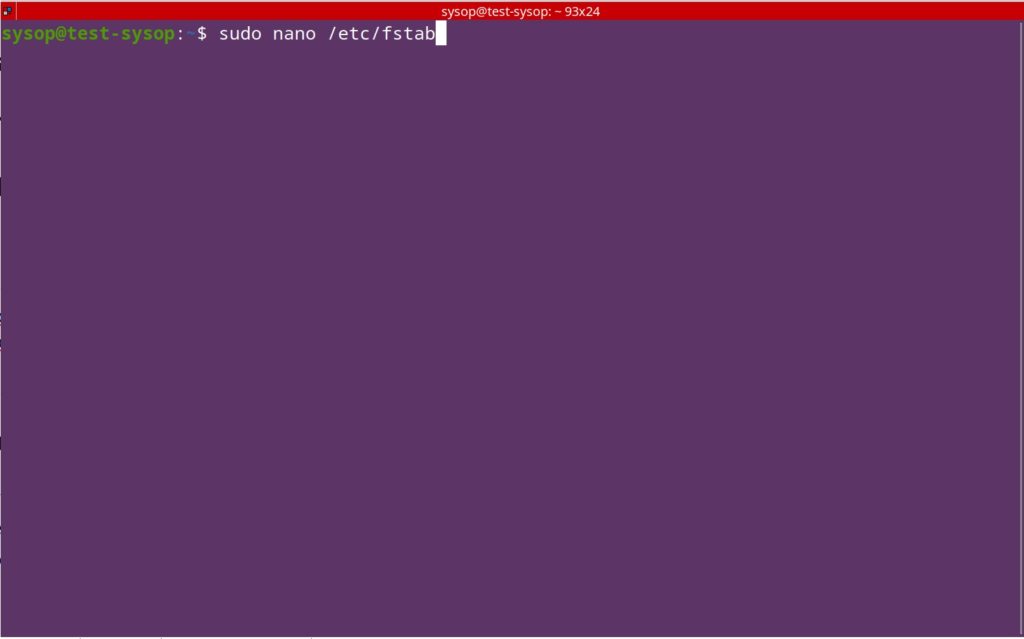
First we need to open the fstab file. Type in the following command to edit it.

sudo nano /etc/fstab

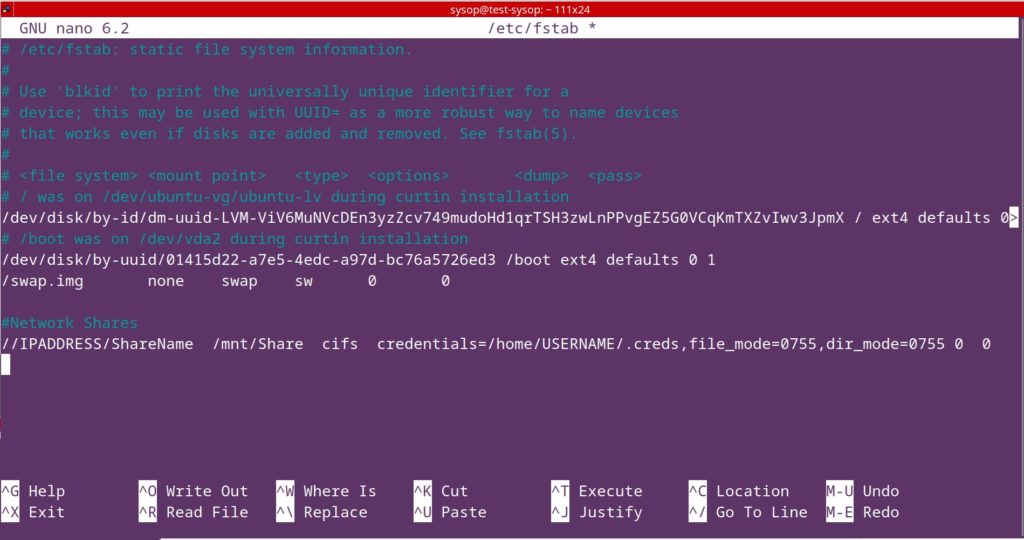
Add fstab Entries

mount cifs share

Now you will want to add a new line for mounting your cifs share. Use the code below as an example of what to type, replacing the credentials, IP, and share name with your own.

//IPADDRESS/ShareName  /mnt/Share  cifs  credentials=/home/USERNAME/.creds,file_mode=0755,dir_mode=0755 0  0

Reboot PC

reboot pc

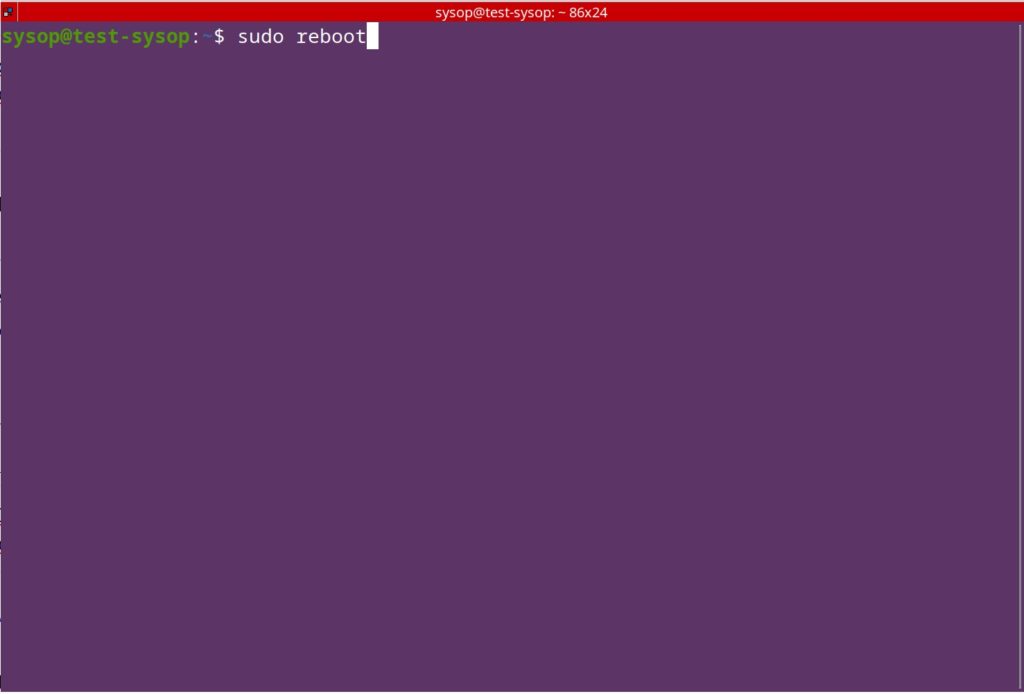
The last step will be to reboot your PC. After rebooting you will see the network share mounted at /mnt/ShareName or /media/ShareName depending on where you created the folder. Thank you for reading the tutorial. If you are interested in similar technology tutorials check out some of our articles below.

Questions?

If you have any questions or comments feel free to leave them below.

Related Resources

View our How to Permanently Disable Windows Defender article.

Learn How to Install Ubuntu Server 22.04 [Step by Step].

Click here to learn How to install and configure Nginx – Ubuntu 20.04.

View our Programming Articles and Tutorials.

Learn more cool things in Linux with our Linux Tutorials.

View all of our available online tools and converters at Formatswap.com.
How to Permanently Disable Windows Defender

Disabling Windows Defender on Windows 10. Crossed out Defender logo.

If you have ever tried to disable Windows Defender within Windows 10 you may have noticed it can sometimes be difficult. In this tutorial you will learn two different methods for disabling it. You can disable Defender using Control Panel, and Registry Editor if you are a more advanced user. This can be useful for many reasons, such as development of applications, cyber security, false positives and more.

Disable Windows Defender (Basic)

Open PC Settings

open windows 10 settings menu

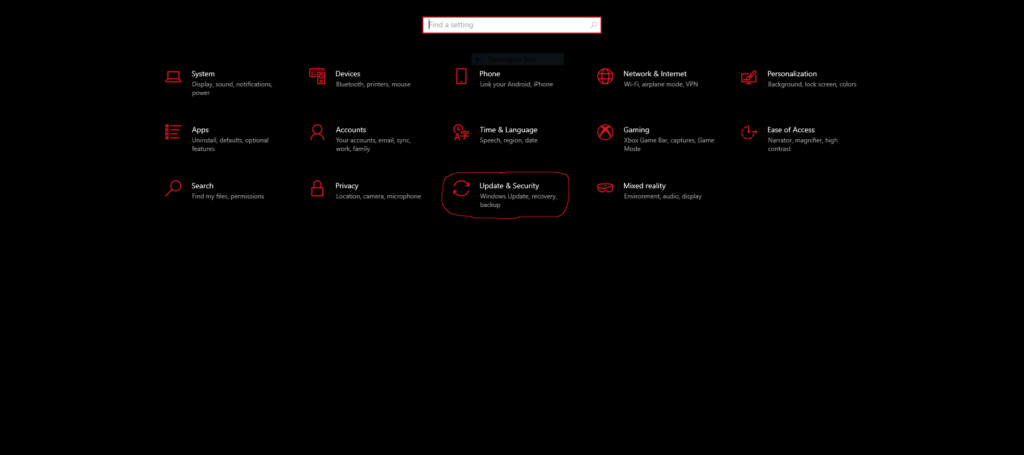
At your computer, open the Control Panel using the Windows button in the corner of your screen, then clicking on the gear icon in the bottom left corner.

Click Update & Security

navigate to the security settings

Once you are at the control panel, click the ‘Update & Security’ category.

Click Windows Security

Go to windows security tab

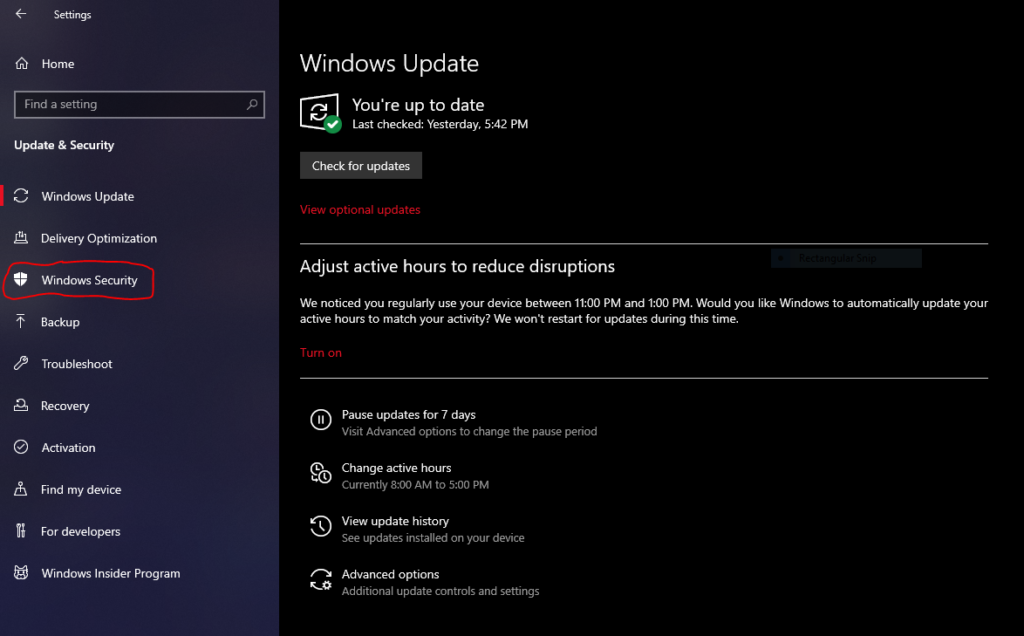
Select the ‘Windows Security’ option from the left hand side of Update & Security.

Click Manage Settings (Virus & Threat Protection)

manage virus & threat protection settings

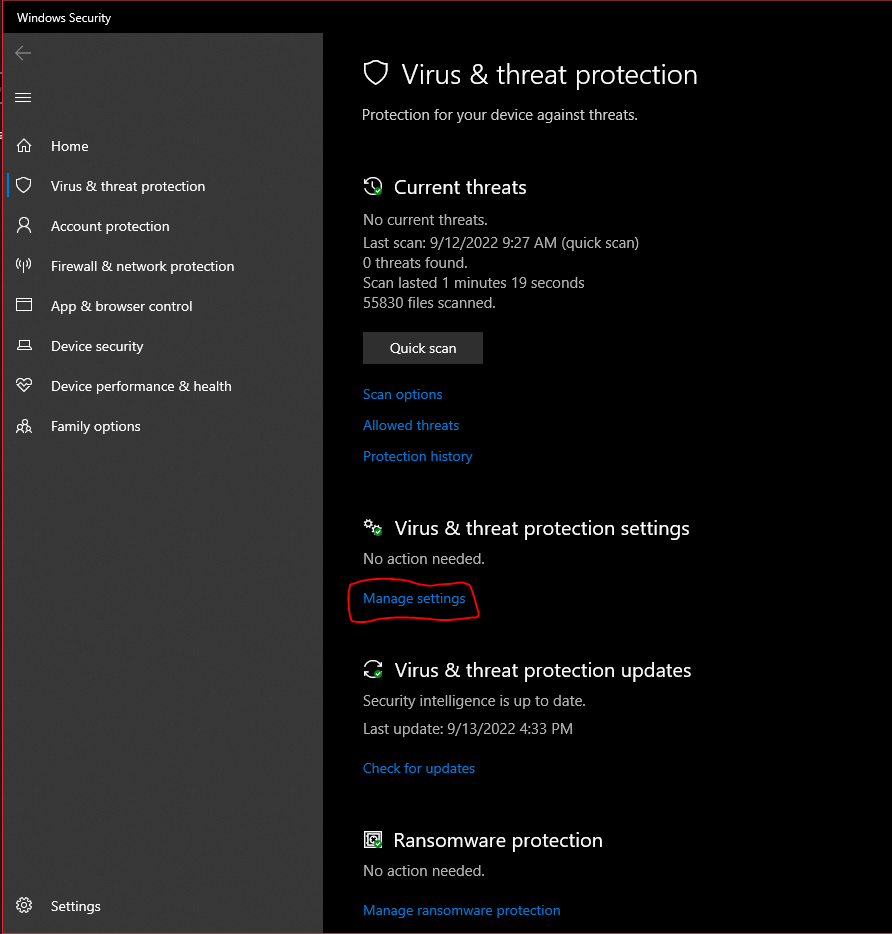
Then, find the ‘Manage settings’ text as shown above and click on it.

Disable Defender Protection Settings

disable windows defender

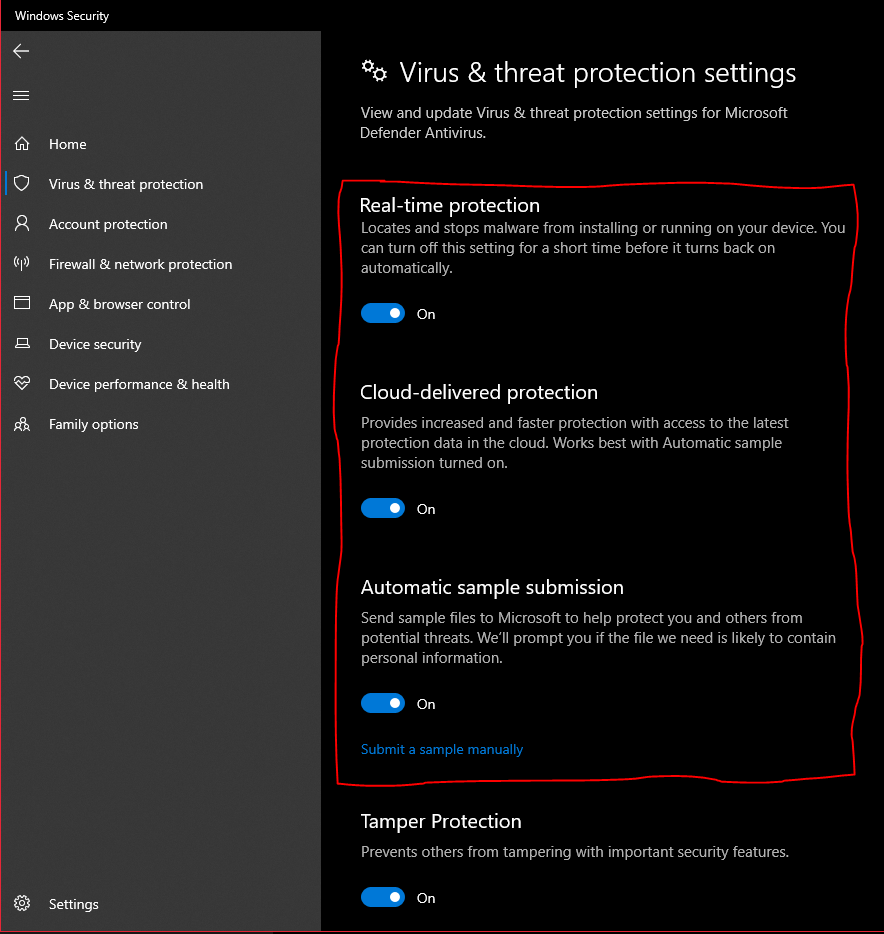
You will want to disable the highlighted options above. The other slider selections are optional. You are done!

How to Disable Windows Defender Using Registry Editor (Advanced)

Sometimes, Defender can re-enable itself during updates and restarts. If you would like to make sure it doesn’t come back and don’t mind tinkering with your operating system a bit, you can disable it with your Registry Editor.

Open Run

open start menu

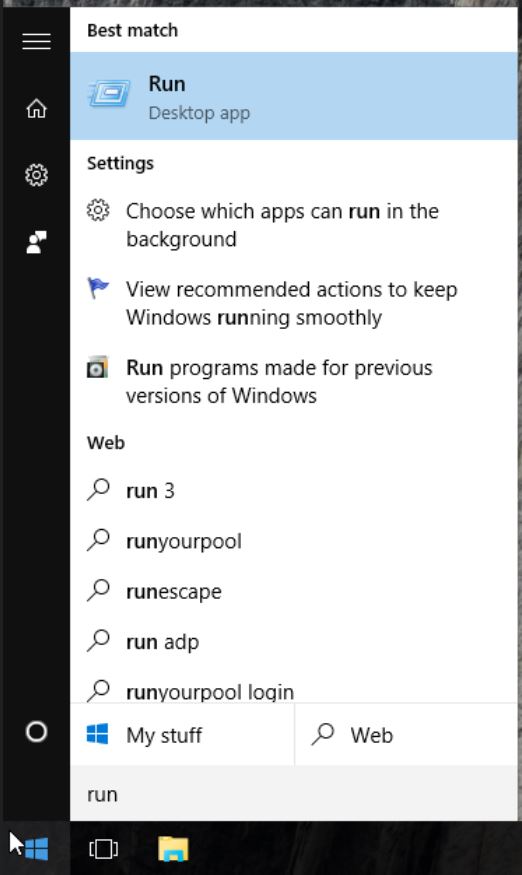
First, you will open your ‘Run’ box either by searching for it or using Windows + R on your keyboard.

Open Registry Editor

open regedit run dialog

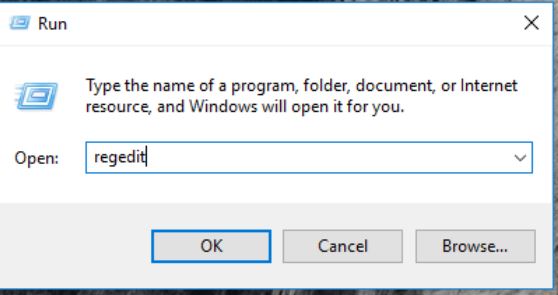
You will type ‘regedit’ in the box and either click OK or press Enter.

Navigate to Folder

navigate to hkey local

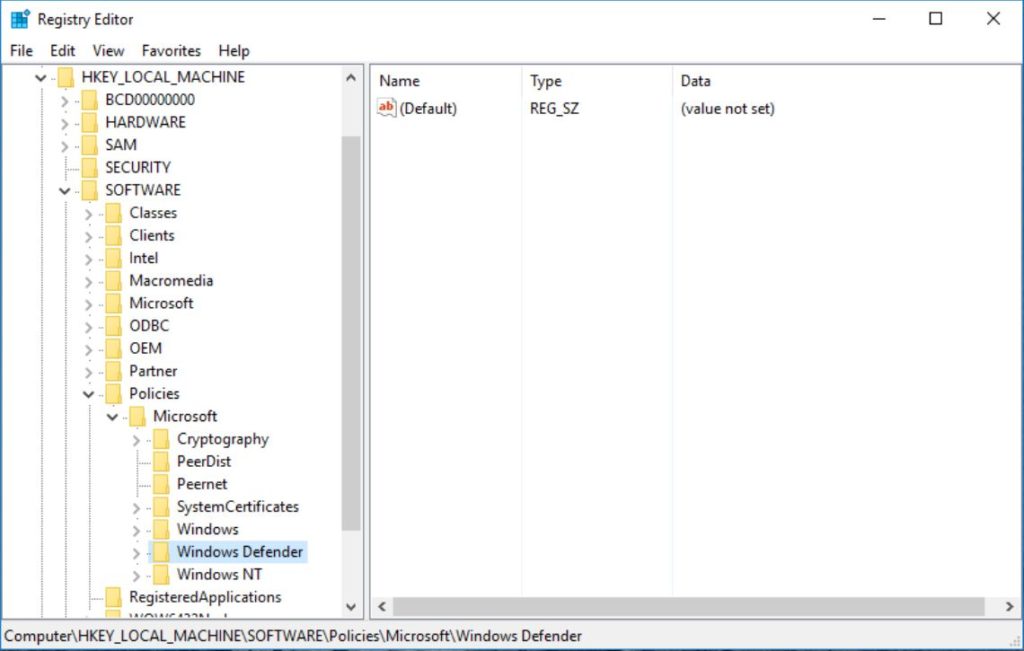
Open the folders inside Registry Editor by using the arrows next to the folder icon. You will want to navigate to:

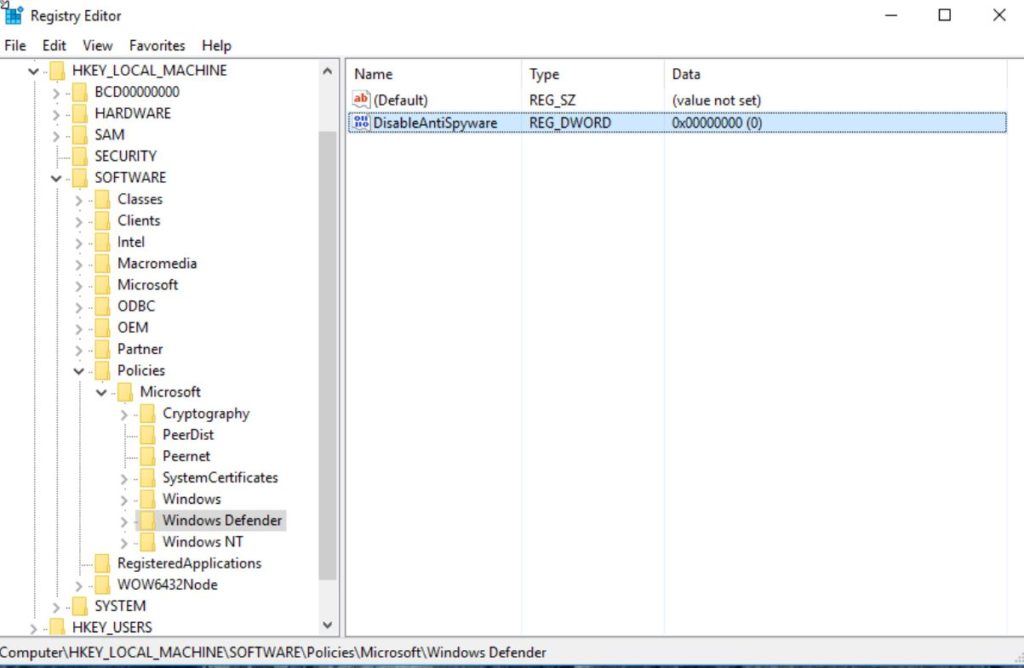
HKEY_LOCAL_MACHINE\SOFTWARE\Policies\Microsoft\Windows Defender

Add New Registry Value

add new dword value

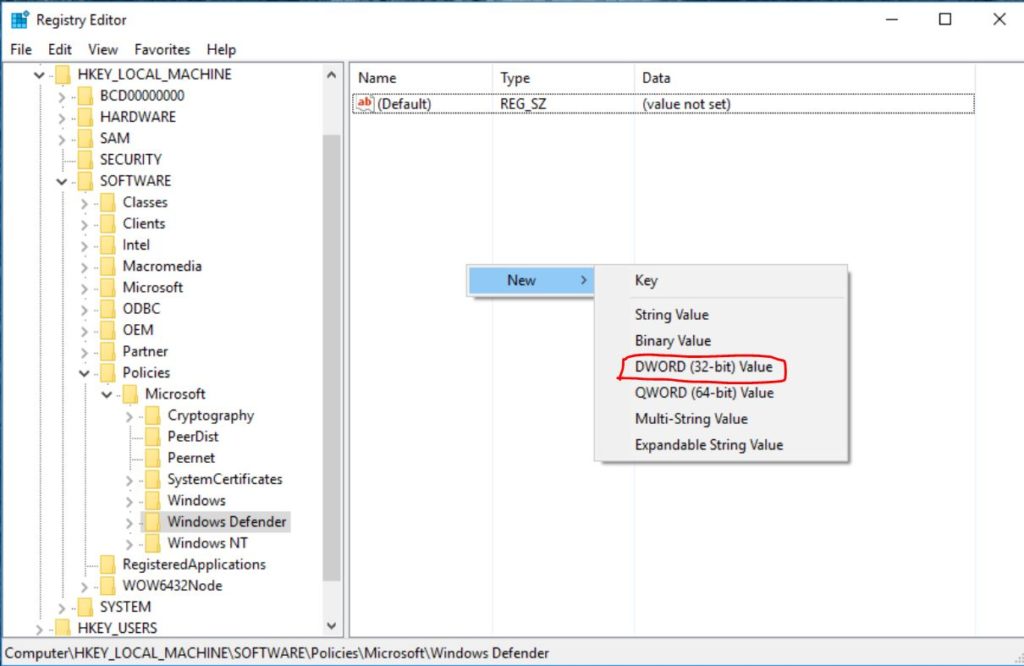
Once you select the Windows Defender folder, you will right click inside the blank space inside the right panel of the window and hover over New, then click the option that says ‘DWORD (32-bit Value)’.

Rename Registry Entry

rename regedit entry

You will want to set the name of the value to ‘DisableAntiSpyware’.

Edit the Registry Value

edit the regedit value

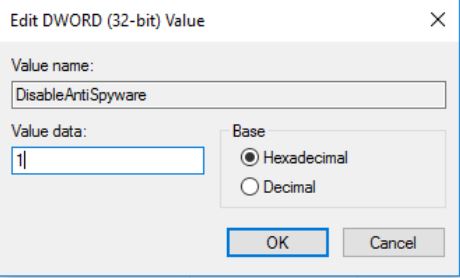
Then, double click on the 0x000… (value) portion of the pair you just created and change the Value data to 1. Double check to make sure that the Value name is the same as the one that you created and that the Base option is set to Hexadecimal.

Restart Windows

restart windows

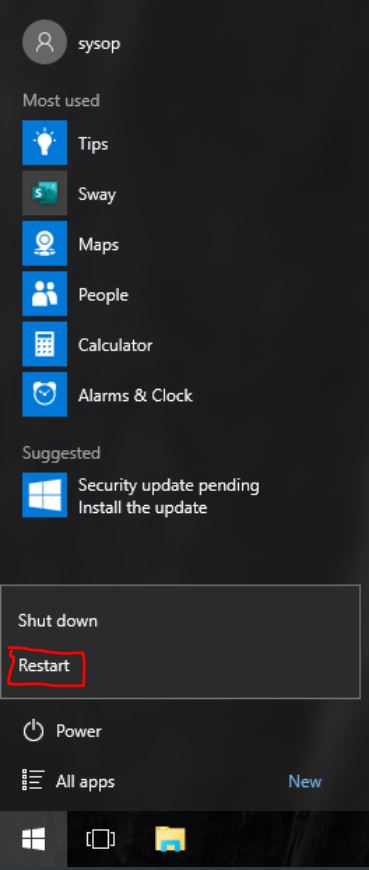
Finally, restart your computer and you have completed all the steps to disabling Windows Defender on Windows 10.

Questions?

If you have any questions or comments feel free to leave them below.

Related Resources

View our 5 Reasons to Switch from Windows 10 to Linux.

Learn How to Create a Mapped Network Drive in Windows 10.

Click here to learn How to Easily Create a Bootable Linux USB Drive using Rufus.

View our OS Installs Category.

Learn more cool things in Windows with our Windows Tutorials.

View all of our available online tools and converters at Formatswap.com.
How to Add a Network Location in Windows 10

add network location splash image

In this tutorial you will learn how to add a network location to Windows 10. This will allow you to access a file share remotely by connecting computers on the network. The main benefit to adding a network location is that it will be permanently saved in file explorer. This allows you to avoid typing the network address of the location each time. As well as easy management of multiple network shares. When you are finished you should have a new location added to the Windows Explorer Network Locations list.
Open File Explorer

file explorer window

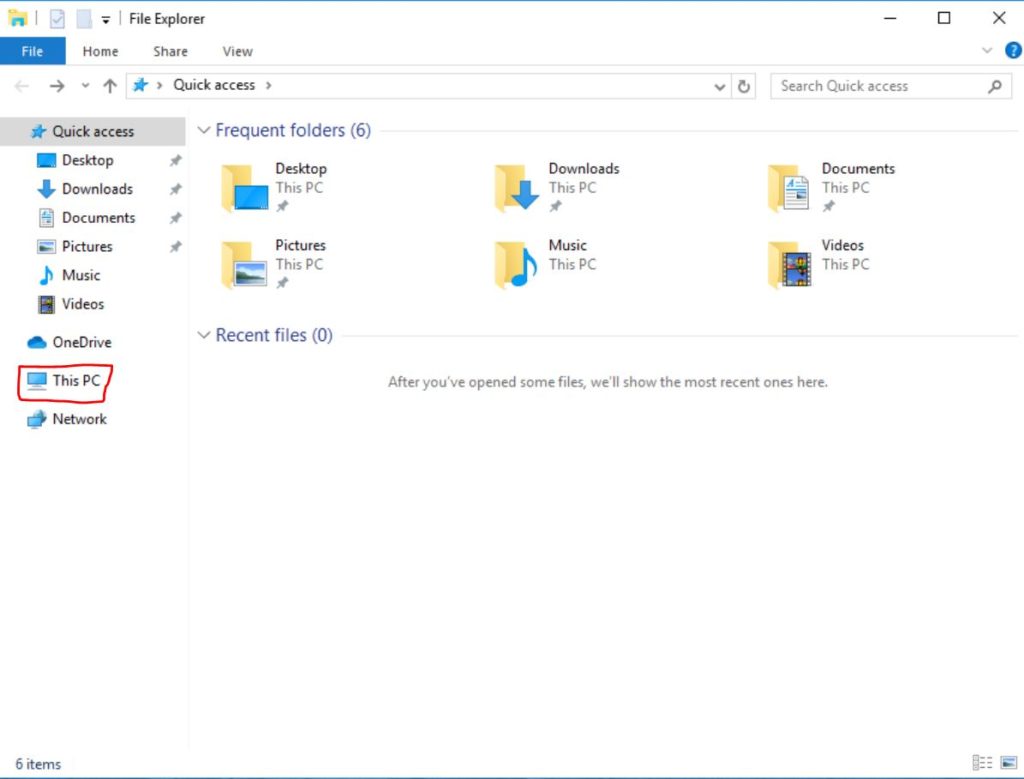
You can open File Explorer by clicking on the folder icon in the taskbar or by pressing “Win+E” on your keyboard.

Navigate to This PC

open "This PC"

Now you will need to click on “This PC” (the computer icon on the left) in your File Explorer.

Open Add Network Location Dialog

add a network location

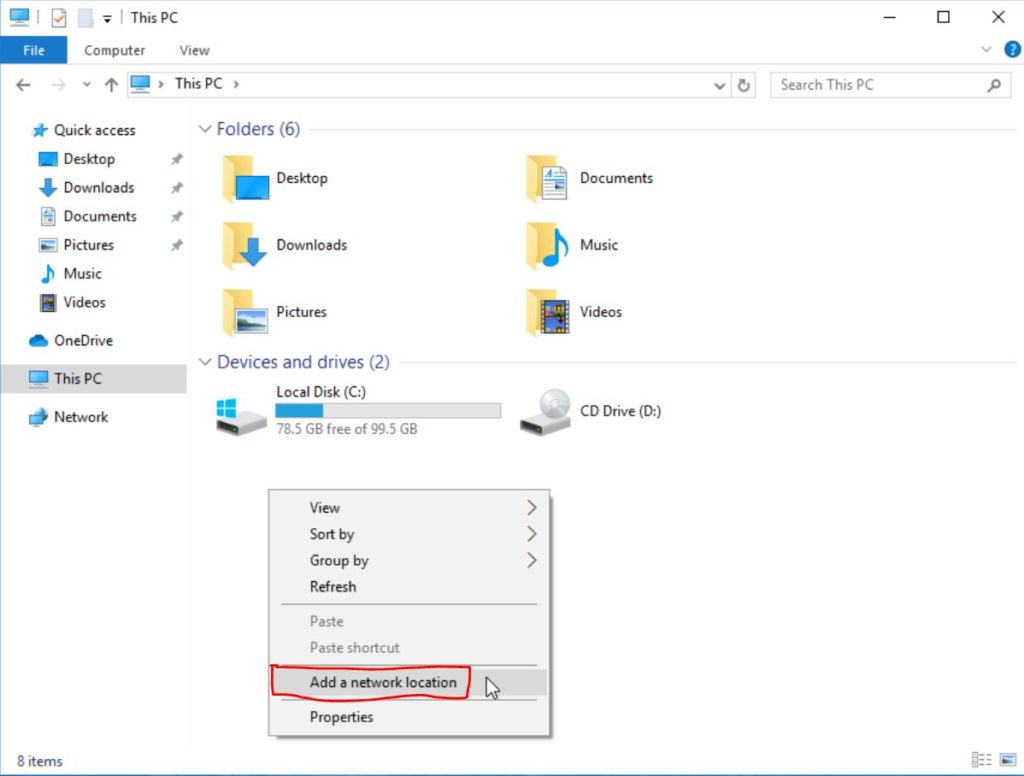
After navigating to the “This PC” window you have to right click then click on “Add a network location”.

Click Next

welcome to the add network location wizard

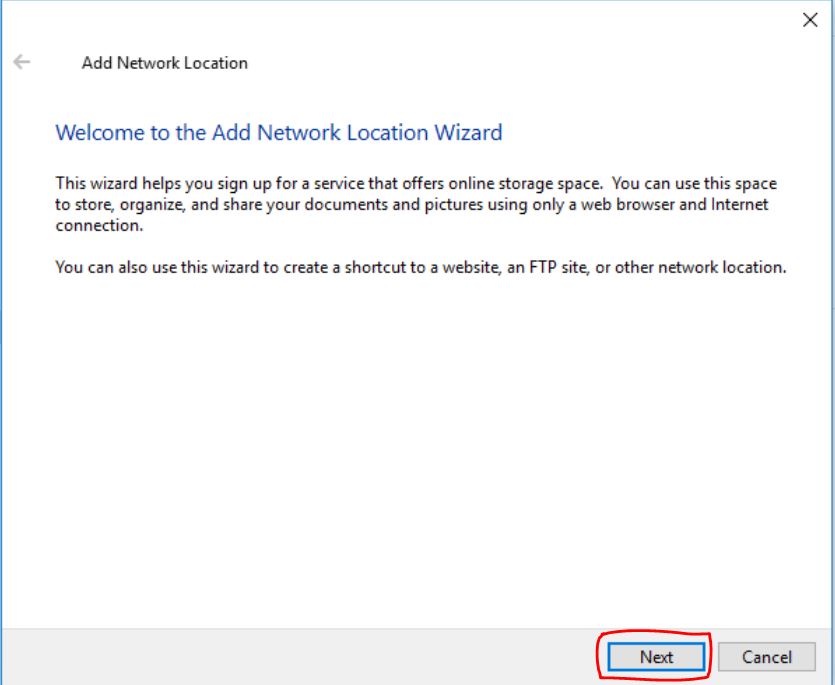
Now that the Add Network Location window is open press the “Next” button.

Set Network Location to Custom

set custom location

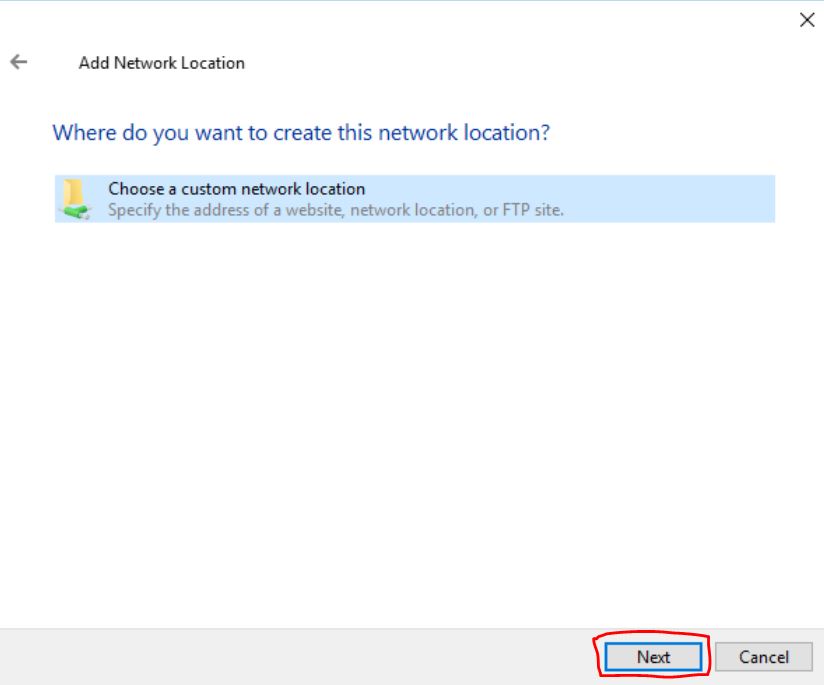
Afterwards click on “Choose a custom network location”. Then click “Next” to continue.

Enter Network Address

enter network address

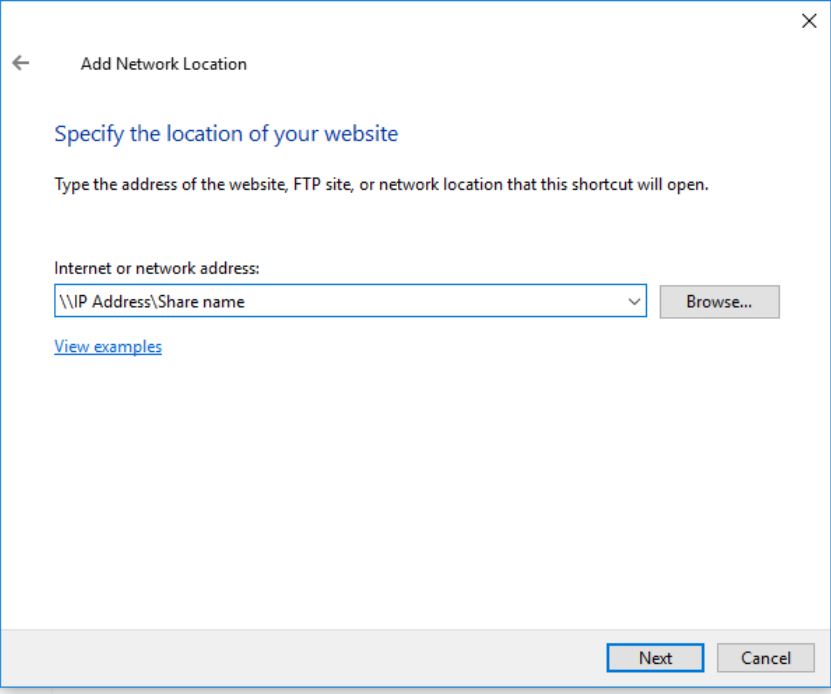
Now you will need to enter the IP address and the name of the share, then press “Next”.

Confirm Credentials

windows credentials dialog

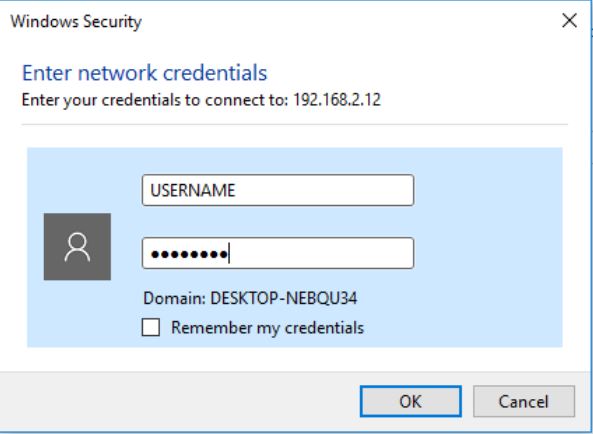
A window will open asking you to enter the shares credentials. Enter the credentials and press “Next” to continue.

Enter a Share Name

enter share location ip

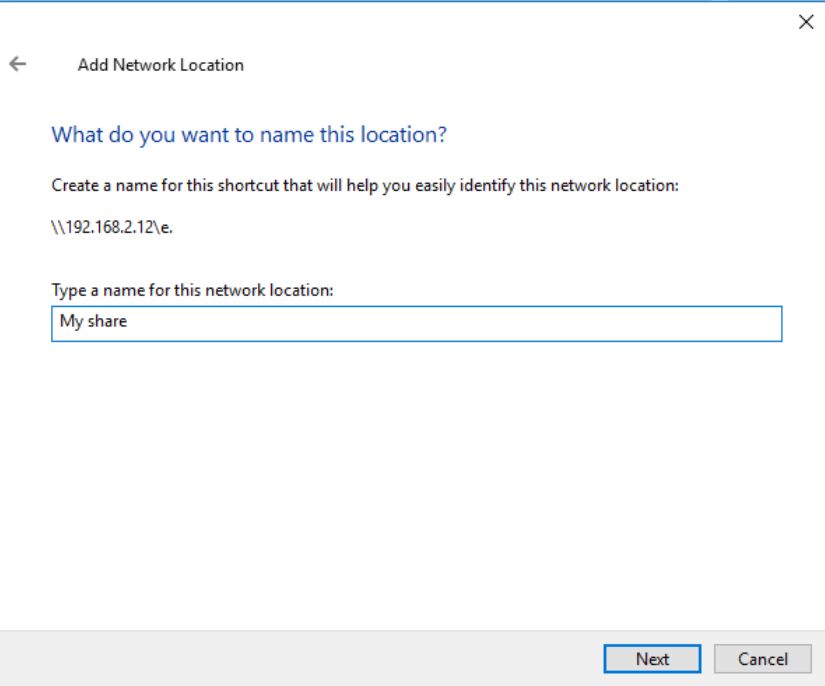
You will then be asked to type a name for the network share. I will be using “My share”. Then you will click on the “Next” button.

Network Location Added

network location added

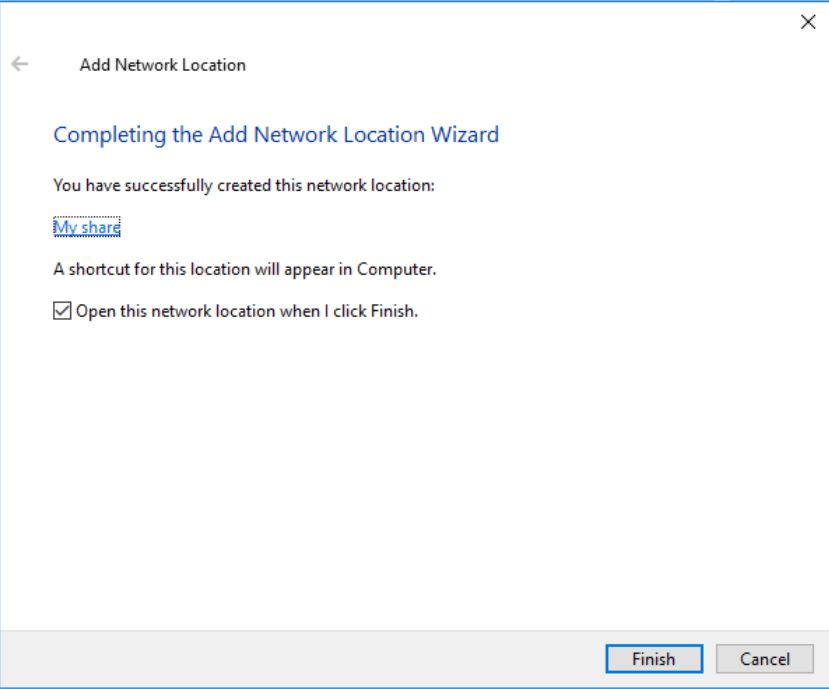
The Network Location has been successfully added. Click on the “Finish” button to open the share folder.

View in My PC

this pc file explorer

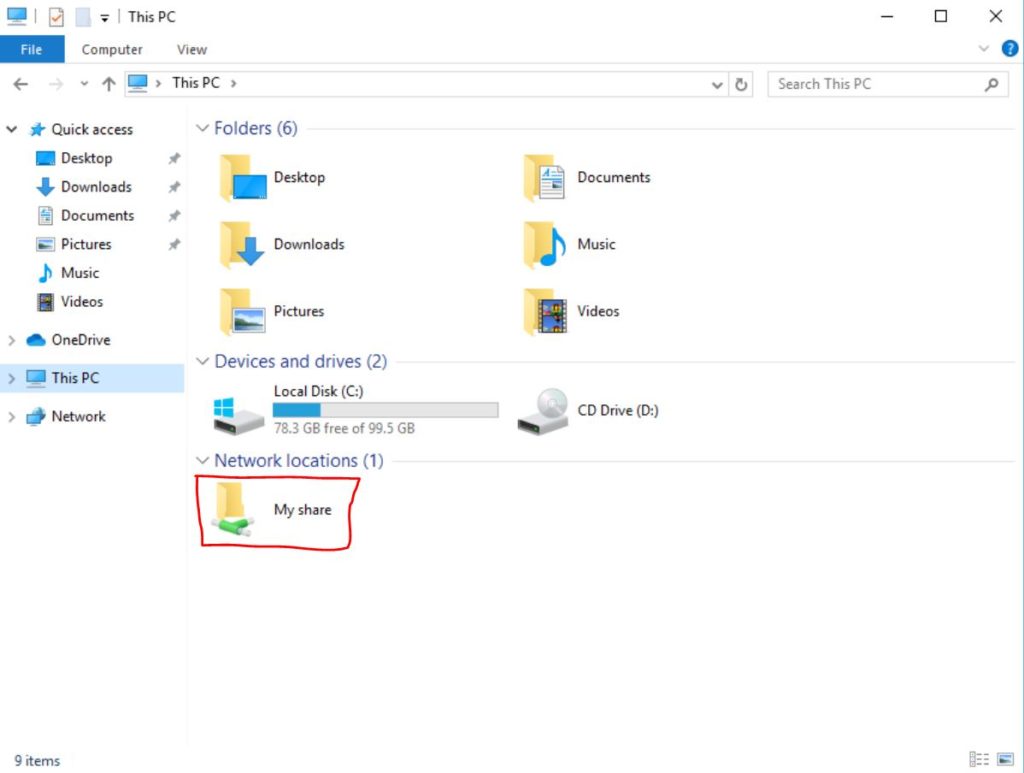
You can find the Network Share you just added by navigating to “This PC” in the left column of File Explorer. You will see the share listed under “Network locations”. You have now completed the tutorial. If you would like to learn how to create a network share continue reading below.

How to Create a Mapped Network Drive in Windows 10

If you want an in depth tutorial on creating mapped network shares in Windows 10 click the link below.

Map a Network Drive in Windows Tutorial

Questions?

If you have any questions or comments feel free to leave them below.

Related Resources

View our How to Create a Deepfake Video Using DeepFaceLab article.

Learn How to Install Ubuntu Server 22.04 [Step by Step].

Click here to learn How to install and configure Nginx – Ubuntu 20.04.

View our Programming Articles and Tutorials.

Learn more cool things in Linux with our Linux Tutorials.

View all of our available online tools and converters at Formatswap.com.